 Many people wonder if there’s something they can do with old Macs and PCs when they’ve become too slow for the latest operating system, or have been abandoned by the OS vendors. With PCs it’s pretty common to put Linux on them but older Mac hardware often has problems with Linux. Maybe a network card doesn’t work, or the camera; something always seems to be a problem. If you do succeed, it’s a bit of a learning curve to get proficient at Linux.
How about turning an old Mac or PC into a Chromebook instead? A company called Neverware has come out with a product called CloudReady that will do just that. CloudReady is free for individual and experimental use, $25/year for schools, and $49/year for work. They have a compatibility list of over 200 hardware models that they say are certified and for each one they tell you what components work with CloudReady.
I’ve been wanting to play with a Chromebook anyway, so I dug out my 2008 13″ Macbook (4,1) with a 2.4GHz Core 2 Duo, 4GBs of RAM with a 250GB 5400 RPM drive that’s been gathering dust on a shelf. This 8-year-old machine was running El Capitan , but it was painfully slow. I’m talking maybe 6-8 seconds to launch System Preferences. I keep it around for emergency needs and experimentation, so I thought why not see if I could make it into a Chromebook with CloudReady from neverware.com?
They say on the website that Windows PCs can be made to dual boot to CloudReady but Macs have to be completely reformatted to run the new OS. However, there’s a loophole that allows you to experiment with CloudReady without blowing your Mac’s OS away. I’ll get into that later.
The instructions at the NeverWare site for installation are pretty good but they definitely skipped a few steps. The very first thing you do is download a zip file from NeverWare suited to your computer (Windows vs. Mac and 32 vs. 64 bit).
First you open Chrome and navigate to the Chrome webstore at chrome.google.com/webstore. In there you search for and “install” (using quotes) the Chromebook Recovery Utility. This app will allow you to make a thumb drive installer for the future Chromebook.
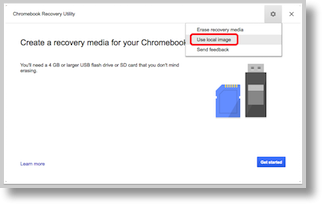 It’s weird to think of installing “apps” within the Chrome browser but we might as well get used to it on the Mac because that’s how it’s going to work in Chromebookland. After I installed the Recovery Utility, I noticed in my Chrome bookmarks bar I had a little button that said Apps. I launched the Chromebook Recovery Utility from there and followed the instructions to create the recovery media using a local image.
This is the first place the instructions fail, they tell you to point to the zip file, but after about 5 tries using various techniques to erase and format the thumb drive, and it still failing, I extracted the zip to the original binary file and finally I was able to create the installer on my thumb drive. By the way, you’ll need at least a 4GB drive and it will wipe out everything on that drive. As soon as I was done installing onto the thumb drive, it disappeared from my Finder which was interesting.
I stuck the thumb drive into the MacBook and restarted it just as the instructions said…and it booted into OS X. A little of the Googles to remember that if you hold down the option key on boot up in OS X you get to pick the boot up drive. I was rewarded with three disks: Macintosh HD (we know that’s not it), Recovery-10.11 (not it either) and one called EFI Boot. By process of elimination I figured that had to be it. EFI by the way is the firmware on the Intel chips that Macs use. They could have used a slightly more intuitive name for the installer disk!
I was then rewarded with a black screen and the words, “Welcome to Grub”. Ok…
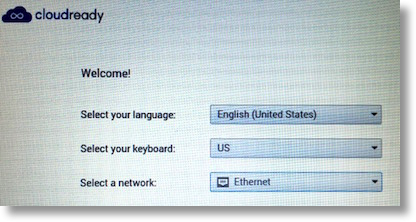 That was quickly replaced with a pretty CloudReady logo. The instructions say to entirely skip next page which shows you the option to set a network, language and keyboard. Unfortunately there IS no way to skip this page. The “Select a Network” pulldown clearly saw many of my wireless radio signals but simply refused to accept my password on any of them. I plugged in Ethernet, and I was on my way. More on networking later.
I had to accept an Adobe Flash EULA (end user license agreement) next which creeped me out, and then I was invited to sign into my Chromebook! Now do you remember any part in here where I actually installed CloudReady to make this a real Chromebook? You didn’t miss it, because it never happened. Remember I said there’s a loophole that will let you experiment with this without committing? Evidently you can just use the thumb drive to live boot and then switch to your normal Mac OS.
After I entered my Google credentials (and did the two-factor authentication dance) a very quick guided tour showed me where Settings are and how to launch apps and I was on my way. I added Google Hangouts and was able to make audio and video calls from my new Chromebook. Remember the compatibility chart I told you about early on? It said that for the MacBook4,1 the microphone wouldn’t work, but they were wrong! Both the mic and iSight camera worked just fine.
I opened Google Drive and it gave me some hints on how I could use dictation to move around in the documents, doing things like selecting words, making them italics and moving to the next paragraph. That’s something I don’t know I can do using Chrome on OS X. Might be there (and I know I can use Apple’s dictation) but I couldn’t find it.
Around this time I thought I’d take a look at the network settings again. I went to Settings, Internet connection, it showed that I WAS connected to my wireless network. To prove it to myself, I unplugged the Ethernet cable and sure enough I was still connected. Very weird but I guess that’s a problem solved.
My screen brightness and volume controls worked perfectly but I did find a few things to fix. First of all, two fingered-scroll worked on the trackpad but it scrolled backwards. I went off to Settings and found how to change it to what they call “Australian scroll”. I can only imagine that’s a play on the concept that Australia is on the underside of the world so everything is upside down?
The second problem was much trickier to solve. Typing was nearly unusable because the cursor was constantly jumping backwards many characters. I went on a hunt and found that there is a shell command to change the time between typing on the keyboard and when the trackpad is active. Well that’s cool, but how do I get into a Terminal-like Shell on a Chromebook? Turns out control-alt-t opens a shell called Crosh. It seems to have very limited commands, but simply typing shell into it took me to a “real” bash shell where I could type the kinds of commands we learned in Taming the Terminal.
The command to change the trackpad timing is called syndaemon, and the time is set with a -i flag and what appears to be the number of seconds. The suggestion was 4, which was an interminable length of time, so I set it to .5 and now I can type and immediately switch to using the trackpad. I put the whole command into the shownotes and the site with the explanation of the commands if you want to see it:
killall syndaemon
syndaemon -i .5 -d -t
It occurs to me that at the beginning I said that Linux wasn’t user friendly and here I am having to modify CloudReady just to type. The good news is that so far, this is the only janky thing I had to do to get it working properly.
I went to Excel online and just like Numbers it worked really well except for trying to drag cells across. Same problem when I try to drag a tab off in Chrome. I’m not sure if this is a setting in CloudReady or Chromium or whatever this OS is called, but it’s kind of a pain.
At this point I had to decide whether I was going to continue to run off the thumb drive or really commit. I first rebooted and OS X was still there so I was able to verify that there’s no danger simply booting from the thumb drive on of a fully functioning OS X machine you don’t want to destroy.
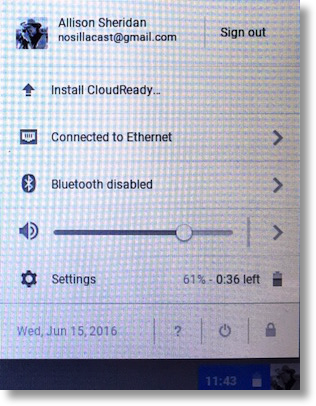 I’m happy to say that it was fun enough already playing on the Chromebook that I took the plunge. In Settings there’s an option to Install CloudReady for real. It asked me if I was sure I wanted to wipe my drive. I said, “Yes.” It asked if I was double secret sure. I said, “Yes.” It said, “I’m only going to ask you one more time, but are you REALLY REALLY sure you want to wipe out everything you have on this disk?” And I said, “Yes.”
In about 20 minutes, the machine shut down as they said it would and when I booted up, I was into the Chrome OS for real. Interestingly it kept the information I’d created – I still had the apps I’d installed, it still had my photo for my login, so I hadn’t wasted much time playing with the live boot drive at all. That’s unusual, on linux any edits to a live boot get erased in my experience. I also have to say that the 2008 MacBook running CloudReady’s version of the Chrome OS is WAY faster than when it was running El Capitan!
I should mention that during the real installation (again the wireless network connection didn’t work) I had to start with Ethernet, and then toggle WiFi off and back on again to get it to work.
Now it was time to get serious – I installed Telegram and after entering my phone number and the code sent to my phone, I was able to instantly start bothering Steven Goetz. It was awesome.
I should explain that everything is a web-based on a Chromebook, but some things don’t feel like it. I installed Tweetdeck for Twitter and it’s just another tab in Chrome, but Telegram shows in my dock/system tray, shelf at the bottom as a separate app. I know in my head that it’s a browser instance but it still feels real! Hangouts is the same way – it feels like a separate app.
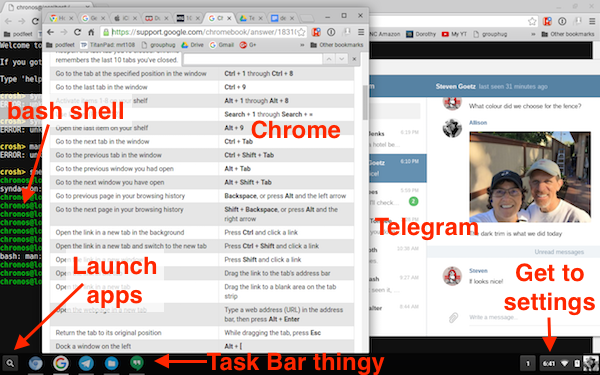 If you can drag a tab off of the browser, it becomes a full screen “app” and gets moved from the icon for Chrome to an icon called Chromium. These don’t feel like separate apps like Telegram but it’s still useful to have them pulled out separately. Makes them easier to find and access, sort of like a favorites list.
It’s time to start trying to get to my regular stuff. Obviously my gmail accounts are right there in Chrome, but how about iCloud services? I was able to authenticate to iCloud (but REALLY missed 1Password) and I could see my photos and edit them, read my .mac account email and even create a Numbers document that I shared with Steven who I was still bothering.
The one thing that’s still problematic for me, and I’m not sure if it’s the trackpad on this laptop to blame, is that I have a hard time using a click and drag. For example, in Numbers I wanted to drag a cell across to auto-fill but pushing on the trackpad and dragging would make the whole spreadsheet scroll all around. Pretty janky.
If you’ve been wondering what all the fuss is about with these new Chromebooks and have been wanting to give them a try, I think creating a bootable thumbdrive with the free CloudReady from NeverWare.com is a great way to learn. If you’ve got an old machine lying around that you’d like to repurpose for yourself or maybe a friend or relative, I think this is a terrific option that doesn’t cost you a dime.
I’m plan to keep playing with the ChromeOS and it was a super fun afternoon to take an old MacBook and breathe new life into it.

Congrats on persevering through to get it done.
I’d make some snarks about how the “best and brightest” at Google still have trouble designing things to work easily, but, hey, Nevermore isn’t Google.
The big deal with CloudReady is enabling budget constrained institutions (e.g., schools) to keep orhpaned gear (old PCs from XP era, and Macs Apple no longer supports) usefully in service.
Having installed ONE Chrome Managed Console for an institution, there’s a LOT of power available there for administrators to keep ChromeOS devices “on the reservation” and users safer. CloudReady can convert an entire fleet of old XP machines to stable, securely updated, modern Chrome, and let the institution’s IT staff open ’em up or lock ’em down, as appropriate.
The downside is those old machines are, well, old. They’ll mostly have spinning HDDs, probably run hot and suck electricity. There’s some darn good Chromebooks with SSDs and low-energy CPUs (as well as plug in Chromeboxes) for $300 and even considerably less.
Google has just released the first version of ChromeOS that taps the Android “Play Store” for Apps that will now run natively and LOCALLY on Chrome devices, beginning with the Asus Flip I carry daily and Acer’s R11. Both offer touchscreens. While institutions may not want those Apps on Chromebooks provided to students, they may, and it’s likely a touchscreen interface will be needed to make the most of them.
[…] If you’ve got hardware that technically can run a supported OS like El Capitan but it’s running super slow, you might be able to repurpose that hardware by making it into a Chromebook. I did that about a month ago with a 2008 Macook and it went from super slow to snappy with the Chrome OS. I have to admit that I haven’t tried a nuke and pave on that little Mac, so that might have sped it up too. If you’re interested, I put a link in the shownotes to a blog post I did about using CloudReady to build a Chrome OS installer for the Mac. […]
I’ll be darned if the isight webcam works on my macbooks. They are 1,1 3,1 & 4,1. lsusb on the 4,1 shows: ID 05ac:8300 Apple, Inc. Built-in iSight (no firmware loaded)
black screen after “welcome grub” i cant get past. cloudready never comes up, this is a common issue amungst us. im fully converting my macbook aluminum (late 2008). please help me solve this ussue.
I converted a number of white MacBooks but could never get the iSight to work with Zoom. I even plugged in an external webcam and it was very weird. I am interested enough to try again but will have to review CloudReady’s list of Macs that they say work with the OS.