Last November, Jill from the Northwoods joined me in a discussion of how she uses Apple’s Focus Modes for emergencies. The conversation starts just around 15 minutes into NosillaCast #966. We set this up more as a “problem to be solved” conversation rather than a tutorial. She described how the elderly parents of a friend of hers were unable to contact her friend and ended up calling Jill in the middle of the night. I kept what Jill told us in the back of my mind, but I never implemented any of her suggestions.
A few months ago we went to Disneyland, and I purposely put my devices into Do Not Disturb using my Apple Watch. One of the nice things about having all of your devices logged into the same Apple ID is that if you put one device into a Focus Mode, they all go into the same Focus Mode. I put my devices into Do Not Disturb because the last thing you want when you’re enjoying the illusion of being in a real battle floating through Pirates of the Caribbean is to start having your phone and watch light up or worse yet make noise. Takes you and everyone else on your little boat out of the experience. Steve also put his devices into Do Not Disturb.
Unfortunately, this caused us to miss some very important notifications. The first notification was that our Ring alarm system had been triggered. Then I missed a phone call from the human monitor from Ring. Then the human monitor tried to call me a second time. The final notification was the police ringing my doorbell since I’d never responded to Ring! Luckily I did respond to this final one.
Now instead of a quick tap to stop the alarm and then surreptitiously checking the cameras in and around our house for intruders, I ended up talking in voice to the nice police officer. I’m sure my voice and his were loud enough for not just my boat but all of the boats on Pirates to be disturbed.
The solution Jill wrapped in a bow for us and I ignored was to tailor Emergency Bypass on our devices.
Make Sure Important Numbers Are in Your Address Book
The first part of this process was suggested by the Ring representative, and that was to put the phone number they call from into my address book so I’d recognize the number if they ever have to call again. It had never occurred to me that they were smart enough to make calls always come from the same number! This is critical since I decline every single call I get unless I recognize the caller.
Allow Calls from Emergency Contacts – AKA Emergency Bypass
Emergency Bypass from Apple is not findable inside Settings using search which is how I looked for it. I didn’t find it there because it’s a feature you turn on contact by contact. My explanation will be for how to enable Emergency Bypass using iOS.
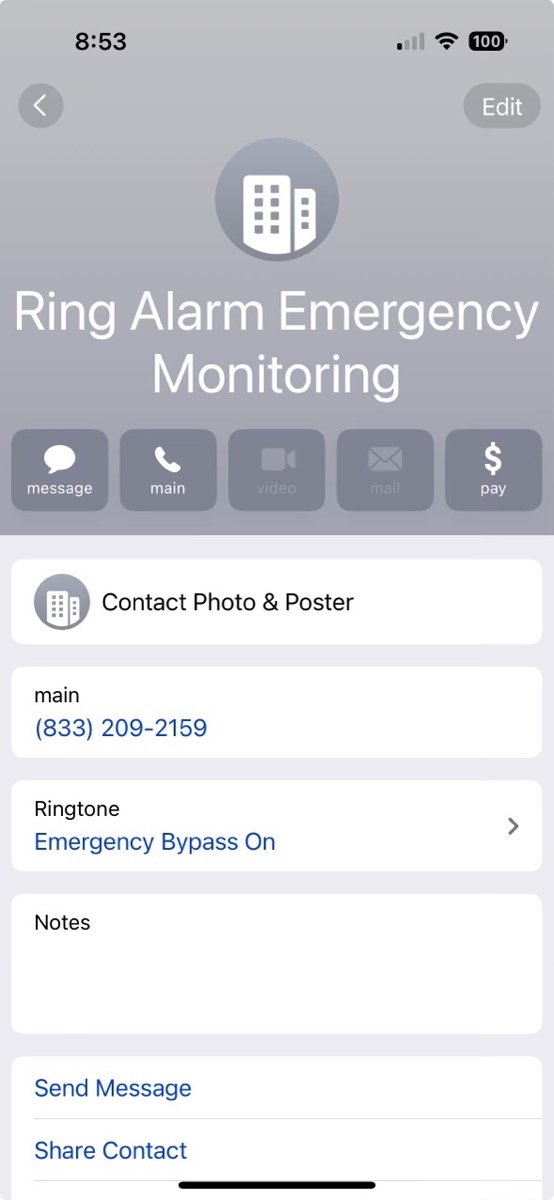
Let’s use the Ring monitoring number as an example of how this works. Most of your emergency bypass contacts will already have names you’ll recognize, like, “Mom” or “Honeybunch”. In the case of the Ring phone number, I created a card that had every scary thing I could think of in the name, calling it Ring Alarm Emergency Monitoring.
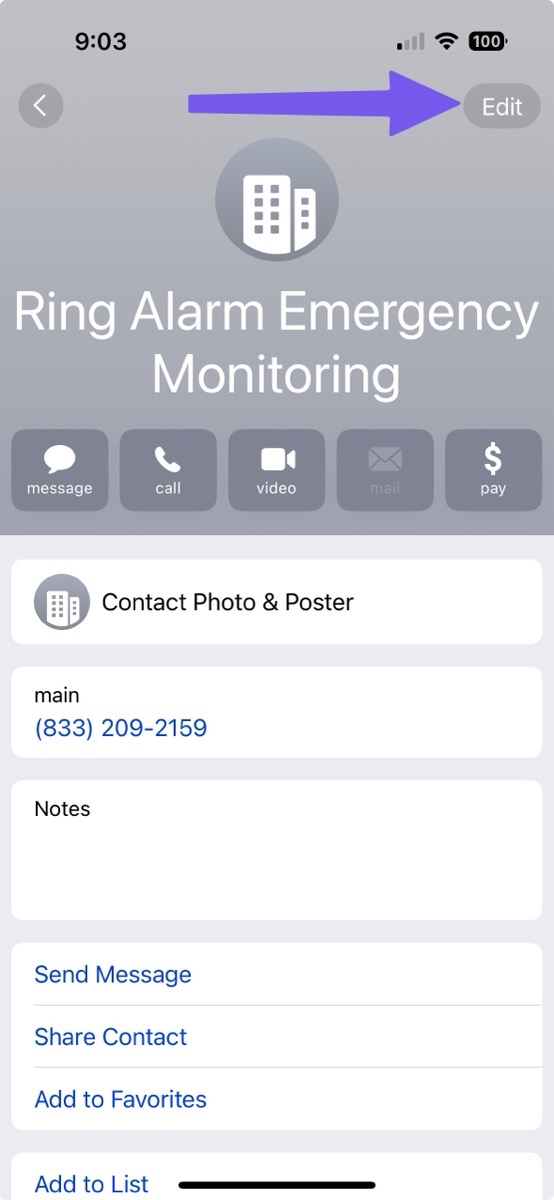
For each contact you want to have bypass Do Not Disturb in an emergency, select Edit. In edit mode, you’ll see Ringtone. I’m sure the first place you think to look for Emergency Bypass is under Ringtone. Don’t be worried if you have a cute ringtone like the opening refrain from the song, “Who Let the Dogs Out?” We’re not going to break that. Next to Ringtone, you’ll see a chevron pointing to the right, inviting you to see another screen.
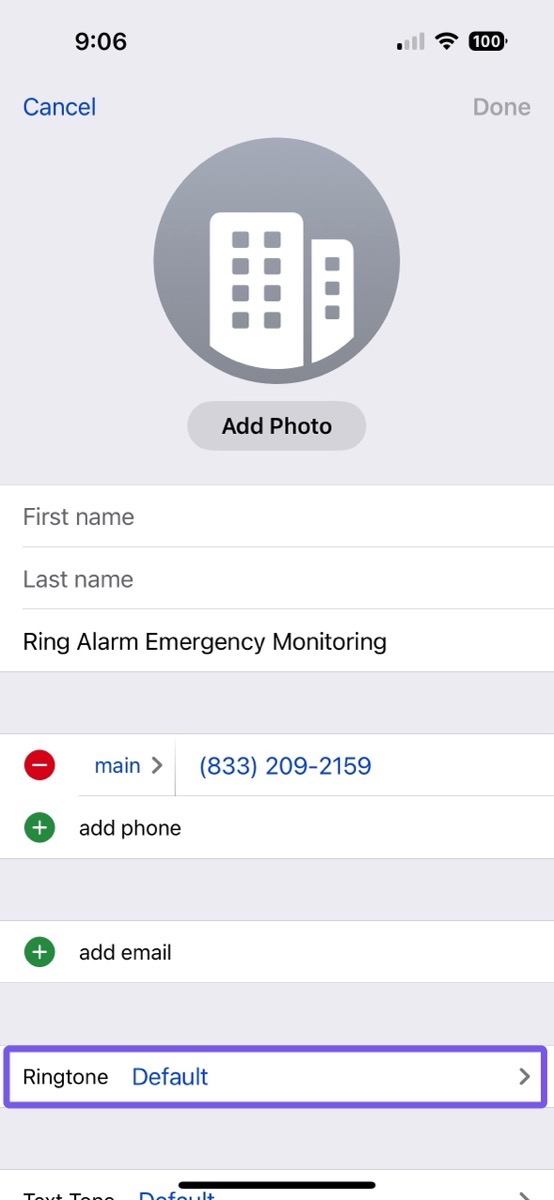
On the next screen, the very first thing you see is a toggle for Emergency Bypass. If you toggle this on, you’ll notice that your adorable ringtone that makes you giggle every darn time is undisturbed, as is the option for whether to use Haptics and which version of haptics.
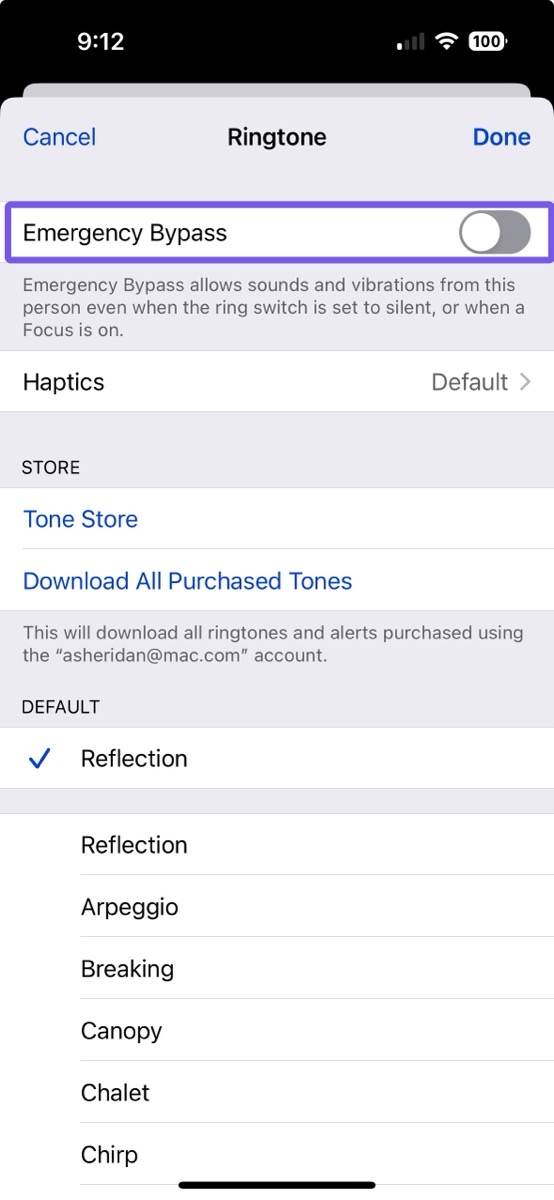
After you toggle on Emergency Bypass for this contact, tap Done. You’ll note that now the contact card says “Ringtone Emergency Bypass On”. If you have tailored your ringtone and/or haptics, it will also say “Who let the dogs out”, and Vibration: Heartbeat.
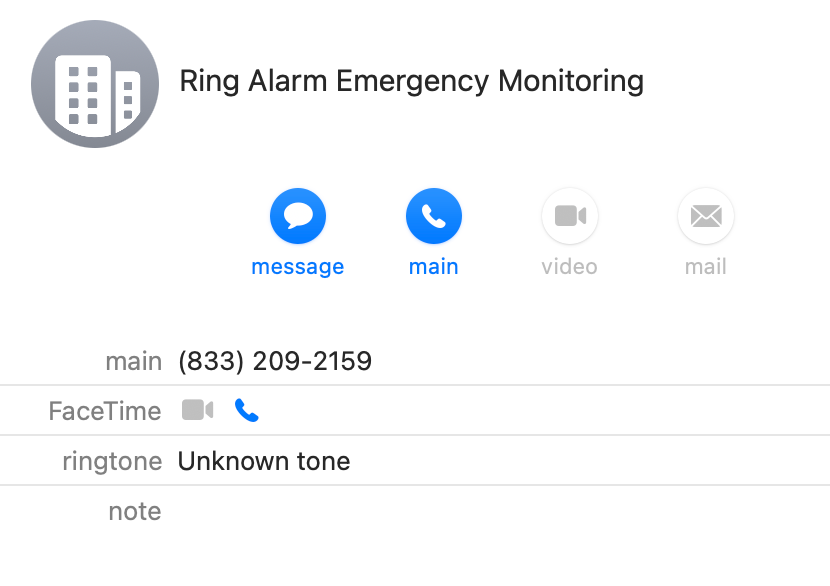
While we can receive phone calls on our Macs, at least via FaceTime Audio or Video, you not only can’t set up Emergency Bypass on the Mac, but you can’t even see definitively whether any given contact is allowed to bypass a Focus Mode in an emergency. If you open up a contact and try to edit the ringtone, there isn’t an option for Emergency Bypass. Worse yet, if you do set it up via iOS and then look at the contact card in macOS Contacts, the ringtone will now say, “unknown tone”, but that’s only if you hadn’t set a specific ringtone. If you have set a specific ringtone, then that’s what will show, so you have no way of verifying whether this contact has Emergency Bypass enabled or not. Thanks, Apple.
Focus Modes
I thought maybe I could create a Focus Mode including tailoring to those contacts with Emergency Bypass, but Focus Modes disappointed me again. There’s no option to select people by ringtone. This probably makes sense because regardless of Focus Mode, your phone is going to go nuts when any of your Emergency Bypass-enabled contacts try to reach you.
One thing I would do if I was starting from scratch is to put a note into each contact that says “Emergency Bypass” as I enabled the feature. If you do this, you can then make a Smart List in contacts for Notes containing Emergency Bypass.

I’d use this if I ever wanted to find every contact designated for Emergency Bypass when I needed to update the contacts. I also thought that this would allow me to select the entire list in Focus Modes, but Apple, in its infinite wisdom, doesn’t include Smart Lists in the selections inside Focus Modes. Thanks a lot, Apple.
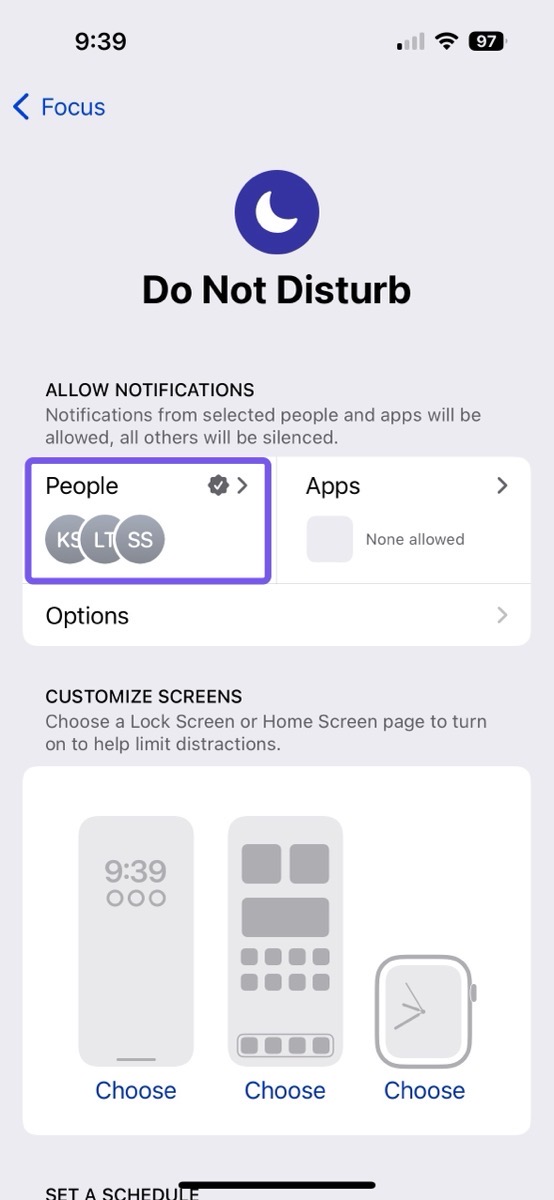
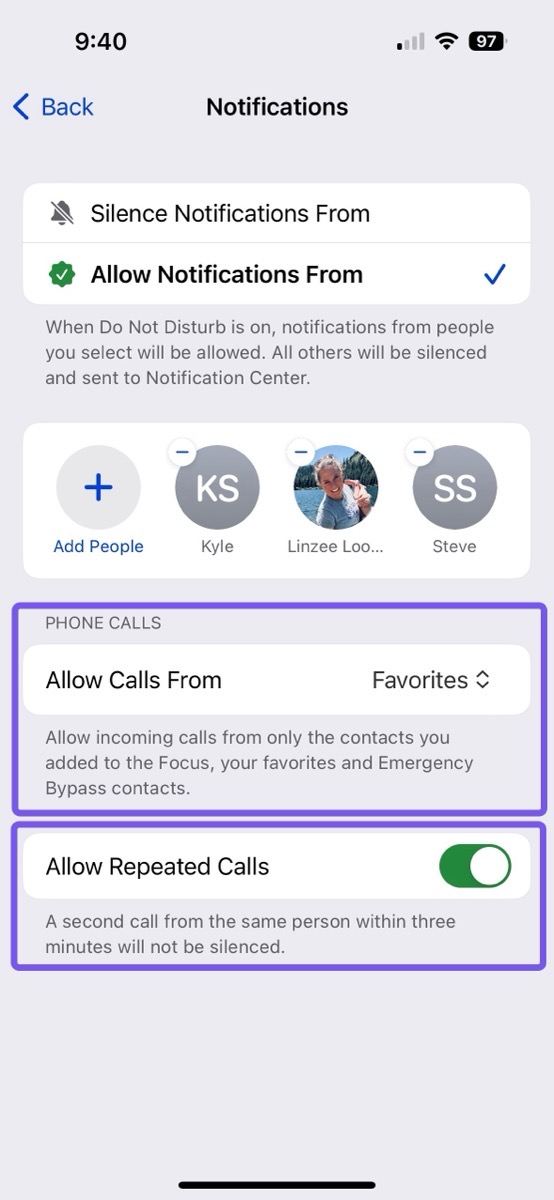
As disappointed as I continue to be with Focus Modes, there’s one feature I do have turned on. In the default Focus Mode Do Not Disturb, which is the only one I use, I have added Steve and my two kids Lindsay and Kyle. If you select the People option, you can use the little plus button to choose from your contacts to allow notifications.
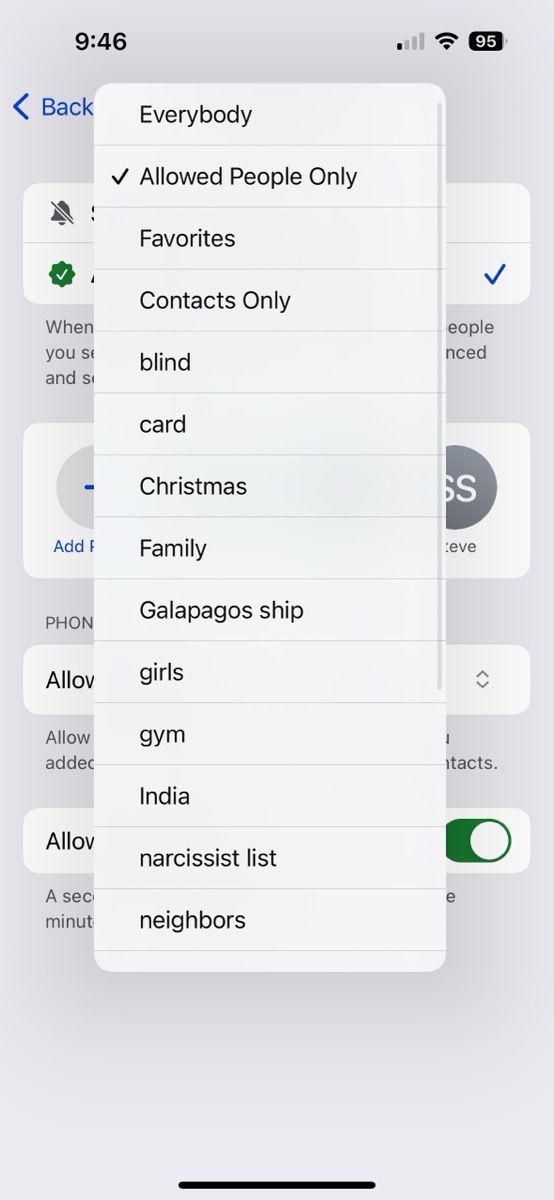
There’s also a dropdown to allow calls from Everybody (defeating the purpose of a Focus Mode), Allowed People Only (which is the people you added in the previous step), Favorites, Contacts Only, or specific lists. But of course not Smart Lists.
But below that is another option that might be very useful. It’s a toggle to Allow Repeated Calls. This means that if a second call from the same person is received within 3 minutes, you’ll get the call regardless of whether they’re in your list of allowed callers. I actually did have Allow Repeated Calls enabled when the Ring folks called me while I was on the Pirates ride, but in my haste not to be rude to the other people on the ride, I declined the second call because I didn’t recognize the number.
Shout-Out to Ring
I want to give a shout-out to Ring and my local police department for the speed at which all of this took place. From when the alarm first went off until the officer rang my doorbell, it was only about 10 minutes.
The other shout-out to Ring is how inexpensive their alarm system is with human monitoring. The cost for the service is only $100/year. Depending on how many sensors and keypads you want, the hardware costs from $200 to $329 which is also highly competitive.
In our case, adding the alarm system monitoring was even less expensive. When we bought our first Ring doorbell, we opted into their cloud video storage because it was only $30/year. When we added a Ring floodlight cam to our backyard, we paid another $30/year. I hesitated on that one but I couldn’t find the logic why the second camera’s footage would be less valuable than the first one. Then we added a third Ring camera system to the alleyway to get into our backyard and we forked over a third $30/year, bringing our total to $90/year.
Now here’s the deal. You never pay ring more than $100/year, so adding human monitoring to our alarm system was only $10/year more. I know Ring is owned by Amazon and that might give people pause, but I have to say we’re really happy with the service for our home.
Bottom Line
The bottom line is that we should all pay attention when Jill from the Northwoods is teaching us because she’s usually if not always spot-on with her advice. I’m glad I have my Emergency Bypass contacts set up correctly now to make sure that if my alarm goes off I will take the call before unnecessarily having the police come out on a false alarm. I’m pretty sure they have better things to do!

