Audacity Manual
This tutorial will provide instructions on how to create an audio recording suitable for a Podcast using the Open Source software Audacity. This is not meant as an in depth tutorial on all of the functions within Audacity, but rather how to set it up so that you can record an audio file and save it in such a way that you can then upload it as a Podcast. All of the screenshots will be taken in Mac OSX, but you should be able to follow along in Linux, Unix, or Windows.
Download Audacity from SourceForge
We should start by actually downloading the application from audacity.sourceforge.net. As I mentioned in the introduction, Audacity is Open Source, which means you have a lot of freedom, and the software comes at no cost, but it does come with a license called the GNU Public License. Make sure you respect this software license as you would a commercial license!
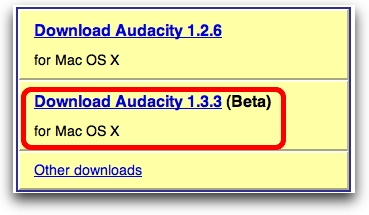
On the downloads page you'll notice there's a stable release for Windows, OSX, and LInux/Unix, but there's also a Beta release. Choose the 1.3.3 Beta version - even thought that sounds scary, it's very stable and has been listed as beta for about a year as of this writing in February of 2008! If you're on Windows or Linux, the Downloads will show for your Operating System (the screenshot shows OSX because that's the operating system from which I hit the site.
Install Audacity
Run the installer for Audacity. Because you're most likely to want to export your audio as an mp3, you'll need to download and install the LAME library. This is availalble at http://lame.buanzo.com.ar/. There are great instructions on how to run the installer on the Audacity page available here: http://audacity.sourceforge.net/help/faq?s=install&item=lame-mp3.
Microphones
Let's talk just a bit about microphones before we launch audacity. I'm not a big ol' audiophile, so I'm not going to tell you to go out and buy a big rig, but there is one piece of advice I will give you. You must have headphones on when you're recording. If you have a standing microphone, plug in some kind of headphones, even plain old earbuds will work. Alternatively you can get a headset microphone that includes the head phones. If you don't wear headphones, you'll get feedback that will destroy your recording. If you can't afford a microphone at this time, you could even use a built in mic like on a laptop, but no matter what you must use headphones!
Many people ask what kind of microphone I use to record my Podcast. When i first started podcasting, I used the headset mic I got in the box with IBM's Via Voice recording software. After a few months I upgraded to the Samson C01U which is a USB mic. I knew it was a good one because it has a sticker right on it that says "Ideal for Podcasting"! It gave me a big boost in audio quality and the price was right, it runs $89 at the time of the writing of this tutorial. I bought mine at samash.com. Don't forget to buy a stand, because this mic doesn't come with one. I just bought a generic one for around $15.
INSERT SOME PICTURES! maybe split this into my first mic, my second mic, my third mic?
After a couple more years of podcasting I decided it was time to take it up a notch and i got a Heil PR20 and a Mackie mixer. This setup is designed to give me more control over my recordings, both my voice and the voices of people I interview over Skype. The setup of this rig is way more complicated than the audience for which this tutorial is designed, so for now go with a headset mic or something like the Samson C01U.
Opening Scene
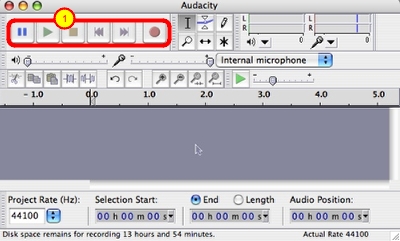
When audacity first opens, you'll see the familiar pause, play, stop, rewind, fast forward and record buttons of any audio application. After that, it's all pretty unfamiliar territory!
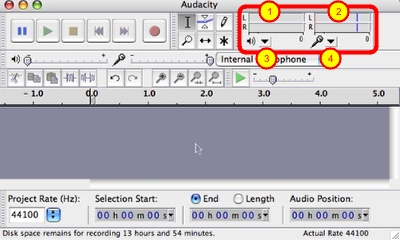
Audio Input/Output Controls

1. speaker volume for playback
2. microphone volume for recording
3. pulldown to choose a microphone input. You probably would have an external microphone to make a high quality recording so you would want to pull this down to select your mic.
Selection Tools
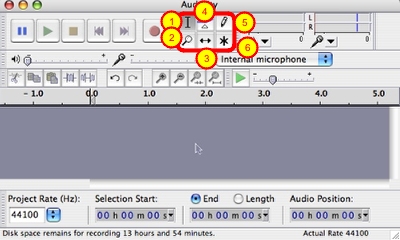
1. This is the selection tool. You'll use this to drag across the timeline to select a region to cut, remove noise, or enhance in some other way.
2. The magnifier is used much in the same way as the selection tool - drag it across a region to expand that area for more close inspection. This is invaluable when you're trying to identify a specific area of sound by its wave form - for example, remove um's and ah's in a recording. Hold down the shift key to drag or click and zoom back out.
3. The time shift tool is used to, well, shift time! just select the tool, and click/drag your audio to slide it right or left in time. This is useful when you are trying to line up two tracks, for example if you want to lay in some music and have it line up with something else you've recorded.
4. The envelope tool is used to help you fade in and out a recording. By simply dragging across a region you can compress down the wave form
Level Meters
1. The left meter shows you the levels for the output - what you are currently hearing.
2. The right meter shows the levels of the input - you want to watch this meter while you're recording to make sure it doesn't go too far to the right and light up red - that would mean you're exceeding the input volume for the device selected and so your recording will be clipped and won't sound very good
Undo/Redo and More Zooming
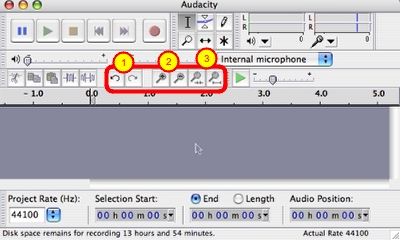
1. The familiar undo and redo buttons
2. Didn't we already learn the magnifying glass? Well, here's 4 more! These 2 allow you to zoom in or out with a click, but not to a specific region.
3. The final two zoom magnifiers are really useful and interesting. The first one zooms up on a selection you've already made, which could be useful if you've got a section you've been fiddling with already. The second one simply zooms out until the entire audio file fills the width of your screen.
Let's Set Up for a Recording
We need to set some stuff up before we can get started recording. Open up Preferences from the Audacity Menu.
Acquire the LAME libraries
This next part is kind of difficult to understand, but you only have to do it once and forget about it. When you're done recording, you'll probably want to change your audio into an MP3 file so it's easily usable by others. Unfortunately there's some arguement over who owns the MP3 format, so the Audacity folks play it safe and don't distribute the libraries necessary to create MP3s with Audacity. You have to download them. they're free, and the ones we'll be using are called the LAME Libraries. LAME stands for LAME Ain't An MP3 Encoder, reflecting LAME's early history when it was not actually an encoder.
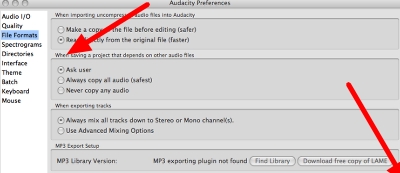
In Preferences, click on the File Formats tab on the right, and then click on the button on the right to Download free copy of LAME. This button will take you to the Audacity website at audacity.sourceforge.net/download/lame. They give really good instructions on this site on how to download and save the Libraries and what you should do with them later. I won't repeat the instructions here because their's are so good, and because they're different depending on your operating system.
Tell Audacity How to Address Your Mic
If you're on a Mac, pull down under the name Audacity in the menu bar to Preferences, and then click on Audio I/O on the left hand pane. On Windows you'll find the same menu under Edit, Preferences, and Audio I/O is a tab across the top of that window. Look for the section on that window that says Recording, and you should have a pull-down for the device. Find your microphone in the list and pull down to it to select it. Close that window and try recording again and you should now see the wave form (the squiggly lines).
In fact, you might see a pair of identical wave forms, because the default for Audacity is to record in stereo. Your first instinct is probably that stereo is what you want anyway, because we all know stereo is better than mono, right? In this case it actually isn't. Since you are one voice going into one microphone, recording in stereo doesn't buy you anything, and makes the file twice as big as it needs to be, which wastes disk space and bandwidth for the person downloading your Podcast!
Go back to the I/O section in the Preferences, and right below where you chose your device from the list, you'll see a pulldown next to the word Channels - pull that down to select 1 (Mono).