 To make sure you know I don’t dislike Photos, I should tell you some stuff I do like. Exporting from Photos works pretty well. You can choose JPEG, TIFF or PNG, set the quality (low/med/high for JPEG & PNG, 16bit for TIFF) and you can define the size of the exported image. You can choose to simply constrain the width or the height, or you can define a specific dimension. I like that you can choose to retain certain info in the file, like the Title, keywords and description and/or the location information. I like to test this kind of thing, so I put the word “boogers” in the description field of a photo, exported it, then did a search for the word boogers in Spotlight and it immediately found the photo. That’s pretty cool. If you do a Get Info on the file it also shows the Title in there.
Another thing I like to do after naming my photos is to export them (in order) to then upload them to social media. In Aperture I could export them with the name I had given them with an index in front of it to keep them in order. In Photos I have to choose between those two options – either to name the file with the title OR have an index number plus the same title for each photo. For example on my recent trip I might export 01-riding camels, 02-dune bashing. But in Photos I have to either have 01-Dubai, 02-Dubai, OR Riding camels and dune bashing which will get alphabetized instead of staying in time order. I submitted the combination as a feature request on apple.com/feedback but in the mean time I sent Dorothy a note suggestion she write me an AppleScript/Automator Action to grab the Title from Get Info and the sequence number from the file and replace the name. I like to keep her busy, you know.
I haven’t needed to use it much but Photos has separate Albums that automatically sorts out your Panoramas, Videos, Slo-mo, time-lapse and burst. interestingly, Panos aren’t just those created by Apple products, Found a (terrible) one I stitched by hand in 2003! I like having these as special categories, especially for videos. Importing videos into Aperture wasn’t trivial if you liked importing RAW photos. Now with Photos it’s automatic and they’re easy to isolate. Helpful not just for the ones you WANT to find, but to delete the ones that aren’t that great but are still clogging up your drive.
Adjustments Are More Powerful Than You Think
A lot of stink has been made about how the adjustments aren’t nearly up to par with Aperture, much less Lightroom. That’s all true, but let’s talk about what you DO get with Photos.
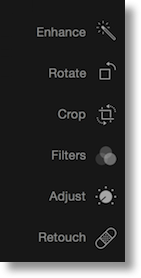
 When you tap on Edit, or simply hit return while viewing a photo, you’re taken into the Edit pane. You only see six choices – Enhance, Rotate, Crop, Filters, Adjust and Retouch. Enhance is a single button push where Photos makes some decisions for you on how to improve the photo. Rotate is a one button push to turn 90 degrees. Crop doesn’t just include crop, it also includes the ability to rotate the photo to say straighten the horizon (or make it crooked if you fly that way.) There’s an auto-rotate where it guesses what you want or you can rotate it very easily yourself. The crop tool defaults to freeform, and I’m more of a original format girl, so I have to switch it every time. You can choose from a bunch of stock proportions or name your own. I hate filters, so we’re not even going to talk about them.
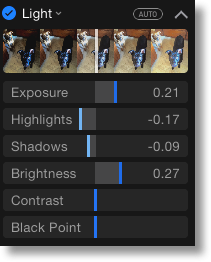
 Adjust is where things get interesting. When you first pop that open your jaw will drop at how limited it is. I’m not sure I can remember exactly what showed there originally – I think it’s Light, Color and Black & White as three sliders and nothing else. However, don’t lose hope. If you tap on the teeny tiny disclosure triangle on the right side of one of the adjustments, it flips down to expose a lot more options. In Light for example, it exposes six more sliders: Exposure, highlights, shadows, brightness, contrast and black point.
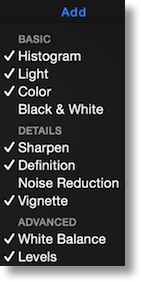
I wouldn’t be happy if it stopped there, however. In the upper right there’s an Add button, which exposes panels for Sharpen, Definition, Vignette, Black & White, Noise Reduction, the ever-critical White Balance and even Levels. Each of THESE has even more adjustments revealed with their disclosure triangles. I’m delighted with what they did give us, and I’m trying to stay positive about that.
Photos includes a healing brush with an icon that looks like a bandaid. This feature was in Aperture but had two modes – one for healing and the other for cloning. Cloning allowed you to choose a sample area, say a patch of uninterrupted grass, and to paint that same grass over a piece of trash elsewhere in the lawn. The healing brush MAY do that correctly if you option-click to choose the grass, but you have to trust it to figure out what to do. With cloning it’s precise, grab this stuff and put it over there too. Healing works…most of the time. I’ve needed to simply erase something in an image and Photos healing brush simply wouldn’t do it, kept picking up the surrounding areas and interpreting it differently from what I wanted.
I mentioned earlier that you can export to jpg, png or tiff, but if you find the adjustment options in Photos lacking, you can use a big girl photo editing tool too. Thanks to listener Janet Chesne, I found out that Photos allows you to export an unmodified original with or without the sidecar XMP file. I tested it and sure enough it does export the RAW file. I’m really glad they included this because it will help me on those rare occasions when I need more powerful tools, but it’s important to keep in mind that when you edit say in Photoshop Elements or real Photoshop or Pixelmator or Acorn, those will be destructive edits. That doesn’t bother me, but I know it’s a problem for some people.
So bottom line is I’m still really enjoying the Photos experience…except for all those complaints I’ve been making.

Has photos the option to choose “edit in external app” so it goes directly to pixel mayor and back ?
It does have that feature but it oddly doesn’t move over the RAW file, just JPG.