 One of my goals in producing the podcast is to make sure that you hear good quality audio. A second goal is to provide that quality audio with as little hassle on my end as possible. I have a very nice microphone, the Heil PR-40 which Steve bought me a few years ago. It’s a high-end mic with what’s called an XLR interface. This is a circular connector with three large pins.
Traditionally one would plug this kind of mic into a mixer. As I’ve mentioned before, I used to have a mixer and while I felt like a big girl with it, I found it to be a real hassle in many ways. Remember Goal 2 which was to minimize hassle?
I got rid of the mixer when I switched over to a Blue Icicle USB interface. This a cylindrical converter that takes the XLR from the mic on one end and converts it to USB on the other end. I used that for years but the volume control knob on it was a bit finicky and Steve wanted it for his Heil PR20, so I went on the hunt for a new interface.
Two years ago I switched to the Shure X2U interface which had a better gain control slider, and had the advantage of a monitor port so I could plug my headphones into the interface instead of my computer. A monitor port like this allows me to hear myself so if I’m peaking, in theory, I should be able to adjust things while I’m recording. There’s also a light on the X2U that should be green unless you’re peaking in which case it turns red. It worked well for me.
But then last year we went to CES and I interviewed the folks at Shure and learned that they had a new lineup of products coming out. The one that struck my fancy was the Shure MVi Digital Audio Interface. Like the two interfaces I had before, it takes an XLR input and converts it to USB so I can plug it into my Mac without a mixer.
Unlike the other two, this is a small block that sits on my desk, rather than a cylinder connected to the end of my mic. There are pros and cons to this – I lose desk space, but my boom arm doesn’t have to hold up the fairly heavy interface. Another con is that with my headphones plugged into the monitor port on the back of the MVi, the cord for the headphones has a tendency to lay across my trackpad which makes it go wild. Not a huge deal but always confuses me for a minute or two!
When I used the Blue Icicle, I could use the software called Shush to mute myself if I needed to cough, but for some reason the Shure x2u didn’t work with Shush. The main reason I wanted to get the Shure MVi was it has a mute switch right on the device.
Steve bought me the Shure MVi for Christmas (noticing a pattern here?) and I’m really happy with it. If you listened to Chit Chat Across the Pond with Bart this week, you will not have heard a single cough, and yet I have a cold and coughed several times during the recording. I’m loving having a mute button already. You should be happy too!
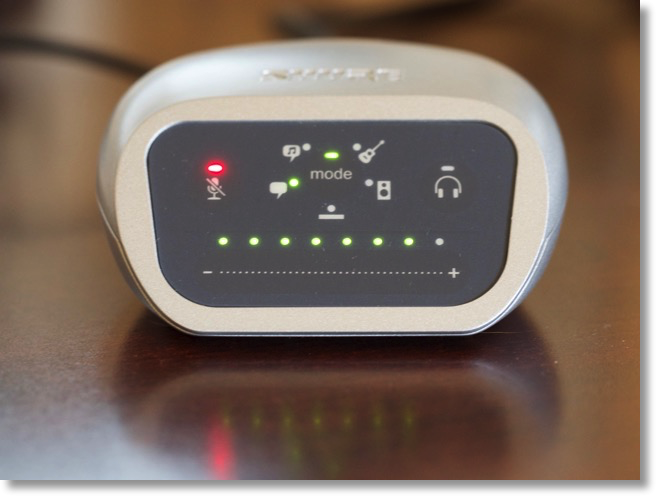
The Shure MVi has a lot more going for it than I realized. The interface is by touch with no physical buttons so this will be of no use to the blind, but for me it works reasonably well. On the left is mute, and across the bottom there’s a series of lights that show the input volume. There’s a touch slider thing across the bottom to move the input volume up and down. It’s a little janky in my opinion. I have to stroke it with my finger several times to move it dramatically up and down. I’d like it better if I could just stroke to the position I want it to stop.
On the opposite side from the mic mute button is a headphone button and toggling to that allows the slider I just described to change the volume of the monitor port. It changes the colors of the lights across the bottom from green to orange so you’re reminded of which one you’re controlling. That’s a real nice nice feature.
In the center there are preset buttons, which I only discovered while writing this review. Probably should have read up on it more before I used it last week. The presets are for speech in podcasting (I love that podcasting is main stream now!), singing, quiet and acoustic music, loud music or band, and flat. I think I recorded last week using the quiet and acoustic music setting. I’ll be curious if any of you can tell the difference now that I have it set to podcasting.
The main thing I would change on the MVi is the coloring of these controls. The face is a very dark grey and the icons for the controls are tiny and in a medium grey. Except in bright lighting, you simply cannot see the icons at all. At my desk in the evening I don’t have light coming from behind me so I simply have to rely on my memory to make sure I’m tapping the right icon. Luckily when you choose them a bright LED lights up next to the icon so if you memorize the locations you’ll be ok.
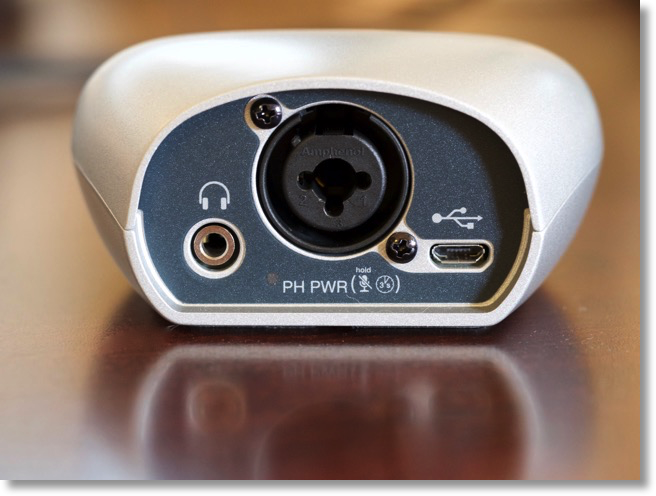
 On the back of the MVi there’s the XLR input, a micro-USB connector to connect to your computer, and a headphone jack. But here’s a cool feature – the XLR connector has in the center of it a hole that will take a 1/4″ instrument plug. This means you could connect, for example, a guitar or keyboards to the MVi to do a recording. This is incredible for such a tiny, portable device.
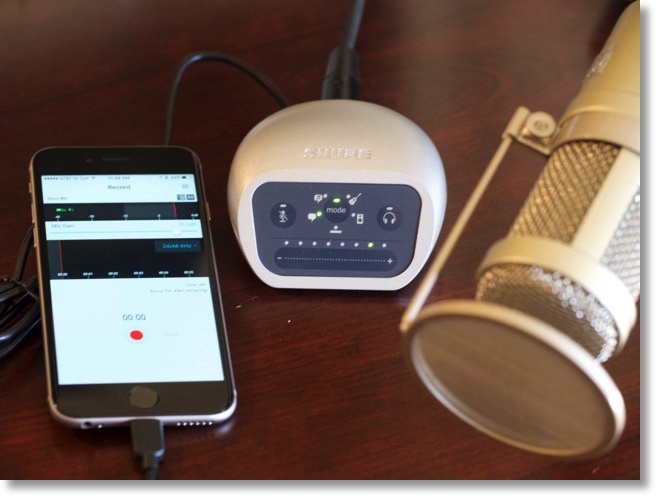
But let’s take it up ANOTHER notch. The Shure MVi comes with a cable I’ve never seen before, it’s micro-USB on one end, and 9pin Lightning on the other end. This means you can plug your big girl XLR mic into the MVi and then record right into an iPad or iPhone! Very very cool. Better mark that unique cable though.
Shure has a free app for iOS called ShurePlustm MOTIVtm Mobile Recording App so I downloaded it to my iPad and iPhone to test this out. I connected my Heil PR40 to the MVi, then Micro-USB to Lightning on the iPad and was ready to record. Get this, the MVi draws its power right from your iOS device so you’re not a slave to power outlets. I left it plugged in for a while and monitored my iPad Pro battery and it dropped by 1% in about 15 minutes. I think the two do good power management between them – when left idle after a while the lights went off on the MVi. I assume the MVi would draw more power from the iPad if I was doing a lot of recording.
 The ShurePlus MOTIV app looks pretty simple at first but has some advanced features I’ll get to in a minute. You can use the iOS app with any microphone, even the internal mic, but the advanced features won’t be available to you without a MOTIV device. They start you out with some instructions for using their MV88 Lightning mic (which also looks really cool), but you can skip past that and go right into the app. You get a really nice levels meter, a pulldown to choose your sample rate (I choose to use 16bit/44.1KHz) and then there’s a big red record button.
ShurePlus MOTIV records as an uncompressed WAV file so you might be worried about how much space you have on your iOS device. You wouldn’t want to run out before your recording was done. There’s a lovely little text line that tells you time left – mine currently says 15 hours and 50 minutes left.
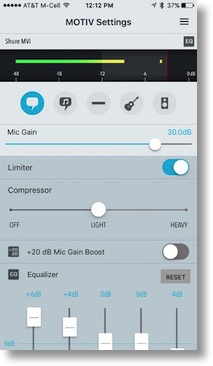
There’s a hamburger icon in the upper right that lets you view your recordings and get to the advanced Settings I mentioned earlier. With a digital MOTIV device attached, like the MVi I’ve been talking about, you get a lot more control.
 In the app I can change the presets I mentioned that are on the physical device, like choosing podcasting vs. guitar. I can adjust the mic gain and turn on a limiter. A limiter is useful to ensure you don’t peak in your recording. I do this in Audio Hijack on my Mac, but this is very cool to have it in the app on iOS. You can also turn on an audio compressor and adjust it from light to heavy.
I seem to ALWAYS have low mic levels so I’ll probably use the +20dB Mic Gain Boost. They suggest you keep your levels between -12 and -6dB, but without the boost I simply can’t get it that high. Finally in the ShurePlus MOTIV app there’s an adorable little 5 band equalizer.
Once you’re done recording, you name it and it saves in the app, but you can then save to camera roll, send it via Messages, or Mail, or you can save to Dropbox. There’s a More button inviting you to attach more services to this menu. I’ll probably use Dropbox myself. I mentioned earlier that ShurePlus MOTIV records in an uncompressed WAV file but you can convert it to Apple Lossless or a 256kbps AAC file within the save menu. It doesn’t overwrite the original file but rather creates a second file with a name that tells you the format. It worked flawlessly in my tests. Let’s listen to a recording done on my iPad Air with the Heil PR40 and transferred via Dropbox. Other than the obvious cold in my nose, see if it sounds any different than my regular recording setup:
Pretty good, isn’t it? I thought I was paying $129 (or Steve was paying $129) simply for the addition of a mute button but instead I got a fantastic portable podcasting rig. Check out the Shure MVi Digital Audio Interface, Amazon Affiliate link included in the shownotes of course!
