 I have fallen in love with Affinity Photo. If you heard Chit Chat Across the Pond this week with Devin King, you’ll have heard me chat a bit about it as a fantastic image editor. I wanted to give you a more in depth look into this fabulous new program and why even if you’re not a huge photography fanatic, you might still want to give it a look. I’m preparing a video for Don McAllister’s ScreenCasts Online podcast, so I’m learning a lot about it right now and the more I study it, the more I like it.
Let’s define some problems to be solved first. They fall into a few categories, the first being money, or lack of disposable money:The big daddy of photo editing and art creation is, of course, Photoshop. Unfortunately Adobe have chosen to go with a subscription model, at $120 per year. I don’t ever want to hear a NosillaCastaway call it $10/month, because that’s simply not true. You can’t buy it month to month so it’s really $120 per year, paid monthly. You do get the very popular and capable Lightroom software along with it so I’m not saying it’s not a good value, but inexpensive it is not. In three years you’ll spend $360 on image editing and organization.
If you can’t afford that steep price, you can buy the less capable but still really excellent Photoshop Elements for $80. I used to really like Elements, but they charge huge upgrade fees pretty much every year. They have a version in the Mac App Store but it’s not updated to the new hotness until well after the pay per device version. I’ve spent $400 on Photoshop Elements over many years so it’s not really as great of a price as it sounds either.
 Affinity Photo is a grand total of $50 in the Mac App Store, so you can use it on all of your Macs. That’s not yearly, that’s total. it will remain to be shown whether Affinity Photo is good enough for most photographers and designers, so stay tuned as I talk through the features.
Now let’s say you’re not a huge pixel pusher, and wouldn’t ever consider buying Photoshop. You use Apple Photos and you’re pretty happy but there are times that you wish you could do a little bit more for your photos. You’ve got a great shut of your baby but there’s a branch behind her head and it looks like it’s growing out of her. Or you have a nice photo of Uncle Ned but he has a hat on and his face is in shadow. Or you took some cool photos under water of some crazy turtles in Hawaii but they look all green and hazy.
Enter Affinity Photo again, but with tools as Extensions inside Apple Photos instead of using the full standalone application. Simple tools that are super powerful and all come with that same $49 price.
I hope that’s enough problem to be solved! I think this review is going to go much like the video for Don – it’s going to have to be in two pieces because the tool is so powerful. I’ll start us off with the Photos Extensions because they give real power to the majority of the listeners. Then next time I’ll tell you all the reasons you need to flex your power and use the full tool!
Affinity Photo is available from a company called Serif, at affinity.serif.com/…, and like I said, it’s in the Mac App Store too.
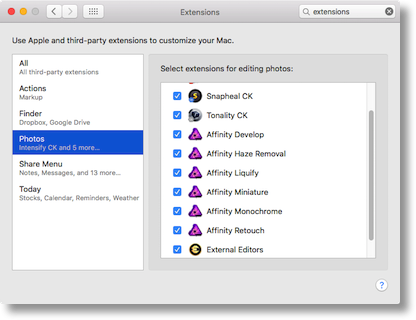
 After you install Affinity Photo, in Apple Photos select an image, hit the edit button in the upper right, and you’ll see an Extensions option on the far bottom right. If you click on that you’ll see any extensions you’ve already loaded up but also a button that says More. if you select More it opens up System Preferences to the Photos Extensions preference, and you can add the new ones from Affinity Photo.
Affinity Photo comes with six extensions and I’ll walk you through each one, giving examples of what you can do with them. Some are super cool and awesome and some are just plain silly.
The first one is called Develop, and to be honest, it’s the weakest of all the extensions. It provides functionality that’s already built into Photos itself. In Photos you can adjust lighting including exposure, contrast and more, you can add clarity, saturation and vibrance, you can adjust the white balance and change highlights and shadows independently and Noise reduction. These are the functions in Affinity Develop. Personally, I’d just uncheck that one and get it out of the way.
Next up is Haze Removal, and it is positively magical. When I first heard about it, I thought it would be super useful to someone like me who lives in Los Angeles. While our smog is way way way better than it used to be, since we still live in a bowl shaped by mountains off of the sea, there’s a natural haze even on the best of days.
What I didn’t realize was that Haze Removal would be so useful on just about every photo. Our friend Ron, who is an accomplished photographer, traveled with us on our trip to Hawaii, and he had just recently bought Affinity Photo on my recommendation. He started trying out Haze Removal on every photo and 9 times out of 10 it improved the photo dramatically.
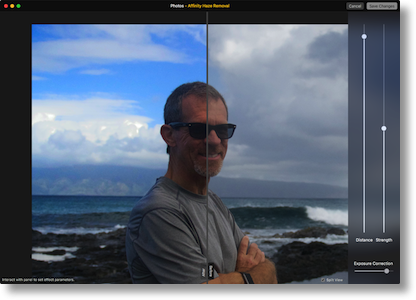
 We started with photos of the turtles under water taken by Steve’s GoPro, and the effect was astonishing. I put a photo in the shownotes of Steve standing on the show with a wave crashing in the background. I thought it looked pretty good till I removed the haze and it looks fantastic now. The colors afterwards are vibrant, the clouds have detail and brightness without being blown out, the lava is dark and menacing and the water is that gorgeous turquoise blue of the tropics. Apologies to Steve – the image I included shows the before and after so he’s sort of between two worlds!
I’m not sure I’d pay $50 for just Haze Removal, but I’d probably pay $25 for it. Seriously, it’s that good.
 Next up is a rather specialized tool called Liquify. You know how models in magazines look amazing and all women think they should be able to achieve those same looks but in reality photo editors have “improved” the images? That’s what liquify is for. I’m not thinking I’ll use it often, but once in a while maybe you want to help someone out a wee bit by pinching here or pulling there. Liquify has one really cool feature I haven’t seen before. You can freeze an area of the image.
15 years ago I had a photo of myself in a bathing suit in Florida and just for grins and giggles I decided to shrink up my waist and enlarge some other parts of my body. It looked pretty good, if not anything like me, but only after I printed it and showed it around did I notice that in pinching and pulling I had made my hand have giant sausage fingers! Today I could make a fake picture of myself look much more believable.
Tilt-shift photography and processing is a technique for making full-sized objects and people look like tiny toys. Bart did a terrific tutorial for us back in 2010 on exactly how the effect is created. It originated with lenses that were literally tilted to provide a sharp focus in a horizontal line but with increased blurriness the farther away from the line. In processing you can do this manually by doing a Gaussian blur with a gradient. The blurriness alone isn’t enough to create the illusion of toys. The second bit is to intensify the vibrance of the colors and sharpen the edges. If you really were looking at toy trains for example, they would probably be very bright colors for children and look like they were close to the lens.
 Affinity Photo gives you an extension for Photos called Miniature that provides the Tilt-shift effect. You get three sliders, one for strength (which is how blurry it is, one for vibrance and one for clarity. Then on the photo itself you identify the center, in-focus part of the image which you can rotate to match up with the objects.All apps I’ve used to create tilt-shift are as I’ve described, but Affinity Photo’s Miniature extension has one difference. Usually you only have control of the blend from focussed to blurry by pulling apart two symmetrically placed lines. In the Miniature you can move the lines independently. This provides a much better way of creating the illusion and it’s something I’ve always wished for.
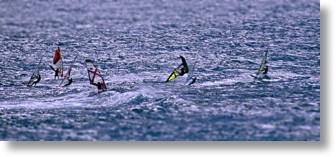
Finding or creating the right image for tilt-shift is tricky, because you need to be looking down on the objects. Cars from the top of a building, or a bridge above a train, or high up in the stands at a sports field are all examples of good angles for tilt-shift. When we were in Hawaii, Steve, Ron and I watched a bunch of crazy windsurfers flying in the air and doing flips from up on top of a cliff. When I got back all of my photo were completely uninspired and uninteresting. But then I played with Miniature and by doing tilt-shift I made them look like little toy boats on the water. It’s a really fun photo now.
Miniature can also do an elliptical effect, but I’m not quite sure why that would work. Haven’t really played with it yet, so maybe someone in the audience can give it a try and show us something fun.
 Black and white effects are all the rage these days and have taken off in many photo applications. Affinity Photo gives you an extension called Monochrome that lets you change the intensity of the 6 color spaces, red, green, blue, cyan, magenta, and yellow, otherwise known as RGB + CMYK to create your black and white effects. It’s got Curves control, which is a method of scaling the brightness of pixels at different levels – darken the shadows, brighten the highlights, etc.
You can also independently control the highlights and shadows’ hue and saturation levels, along with sharpening of the image and adding a vignette. The vignette slider is pretty useless though, it’s at a predefined distance from center and you can’t control the sharpness of the edge. I’d skip it inside the Monochrome tool and use the built-in vignette from Photos if I were you.
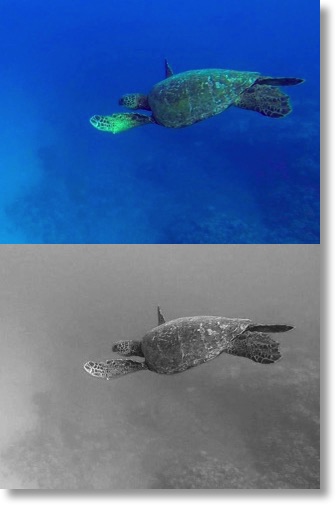
As with all of Affinity Photo’s tools, the best thing is how fast they work. Even on the 12″ MacBook which has a less than impressive processor, moving sliders to learn how they effect an image is virtually instantaneous. I messed around with a photo of a turtle underwater and I could very quickly determine that there was very little red, yellow or magenta in my image because swinging the sliders violently in either direction had little to no effect. I was able to concentrate then on slight movement of the colors that did matter.
Do you feel like you’ve gotten your $50 worth yet just from these extensions? Well hold on with that judgment, I saved the biggest extension for last, called Retouch. This is probably the extension I’ll call more than any other one (maybe next to Haze Removal). It also has a magical tool in it called Inpainting. Inpainting allows you to simply paint out of the image anything you’d like to remove. You’ve seen these kinds of tools before, in fact I spoke extensively about the joy of using Macphun’s Snapheal in the past. Inpainting with Affinity Photo extensions is so much better than any of them. Not only does it do a great job of sampling the surrounding areas to create the image behind the thing you’re removing, it’s fast. I don’t mean a little bit fast, I mean wicked fast. With other tools you have time to go brush your teeth while you wait, with this you’ll miss it with a sip of coffee.
If Affinity Photo just gave me Inpainting and Haze Removal, I’d pay $50 for those two things. But that’s not all you get in the Retouch extension. You also get dodge and burn tools which allow you to brighten and darken specific areas, where repeated application increases the effect. You can set the opacity of the effect, the flow, which is a term for how quickly the effect is applied, the hardness and the tonal range to which you want the effect to be applied, like midtones, highlights or shadows. Remember Uncle Ned in the hat? Dodge is perfect to bring his face out of the shadows.
Retouch also has a sponge tool which is designed to help you desaturate or saturate portions of your image, again with control of hardness, opacity, and flow. You can even increase the vibrance and hue/luminance and saturation. You can blur and sharpen and reduce noise with brushes and add smudges if that’s your thing.
The healing brush is really cool. You know how the normal bandaid-icon tool works, right? Let’s say there’s a blemish on someone’s face, and it’s someone you actually like, so as a favor you’ve decided to remove it. You normally hold down the option key and click in a a good area of skin, and then let go and click on the blemish. If you’re lucky it works, if you’re not, it’s too bright or too dark or the wrong texture so you have to undo and try again. With the healing brush in Affinity Retouch, you click right on the blemish first, and then drag your cursor around until you find the right area, and the blemish is changing real time. That way you don’t have any guess work at all.
So many tools in Affinity Photo’s extensions are just like other apps, but done better. Faster, more accurate, more intuitive and easier to achieve great results while never even leaving Apple Photos.
Whew – that was pretty long and it was ONLY the part about the Extensions, can you believe it? The full tool is even more capable, but like I said, the extensions alone are worth $50 to me. Check out Affinity Photo at affinity.serif.com/…

Excellent Article.
I really enjoyed reading it as I’m a massive photogrpahy fan. Will be checking out Affinity photo
I’m not a photographer, by any stretch of the imagination. However, when you said that Affinity has some big advantages for those of us who are pretty much Photos-only people, you got my attention. I’ll be anxious to see your SCO video(s) before making a final decision.
One question, though: is there any advantage to buying at the Affinity website or the Mac App Store? For ease of keeping track of things, I really like the App Store, but sometimes there’s a good reason to buy directly from the publisher. Opinions?
Great review of Affinity Photo. I’m also using Affinity Photo on a daily basis. if you compare Affinity Photo with Photoshop, you will find that it can do approx. 95% of the same things. Affinity Photo is really stable, except when handling very large files, then it gets a bit slow compared to PS. However, I really love the live brush feature in Affinity Photo. It is such a relief to see the result before you do the actual brush strokes.
the interactions with XP-Pen graphic tablets such as Artist Series https://www.xp-pen.com/series/Artist-display.html could be improved. In particular, there’s no way to properly use the brushes properties of pressure and tilt. The brushes customization self, is very complicated and inadequate, so it works bettere with mouse and keyboard instead than a graphic tablet.