We all have times where we really wish we could see the screen of someone we’re helping on their computer. There are a lot of commercial options like Log Me In, and Team Viewer, but I wanted to tell you about a couple of free and relatively easy ways to do it.
Screensharing with Skype
 I’ve been doing a few remote presentations over Skype lately and it’s worked out pretty well. For example, we didn’t make it to Macstock this year, but with Mike Potter’s help, I was able to show my presentation to the crowd and be able to see them at the same time using Skype. I also like to use it when I’m helping someone with a computer problem.
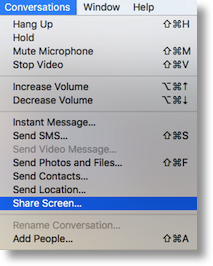
First launch a video Skype call. You don’t have to have a video call going to do screen sharing but I wanted to see the person I’m talking to while I talk. I like a little feedback you know? In the menubar for Skype you’ll see Conversations. From there, pull down to Share Screen…
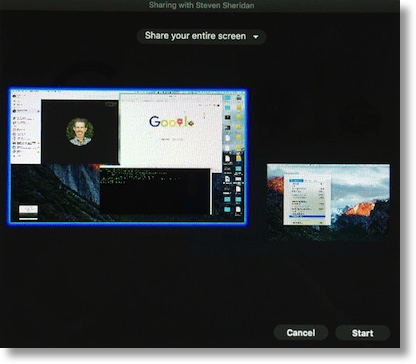 A dark, heads-up-display window will pop up. It will show you the screens you have available to share. It will ask you to choose which screen to share, even if you have only one. You can even choose from that same popup window to share your entire screen or just one window within a screen. Once you select a screen, hit Start.
This is one of the features I love about Skype. I use a 15″ MacBook Pro hooked up to a 27″ Apple Cinema Display, and other applications will share both screens, which makes it impossible for the viewer on the other end to see anything at all. With Skype, I can customize what I want the other person to see.
As I mentioned, it’s helpful to understand the size of the screen on the other end. If your viewer is on a 9.7″ iPad, they’re not going to be able to see the text from a 27″ display at full resolution. A quick trip to System Preferences, Displays and you can lower the resolution of your screen to meet their requirements. Unfortunately if you start screensharing first, changing the resolution will stop the screen share. Luckily, it’s easy to start the screenshare up again so it’s not a huge deal, but I just wanted to warn you so you don’t think something is wrong when screensharing stops after a resolution change.
When your screen comes up on the other end, the video from your webcam will become a small box down in the corner of their screen. If you keep Skype up on the screen you’re sharing to them, it will cause one of those hall of mirrors effects where you see the end of time. I like to move the Skype window to another screen and then start doing my demo. Remember though that I said I wanted to see the audience? Skype is smart enough when you click away from the Skype window, it will bring up a small heads-up-display window showing you the caller on the other end.
These heads-up-display windows are an interesting thing. you can actually leave that little window on the screen you’re sharing…and they can’t see it! In fact, to put a screenshot into the shownotes of the share screen heads-up-display window, I had to actually use my phone’s camera to take the picture. Screenshots can’t see these windows. It’s kind of like trying to see a vampire in a mirror! I even tried using Screenflow to capture my entire screen and take a clip out of it, but it too was foiled by these unusual windows. Anyway, in the case of Skype calls, it’s really handy that it’s invisible because you can keep it up on screen and they don’t get that hall of mirrors effect.
On Chit Chat Across the Pond Bart and I have done a couple of videos where he shared his screen for the video. Bart used Skype to share his screen to me, and I recorded the Skype video using Call Recorder for Skype from Ecamm Software ($30). I knew we’d be taking the resolution down to 720p, so we had Bart set his screen resolution as close as we could get to a vertical dimension of 720, and so did I. This gave us a video that when viewed at full resolution looked beautiful with crisp text.
Screensharing for iOS
 Steve and I use the screensharing option in Skype all the time for helping his family with their tech problems. Once you get them over the hump of using Skype to get help, getting them to tap that screen sharing button is pretty easy.
This week Steve was helping his sister untangle a complicated iCloud account problem on her new Mac. They used Skype screensharing and got her sorted out. But then she needed help getting her new iCloud account work properly on her iPad and iPhone. Screensharing isn’t an option in Skype for iOS, but there is a way to do it.
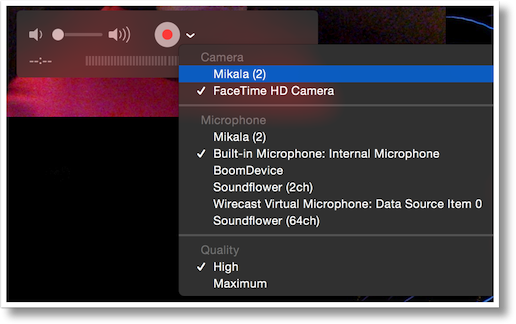
With QuickTime on the Mac, you can actually view your iOS device onscreen. Plug in your device, launch QuickTime and choose File, New Movie Recording. When the window opens up you’ll likely see your own face, because by default it shows your webcam as the video input for the new movie recording. Next to the little red recording button is a chevron that when clicked allows you to select a different video source, and your iOS device SHOULD show up in the list.
Once chosen, if you’re already doing screensharing through any method, your iOS device will be visible to your caller! It’s a terrific way to get this done. I did a Clarify tutorial on it (of course I did), so there’s a link in the shownotes to How to Play Content from Your iOS Device On Your Mac.
Screensharing with Messages
When I did a presentation at the Silicon Valley Mac User’s Group with the most awesome Linda Goushá, we played around with a lot of options to get screensharing to work. Back when we first tried it, she suggested using iMessage (or was it iChat back then?) with this really janky connection to AOL Instant Messenger.
Today there’s a much better solution hiding right at your fingertips. In Yosemite, Apple added a feature to its Messages app to do screensharing. It’s been there for two years but for some reason not highly talked about. Don’t feel bad if you didn’t know, I only found out about it recently!
![]() Open Messages, and either start a conversation with the person you want to share with (or select an existing message from them). Note that they must be using an Apple ID for this to work, in other words a blue bubble person.
Open Messages, and either start a conversation with the person you want to share with (or select an existing message from them). Note that they must be using an Apple ID for this to work, in other words a blue bubble person.
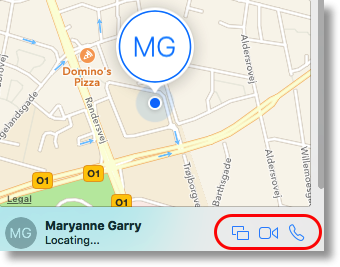 After you hit Details you may see a map of their location if they’re sharing it with you and below that you’ll see three buttons next to their name. The right two buttons allow you to start a FaceTime call with them (audio or video) without launching the FaceTime application. That’s pretty cool. But the left of the three buttons is an icon of two rectangles, the universal symbol for screensharing.
When you tap on that you’ll see two options – the first is Invite to Share My Screen, and the second is Ask to Share Screen. So this is cool if you need to help someone who’s maybe not so technical. You can ask to see their screen and all they have to do is say Yes when the request pops up on screen.
 Either way, when you’re doing a screenshare, you’ll get that double rectangle in your menubar, which is where you’ll go to stop the screensharing when you’re done.
 Messages is easier for sharing than convincing someone to use Skype, but you don’t get the option to decide which screen to share. You do get a bonus prize though, screensharing automatically launches a voice session through FaceTime audio, which is pretty cool. Messages has one other huge advantage over Skype. You can allow the other person to control your screen. If you’re helping someone with a computer problem and they’re just not getting how to do something, you can take over the screen.
Remember too if you’re using Messages for screensharing, the QuickTime trick works just fine to share your iOS device screen.
I hope this little walk through the different ways to do screensharing helps you out as you do tech support for your friends and family or as you give presentations across the globe!

This is great stuff, thanks Allison.
We were struggling with how to do presentations for our local Apple user group on iOS and Mac, and jump back and forth. We use an HDMI-connected projector. We had bought an HDMI switch, and some adaptor dongles, but just couldn’t get it all to work reliably with iOS. Your tip about using Quicktime to get the iOS screen onto the Mac is brilliant. This definitely solves a problem for me. Thanks! So many good ideas coming out of Nosillacast lately that I don’t have time to investigate them all!
Yay! I’m so happy this helped you out!
Screen sharing with Skype is good but quality is a concern. Instead, I would recommend using commercial options like LogMeIn, TeamViewer, R-HUB remote support servers etc. They work well by giving best quality screen sharing experience.