Affinity Photo for iPad is a glorious app. I’ve done my two part series on it, I’ve created a 45 minute screencast for ScreenCasts Online (not out yet) and I’ve started doing the user group circuit to demonstrate its awesomeness. Last weekend I presented at SMOG (Southern California Macintosh Owners | Users Group). While I was teaching it, I realized I’d figured out a few tricks to how to effectively use the tool.
Two Taps or One for Layer Effects?
 The Layer Effects Studio includes 10 different effects you can apply to a layer. From Guassian blurs to glows to shadows and more. With the correct layer selected, tapping on fx in the Studios panel on the right brings up the Layer FX studio.
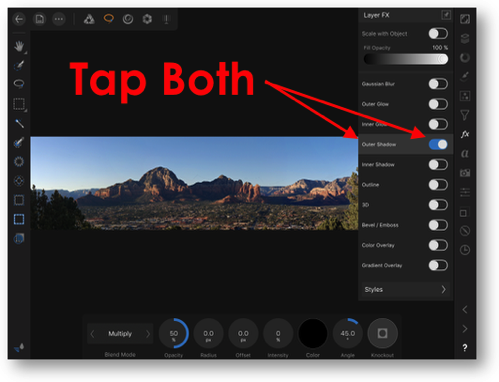
If you tap on the switch next to an effect, for example Outer Shadow, absolutely nothing happens. No default shadow is applied and there are no controls to change the shadow. The only way you can tell that something has happened is by tapping on the Layers studio and now that layer will have fx written next to it.
After turning on the switch for an effect, tap a second time on the name of the effect. Now the controls will pop up on the bottom of the screen with some default settings. You still won’t see a shadow because the radius and offset default to zero but as soon as you change them by dragging your finger on the control or tapping and entering a value, you’ll see the effect.
There is a way to accomplish this in one tap, but I came across it by accident. After you open the Layer Effects Studio, don’t tap the switch, just tap the name. This will not turn on the switch but it will bring up the controls on the bottom of the screen. As soon as you start adjusting the controls, the switch will turn on automatically.
This is a very weird way to make an interface, but I hope this tip will get you moving and clear up confusion.
Selection Tools Don’t Let Me Copy and Paste
 Serif Labs designed Affinity Photo for iPad to accommodate our fat fingers. In order to avoid wee tiny targets for the tools, they moved all of the selection tools into a separate Persona from the rest of the standard Photo Persona tools. While a great way to go, there is a little bit of a trick to using them.
In each Persona, there’s a Commands menu, designated by 3 dots inside a circle. If you’re in the Selection Persona, after you make a selection, the Commands menu will show you select all, deselect, reselect, or invert selection. There are also commands for selecting tonal range, hue range, transparency range, and selection as layer.
Those are all swell commands, but what if you want to copy this selection and paste it somewhere else? The only menu at your disposal is the Commands menu and copy and paste aren’t in there.
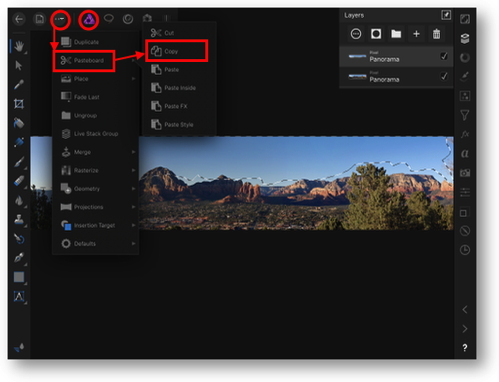
Here’s the trick. Tap over to the Photos Persona and tap on the Commands menu again. Now you’ll see a completely different set of commands. One of them is called Pasteboard, and inside there you’ll find cut, copy and paste.
There’s a lot more goodness in this Commands menu, but if you don’t know to flip back to the Photos Persona from Selection, you’ll never be able to find all that goodness.
I Can Import from Photos, Why Can’t I Export to Photos?
 Affinity Photo has a set of import options. You can import from all kinds of cloud services, and you can import directly from Apple Photos. A recent change to the way Affinity Photo handles Apple Photos albums is tying me in knots (they don’t reveal the structure of “My Albums” so it’s a jumbled pile of unsorted albums), but I’ve chatted with them and they assure me they’re working on it. But let’s get back to the tip.
While you can import from Apple Photos, the Export options don’t appear to include exporting the modified image back into Apple Photos. You can export as PNG, JPEG, GIF, TIFF and more but when you choose one of those formats, you’re only allowed to export to cloud services, not to Apple Photos.
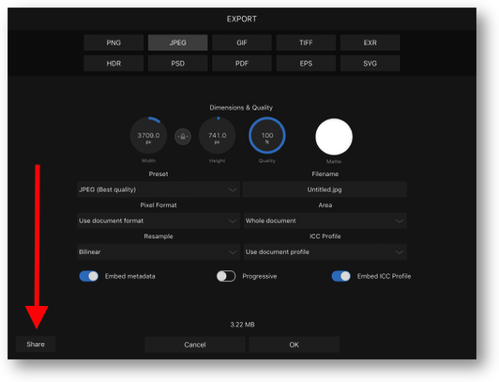
But there’s a trick. If you’re on the export page, before you tap OK, look in the bottom left corner of the page. You’ll see a Share button which reveals all of the classic share sheet options, one of which says simply, “Save image”. Tap that and your image will swoosh into Apple Photos.
At this point you’ll be tempted to tap the OK button, but that will open up the export to Locations page. Your image is already saved to Photos, so you have to Cancel to back out of the Export page. Kind of a clunky way to leave but it works.
An Easier Way to Move Through Options
 I was demonstrating Affinity Photo for iPad for a local user group when I stumbled across something wonderful. The good news is that Affinity Photo has lots of options. The bad news is you often have to scroll through these options to get to what you want. Let’s take a look at the options under Filters for example. When you first select the menu you’ll get a loooong list of filters. They’re in alphabetical order so if you know the name of the filter, you’re golden.
But what if you just want to look at blurs or sharpening filters? At the top you’ll see All Filters, and chevrons pointing to the right and left. If you tap on those little chevrons, you can cycle through all six of the filter sets. But that’s tedious. So here’s the trick.
Instead of tapping on the chevrons, tap on the name All Filters. You get a scrollable list of all the filter sets! It’s an odd little menu because it cycles around and around with no end.
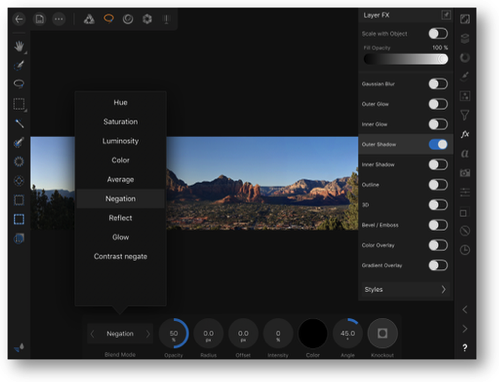
Once I found this method, I tried it wherever I saw those side-to-side chevrons. If you look in Layer FX at the Outer Shadow effect, it has a Blend Mode. If you tap on the chevrons in that one you’ll lose your ever loving mind because there’s so many options. But if you tap on the name of the blend mode that’s shown, you’ll be able to scroll through all 29 options! Unlike the Filters menu it’s not an infinite loop, but with 29 options it feels like it.


Terrific tips Allison. Keep em coming!
There is no way to deselect in Affinity for the iPad. I have searched everywhere. Also clone tool does not work at all with Apple Pencil.
Very un intuitive. The is no answer to the question “deselect” within Affinity for the iPad.
I think you really need to spend some time learning the tool, Anonymous. Maybe watch some of the videos from Serif on Vimeo? Just click anywhere else on the image and it deselects. To use the clone tool, press with your finger first on the area you want to clone and then use Pencil to draw where you want to clone to be.
https://forum.affinity.serif.com/index.php?/topic/40981-official-affinity-photo-ipad-tutorials/