The CMD-D Conference infected me with the desire to automate everything. I’m pretty sure that was their evil plan all along. In this article I’m going to talk about one quick thing I did in AppleScript in the finder, then tell what I hope is an interesting story of discovery in AppleScript for Photos, then I’ll talk about what I want to do in the future on iOS in Workflow and Keyboard Maestro on the Mac. I’m telling you, I’ve descended into madness!
Spaces into Underscores
![]() When I got back from the conference, I was working on my article for it and I realized I’d been doing something for a decade that could probably be automated.
When I got back from the conference, I was working on my article for it and I realized I’d been doing something for a decade that could probably be automated.
I take screenshots as often as most people breathe. Those screenshots go into Apple Photos most of the time, and I name the images with fairly descriptive names. I use good descriptions because when I drag them into my blogging tool of choice, MarsEdit, the app will automatically use the title as the ALT tag so screen readers can read it out loud.
Here’s the problem. I always name my images with spaces in the names, but if I put them on the web with spaces, the space gets turned into the unicode for space, which is %20. So a file called “Error in Photos” will change into “Error%20in%20Photos” which looks super dumb.
My solution is to go through and change each one of the spaces by hand into underscores. On every image. Every week. For a decade!
I did a search for “AppleScript replace spaces underscore”. Immediately I was taken to Replace space with underscore at strawhousepig.net where Kevin and Polly had posted exactly what I needed!
The cool thing about AppleScript is that you can read it, even if you don’t know how to write it. Don’t tell Bart, but I was in a careless mood and copied the script without reading it first (which you should NEVER do). I opened Automator, dragged in a Run AppleScript block, and dropped in the code I had copied from Kevin and Polly.
I read far enough in the code to figure out I should probably select some files, and then hit run inside Automator. Up popped a window asking if I wanted to replace the spaces in the listed files with underscores and I clicked Yes. Boom. Spaces gone, underscores in!
I saved the Automator workflow as an application, then opened Affinity Designer and created a white square with a really big underscore on it. I exported that as a JPG, did a Get Info on my new little app, and pasted my stupid little logo into the icon box. Then I dragged my little app up into the menubar of my Finder window.
Now when I’m working on files for upload, I can just drag them onto the icon and my spaces will disappear and turn into underscores. You have no idea how happy this makes me!
Naming Images in Photos
Speaking of naming images, I mentioned that Sal showed us how using dictation he can edit the titles of his images in Photos. This sounded glorious to me. I didn’t really care so much about the dictation part, but I like to name my images and it’s incredibly tedious to do in Apple Photos. I name pretty close to 75% of my images, and as a result even on on my iPhone I can search for just about anything and find the photo I’m looking for.
Let’s walk through the process of entitling images in Apple Photos, with a couple of ways to do that without automation. Before I start though, note that the title of an image in Photos has nothing to do with the file name of the image. By default, images in Photos have no titles.
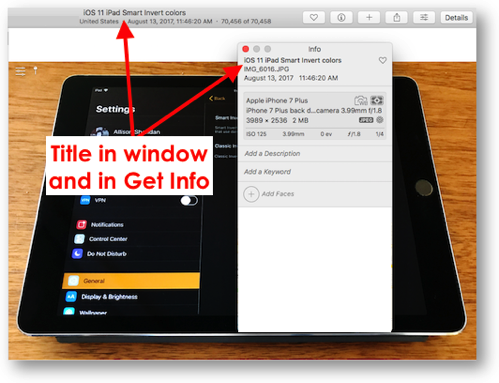
In Apple Photos in the thumbnail view, by default, you don’t see the title of the image. If you go into the menus to View and pull down to Metadata, you can select different options to view, one of which is the title. Once you select it, you’ll see in light grey, “untitled” under your images.
You can also view the title by doing a Get Info on an image. That’s a handy little option where you can also see things like the EXIF data of your image – camera, lens focal length, ISO, aperture and exposure time for example.
In the thumbnail view, you can click into each title field and type the name you want to give the image, but you have to take your hands off of the keyboard and use your mouse or trackpad to click into the next image’s title field. I hate that.
I also prefer to have the image up big on screen, by double clicking on it. From there you can’t see the title, unless you bring up the Get Info window I talked about. But naming in Get Info is even more tedious.
Let’s say we’ve got the image up big, and we’ve already brought up Get Info. Click in Get Info in the title field, type in the name, move your hand to the mouse/trackpad, click into the main photos app, and hit the right arrow to advance to the next slide. Now use the mouse/trackpad to click back in the Get Info window once, and again into the title field. Rinse and repeat. Soooo annoying.
When Sal demonstrated his script on stage, he started by selecting a bunch of images, and then dictated the words, “assist me with adding titles”. The script launched, and then changed from the thumbnail view to show the first image filling the window. There was a popup window asking him to fill in what he wanted the title to be, and when he hit enter, Photos advanced to the next selected image so he could add the next title. Like I said, the dictation part wasn’t what I cared about; it was being able to type the image title, hit enter, type again until I was done naming the images that was so glorious.
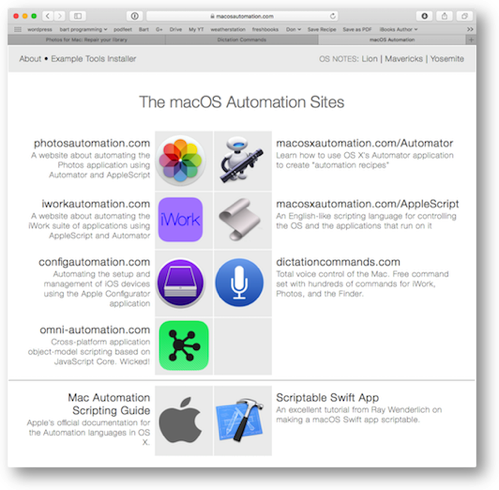 The coolest thing about Sal isn’t how brilliant and inventive he is. It’s that he has this innate desire to share what he knows. He’s the only person inside Apple who was ever allowed to give external presentations. While he was working at Apple, he created a ton of cool automation sites. You can now find them all together at macosautomation.com. He’s got a certificate problem at the site as I check it right now, but you can get there by macosxautomation.com too and there’s no mismatch to the certificate.
Anyway, from there you can go to dictationcommands.com to find the scripts he demonstrated at CMD-D. He’s got great instructions on how to download and run the commands. It’s not a short procedure, in fact there’s a lot of steps I don’t completely understand, but when I was done I had all of the commands he’s written for dictation.
In the menubar now, I’ve got a little AppleScript icon that when tapped shows me all of the scripts I installed. For some reason I can’t invoke them with dictation (even though dictation itself works just fine for typing), but that’s cool, I can get right to the one I want using the pulldown.
So with great excitement, I used the script entitled AssistWithAddingTitles. I selected some images, ran the script and up popped a nice window where I could add a title and a description and advance to the next image. Very cool!
But here’s a problem. When I finished adding titles to the selected images, only the last image had a title! Argh.
Well, I’m a big ol’ hotshot AppleScript developer now, right? I decided to write to Ray Robertson, the guy that taught the AppleScript class at CMD-D and ask him how to fix Sal’s script. His answer was great – he wrote me a new script instead of trying to pile through all the stuff Sal wrote.
Ray’s script was only 9 lines long, while Sal’s scripts went on for pages and pages and pages. Sal’s did more stuff, but I only needed what Ray wrote.
Ray’s script did let me add titles, but it kept the view of the images in the thumbnail view, and showed all of the images selected as it let me name them. So I couldn’t tell which image I was naming.
I figured I shouldn’t bother the teacher anymore. If it’s a nine-line script I should be able to figure out how to make it do what I wanted. All I needed was to add a line to say that after it receives the selected images, make the first image fill the window, and repeat that step as it iterates through all selected images. How hard could that be?
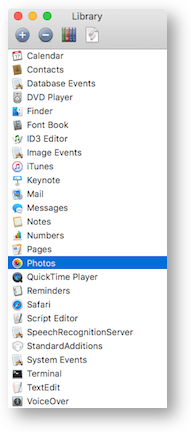 Turns out, much harder than I expected. AppleScript has what they call Libraries, one for each scriptable application. I learned all about these libraries from Ray’s class. If you find the right library, you can see all of the commands available to you and what kind of actions they take and what kind of objects they can modify. It’s really cool.
There’s only one rub. To search for a command, you have to know what Apple called it first. You can’t search by what it does. So I want to find the command that embiggens the image from a thumbnail to filling the window. You do it by hand by double clicking or by hitting the space bar. So what would Apple call that?
I read every single line in the Photos library, at least three times and I couldn’t find anything that made sense. Then I thought maybe I could figure out how to tell AppleScript to double click! I found another library called System Events, and found online that you could tell System Events to click by sending the command ‘tell application “System Events” to key code 49’ where key code 49 is the space bar. I tried it, and that didn’t work.
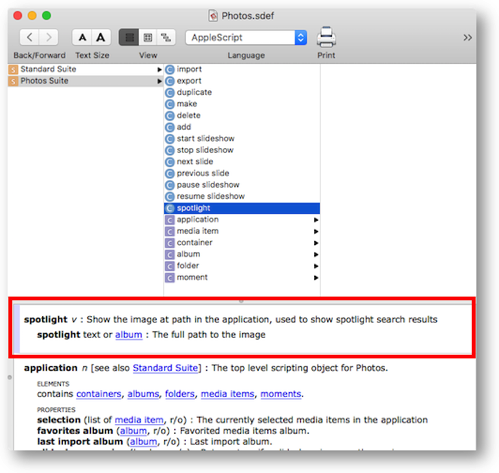 After two days of futzing around and not getting much done, I gave up and contacted my resourceful scripting buddy Dorothy. She spent a bunch of time looking through the Photos library for AppleScript and finally just started trying commands to see what they did. She finally found it. The command is called Spotlight. Well sheesh, Spotlight is the search tool. Quick Look is how you can embiggen something without opening it using the space bar! I call foul.
I have to admit that Steve did suggest Spotlight earlier to me, as he’d seen it in Sal’s script when I was showing it to him and complaining about this problem, but I dismissed it because Spotlight has nothing to do with Quick Look.
Anyway, I tried the Spotlight command in Ray’s script and sure enough, it brings the image up while I’m titling the images! Dorothy and I did Skype high fives and I was so happy. Until I noticed that the titles weren’t sticking, JUST like with Sal’s script. I did some more poking around and discovered that the titles actually are still there, but not visible under the thumbnails. I can see them in Get Info and in the top of the window when the images are in full window mode. I can quit Photos, and reopen, and the titles show up in thumbnail view. I tried rebuilding my 60K photo library but the problem persists.
So the bad news is something is dodgy in my copy of Photos. The good news is that there’s nothing wrong with Sal’s automation script. The bad news is I don’t know how to fix this. The good news is I had fun learning from Ray and from Dorothy so it was a good exercise.
Workflow
David Sparks talked at CMD-D about Workflow for automation on iOS, so now I might have to buy his Video Field Guide on Workflow. No better way to learn a tool than to have David spoon feed it to you.
I got more interested in Workflow recently because of a comment back from a listener. Bart and I were talking about removing location data from photos before posting them to social media. Bart recommended an app that would do this for you on iOS. I tried it out, and it was a bit clumsy with a fair amount of overhead.
Jonathan, who goes by @nuclearjon, tweeted out that he heard us talking about removing EXIF data, so he wrote a Workflow to do it for us. I hadn’t ever run a Workflow before, but I followed his link to the Workflow and added it to the Workflow app, and it does exactly what I wanted. It’s actually less clumsy and more useful than the app Bart and I talked about. I put a link in the shownotes to Jon’s Workflow script so you can see how it works and play with it yourself.
Keyboard Maestro
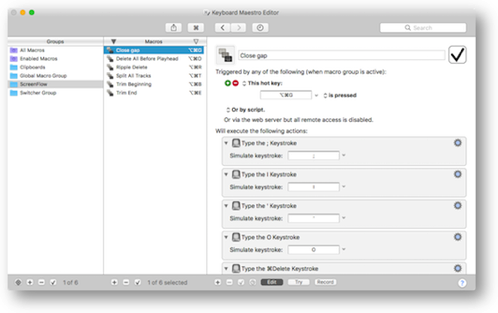 I’ve been planning forever to learn how to use Keyboard Maestro. Much like Automator, you drag steps in to be followed and with a single keystroke you can execute magic. In January, listener Dick Nelson told me he’d help me get started.
I got motivated to learn Keyboard Maestro by a couple of things. When I did my presentation at CMD-D, I demonstrated how I created an Automator app to launch all of the applications I need when I do the live show. It’s a very unsophisticated app. It basically says, “launch Webcam Settings. Launch Moom. Launch Nicecast…”
Anyway, after the presentation, Jason Snell made a point of telling me that he has an almost identical script for his live shows. We use a lot of the same apps so it was fun for him to see me doing the same thing. I mentioned Nicecast. This is an app from rogueamoeba.com that allows me to pipe just my audio to an Icecast server that Bart built. While most people watch the video feed of the live show, the audio-only feed can be great if you’re on the road. Kevin likes it because it’s actually slightly ahead of the video feed from YouTube, so he can be clever faster in the live chat room.
Anyway, this was supposed to be about Keyboard Maestro. Jason explained that he uses two different Icecast servers for his different shows, so after Nicecast launches, he has to use a pulldown to select the server. Icecast isn’t scriptable to that granularity, so he used Keyboard Maestro to do the pulldown. Get this – he said that he took a screen capture of the button that needs to be pushed in Nicecast and gave the image to Keyboard Maestro and told it to click 5 pixels to the right of that image. That’s crazy talk! I totally need to learn how to do this!
And then I was learning all about the new ScreenFlow 7 from Don McAllister on ScreenCasts Online, and he demonstrated how he created a bunch of really useful keyboard shortcuts for his work with ScreenFlow. He showed how they worked and then explained that he’s made them available online for others to download. I need those! So I’d better learn Keyboard Maestro.
So take this as fair warning, Dick: I’m fixing to make a plan to actually learn Keyboard Maestro and you’re the first person I’m going to bother when I get stuck!
I entitled this article, “I Want to Automate All the Things” because I can’t stop here. I want to script up ID3 Editor that I use to edit the ID3 tags for the podcast episodes, I want to modify my DropShadow app so I don’t have to paste the title back in every time.
I’m telling you, automation is like a madness! I can’t stop!

Spaces into Underscores?
Easy.
I just created a folder with three files. Format of name: “PictureSubject YYYY MM DD ###.jpg”
Highlighted all three files and selected “Rename three files” from the Drop Down Menu.
MacOS rename box opens (this computer is still on El Cap)
Q: Find – If you want to replace blanks, just hit enter
Q: Replace with: enter the _
Replaces all the spaces in your selected files with _.
Everything right with learning how to go “up a level” with Apple Script if you want, but not necessary for that particular task.
Name Mangler offers much more powerful options, including programmable “Droplets” for actions you’ll repeat often.
What drop down menu?
I figured out what you mean – right click on the files selected and you get Rename as an option. That’s pretty slick, George! I like it! I also like that it saved my terms when I went to do it a second time so it’s all ready to go. Love it!
Apple UI now hides some features. For simplicity? Sometimes a Right or Option or Ctrl Click will open a surprise door to SuperPowers.
Allison, perhaps i just missed it but would you be willing to post the short Applescript for titling photos?
Anything to make Photos better is good. I still miss Apatute . Besides Photos , for me, is notoriously bad at importing images (not a fan of icloud sync because unless yiu optimize photos you run out of space. But when you optimize on an ios device editing those images and videos on the ios device becomes iffy because you dont have the full rrsolution file. Sonetimrs getting that downloDed can be a real pain).
Kenneth – I really should have done that!
tell application id “com.apple.Photos” — Photos
set selectedPhotos to selection
repeat with i from 1 to count selectedPhotos
set thisPhoto to item i of selectedPhotos
spotlight thisPhoto
display dialog “Enter the name of this photo and say ’Thank you, Ray’:” default answer “”
set thisName to text returned of result
set name of thisPhoto to thisName
end repeat
end tell
I’m studying other scripts to figure out how to add a skip button next.
Thenks. I wonder if my Photos is mucked up line yours brcause spotlight dorsnt seem to fo snything to the desired phito.
As a trsult i drvided to dudt off tusty scripting skills, make use of snippets from websites, and spend some time coming up with a work around that tskrs photo names snd captions i put in a text file and adds them to selected photos. From the standpoint of bulletproof coding it is not a thing of brauty but it works. It gives me the advantage that i can write caption ns in a nice trct editor and keep them.
If there is interrdt ill share it but i need to sit fown at the Mac and i sm not there now. (As iPhone induced typos will show).
I think you made a wise decision once you decided to rename all your images with blank space between words and use underscore instead. Personally, I use dash. 🙂 Good tips Allison!