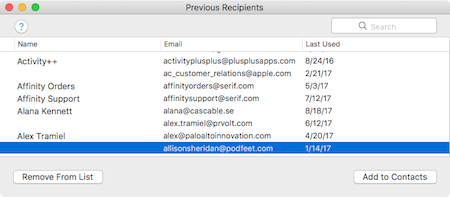
 There’s a rather hidden feature inside Apple Mail that is helping you right now but may trip you up in the future if you don’t know what it does and how to manage it. It’s called Previous Recipients.
The problem Previous Recipients solves is this. You get an email from someone with whom you haven’t corresponded before. Maybe you know them but you don’t know them well enough to have ever added them to your Contacts.
Now at a later date, you want to send an email to them. You start typing their name in the address field, and Apple Mail auto-fills in their email address. This happens because Apple Mail has added their email address to your Previous Recipients.
This can be super helpful, at least to me. If you write to me, there’s a pretty darn good chance I’ll right back, and maybe later I want to ask you a question. I’ll be able to easily do that.
But what happens when you get a new Mac? If you use Migration Assistant and tell it to move absolutely everything, or if you use SuperDuper! or Carbon Copy Cloner and replicate onto the new Mac, you’ll never lose your Previous Recipients.
But what if you take my advice and do a clean install of your OS and all of your apps, and just move your data? Turns out all those Previous Recipients will be gone. But don’t despair – there’s a lovely interface to Previous Recipients where you can do some interesting things.
Open Mail and select Window in the menu bar and from there select Previous Recipients. You’ll see four columns and a search window. For every entry in Previous Recipients, you’ll see the Name of the person (if it was able to figure one out), the email address, and the last date the address was used.
But to the far left, there’s actually a fourth column. For some recipients, you’ll see a little address card symbol. If you click on top of that column, it will sort all of the addresses you have in your address book to the top. Those aren’t the really interesting ones because when you copy your address book you’ll get those just fine.
Click the column again to see all of the address you don’t have in your address book. There are really two useful things to do now. As you scroll through the names, you can decide who you’d really like to be able to easily communicate with again, and for those, you can select “Add to Contacts”.
In some cases, you’ll have a name that keeps popping up in your way when you’re typing someone else’s name. For those, you have a button that says “Remove from List”. I highlighted one in mine that says allisonsheridan@podfeet.com. No idea where that came from because that’s not a real email address! Boom, it’s gone!
You might also have OCD (a significant number of geeks seem to be afflicted in that way), in which case you’ll really like to be able to remove all of the names that aren’t in your address book.
Back on those people you want to add to your address book. In some cases, Mail.app hasn’t figured out their name or maybe you want to add more info to their newly-created address card. If you double-click on the little address card icon that is now next to their name, it will open Contacts to show their card where you can happily edit away.
You’ll be seriously surprised at how many addresses you thought you had in Contacts but only seemed that way because they were in Previous Recipients. It might also explain why when you tried to send an email to someone using your iPhone or iPad and Mail on those devices couldn’t find them!

