 I’ve got a lot of photos. And by a lot, I mean 72,928 of them in Apple Photos. While I’m quite fond of Apple Photos, I’m annoyed by a few things. It’s pretty slow on the Mac (I can’t imagine why) and the iOS app is pretty limited in what you can do with it. What if there was an app that worked within the Photos library but also gave iOS a seat at the big girl table in terms of editing and more? HashPhotos from beyondf.com/… might be the solution to these problems.
HashPhotos is incredibly powerful. I found a list on the App Store web link of all of the features of HashPhotos and it is an enormous list. It’s clear that I will have to do a ScreenCasts Online video on this tool in order to explain all of it and the intricacies of how it works. But here I want to talk about the features that have really caught my eye.
Pricing
HashPhotos is gorgeous on both iPad and iPhone and is under the freemium model. If you buy the all-in-one pack, it’s going to set you back the grand sum of USD $3.99. You can pick and choose from six smaller packs for a dollar each, but after you hear what HashPhotos can do, you’ll probably want to dig in the couch cushions for the $4. As I went through the app I tried to note where I ran into the option to upgrade, but I’m sure I didn’t catch them all. They let you try each feature up to 3 times before paying so you can decide what’s worth it to you. Spoiler alert, I’m going to pay the $4!
Performance
I am blown away by how quickly HashPhotos works with my giant photo library. Just opening the library and switching albums on my iPad Pro or iPhone X is significantly faster than performing the same functions on my MacBook Pro.
Basics of HashPhotos
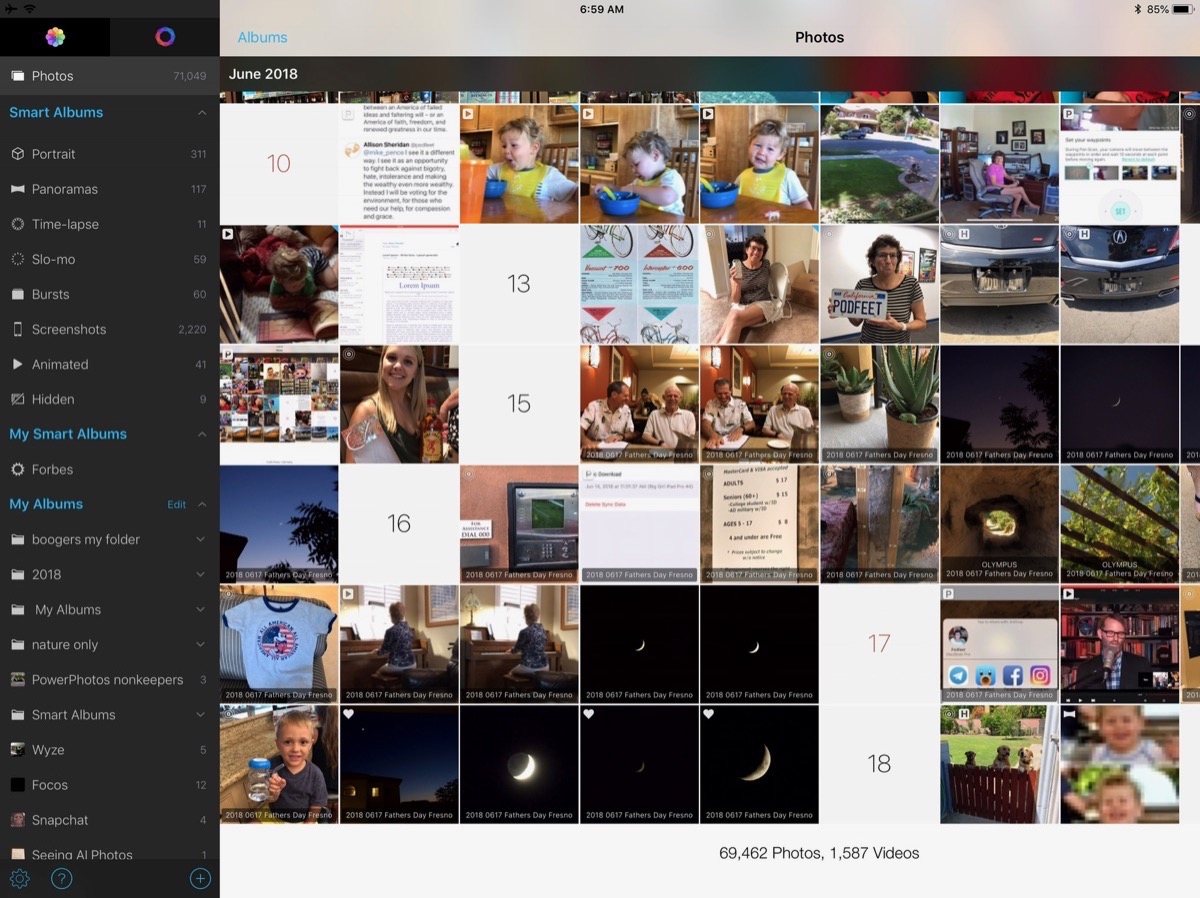 When you first open HashPhotos you’ll immediately feel at home. The left sidebar (which slides out of your way automatically when it’s not needed) shows you the same album and folder structure you see in Apple Photos because it really is looking at your Photos library. You can see the built-in smart albums Apple creates for you like Selfies, Live Photos, Portrait, Panorama and more. You can also see the section Apple calls My Albums. My Albums is where your carefully curated folder, subfolder, and album structure lives – if you’re anal retentive like me.
Photos themselves take up most of the screen showing as square thumbnails. In preferences, you can change to rectangular thumbnails and also change the size from small up to extra large. HashPhotos shows little symbols and words on photos to give you a hint about them and their origin. For example, I saved a couple of videos and photos from SnapChat and the thumbnails actually say snapchat on them. Favorites marked in Photos show the familiar heart symbol, and videos have a little play arrow in the corner. I haven’t figured out what all of the symbols mean yet, but I’m piecing them together through observation. For example, P evidently means screenshot.
The default view shows the latest month, and it baffled me for a while how to jump to another month or year. I discovered eventually that a swipe with one finger from right to left reveals the timeline with every year and month in blue, so it’s super easy to jump to the time you want to view.
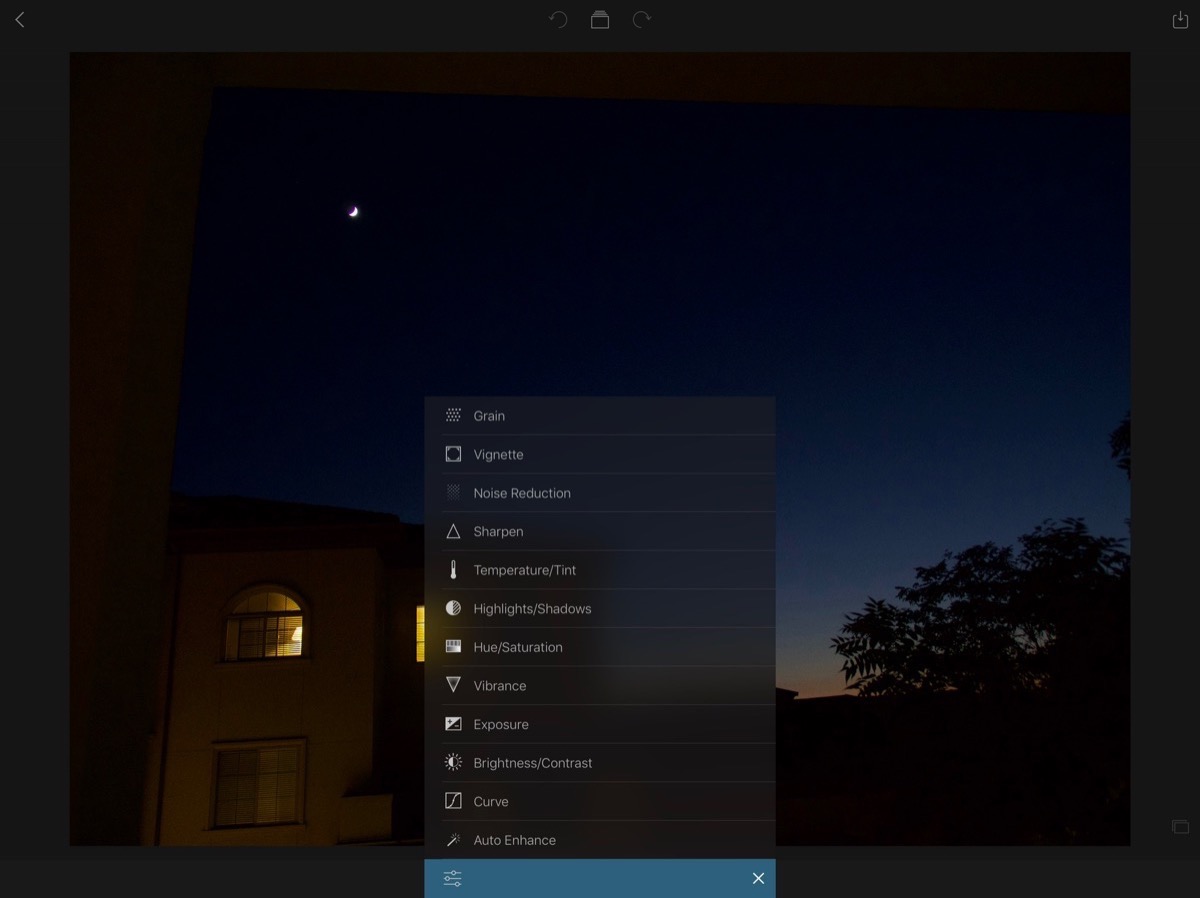 HashPhotos isn’t quite as capable as Apple Photos in image editing, but it does have a pretty impressive set of editing tools. The most common tools are right up front when you to edit an image. You can rotate 90° or 180° and execute a crop under the first edit icon. In the next icon, you can add grain, a vignette, or noise reduction. You can sharpen the image, change the temperature and tint, adjust highlights and shadows and hue and saturation. I’m a fan of adjusting exposure and brightness and contrast and it’s got that too. For those who like a little more control, you can add a curves adjustment on all RGB levels or individually. And if you just want HashPhotos to do the work for you, there’s an auto-enhance option as well.
You can add frames and filters, and add a shape mask to put your image in a heart or a star if you’re of that persuasion. You can overlay an image over an existing one, you can draw on your image, blur out a section, add tilt-shift, stickers and text.
At the top of the edit window, and in light grey so I almost missed it, is a button that lets you scroll back through your changes to an earlier version. That’s pretty cool!
After you’ve made your changes to your masterpiece, you need to decide whether to commit to the changes. In the upper right is an icon that looks like a save icon but actually does more than that. It has an option to open in another application, send directly to email or messages, or you can save a copy. This last option saves back to Apple Photos. Before you save or send the image along, you get to choose between small, medium, large or full size and it even tells you the dimension of the resulting file.
One of the best features in HashPhotos is that you can turn off metadata and location before sending to social media. It drives me around the bend how Facebook insists on sharing my location from my photos no matter how many times I tell it to stop. With HashPhotos I can open a photo, make edits (or not), flip that slider off, and my location will be stripped from the photo before I open it in the Facebook app.
But Wait, There’s More
If you’re super organized like me and put your images in albums and folders, HashPhotos has you covered in some interesting ways. If you create a new album in the left sidebar, you can choose to create what they call “My Album” which actually creates an album visible over in Apple Photos. Likewise, Add Folder creates it in Apple Photos. That means I can really triage my photos and get them organized right within HashPhotos.
But it also has private albums. You assign a global 4-digit pin to protect your private albums from prying eyes, and then any album you create that’s private will be protected by that pin. They do explain in a popup that the photos and videos are not actually encrypted, but it does give you a measure of privacy. They also explain that private albums only exist within the HashPhotos app, so no other applications can access the images within a private album. They’re serious about this. When you move images into a Private Album, you’re asked whether you really want to delete these photos from iCloud Photo Library on all of your devices.
I created a private album called deleteme and for the life of me I couldn’t figure out where it put the album. Then I noticed at the top of the list of albums there was an Apple Photos icon and a HashPhotos icon. I tapped on HashPhotos and after entering my pin I could see my private album.
You can also create normal albums that only live on HashPhotos. They call these local albums, and you access them using the HashPhotos icon I mentioned in talking about private albums. Private and local albums are part of the vast sum of $4 you can pay for the super pack of features.
I’ve been annoyed that Apple Photos on iOS doesn’t allow us to tag or name our photos. HashPhotos has a partial solution. In HashPhotos you can add tags to images, search by them, and make smart albums by them. Sadly this tagging data does not appear to sync back to Apple Photos keywords. I’m just betting that if Apple would allow it, HashPhotos would be able to do it. This means that whatever you add to your images here is only of value inside HashPhotos. Along with support for tags, HashPhotos lets you write entire paragraphs in memos attached to your images.
In Settings, there’s a section entitled Sync (beta). The menu says that with syncing through iCloud or Dropbox you can sync your tags, memos, events and my smart albums (the local ones) between devices. It’s labeled “Manual sync” though and they really mean that. After I told my iPad Pro to turn on syncing via iCloud, I looked at HashPhotos on my iPhone and none of my tags had come over. But then I looked back at the iPad Pro and it had a new button that said “Sync Upload”. I selected that and then looked over at my iPhone and it now said “Sync Download”. Finally I had my synced tags and local folders over on my iPhone. Better than nothing but it would be cooler if I didn’t have to remember to push sync.
Find Duplicates and Similar Images
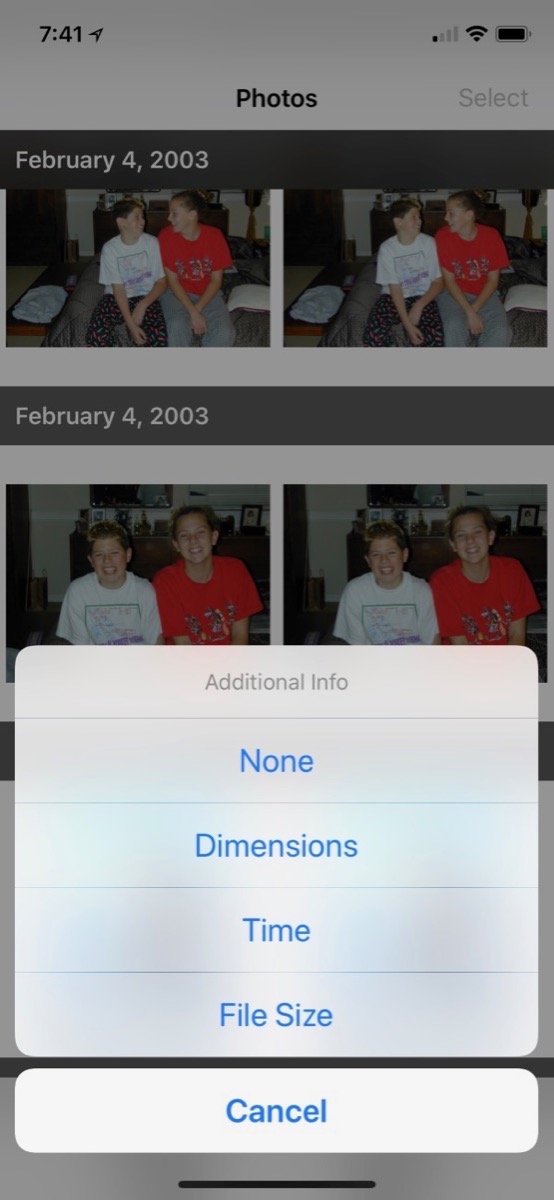 HashPhotos has some really advanced features too. One of my favorites is that it will help you clean up duplicates and find similar photos. You would think that with a library of 70K+ images, checking for duplicates would take a really long time, but that’s the beauty of HashPhotos: it’s FAST. It took 37 seconds to find 273 duplicates. In the viewer on even the smallish iPhone X screen, you can easily see that the images it found are indeed duplicates. But if you want to check to be 100% certain, you can choose to see the dimensions of the images, the time they were taken, or the file size. I wish I could see all three metrics at the same time but it’s super fast to flip between them so it’s still really helpful.
On similar photos, it found 13,922 in my library and again it was super fast. This proves that I truly don’t Bart my photos as much as I think I do. With the dimensions turned on, I was able to see a ton of images where I’d saved smaller versions for various reasons and I was able to quickly triage a bunch of them. It was such a fluid and enjoyable process that I had to stop myself from doing it all afternoon. This would be a great thing to do while watching TV or stuck on a plane. I should mention that in similar photos, you get the choice to select an image to delete, or you can tap a button that means “not similar”. If you have a bunch of photos that are similar to each other, it doesn’t give you this overwhelming set, you only view two at a time. If you delete one, it will gracefully slide the image up into view for comparison again.
Any images you delete while using this functionality are deleted over in Apple Photos, which is exactly what I want. Surprisingly this feature is not one of the paid-for features, but it really should be.
Send to Mac/PC
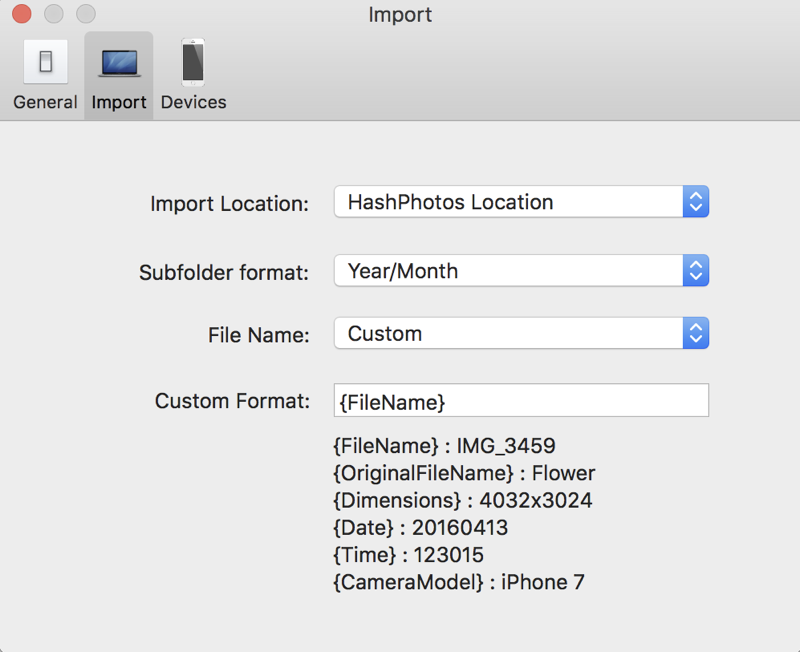 You may not be an iCloud Photo Library person and instead you may want to manually import images from your iOS device to your Mac or PC. HashPhotos has a beautiful way of doing this. You download a small app called HashPhotos Transfer to your desktop and launch it. On the iOS device, you choose import/export and then tell the app whether to trust your desktop. From that point, you can simply tap transfer and your image swooshes over to your Mac. This is a paid feature, but HashPhotos lets you try it three times to see if it works as you hope it will.
When the images whoosh over to your desktop, they go into a dedicated HashPhotos folder (or one of your choosing). You can choose the subfolder format but by default, it organizes them by Year/Month. You can set the file naming convention, choosing the original file name, date and time, sequential or even a custom name They give you an example of how to identify the information from the EXIF data to put in the custom name. Very cool.
Sharing vs. Link
With a photo selected, there are two icons that appear to do the same thing. I’m sure there’s a difference between them but I haven’t yet figured it out. There’s a typical share icon (the box with an up arrow) but there’s also a link icon. Both icons when selected reveal a row of options to share your image. You can send the image via Messages, email, or to any other messaging or social media apps you have on your iOS device.
But it’s the row of icons below the social sharing options where HashPhotos gets really interesting. Beyond some of the usual suspects like save to Files and save to Dropbox, you’ll see some unique options.
-
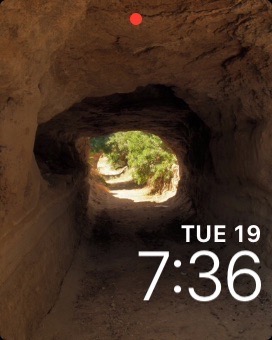
- Create Watch Face – When you choose Create Watch Face, you get an option for the Photos watch face or Kaleidoscope. As soon as you make a choice, it adds the Photos Watch Face to your Apple Watch. I didn’t have the Photos watch face enabled on my watch before testing and sure enough I had it after using HashPhotos to add a photo. I just wish I’d chosen a picture of Forbes, but it’s very interesting that HashPhotos had the ability to write data to my watch.
- Set Location – You can change the location of an image, or select a group of images and batch change their location. When you choose Set Location, you drag a map pinpoint around. This is a paid feature btw, again for $4. My big girl camera doesn’t have geolocation so I might go back through my big vacations and set the location manually using HashPhotos.
- Adjust Date/Time – Just like changing the location, you can also change the date and time of images. This could be helpful if you’re like me and forget to change the time on your big girl camera when you’re away from home and then your images don’t line up next to your mobile phone photos.
- Slideshow – If you select multiple photos, you can create a slideshow with music and transition options and choose how long the images are on screen. You can set it to shuffle and even repeat. It’s fun to play with but I don’t see a way to save your slideshow which would make it a bit more useful.
- Hide – There’s a button to add your selected image(s) to the Hidden album in Apple Photos. I had entirely forgotten that even exists in Apple Photos.
- Resize – While we already talked about the image editing tools in HashPhotos, there’s also a simple resize option in the Share icons. This is useful when loading an image to social media or your blog where you want to limit the size. You might want to do this as a courtesy or perhaps to make sure your highest quality artistic images aren’t posted online. In Resize, you give it a pixel dimension and then decide whether you want to resize by max dimensions, width, height, shortest or longest edge. In the same Resize section, you can also strip off the metadata at the same time. After setting the options you get a choice of whether to save over the existing image, save a copy, or simply go right to sharing it online. Pretty quick and easy. Again a paid-for option but you can try it 3 times first before buying.
- Remove Metadata – If you only want to strip the metadata, there’s a button for that too. You can choose to remove the EXIF data, or the location data, or both.
- Live Photo to Still – If for some reason you didn’t want an image to be a Live Photo any longer, there’s a button to simply delete the Live version and keep the still image.
- Send to Mac/PC – Remember the Send to Mac/PC option I mentioned earlier? That’s available under the share icon too.
- More options when you select multiple images
- Compare and Pick – As much as I believe in Barting my images, I find it really hard to choose between them, almost as though I’m choosing which child I love the best! If you select several similar photos and then Compare and Pick, HashPhotos will reveal just two of them at the same time. One is the chosen photo by default, and the second one can be swiped to reveal other images. I was able to do this with 15 MB RAW photos from my Olympus EM5 camera. It wasn’t super fast to reveal the images because it had to download the originals, but I was able to zoom in and pan around with my fingers and see the histogram to fully compare. Compare and Pick is a paid feature and in my opinion worth the entire $4. I had to stop myself from triaging photos several times just to work on this article, it’s that much fun.
- Find Similar Photos – Again after selecting several photos, you can choose to have it show you similar photos while viewing the dimensions, time and file size. If I’m manually choosing the photos, I’m pretty sure I can tell if there are similar photos, can’t I? Maybe it’s a way of triaging an album at a time instead of all of your 72,000 photos at once?
- Convert to GIF – If you’re an animated GIF fan, you might like the option to create one from a series of images. There aren’t many controls though. You can set the delay between frames, the GIF will always be square, and you can’t reorder the images.

-
- Combine Vertically/Horizontally – You know those cute film strips you can take in a photo booth? With HashPhotos you can select a set of photos and make them into a vertical or horizontal film strip. Even with a little feature like this, they’ve taken great care to make it customizable. You get a slider for the gap between images, you can round the images, and change the color of the frame around them.
Video
I know I said I wasn’t going to go over EVERY option in HashPhotos but I can’t figure out where to stop! Would you believe it will let you work with videos too? In the share sheet option, you can save the current frame as a still shot which is really useful. In the editing button, you can do much more. How many times have you started recording in portrait mode and suddenly realized you should have done it in landscape (or vice versa?) If you switch partway through, you could open your video in HashPhotos, use the handles to trim out the beginning before you rotated, and then use the rotate tools to rotate it back to look right. Awesome feature.
Just like with images, you can do a lot of adjustments to your videos. You can add a vignette, sharpen the video, change temperature and tint, adjust highlights and shadows, change the hue and saturation, add or reduce vibrance, set the exposure or change brightness and contrast. I took a video of Steve’s mom playing piano the other day and her light on the music blew out the exposure – everything else in the video was in shadow. Using the highlights and shadow sliders, I was able to bring down the light on the music and bring out the couch and piano and you could even see Steve’s mom. Absolutely amazing for a free photo editing app. No cost for this feature, by the way!
You can export the new version of your video to low/medium or high quality just as you can any kind of image and send it off to all kinds of applications and services. You can even save it as a GIF.
What’s Not to Like?
It was hard to find something wrong with HashPhotos, but there was one feature I couldn’t find. I hope I’m wrong about this, but I couldn’t find a way to search my photos by their image name. I also couldn’t figure out how to search photos by things like flowers or dogs or babies, with the AI Apple has added. The only thing I could search on was tags as added in HashPhotos or by location.
Speaking of search location, that’s actually a super cool feature. Tap on the search button, then the location icon and you’ll see a map of the world and your images as taken in every location begin to appear. You can zoom in, and they separate out into the different regions and cities. I know people have waited for this in Apple Photos for ages, but with HashPhotos it’s already here.
I thought of one more thing I don’t like. I don’t like that I can’t buy it for my Mac too.
Bottom Line
Even without being able to search my photos, I will absolutely be shelling out the $4 for HashPhotos. If it was only for the speed of viewing and editing my vast photo library, it would be a win for me. But there’s so much in here, I’m pretty sure I’ll be using it for a very long time.


Can you use HashPhotos if you don’t have Apple Photos on that particular laptop? I’m still reluctant to give up the disk space to have them all local, so I’d love to try this program first before I let Apple download all my library to my MBP.
Tim- HashPhotos doesn’t run on the Mac, it’s an iOS-only app. It does not require full res photos, it pulls them down on demand just like Apple Photos does. If you don’t have iCloud Photo library on the iOS device, I presume it would work just fine, and you could even use the Transfer to Mac / PC option 1 described. It’s free to find out!
I am looking for an iOS app to do the filling and wondering if HashPhotos might be the one. I need it to:
1- Cull through 1000s of jpeg files. I need to be able to quickly delete photos.
2- Quickly sort remaining photos into albums I define.
Do you think this would be a good app for those things?
Lastly, I think I understood your article correctly that any tags or keywords you attach to a photo in HashPhoto do not stay attached to the file outside of HashPhoto?
Thank you.
Absolutely on #1 and 2. And yes to #3, the keywords do not cross over to Apple Photos. Enjoy, Donna, let me know what you think of it.
Hi and thanks for a good review. Have a question. Can I search for keywords in HashPhoto which I Have entered in Mac Photos?
Per – It doesn’t appear that you can. Search is the one big thing I’m missing in HashPhotos.
Thanks for all the things you do.
I import photos to my iPad with Apple’s SD card reader, and each time my videos are 9 hours behind the actual time they were taken. I use Hashphotos to shift the video metadata to the correct time, but when I import those videos from my iPad to my Mac, they revert to the incorrect time again. Am I doing something wrong? Any help would be greatly appreciated.
You can, however use HashPhotos to tag photos in Lightroom.
Do the following:
1. Import photos from card into iPhoto.
2. Use HashPhotos to tag photos
3. Export photos from HashPhotos to Files app.
4. Import photos from Files app into Lightroom. Will now contain tags in Lightroom.
5. Delete photos from files app once Lightroom is done syncing to cloud.
Will HashPhotos read tags (keywords) created in Lightroom and imported to IOS?
If so what’s the correct export process in Lightroom to create HashPhotos readable tags?
Thx (metadata sync across platform mystifies me)
Thank you for this article. How do I upload to a Facebook group from HashPhotos? When I use the uploaded, I only see iPhotos as an option, and my HashPhotos albums do not appear.
Hi,
I was an early enthusiast of HashPhotos, and even recommended it to friends, who like me bought the full version. Fast forward a couple of years, and I find out that was a terrible mistake. ALL the functions you mention for transferring to Mac (or PC) aren’t nearly as easy. It *only* uses Wi-Fi, and trying to send anything over a few dozen pictures at a time crashes it. The latest devices (I have an iPhone 12 Pro and an iPad Pro). I have Created and “organized” albums in HashPhotos with thousands and thousands of photos.
The only way to transfer them (I found out after much searching, since HashPhotos’ developer hasn’t responded to a single email) is to export them batch by batch from HashPhotos menu to Files (there’s a local empty HashPhotos folder there), and then use file transfer. But when you do that, you lose ALL EXIF (geotag, location, camera info, date, album) information.
So people should know: if you want a great way to organize your photos on your Apple mobile (iOS) device, this is a great app. But if you at all want to them *tranfer* any if that to a desktop, or back it up elsewhere, you’re out of luck.
Don’t be like me and only find that out after years of using hashphotos and creating and organizing local folders. Unless you also don’t care about any of your EXIF info, which transfers automatically with iPhoto, for example…