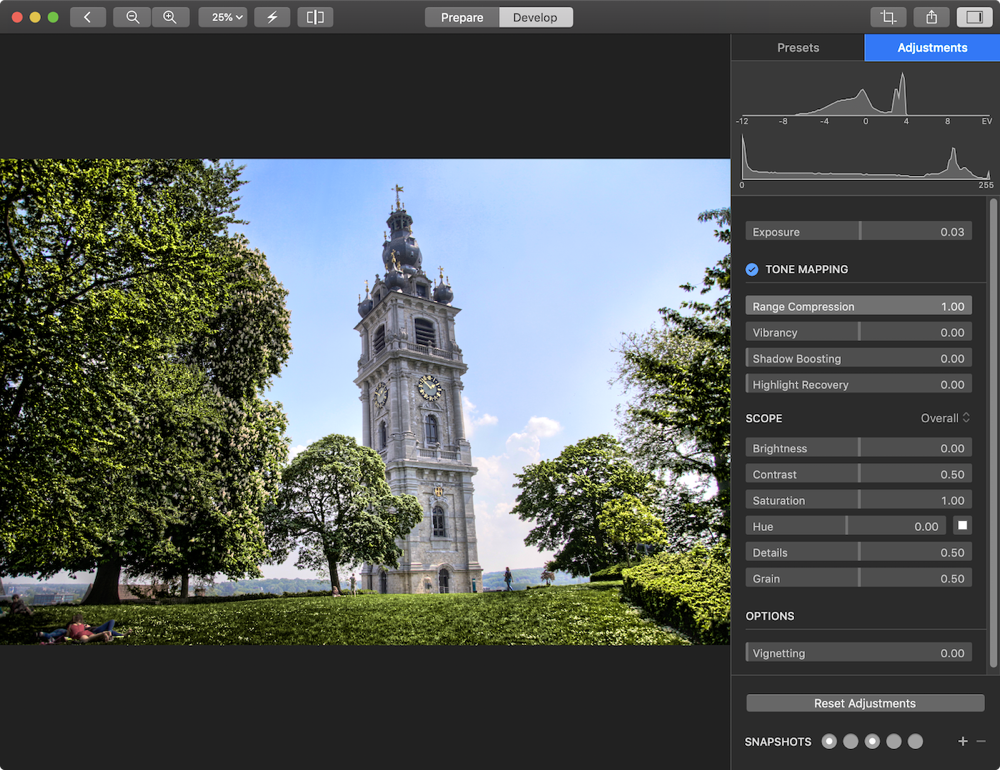
Have you ever noticed that when you look at a beautiful scene, and then take a photograph of that same scene only to find there are dark shadows with no detail, or those puffy white clouds are all one continuous blob of white? That’s because our eyes can perceive a high dynamic range of light, but our camera sensors can’t do that nearly as well. From a phone camera to a full-sized digital SLR sensor, none of them do as well as our eyes.
Luckily there are methods and tools to capture and reveal that high dynamic range, AKA HDR. Recent models of iPhone and Android models all include HDR modes which do a pretty good job of capturing that range, but you can do even more with some tools for your computer.
The darling of the HDR industry is Aurora HDR, but I’m not personally a fan of the policies of the company that creates it. The company’s name is Skylum, formerly known as Macphun. You may remember that I super excited years ago about a suite of product they created called Creative Kit 2016.
You never heard me talk about them again because they have a habit of abandoning products that are only a year old and starting fresh. The products that I told you about in many cases don’t exist, and upgrading is very expensive.
With Aurora HDR they didn’t abandon the tool but they charge a fortune for upgrades. The software is $99 and upgrade pricing is $59. I did some testing of Aurora HDR 2018 vs 2017 and I couldn’t find much to be excited about, especially paying 60% of the price of the original. They do this every single year too.
All that is a precursor to telling you about an HDR photo editor alternative called Hydra for macOS from Creaceed, This is not to be confused with Hydra for iOS from Creaceed, which is an HDR camera app, not an editor. I may talk about that at some point but let’s stick to HDR photo editing for now.
Now that we have a problem to be solved (creating photos that better represent what the eye can see), and a reason why this isn’t a review of Aurora HDR, let’s take a look at Creaceed’s Hydra for macOS. I’ll simply call it Hydra from now on but remember which one I’m talking about.
Pricing
Hydra is half the price of Aurora HDR, coming in at $49 in the Mac App Store or directly from the Creaceed website. The website also offers a free trial so you can try it out before you buy.
HDR vs. Tonemapping
Before we talk about how to use Hydra, let’s review the concepts of HDR and tonemapping. Traditional HDR is where you take several several images at different exposures. You take one at the optimum exposure, one under exposed and one over exposed. You can take even more photos, going from 3 to 5 to 7 on up. Some higher-end cameras have a mode where they take these photos in quick succession for you so you get them taken with the same framing. The tools for HDR can forgive some difference in framing of each image, but tripod is highly recommended for capturing multiple exposures. The photos you merge into an HDR image can be simple JPG images or uncompressed RAW images.
Tone mapping is the process of pulling out the data from a set of images merged together. The applications take the detail in bright white clouds from the under-exposed image, and pull the shadows from the over-exposed image, getting the best of both worlds. If you don’t have multiple images, you can still do tone mapping, but it needs to be from an uncompressed RAW image. A RAW image can contain high enough dynamic range in the file, but it can’t expose all of it to you without the assistance of an HDR program.
Whether you combine several images, or use a single RAW image, the process of creating the HDR image is called tone mapping.
Importing Images
There are several ways to import your images into Hydra. You can use the standard image browser which will reveal your Photos library. I’ve never found that tiny window to be that useful with my excessively large library, but maybe it works for you. You can also import from your desktop, or you can enable the Hydra extension to Photos that gets installed when you install Hydra.
Images imported at the same time become part of a Project inside Hydra. You can jump in and out of Projects easily to work on different image sets without any need to save your progress.
Prepare Mode
When you first open Hydra, it will show you a sample project that’s really helpful to get started with the app. The sample project is three images of different exposure values. Hydra opens the sample project in what they call Prepare Mode.
Exposure Value
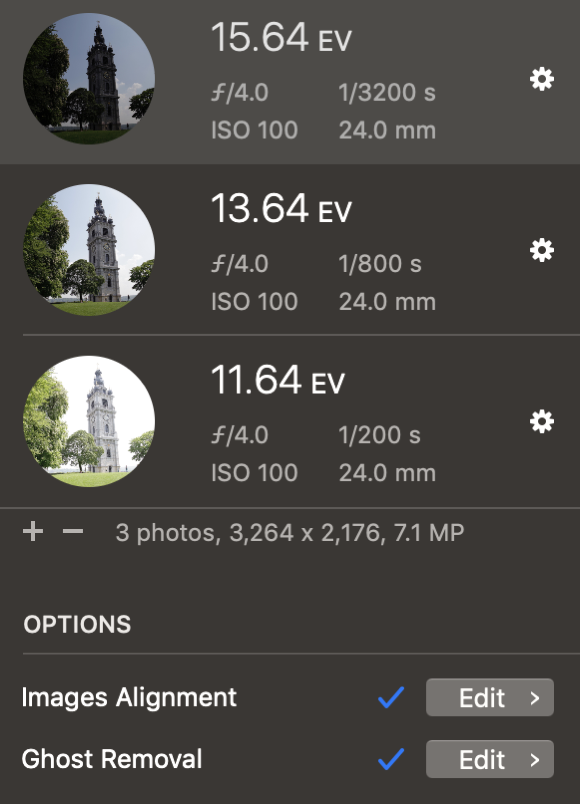 Prepare imports your image(s) and in a side panel shows thumbnails of each of the images. Next to the thumbnail you can see the EXIF data, highlighting their exposure value. You can also see the aperture, shutter speed, ISO and focal length of the lens used.
Next to each thumbnail there’s a gear, which when selected allows you to recalculate the exposure value by changing the aperture, shutter speed and ISO. You normally wouldn’t want to mess with this but the option is there in case one of the values is missing or incorrect. I’m not sure how it could be incorrect, or how you would even know if it was incorrect, but it’s there if you need it. The Prepare Mode allows you to apply RAW sharpening before the images are combined.
Image Alignment & Ghosts
You can choose whether to have the images automatically aligned and whether to remove ghosts. If something moved between exposures, like people walking or leaves moving in a tree, it can cause ghosts which Hydra can attempt to remove automatically.
Unlike some applications, Hydra allows you to edit both the alignment and ghost removal. Editing image alignment is a really interesting process. In the sample image, they show exposure 1, 2 and 3, with exposure 2 set as the Reference. You’ll see four circles on the screen. These are the four points being used during auto alignment. If you select exposure 1 or 3, you can drag the exposure around and change its alignment with respect to the reference.
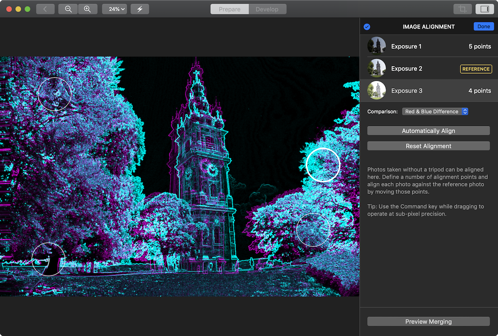 By default, the reference exposure is a blue tint while the exposure you’re moving around is a red tint. This allows you to see the alignment all around the image to find the exact right placement. I put a screenshot in the show notes with the images drastically misaligned to illustrate how it works.
If you don’t like the red/blue tint, you can choose a gray difference, or color blend view while you’re aligning the images, but I think the red/blue works really well. You can zoom in on your image while you’re working and if you hold down the command key while dragging they say you can operate at “sub-pixel precision”. I don’t think I can see sub-pixels but maybe you can!
I did manage in my experiments to completely bork the image alignment to the point I couldn’t get it back, so luckily they’ve included a reset alignment option and an automatically align option as well.
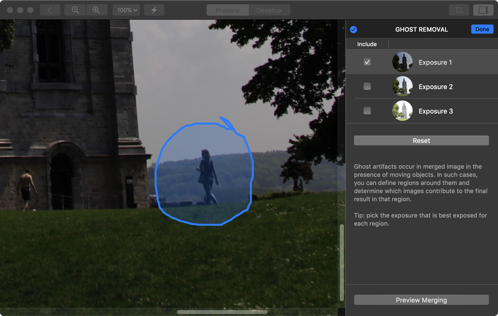 Ghost removal can also be edited, and they do it in an interesting way. The sample project has a woman walking across the grass next to a church. Next to ghost removal is an option to edit. The sample has a scribbled circle around the woman designating the area chosen to remove ghosts.
If you hit reset, the scribble disappears. Then you can flip through the three exposures and when you see the woman where you want her, scribble around her. This will tell Hydra to use that image as the primary one and to remove the ghosts for the other two in that area. Repeat for all areas with ghosts. You can choose Preview Merging, you can see approximately how it will look after the ghosts are removed and alignment is achieved.
Develop
Ok, enough about preparing our images, let’s actually do some tone mapping. When you hit the Develop Mode button, you’ll be shown 12 presets. Apps like Aurora HDR have tons more presets, varying from useful to crazy, with a significant bias towards the crazy end. Hydra has just the 12.
You can’t save your own presets, which is available in Aurora HDR, but interestingly you can copy the adjustments you’ve made in one project to another.
I tend to like the more realistic tone mapping options, so I lean towards the Photorealistic or No Effect presets. It doesn’t actually matter which preset you choose though, because the next tab over is to make adjustments to the image manually, and that’s where the real power is.
Adjustments
I really like the adjustment options on Hydra, but they are definitely more limited than Aurora. What they do have is quite intuitive. Under tone mapping they’ve got sliders for range compression, vibrancy, shadow boosting, and highlight recovery.
The next section under Tone mapping has a pulldown for Scope. By default it’s set to Overall, and you’ll see sliders for the usual suspects: brightness, contrast, saturation, hue, details and grain. With the pulldown for Scope, Hydra lets you apply adjustments to specific features of your image. You can choose to individually modify dark or bright tones, or by color with red, green and blue as options.
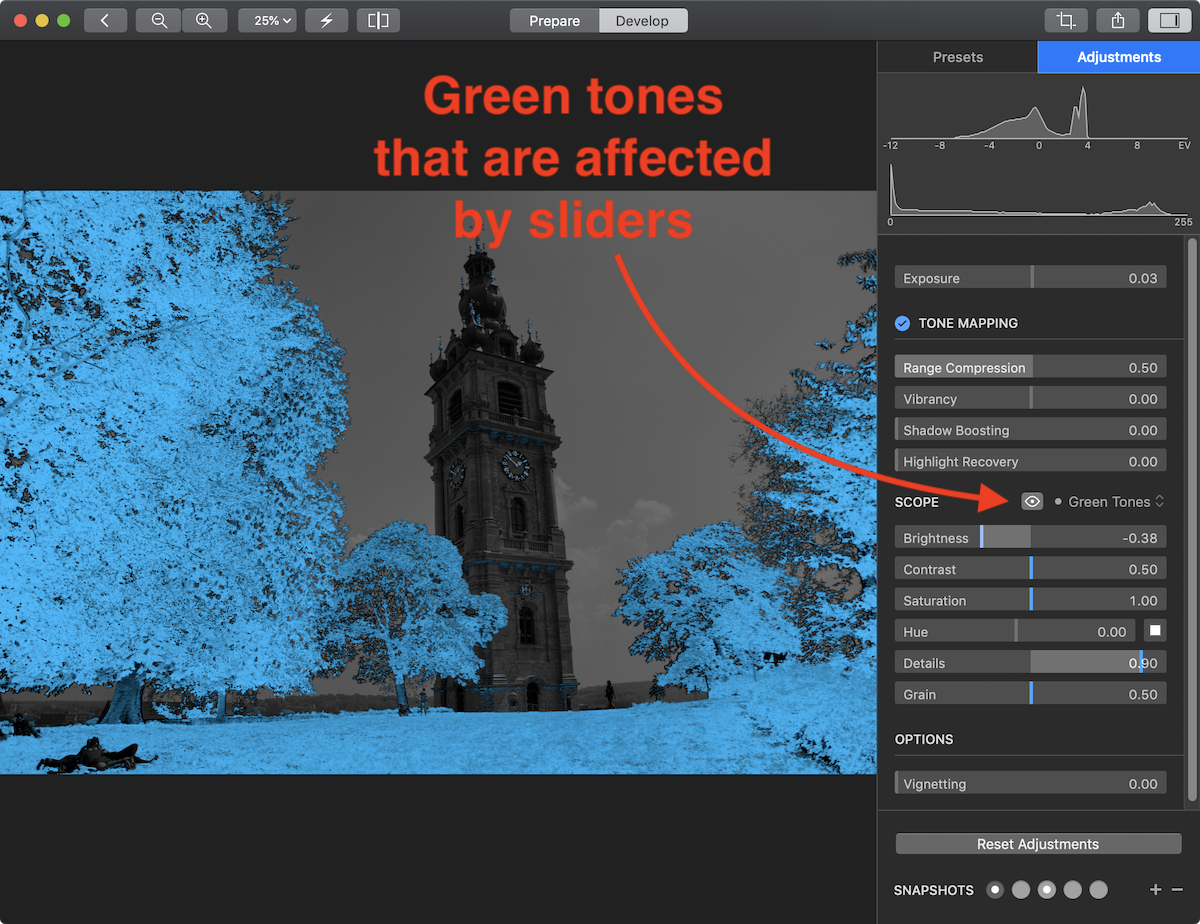 It’s often hard to predict what parts of an image will be affected. To aid you in figuring out where adjustments to red will be applied, there’s a little eyeball that when selected will show you the intensity of red across the image. Haven’t seen that in other tools.
There’s a vignette option in Hydra that only has radius control which is pretty limiting. You can’t change it from a dark vignette to light and you can’t change the intensity, just the radius. I’m not sure applying a vignette inside an HDR tool is that critical though.
At the bottom of the Adjustments window you’ll see five circles where you can save snapshots of your work. Let’s say you’ve got a pretty good looking image, but you want to experiment some more. Rather than trying to figure out how to get back to this known state, click in a circle and tap the plus button to add the current settings as a snapshot. If you find you’ve snapshotted some settings that are not as pleasing as you originally thought, you can simply hit the minus button to remove that snapshot. Probably the most helpful button of all is the Reset Adjustments button which gets you back to square one.
I’ve said I’m not a big fan of Skylum, makers of Aurora HDR, but I did miss some features of their software when working with Hydra. The main thing I miss from Aurora is the ability to affect the top and bottom of an image separately. It’s natural to want to affect the sky separately from the ground, but Hydra has no such capability.
Hydra has a split view that allows you to see the before and after affect of your image adjustments. If you’ve merged multiple images, you can choose any one of the original images to use for the comparison or you can use the unedited, but merged image. I find that sometimes I’ve gone way off the rails with my image adjustments thinking it looks great, but seeing that comparison highlights if I’ve gone too far. In those cases I sometimes find that the original combined image was better than what I’ve done and it’s time to start over.
Flash Extremes
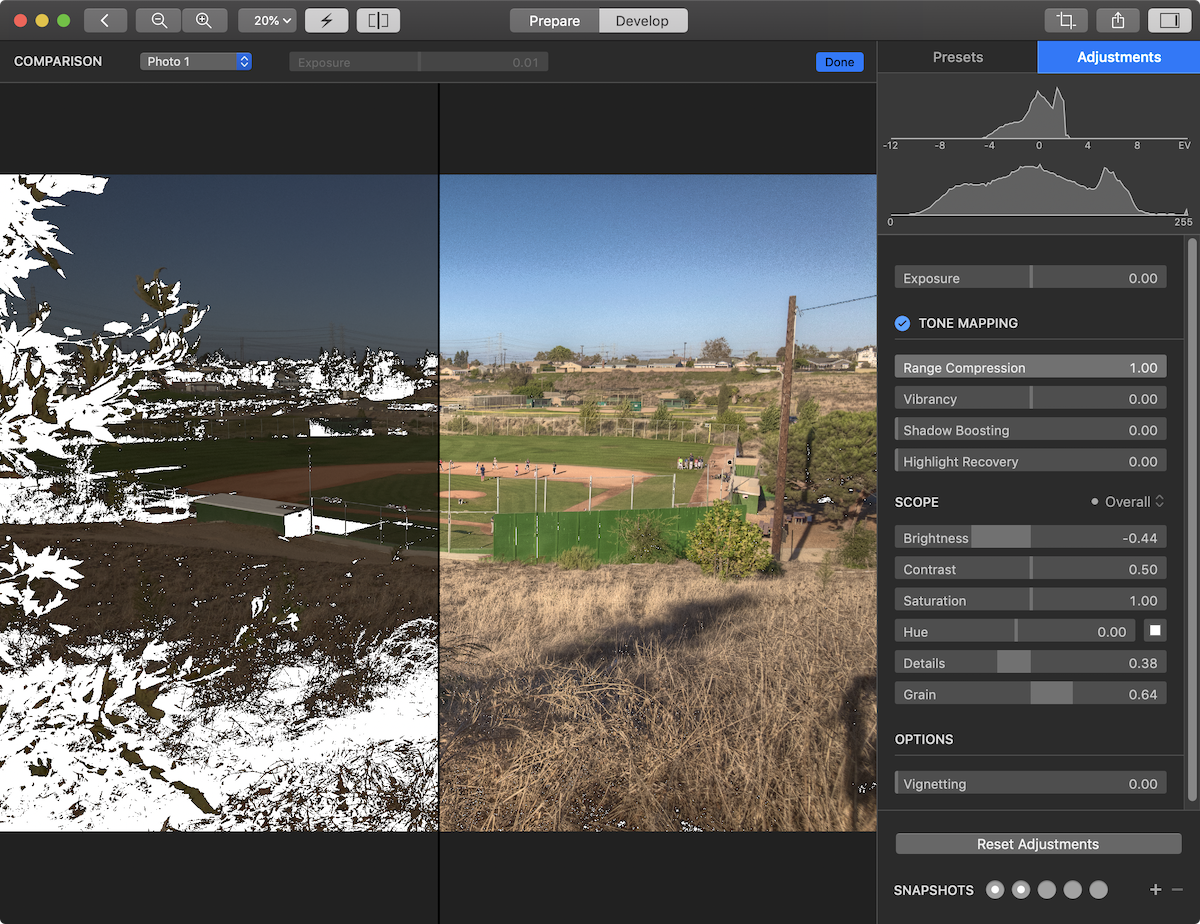 In the Prepare mode we talked about earlier, Hydra includes a tool that will expose the extremes of your images; those areas that are too dark or too light to hold useful information. It’s called the Flash tool and looks like a lightning bolt. It flashes on and off showing black where an image is overexposed, and white where it’s underexposed. The flashing is a bit annoying, but it does allow you to alternately see the image itself and then the indicator of problem areas.
The whole reason we’re combining multiple images is to get all of the information possible across the scene. If you flip through your photos with the Flash tool turned on, you’ll be able to verify that at least one of the images has the information for all areas of the scene.
In Develop mode, the Flash tool is still there but it provides a slightly different function. With the Flash tool enabled, you can easily see the areas of the image that could be improved. If you enable the Flash tool while in split mode, you can see real time whether you’ve got the information in the original images while changing the adjustments on the edited project. It took some getting used to with all that flashing but it really is a unique tool to help improve your final image.
Bottom Line
If you’ve been wanting to try your hand at HDR and want a dedicated tool for the job, I recommend giving the free demo of Hydra from Creaceed a try. It’s easy to use and for $50 is more affordable than Aurora HDR. It’s definitely not as capable but for many it might be easier to learn.
There is another option though, and that’s Affinity Photo for the same $50. Not only is it a pretty good Photoshop replacement, it also has HDR capability. You can import multiple exposures and do many of the same types of adjustments as are available Hydra. It has more presets, and also allows you to create overlays. Overlays are a way of applying adjustments to parts of an image.
For example, with Affinity Photo you can apply a gradient overlay, which allows you to make adjustments just to the sky or ground. You can use a paintbrush to apply adjustments to very specific areas of your image which can really improve an image.
On the other hand, Hydra’s image alignment tools and ghost removal control is more advanced than I’ve seen in Aurora HDR or Affinity Photo. Their flash extremes tool is different than similar tools in other applications.
Hydra is easy to learn which is a good thing because their manual hasn’t been updated since they did a major redesign of the interface. You’ll have to figure it out on your own but if I could figure it out, I’m sure you can too.
I think it’s great that we have all of these options available to us for creating HDR and tone-mapped images. It’s one of the reasons we like using the Mac so much. Go check out Hydra at Creaceed.com

So, Allison, interesting application.
Workaround for the issue you mentioned, inability to process top and bottom of image separately? Can Hydra edit just one image? Import just one, get the “bottom” like you want, import another, adjust the top. Add those two to your HDR stack, and you should in the merge arrangement get to where you want? If Hydra doesn’t process only one image, Affinity and others will do that for you.
I’m not sure that would help though George. If I make the top look good in one and the bottom look good in the other, the bottom of the first and top of the second would still be changed. If I’m gong to use Affinity, I might as well do the HDR there, right?
Guess you could find out if you had one image with the sky like you want and another with the “bottom” like you want.
Thank for a good review. The Hydra app didn’t tempt me but the company that makes it seems professional and likeable.
Maybe I looked because of your comment about Aurora/Skylum, whose earlier product I tried and got a refund on.
So I looked at Creaceed’s other apps. Their Prizma Go optical character recognition app for iOS is by far the best I have used, and I bought it to take advantage of the export feature.
That’s good to know, David. I didn’t have great success with it when testing recently so maybe I’ll give it another go. I like the company very much.