What is MacTech
 This week I attended the MacTech Conference for the first time. I’d heard about it for ages from Dave Hamilton of the Mac Geek Gab, but for two reasons, I hesitated for a long time about attending. Even though it’s conveniently in Los Angeles, it’s super expensive. I used a pre-registration discount this year, saving $400, and it was still $1200 for a 3-day conference. Just for comparison’s sake, Macstock Expo is only $249 for 3 days.
But they are very different conferences. In fact, the other reason I had for hesitating was that I was afraid MacTech would be too deep for me. Now I consider myself a “reasonably bright girl” (a phrase coined by a man at IBM talking to my friend Linda in the 1980s), but I’d heard so much about the really deeply technical topics at MacTech that I was worried I’d be lost and wasting my money.
The good news is that I was able to find sessions that were very interesting to me.
Let’s back up and talk about who I think the intended audience is for MacTech. It really splits into two groups: people who are Apple consultants, and people whose job it is to manage Macs and networking in a company environment. The size of the company doesn’t dictate who would find value, but rather just that you’re responsible for other people’s computers. It’s not intended for enthusiasts, which is really the target audience for Macstock Expo.
I had a fantastic time and will probably attend again. I’d like to tell you every single thing I learned from every single session and every person I met, but that would be impractical. Instead I’m going to do a bit of a deep dive into just a couple of the talks and highlight what I learned from those presenters.
Python
You may remember that I installed Python on my Mac. I did this so that I could run a Python script that would stitch the 180 video clips per hour my Tesla records into one coherent video. In my article about this adventure, I explained that I had to install a recent version of Python (3.7.4) because Apple includes Python 2.7 by default. I also talked about how tricky it was to get the operating system to let me use the newer version.
I also mentioned that Apple will no longer be shipping Python (and other scripting languages like Ruby and perl) with the operating system. My initial thought was that this was a good thing. If they don’t include the latest version, wouldn’t not shipping it at all be better? Well, yes, but.
At MacTech I attended a session entitled “Python, Apple & You” by a fantastic presenter named Greg Neagle from Disney. I loved this guy because he put in plain English explanations that even I could follow of what the problems will be. Even better, he offered very specific solutions to some of the problems, many in the form of tools he had personally written to smooth the way. I promise my regurgitation of what he told us will not be too nerdy, even if you’re not a programmer at all.
He explained what I mentioned earlier about how Apple won’t be shipping scripting languages in “future updates”, with no clue as to when that will be. Will it be a point release in Catalina? A future major OS named Mammoth? No one knows.
But there are some rather scary things we do know. The version of Python currently running in macOS, 2.7, will actually be end-of-life by the open source development community Python.org in January of 2020. That’s really soon. Oddly the last update will come out after that, in April 2020. That means after April of next year there will be no security patches to Python 2.7. My guess would be that it might disappear from macOS some time between January and April of 2020.
But why do we care about 2.7 if this new version of Python is already out there, 3.7.4? Well, it turns out that tons of applications use Python scripts for their package installers, and they’re using Python 2.7! They run Python scripts before installing and again afterwards during clean up. You’re probably thinking these are rinky-dink little developers who don’t know any better, but you’d be wrong.
Greg explained that Office 2019 uses Python 2.7 in its installer and so does Office 365. So does Adobe Acrobat Reader’s installer. Greg didn’t elaborate any further than that because he had our attention now.
He told us about a tool written by Armen Briegel that you can point at a folder of package files and it will tell you what scripting language they’re calling to see if Python 2.7 is involved (https://github.com/scriptingosx/pkgcheck). For people who deploy a lot of Macs and have to ensure their applications all run, this is a really valuable tool.
I had dinner with a woman who was responsible for a fleet of Macs at a video production company. She has a lot of Maya software, and their installer is based on Python 2.7. She was not at all happy with what she learned. Of course the Maya folks will have to fix this, but it’s her job to make sure they do before she can upgrade her users to a new OS. Start to see the problem even for folks who are not developers?
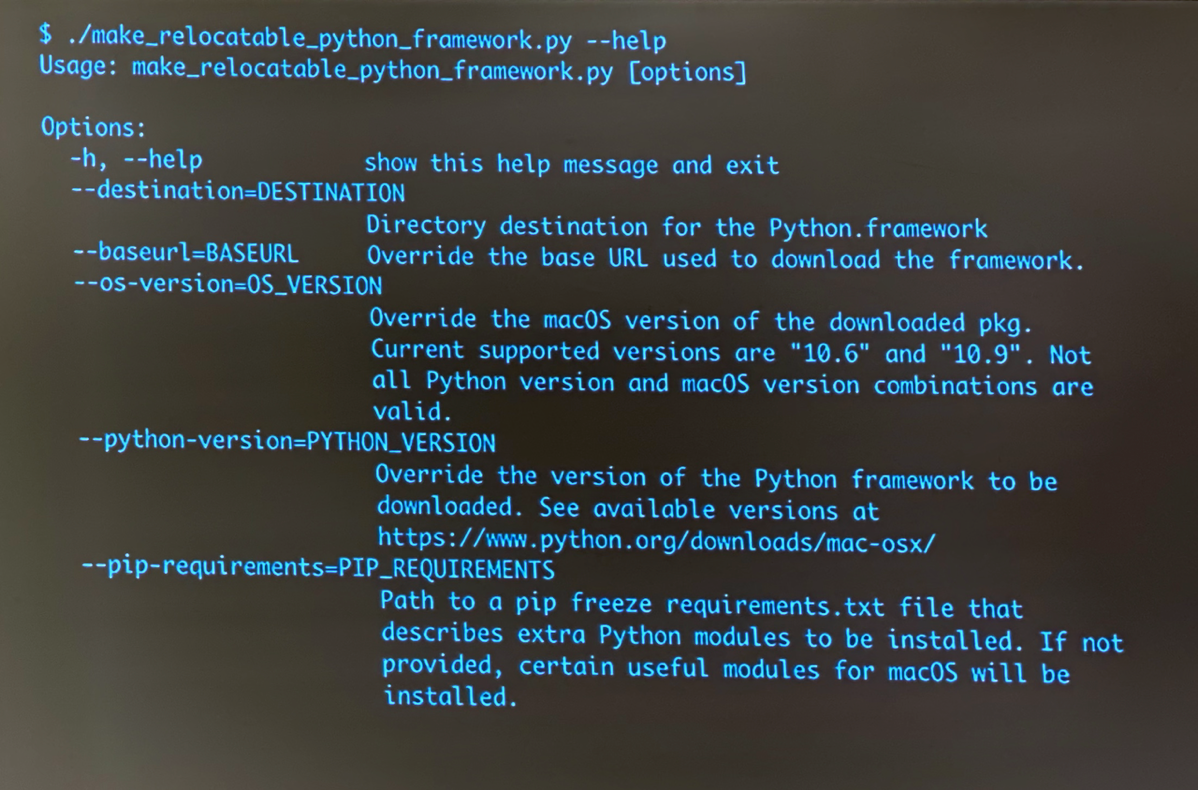
For the even nerdier, Greg told us about a tool he wrote that will allow developers to download a relocatable version of Python. Remember that Python 2.7 is already on our Macs and you need Python 3, but they can’t live in the same directory at the same time. He also noted that Apple adds some Mac-friendly stuff to Python that could be useful so he packaged that all up in the same tool. Greg posted his tool on Github for all to enjoy: https://github.com/gregneagle/relocatable-python.
I was starting to get lost about here in the talk, but I’ll give you two more tidbits in case you do dabble in Python like Claus, but I’ll stay in plain English. In programming there are tools that fall under the umbrella called “lint”. A lint tool is one that scans some code to tell you what’s wrong with it. It looks for programming errors, bugs, etc. As you might be able to guess, there’s one called pylint for detecting errors in Python code. Greg added a little tip here. If you invoke pylint and add the flag –py3k, it will look for things in your code that won’t work in Python 3. I liked learning that the flag contains “3k” because Python 3 is sometimes called Python 3000.
Finally, he talked about a set of instructions he really liked called “The Conservative Python 3 Porting Guide“. The reason he recommended it was because the theme of the guide is, “What’s the least amount of work I can do?” Don’t you wish EVERY guide had that theme???
His final link was to all of the services he uses and has provided all in one handy link at managingosx.wordpress.com/…
Tim Standing OWC
Another awesome talk was by Tim Standing from Other World Computing. It was definitely nerdy but there was some information that I think might be interesting to most of us. The talk was about the new volume structure in macOS Catalina. I am not an expert on this topic, so it’s dangerous for me to attempt to explain this. I’ll stay at a pretty high level where I’m fairly confident.
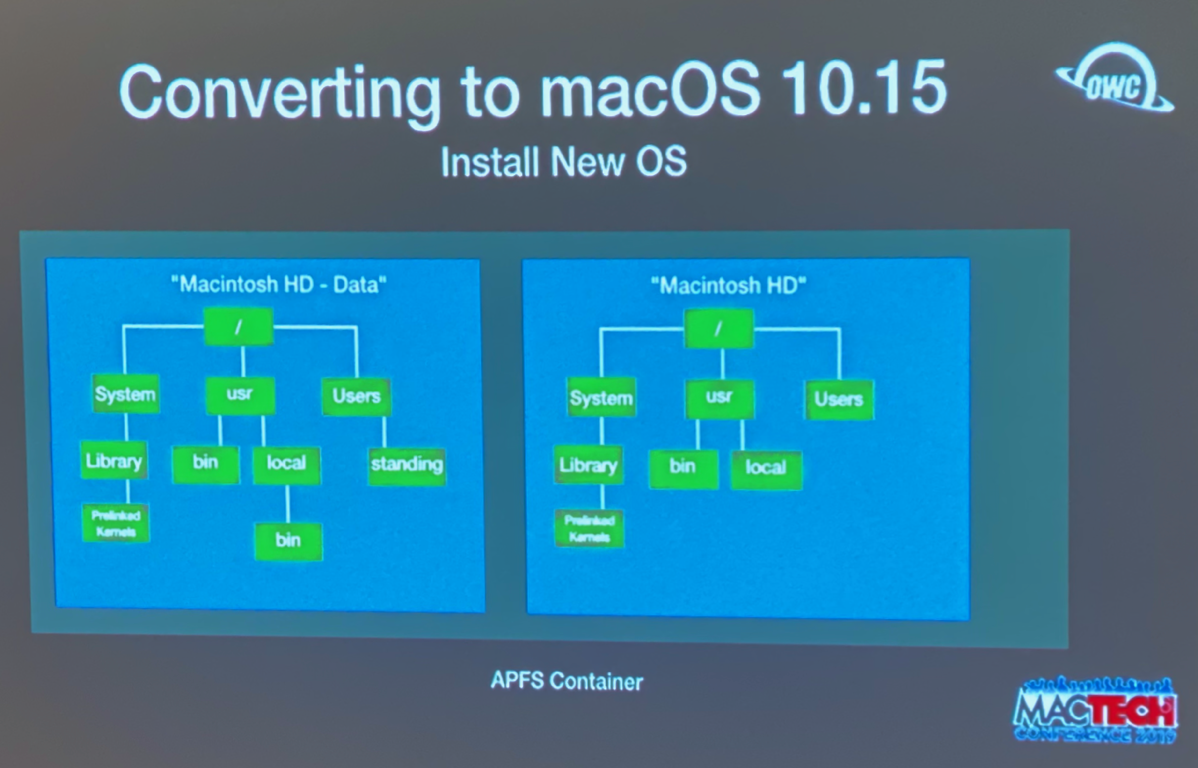
The big thing Apple changed in going from Mojave to Catalina is that our operating system is now on a completely different volume from our data. This has been changed in order to even more effectively protect us from malware and poorly designed applications.
You may recall that Apple changed our file system to APFS a while back. In the old days, we would partition our drives, but the unallocated space could not be shared, which was a big waste of space. APFS allows us to share space between different volumes on a single physical drive. This means with separate volumes instead of partitions, you don’t have wasted empty space in both. The term we use to describe this concept is APFS containers. APFS containers contain volumes.
In Disk Utility with APFS, you can add and delete volumes willy nilly and they each show up looking like a new hard drive has been attached to your Mac. If you only have one volume on your Mac on Mojave, you may never have seen extra volumes.
But with macOS Catalina, Disk Utility now shows two volumes by default: Macintosh HD and Macintosh HD Data. The second volume, the one with Data on the name, gives you read/write privileges and you can do anything to it you like. The one that says simply Macintosh HD is actually a read-only volume and you cannot play with it at all. This is where your System files live.

What I just described is how it looks in Disk Utility. When you look at the Finder though, they don’t want you to worry your pretty little head about all this so your read-writable data drive will be called simply Macintosh HD, without the word Data. I think this is a good thing but it is a bit head-bendy when you look at Disk Utility and they’re not the same. The good news is that in Disk Utility, the volume you’re allowed to play with (Macintosh HD Data) has a little home icon attached to the Disk icon so you can tell it’s yours.
Ok, I’ve now laid the ground work for Tim’s talk. He explained that these two volumes appear to have the exact same contents. I took a screenshot of his slide where he showed that in Macintosh HD, you will have /System/Library, and you have /Users, and on the Data version of Macintosh HD you see the same structure. These two volumes share that one APFS container. The files and folders look the same because they use what are called firm links between them.
Now here’s a fun fact to know and tell. Those two volumes are not the only ones in that APFS container. There’s also a volume called Preboot and one for Recovery, but these last two don’t show in the volume list in Disk Utility. All four of those volumes must be in the same APFS container in order for the Mac to boot. I assume (hope?) that the bootable backup people who make SuperDuper! and Carbon Copy Cloner will be paying close attention to this.
He then addressed an interesting conundrum this whole concept of a read-only System drive creates. How on earth do you install a kernel extension if you can’t write to that drive? Apple did something really creative here. Remember that the two volumes appear to have pretty much the same structure.
The installer will put the kext in the normal System place, but it will be on your Data volume, not your System volume. A firm link (not to be confused with a hard link or a symbolic link) will be created by the System software.
When you reboot your Mac, the firm link to the kext will be copied over to the System volume where it belongs. Now here’s why it can do this. The very top level process with all rights and privileges is called launchd. launchd shuts down every single process during shutdown. That means that it can be 100% certain that no nefarious application or utility is trying to write to the System drive. At that point, with no processes running but itself, launchd flips the System volume to be read/write, copies in the kext file, and then flips it back to read-only before booting up.
I know that was nerdy but it’s so clever I felt compelled to tell you about it. If you were worried that this new volume structure would make it impossible to install “interesting” pieces of hardware or software for your Mac because of security, hopefully you’ll at least be cautiously optimistic now.
If you’d like to learn more about APFS, Tim did a presentation at MacSysadmin 2018 that covers this topic as well as explaining the implications of the T2 chip and that presentation is publicly available. They’ve posted it on the MacSales Blog for all to enjoy. Tim is an engaging and interesting speaker and I guarantee you’ll learn something!
Script Debugging by Sean Colins
I went to a talk on script debugging by Sean Colins, and I’m definitely not going to go through everything I learned in this talk. I do want to tell you one single mind-blowing thing I learned from Sean.
He suggests when you’ve been staring at your code for a very long time and you simply cannot see your mistake, try changing the font size. He says that this fixes what he likes to call “code blindness”. As soon as he said it I could totally picture this working. Changing the font size will cause all the lines of code to sort of shift around with respect to each other and suddenly that extra squirrelly bracket or missing semi-colon might just be immediately obvious.
Sean was a phenomenal speaker and he volunteered to be on Chit Chat even without me prompting. I hope to do that some day soon.
Sal Finds a trick
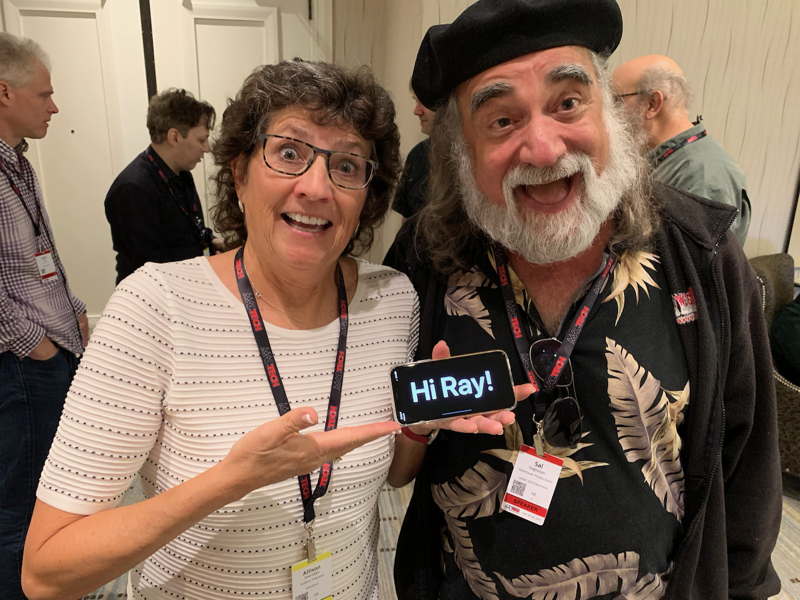
Sal Soghoian, the father of automation at Apple, was an attendee at MacTech. I spent quite a bit of time with him and he told a couple of stories that were interesting. He said that when he first got a job at Apple, he lived in an apartment across the street from the office.
He would go into the building at 2 in the morning and test his badge on every single door he could find. He figured if his badge worked, then it was ok for him to go in. He especially liked going into conference rooms because he discovered that he could boot the Macs in the room and see all of the presentations people had given from that room. I’m sure they’re more protected now, but back then he said it was great because by watching presentations he could figure out who the engineers were he needed to get to know what they were working on.
He also discovered that he could go into the library where they stored recordings of every single WWDC. He said he learned a lot at 2am watching these shows.
He told this story as an explanation of his personality because it will be relevant to his presentation. The anecdote illustrates how he likes to go around twisting door handles to see if he can get in somewhere, and then to poke around inside and see what he can find. That trait is what allowed him to figure out something really cool that he presented in his session at MacTech.
I will definitely not be able to do justice to his discovery, but I’m going to try anyway. He is going to make a video tutorial on how to do what he showed us and as soon as that’s available I’ll definitely link to it.
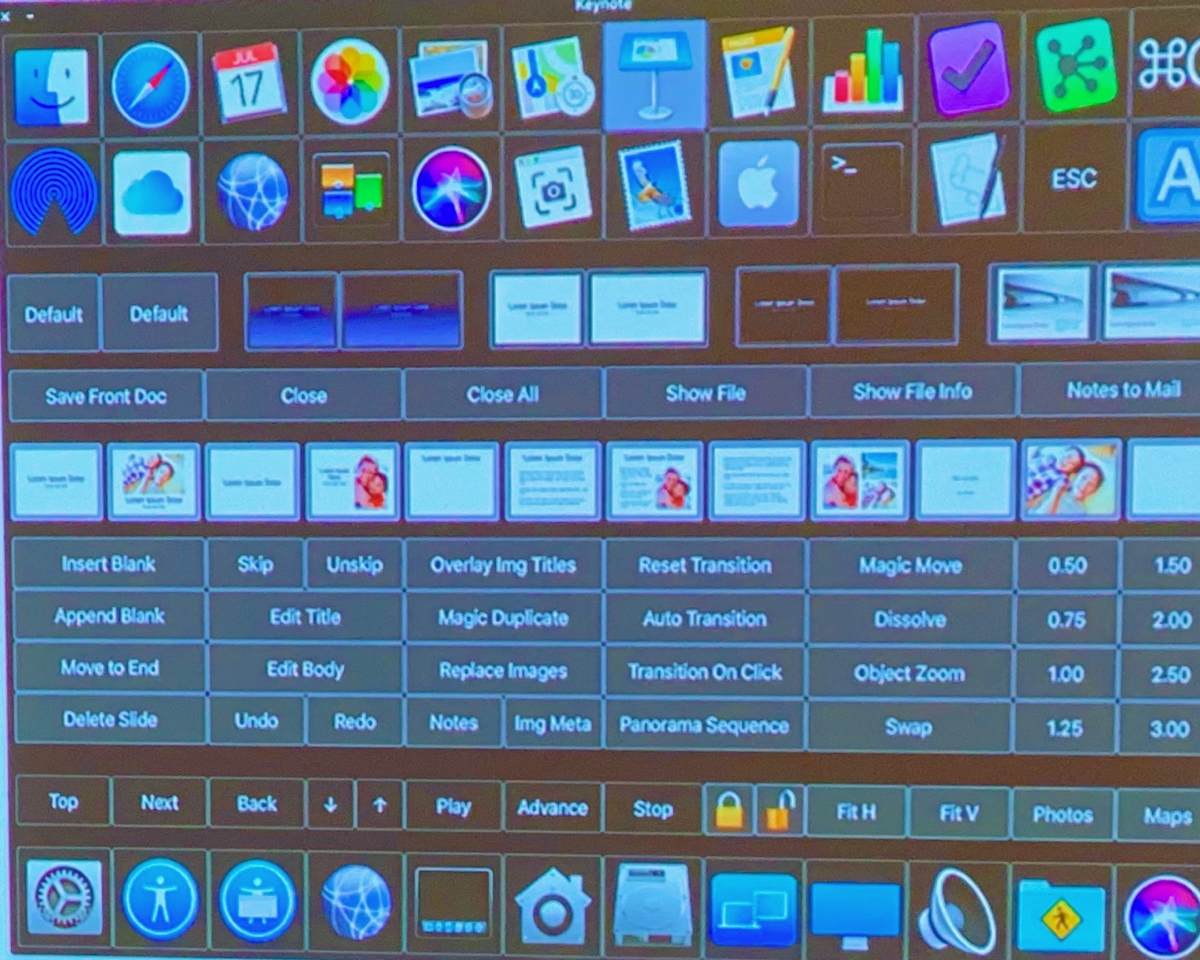
Sal discovered a way to make a touch screen control pad for your Mac. You need three things. A Mac, an iPad, and the Luna Display dongle that lets you create a second screen to your Mac. He was quite specific to point out that you cannot do this trick with Apple’s Sidecar feature in macOS Catalina; you must use a Luna Display. If you aren’t familiar with Luna Display, I wrote an article about it entitled Luna Display Turns Your iPad into a Mac Monitor with Low Latency.
If you open Accessibility preferences in System Preferences, and turn on the Accessibility Keyboard you’ll be able to play along with Sal’s discovery. In there you’ll find a button for Panel Editor. This invokes a double-secret application in System/Library/Input Method called Assistive Control.app. I told you he digs around and rattles doorknobs!
The Panel Editor lets you create buttons on a grid that will do all kinds of interesting and useful things. When you hit the plus at the top to add a new button, you can assign several functions to that button. You can launch an application, run a script, access a menu, or even execute a keystroke. Knowing that, he suggests a way to lay out these buttons for maximum productivity.
He creates three areas on the grid. Across the top he put buttons for his favorite applications. Not only will they allow you to launch an application, if they’re already open you can instantly switch to the applications. You can even add the graphical icon for the application which makes it easier to easily jump to the application you desire.
Across the bottom he put his favorite System Preferences, so they’re easy to access and in they are in an order that makes sense to him.
In the center section, he puts app-specific buttons. He’s a Keynote fanatic so he made buttons for Magic Duplicate, Move to End, Delete Slide and a ton more that are only visible when he’s in Keynote.
You can do all of what I’ve described just with macOS, but to make this a touch-screen control requires an iPad and Luna Display. Luna Display lets you extend (or mirror) your Mac’s display. If you slide the control surface you just created over to the iPad, you now have a touch screen controller for your Mac. It’s positively brilliant.
You may be wondering why this won’t work in Sidecar at this time and why it requires Luna Display. That’s because Apple has specifically disabled touch on the iPad in the area where the Mac screen is displayed. Sure you can use touch on the sidebar buttons that they give you and you can even use your fat fingers on the representation of Touchbar on that same screen, but the area where the Mac screen itself is displayed doesn’t allow touch. I imagine it’s because macOS isn’t optimized for big, fat fingers. You can use an Apple Pencil to touch the Mac’s display on your iPad using Sidecar, so that might work, but holding Pencil in your hand while working primarily on your Mac might not be as useful.
I’ve started fooling around with making a touch control pad for myself using Mojave, and I’ve got some ideas of where this could really help me out. I’m hoping to add some automation to how I work with ScreenFlow when doing videos for Don. I know I’m retired but I need more time to play with stuff like this!
Bottom Line
I met great people at MacTech, and I learned a lot. It is definitely a very expensive conference but if you support a fleet of Macs, it could be invaluable. I did interviews with two of the sponsors of the show but I’ll leave those till next week.

