Problem to be Solved
Podcasts are awesome because audio can be listened to while you’re doing something else, like washing the dishes, washing the car, cycling the hills of Ireland or commuting to work. But there are lots of situations where listening isn’t an option or isn’t the consumer’s preferred option. If you’re hearing-impaired, definitely not an option. Low-bandwidth Internet plans can make even downloading podcasts problematic. Maybe you just like to read. Maybe you heard a podcast but would like to have a transcription of what was said so you could scan it more easily than scrubbing through a long audio conversation.
I talked recently about how to have a podcast transcribed through the freemium service otter.ai, but that was transcription after the finished product was produced. I got to thinking that it would be really cool if I could have an audio conversation on a service like Skype transcribed in real-time by otter.ai while I was recording with someone. I’m happy to say that I figured out how to do just that. The screenshots for this tutorial are shown with Skype but there’s no reason they couldn’t be followed to do the same thing with Discord or a Google Hangout (if those still exist by the time you see or hear this).
First let’s go through what you’ll need to accomplish this.
What You’ll Need
- Mac
- I’m not saying you can’t do this on a PC, I just don’t know anything about PC tools to tell you how to do it, so this will be a Mac-centric solution.
- Microphone
- If you’re going to record a call, you need a microphone. It can be your internal mic but the quality of your mic will influence the quality of your transcription (and of course your audio recording).
- VOIP app
- e.g. Skype or Discord
- Someone to talk to
- If you’re not trying to transcribe a two-way conversation, you can just hit the record button on otter.ai.
- Loopback and Audio Hijack from Rogue Amoeba
- Both of these apps are, in my opinion, must-haves for any podcaster using a Mac. I wouldn’t podcast without them. Audio Hijack by itself keeps me from having to use a mixer to create my shows.
- Loopback from Rogue Amoeba is an application that allows you to create virtual audio devices by combining real physical audio devices and applications into one virtual device. Loopback is $99.
- Audio Hijack from Rogue Amoeba allows you to capture audio from your VOIP application (e.g. Skype) and your real microphone into the virtual audio device created by Loopback. Audio Hijack is $59.
- Note that if you buy both Loopback and Audio Hijack together, they sell them for a total of $130.
- otter.ai free account
- otter.ai is a web service that allows you to import audio files, or record right on the site, and receive a text transcription of the audio.
- I did a full review of otter.ai which I recommend reading so you understand how this amazing AI-based transcription works.
- otter.ai has a subscription service, which gives you the ability to create SRT captions for videos, but to create a text transcription, the service is free for 600 minutes per month.
- Create a free otter.ai account before following this tutorial
Set Up for Each Application to Route the Audio
Loopback Setup
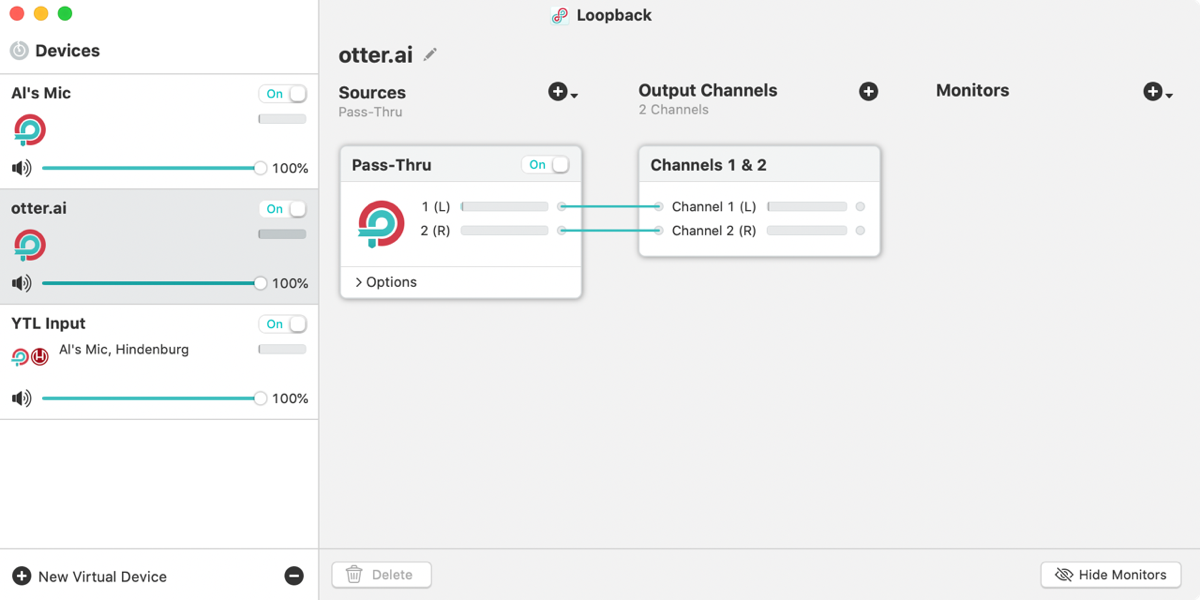
Using Loopback, create a simple pass-through virtual device and name it otter.ai. I left the Output Channels to stereo.
Audio Hijack Setup
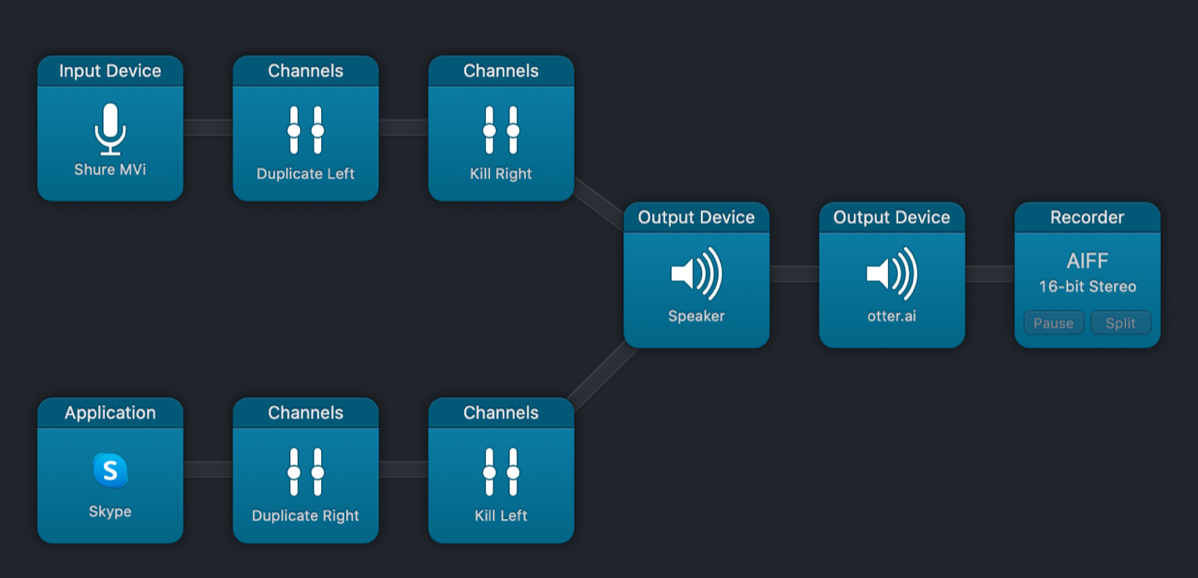
In Audio Hijack create you’ll the audio flow. If you’re unfamiliar with Audio Hijack, the help files are very useful for getting started. If you want a full video tutorial, I created one over at screencastsonline.com/…. ScreenCastsOnline is a subscription service, but there’s a free trial that lets you watch the entire back catalog including my Audio Hijack tutorial. Create a new Session in Audio Hijack.
- Put an audio source input block on the top line and change it to your microphone (my mic interface in the screenshot is called Shure Mvi). Pull in two Channels blocks one after the other and set one to Duplicate Left, the second to Kill Right. This odd combination will put the audio from your mic alone on the left channel.
- Put an Application source on a second line, and change it to your VOIP application. Do the reverse of the Channels blocks, this time Duplicate Right, Kill Left. This will put your caller on the right channel alone.
- Put an Output Device inline between the two sources for your own headphones so you’ll be able to hear your speaker in your right ear. My headphones are identified as Speaker in the screenshot below.
- Add a second Output Device, and select your otter.ai virtual audio device. Without Loopback this step would not be possible.
- Add a Recorder Output to record the conversation and set the quality to your own requirements (I choose uncompressed AIFF for the highest quality.)
I’ve included my Audio Hijack session as a download here just to save you the time of building it yourself. After downloading, unzip and then simply double click the .ahsession file to import into Audio Hijack. Modify the input mic and output speakers to your own hardware.
Sound Preferences
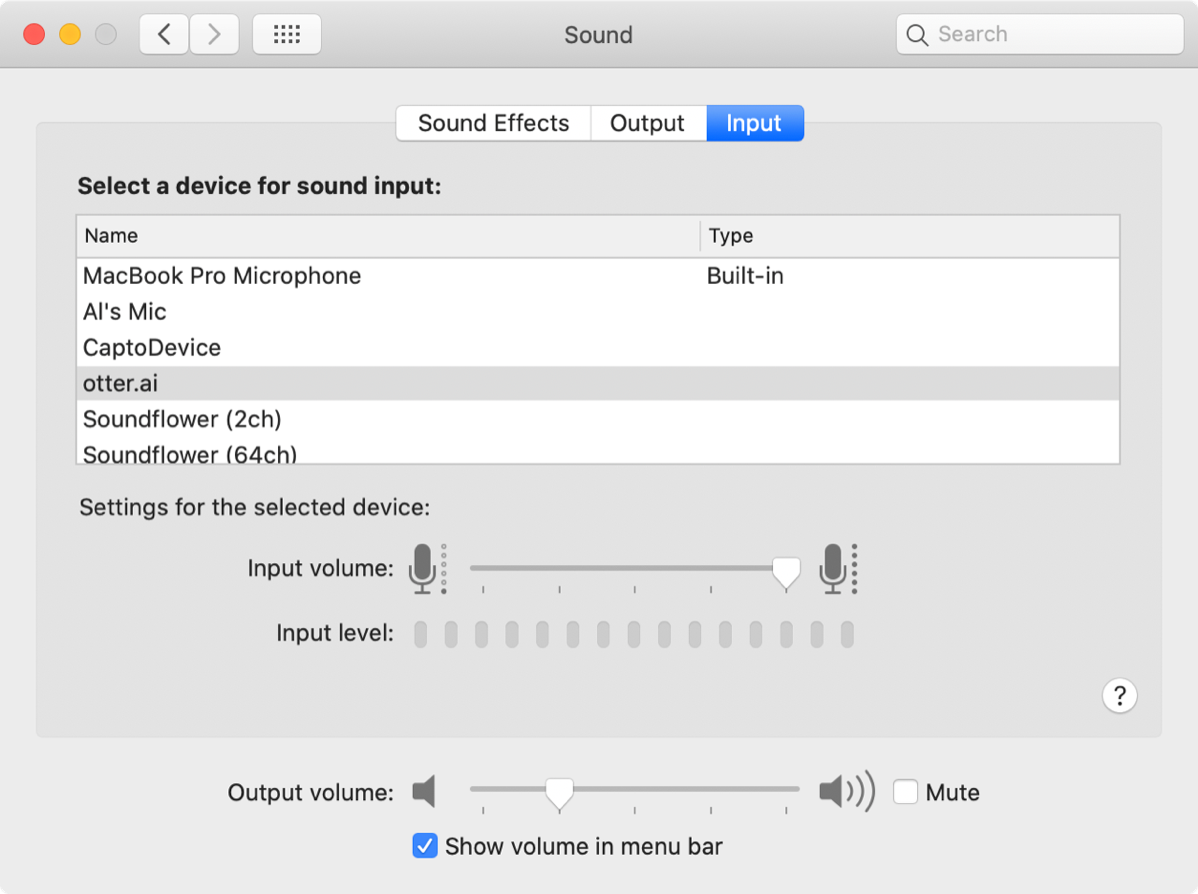
Open System Preferences, and in the Sound Preferences, select the Input tab. Choose otter.ai as the input device. Because of the session we created in Audio Hijack, the input device otter.ai will have your voice on the left channel and your caller on the right channel.
Skype Setup
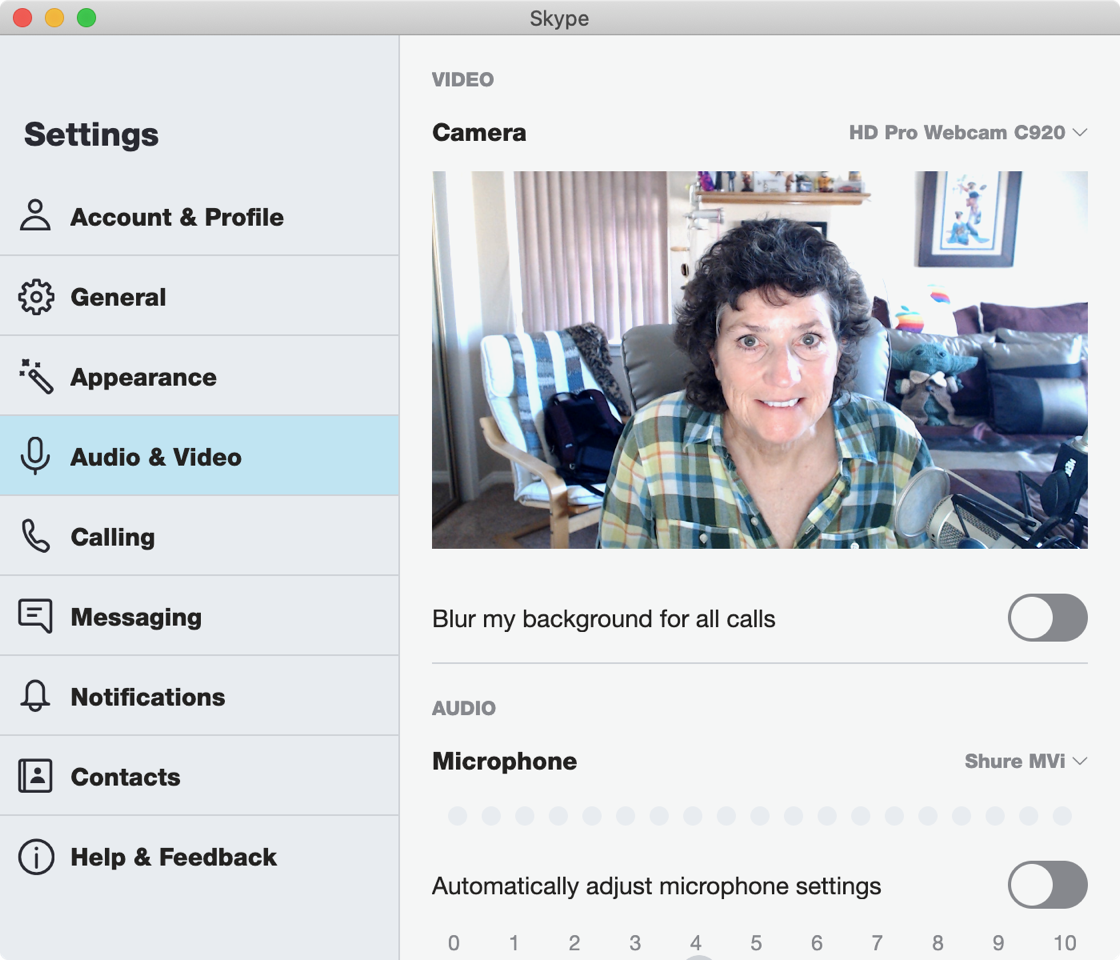
In your VOIP app, set the input to your microphone. Note that you don’t want to use otter.ai as the input device! In this image, you can see mine is set to my mic interface, the Shure MVi.
Browser Setup – Chrome
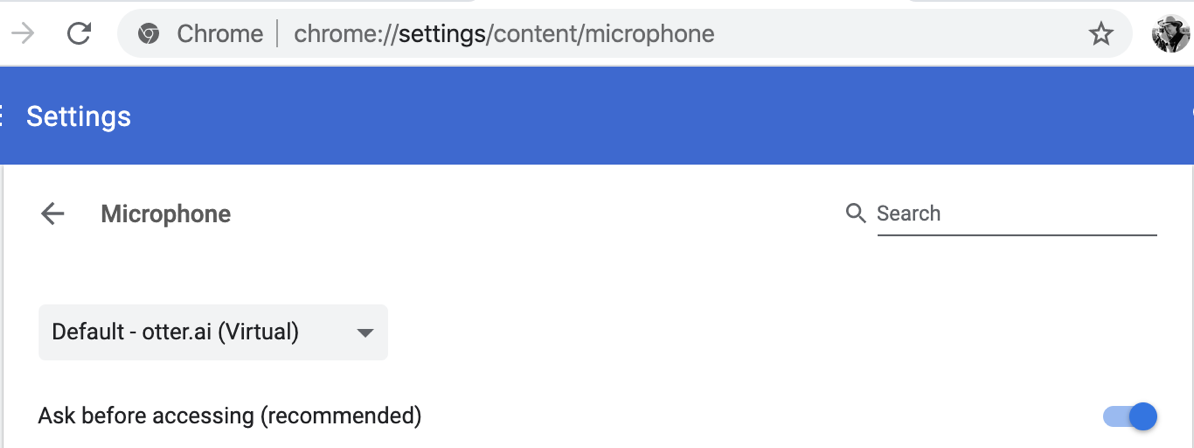
This process may work in other browsers but it seems that Chrome works better than other browsers for doing audio and video input to a web service. Microsoft Edge (based on Chromium) also works well. In the browser URL field on Chrome, enter chrome://settings/content/microphone (or open Chrome Settings and search for “mic”. Ensure that the microphone is set to “Default – otter.ai (Virtual)”.
Let’s Do This Thing

With all those pieces put together, start your Skype call and start the Audio Hijack session you created. Then on the otter.ai website, simply hit the Record button. If everything is working properly, you’ll see the little wave form wiggling when you or your caller speak into your microphones.
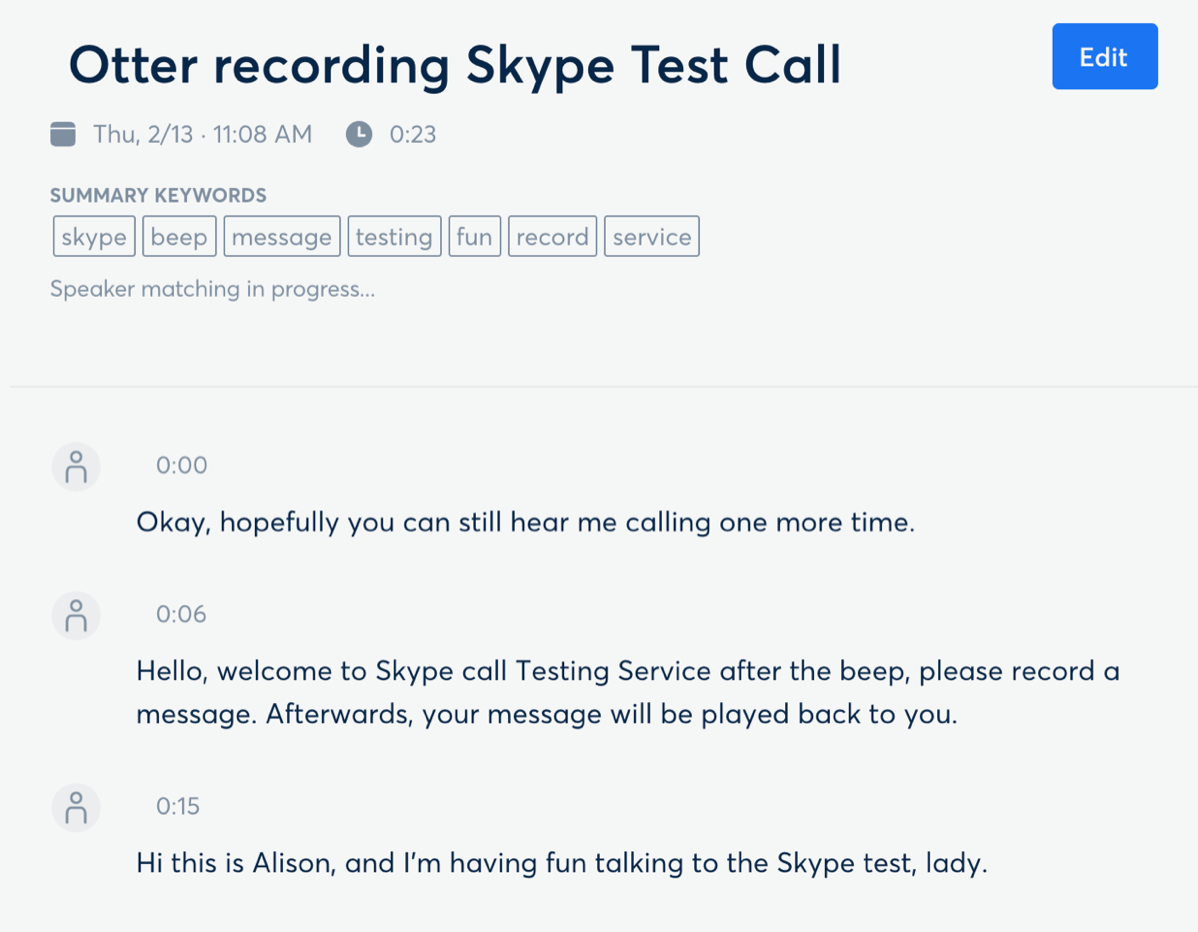
One of the amazing features of otter.ai is that it will separate the different voices into separate sections. After your call, you can name a couple of the voice identifications, and the service will rename them all based on the voice it heard. It’s pretty magical.
As an example, I called the nice Skype testing lady. As you can see, it worked!
I think otter.ai is a phenomenal tool for so many uses. The transcription isn’t perfect, but for AI-driven transcription it’s pretty darn good. If perfect transcription is your expectation, you can use the otter.ai interface to edit while you listen to gain that perfection.
In any case, I hope that this tutorial helps you to create even more valuable and accessible content for your listeners.


Hearing impaired user here, thanks for the tutorial. It may work for when I do conference calls from home but not entirely sure how this works. Will I get the conference call audio in both ears or just the one?
Hi Hugo – You’re welcome. It should not change how you hear the conference call. should come through to both ears unless you set it up differently than what I show here. I hadn’t even THOUGHT about how cool this would be to basically have real-time closed captioning!
could i do this using soundflower instead of buying loopback?
Beth – Possibly, but Soundflower is an abandoned product. The original developer handed it over to Rogue Amoeba, who were stewards of it for a while, then they spun it off again when they created the far-superior Loopback software. The community didn’t pick it up. There is a new alternative called Blackhole which at https://existential.audio/blackhole/. I played with it briefly but I didn’t get it to work. I’ve heard good things though so maybe it would be worth a shot. Let us know if it works for you?
Thank you for this, specifically thank you for the ready-made adhesion, which I’ve been using with Otter.ai/Slack/Airpods/Audio Hijack. My only issue is with my input/output device being my Airpods, my voice echos and it’s driving me insane. Is there a way to kill my own voice in this scenario?
Hi Suzanne – try dragging the first audio output block down so it’s only connected to the Skype part of the chain. This should stop you from being able to hear yourself. I monitor my own audio, but if you’re using any kind of Bluetooth headphones there’s a GIANT lag from Bluetooth and it will drive you insane. Switching to wired headphones would fix the problem too, but you’d need to figure out a separate microphone. Let me know if this helps.
Hi Allison – Hurray, worked like a charm. Thanks so much!
Excellent! Thanks for letting me know.
Hi Allison could this be used with Jabber a CISCO voip app?
I would think so, Lisa, as long as it’s running on your Mac.