This article is a story of how my fans are going bananas on my new 16″ MacBook Pro. But we can’t start with the amazing solution I found in the app Turbo Boost Switcher until we back up and learn a little bit about computer processors. Not too deep, because we get in over my head pretty quickly, but deep enough to provide some understanding that may help you in your computing journey. Once we’re done with the lesson, I’ll explain my specific problem and then explain how you might like and need Turbo Boost Switcher even if you don’t have banana fans.
CPU Clock Rates and Turbo Boost
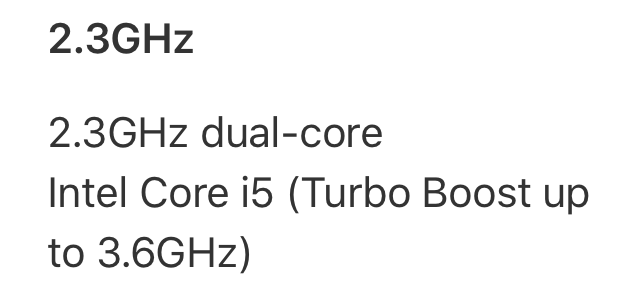
When you choose a computer you’ll see information about the CPU family and about the speed of that CPU. CPU stands for Central Processing Unit, which we often just refer to as a processor. Let’s use as an example the entry-level iMac with a 2.3GHz Intel Core i5. The CPU family is the Intel Core series, the specific processor line is the i5, and the processor speed is 2.3GHz.
The speed in GHz is the clock rate or also called the clock speed. The clock speed is the number of cycles per second in which the processor does its operations. If we stay within a given processor line, we can speed up our computations by getting a processor with a faster clock speed. In our entry-level iMac example, a 2.3GHz Intel Core i5 would be faster than a 2.0GHz i5. If you try to compare to a different processor family, such as the i3, i7 or i9s, then you can’t just look at the clock speed to know how fast the machine will go. For simplicity of discussion, I’m going to ignore the effect that multi-core processors and multi-threaded processes have on speed.
Ok, so we’ve established that our new 21.5″ iMac has a clock speed of 2.3GHz. But there’s more to it than that. Modern CPUs can operate at varying clock speeds. This is a huge advantage from a power consumption perspective. If you’re just doodling around writing emails, your CPU doesn’t have much to do, so it will slow down to a very low clock speed. With a laptop, this is extremely important because it means longer battery life.
But let’s say you decide to watch a video on YouTube. This is a bit more work so the processor will increase to a higher clock speed. Then, later on, you decide to transcode some video, maybe rendering from FinalCut or ScreenFlow; that’s even more work for the processor to do so it has to speed up even more.
In the Intel line of processors which are in all modern Macs and many PCs, Intel calls this ramp-up in speed Turbo Boost. When you buy a machine, you’ll often see two speeds: the standard clock rate and the Turbo Boost rate. Our 2.3GHz iMac has a Turbo Boost clock speed of 3.6GHz.
For purposes of our discussion, we need to understand when this Turbo Boost will occur and what factors cause it to engage.
According to Intel:
Availability and frequency upside of Intel® Turbo Boost Technology 2.0 state depends upon a number of factors including, but not limited to, the following:
- Type of workload
- Number of active cores
- Estimated current consumption
- Estimated power consumption
- Processor temperature
Basically, if you’re demanding a lot from your computer you could see the process speed ramp up and for short bursts even reach the top Turbo Boost speed. I use the tool iStat Menus from Bjango to monitor the speed of my processor and many other metrics. If you’re not already running iStat Menus you really should check it out. It’s available in Setapp too if you have a subscription.
Bottom line is that Turbo Boost sounds like a really good thing. Save my battery when I’m just fooling around but when I’m transcoding video or doing other such heavy lifting, give me all the power.
When Turbo Boost Kicks In
There are some side effects to Turbo Boost. When the processor speeds up, it generates more heat. It’s not good for the processor to get too hot though, so at some point, the fans will speed up to maintain a safe CPU temperature. All of this I’ve told you makes perfect sense. You ask the CPU to do more work, it speeds up, it heats up, and macOS tells the fans to speed up to cool it back down.
When Turbo Boost Kicks In for No Reason
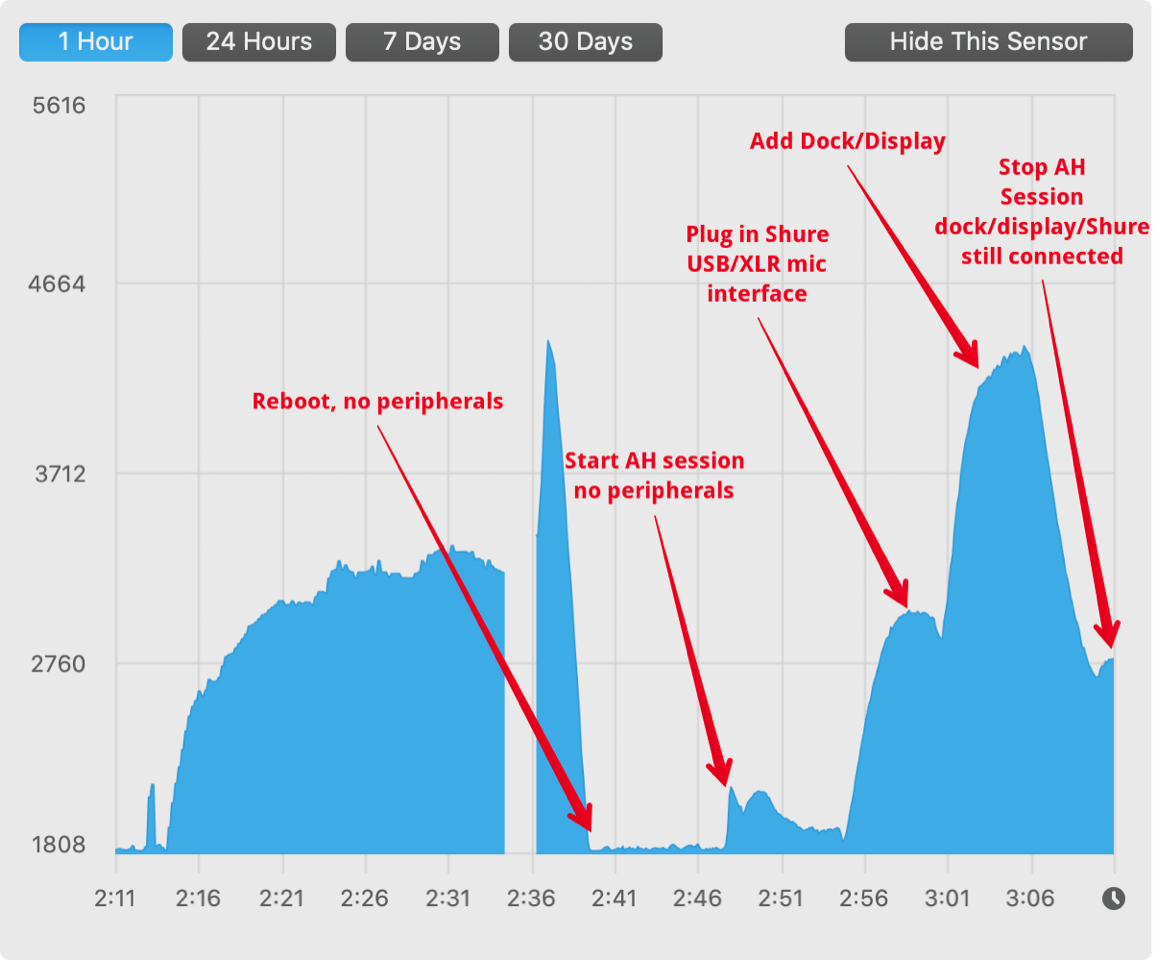
We are now finally to the Problem to be Solved™. For years I have been using a 15″ MacBook Pro hooked up to a CalDigit Thunderbolt 3 dock. From there I hang a bunch of peripherals off the dock, including my 27″ LG 5K display via Thunderbolt. I recently swapped out the 15″ for a 16″ MacBook Pro, connecting it to the same dock and peripherals as I’ve been using for a long time.
I demand a lot of my computer when I’m doing the live show as I record into Hindenburg, broadcast my video and audio through Chrome to mimoLive and on to YouTube, route my audio from my mic and Hindenburg back into Discord and YouTube using Audio Hijack, plus a plethora of other less-demanding applications. If you ever want to descend into madness by reviewing all of the hardware and software I mix together for this, there is, of course, a diagram: https://www.podfeet.com/blog/nosillacast-live/live-show-setup/.
But when I’m not doing the live show, the load on my Mac is often quite light. My processor just hums along at a low clock speed and the fans are nice and quiet at under 2000RPM. I should mention that the 16″ MacBook Pro I bought has 8 processor cores, and it’s the top-of-the-line Intel Core i9 rated at 2.4GHz and Turbo Boost of 5GHz. With that much power, it’s really hard for me to come close to stressing the computer. Under normal operations (not when recording) I’m using well under 5% of the power of this machine.
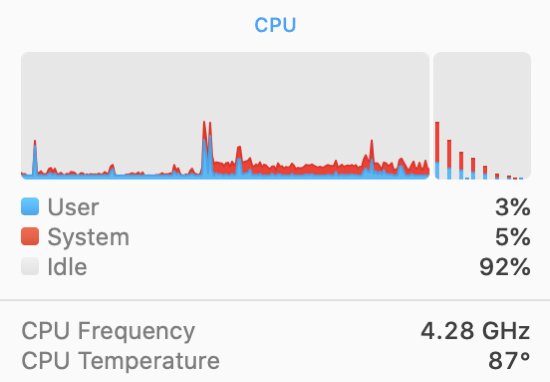
But for some reason, my fans are kicking in when I’m not doing any heavy lifting. I use Audio Hijack from Rogue Amoeba to route audio around my Mac and to sweeten my sound when doing recordings. It barely stresses this computer to have it on and running. I’ll see a quick pop up to 12% of my CPUs being used and then it quickly settles back down to around 3% again. This is not a labor-intensive app.
However, I noticed shortly after getting the 16″ MacBook Pro that my fans would go bananas when I fired up Audio Hijack and practically nothing else. The app does do a nice animation to show the flow of audio to the different devices and apps it is routing but other than that it’s not really doing any heavy lifting.
Using my old pal iStat Menus I was able to monitor the fan speed and see it jump from under 2000RPM before engaging Audio Hijack to over 5000RPM. I haven’t done a decibel test, but the 16” fans at 5000RPM are stupid loud. Want to hear it? I knew you did…
Audio PlayerWhen this started to happen, I took a look at the graph for CPU Die temperature in iStat Menus and, sure enough, it had ramped up incredibly quickly, which explains the speed up of the fans. Likewise, I took a look at the CPU speed, and sure enough, clearly Turbo Boost had kicked in.
As I explained upfront, all of this is completely normal if you’re putting a heavy load on your Mac, but I’m not under these conditions. So why is the processor speeding up? I wish I knew the answer to this question but as of now, I do not know.
I shot off a note filled with lovely graphs to my little friends at Rogue Amoeba and they got right back to me that they agreed this was quite odd. They didn’t have any 16”ers to test with and they weren’t sure what was going on.
The fan noise is so bad that I’ve had to abandon my beloved Audio Hijack when making videos for ScreencastsOnline. It’s ok for my audio-only shows because of the orientation of the mic vs. the laptop itself. But for recording screencasts, I use the monitor on the laptop as the recorded screen so I have to be up close and personal to it and the fan noise comes right through on the mic.
Being motivated to figure this out because noise is the last thing you want when doing a recording, I did some more experiments. I can’t explain why this is true, but this big ramp-up in CPU speed/temperature/fans only occurs with Audio Hijack when I’ve got the Mac connected to the dock and thus the 5K monitor. If I unplug the dock and thus the monitor, my Mac does not Turbo Boost with Audio Hijack.
It seems that the problem must be related to graphics but I can’t really just stop using my external monitor and dock. Several months have gone by and the Rogue Amoeba folks have told me that they can now replicate the problem on their 16” MacBook Pros but they still don’t know why it’s happening. The only thing they could think of was to minimize the window when using Audio Hijack because maybe the little animation is causing the problem, but that didn’t fix it.
This appears to be a bug introduced with the combination of the new 16″ MacBook Pro and the latest version of macOS. I’ve visited the Apple forums where it’s been a significant subject of discussion. One person has posted an enormous amount of detail of experiments they’ve run with multiple 16″ MacBooks Pro and s/he’s convinced it’s a Graphics processor problem. Doesn’t help me much but misery does love company.
Backup Software Cranks the Fans Too
It’s weird enough that an audio application app triggers Turbo Boost when my system load is so low, but there’s another app that causes the problem, and that’s my backup software Carbon Copy Cloner from bombich.com. This software is definitely doing nothing graphically when it’s running in the background. There isn’t even a visible window. But I know within a few seconds of when my hourly backup is running because I can’t hear myself think with the fans cranked to 5000RPM.
If I’m recording using Audio Hijack when Carbon Copy Cloner kicks off, I’m doomed.
The Workaround – Turbo Boost Switcher
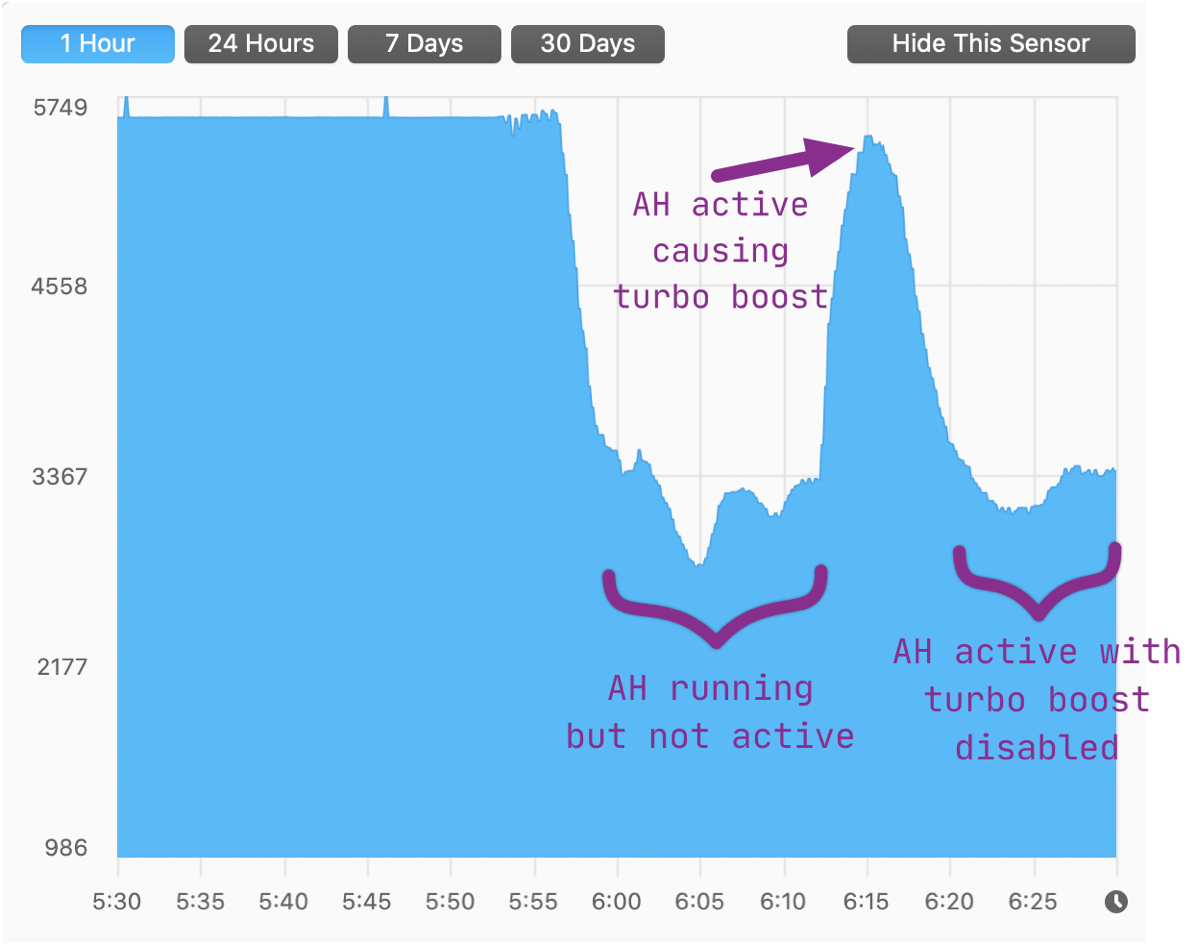
The dumbest thing I could do would be to treat the symptom with a tool like SMC Fan Control. This is a tool that lets you override the fan speed signal coming from macOS. Since the processor is clocking up and the temperature is going up, the worst thing would be to tell the fans not to blow. But I did find a tool that treats the root cause rather than the symptom.
I was listening to the Accidental Tech Podcast and heard Marco Arment refer to a tool called Turbo Boost Switcher from http://tbswitcher.rugarciap.com. This app is designed to allow you to tell the Mac to simply not enable Turbo Boost.
Turbo Boost Switcher is a freemium program so you can do the basics like disabling and enabling Turbo Boost without paying for it but you get enhanced capabilities with the pro version. Turbo Boost Switcher Pro is only $10 and after using the free version for about 10 minutes, I gave the developers their money. You get free updates for life for that $10 so why not?
At its simplest, you get a switch that allows you to turn off Turbo Boost. I disabled Turbo Boost with the app while using Audio Hijack, and the CPU slowed down immediately, causing the temperature to drop and in turn, the fans went back to their normal happy idle speed of around 2000RPM. It was glorious.
You might think that this would cause problems because obviously the Mac really, truly did need to clock up the processor speed or it wouldn’t have done it. But in my usage, I have not found that the case. Audio Hijack does not need that much power, and I’ve had no problems with recording with Turbo Boost Disabled.
I’m not using Turbo Boost Switcher while recording the live show because I know that the Mac is actually doing a great deal of work and the smoothness of my video will depend on it having all of the power it needs.
However, it turns out that recording a screencast and editing in Screenflow doesn’t really require as much performance as you might think, so I can use Turbo Boost Switcher to disable Turbo Boost and I have the sweet sounds of silence even though I’m using my beloved Audio Hijack.
What Else Does Turbo Boost Switcher Do?
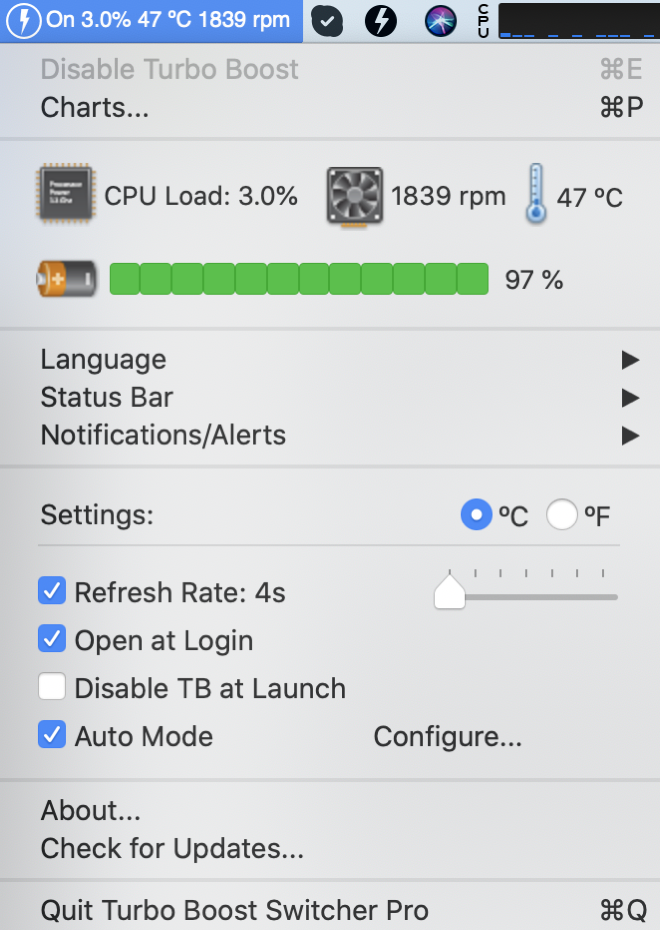
Now that my primary problem is solved, I started poking around into what other features there are in Turbo Boost Switcher Pro. Whether your fans are bothering you too, or whether you want to eke out every minute of battery life on your Mac laptop, I think you’ll find value in these advanced features.
Turbo Boost Switcher allows you to configure some automatic settings that are perfect for saving your battery. If you switch to auto mode, you’ll see three tabs to configure it just the way you want it.
If fan noise is what bothers you, you can tell Turbo Boost Switcher to disable Turbo Boost when your fans exceed your chosen RPM rate and to keep it disabled until it goes below another specified rate. For example, you could tell it to disable Turbo Boost if the fans go above 3500RPM (which is right around when they annoy me) and keep it disabled until it behaves itself and goes below 2000 again.
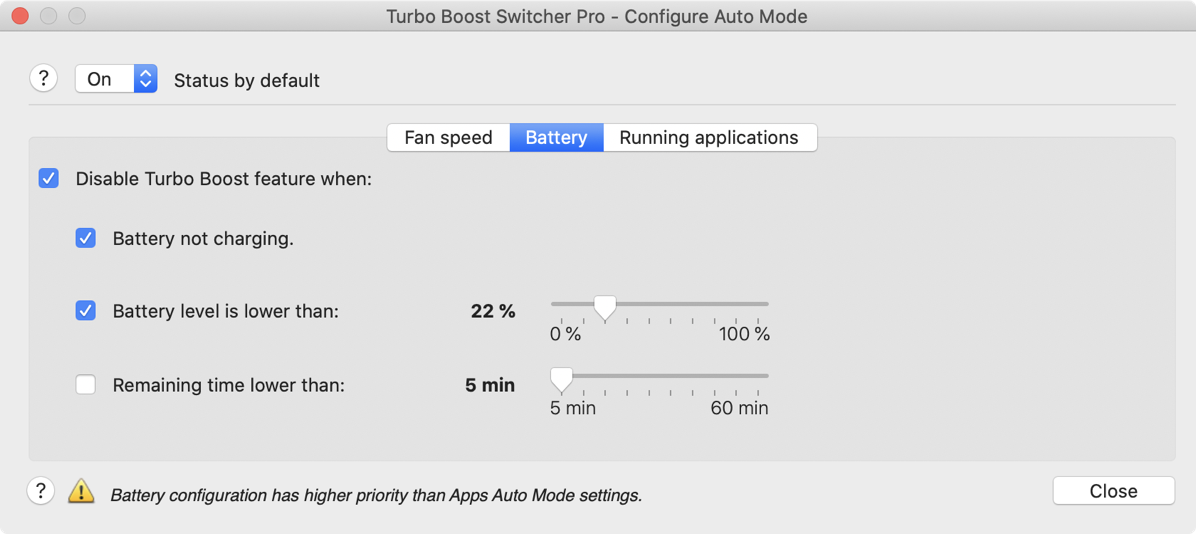
If more battery life is your goal, you can have the app automatically disable Turbo Boost entirely when you’re not charging the battery. Or you can set a threshold of battery percentage and time left on battery below which Turbo Boost doesn’t get to play.
Finally, if you’ve got a few apps that are causing Turbo Boost to kick in unnecessarily, then you can add those to a list that will automatically disable Turbo Boost for those apps. I am absolutely not throwing Audio Hijack and Carbon Copy Cloner under the bus here, but some bug in macOS Catalina is causing this silly problem, so I’d like to add them to the list until it gets fixed.
If you tap the gear, you can scroll through the list of running processes, but this is a really tedious way to do it. The apps and processes aren’t alphabetized and the app has to be running to be in the list. Instead just use the magnifying glass to search for the apps you want to add.

With the Auto mode in Turbo Boost Switcher I was able to have Turbo Boost on by default, disabled when Audio Hijack or Carbon Copy Cloner are running, and disabled if my laptop isn’t charging. And Turbo Boost Switcher sends me notifications if I want to know when an app has triggered disabling of Turbo Boost. Isn’t that cool?
If you’d rather control things yourself (and to be honest I’m more on the control freak side), you can still get notifications of high temperature or low battery without being in auto mode, so you don’t have to wait for excessive fan noise before you disable Turbo Boost manually.
I didn’t mention it but Turbo Boost Switcher runs as a menu bar app and you can have it display your current CPU load, fan speed and the temperature of your CPU. I’ve been using iStat Menus for that, but it takes up a fair bit of room so I’ve decided to let Turbo Boost Switcher take over showing me those numbers.
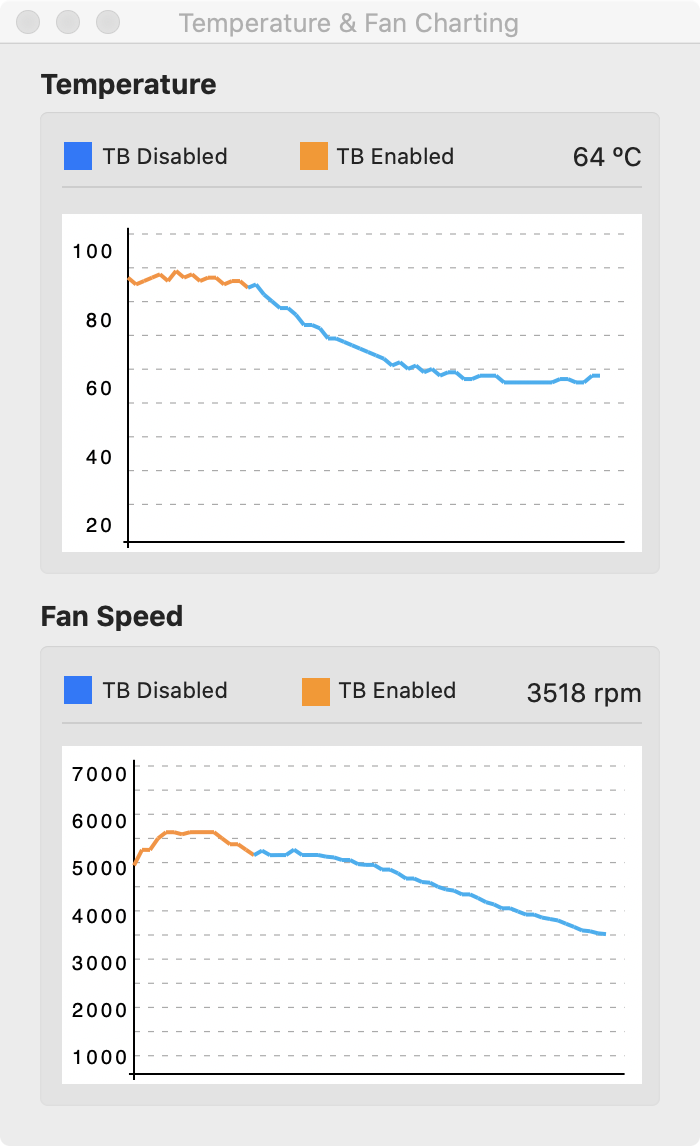
Turbo Boost Switcher even has a pair of graphs you can view to show you the temperature over time and the fan speed. If you have Turbo Boost enabled, the line is orange in both graphs and if you disable it, the line turns blue. It’s really fun to see high CPU temperatures and high fan speed and then disable Turbo Boost and see the lines drop down. This is truly unnecessary for functionality but I love me a good graph.
Turbo Boost Switcher has gotten sort of stalled from time to time where the menu bar indicator doesn’t show the correct temperature and the graphs aren’t recording. Not sure what’s caused that but a quick quit and restart and it gets back to work for me.
As I was writing this article over the course of a couple of days, I had Audio Hijack running and I noticed my fans weren’t kicking off. I thought to myself that I took too long to write the article because obviously a recent update to macOS Catalina had fixed the problem. And then I glanced at Turbo Boost Switcher and noticed I had disabled Turbo Boost. That’s how silently this app works for you in the background that you can even forget that it’s running.
Bottom Line
I am super happy with Turbo Boost Switcher and I’ll be keeping it on my Mac for sure even after Apple fixes this annoying bug. For $10 it could make your battery last longer on a long flight so why not give it a free trial?

Thank you for this spectacular review
A question though, do you use turbo boost switcher while using an external monitor and CalDigit dock?
I have, Aloboudi. I’ve been simply tolerating the fans for the most part but from time to time I do. If you’re looking for extended battery when away from a dock it’s great for that.
Much obliged for the quick and helpful reply.
unfortunately this app doesn’t work with MacBook Pro 16. I tried literally everything but I can’t disable turboboost.
We should compare notes Jack because I’m using it on a 16” MacBook Pro. Describe more of what you’re seeing?
There are instructions on the site faq. One trick was to move the app from the download folder to the apps folder.