I’m a huge fan of Audio Hijack from Rogue Amoeba. In fact, I’m such a huge fan that when I was at Alt Conf last year and they were giving out free drink tickets if you answered a question and I was asked, “What one app keeps you from switching to Windows?” I answered, without hesitation, Audio Hijack.
Now that we’ve established how important Audio Hijack is to me, I’ll give you a brief overview of what the software does. After that, I want to share some of the more interesting sessions I’ve created with Audio Hijack. You’ll be able to download these sessions from this article and then run them yourself.
You may think you’d never have a need for Audio Hijack because you don’t record a podcast, but there are so many other things you can do with it that you may find a use for this awesome software.
Brief Overview of Audio Hijack
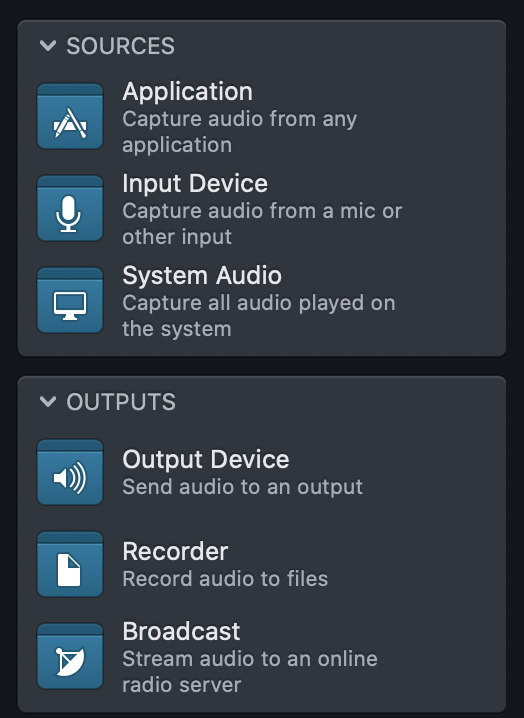
Audio Hijack is a macOS app that allows you to capture audio from different sources including microphones and even applications. It then lets you pipe audio through special audio unit effects to sweeten the sound. And finally, you can pipe the output to multiple sources and even record the audio you’ve hijacked.
Audio Hijack’s interface is like nothing I’ve ever used. It has a blank canvas and you drag sources, outputs, and effects onto that canvas. If you’re visually impaired, Audio Hijack, like all of Rogue Amoeba’s software, is completely accessible. The software simply calls out to you the location of each block in x/y coordinates. In VoiceOver you’ll hear it say things like, “Your microphone has no input connections, one output connection to 10-band EQ at 2.75x, 2.25y”. I’ve taught two blind people to use Audio Hijack so far and they left a one-hour session knowing exactly how it works. I’ll give myself partial credit for being a good teacher and being smart enough to let them drive while I watch on screen sharing, but the other 90% credit goes to Rogue Amoeba.
So as I said you drag in these blocks for inputs, outputs, and audio effects. When the blocks get near each other, they become connected by a line. This shows how the audio will flow from block to block. When you start an Audio Hijack session using the Run button, you’ll actually see the audio flow between the blocks as a yellow line. That yellow line saved me just today. I was recording with Bart and glanced down to verify the yellow line was moving on both of our tracks, only to discover there was no yellow line for Bart! Luckily we had just started recording, so I was able to just stop and start over.
At the very simplest, an Audio Hijack session has to have an input and an output, but you can go way beyond this by adding in blocks for applications and broadcast streaming and equalizers and meters and more. You can get really creative with all of these options and do some really interesting things.
I said this overview would be brief, so I’m going to cut myself off but I could go on and on about how much fun this app is. If you want an in-depth tutorial, I did one for ScreenCastsOnline quite a while ago at screencastsonline.com/…. You’ll see that it’s archived but that just means it old, it doesn’t mean it’s not current. The app has been stable at version 3 with no huge revisions, just great free updates for the last 5 years. Ok, let’s get to the interesting examples. I’ll do each one as a problem to be solved.
Recording 2 Mics into your Mac
Every episode of Chit Chat Across the Pond you hear means I’ve recorded my voice and my partner’s voice from a voice over IP service, such as Skype or Discord. The first time Dr. Garry came to visit and we decided to record together, I tried to get her to go into Steve’s den and let me call her over Skype so I could record with my existing session.
She asked why we couldn’t record in the same room and I had to confess that I actually didn’t know how to do that! I could record with someone half a world away in New Zealand or Ireland but recoding someone inside my house was beyond my skill set. She insisted I should be able to figure it out.
I know at least 12 of you are yelling into your devices right now that if I just had a hardware mixer, this would be easy. I had a mixer at one time, and I didn’t like it. I didn’t ever understand it particularly well and it took up a giant area of my desk. I have figured out how to avoid having a mixer by using Audio Hijack. And it turned out to be much easier than I expected.
I can plug two microphones into my Mac pretty easily. If they’re both USB, I just need the USB-C adapter and the hardware is taken care of. I use a big-girl mic with an analog XLR connection so I have to plug my mic into a USB-interface first but then it’s right into the Mac with the USB-C adapter. Ok, so hardware is sorted.
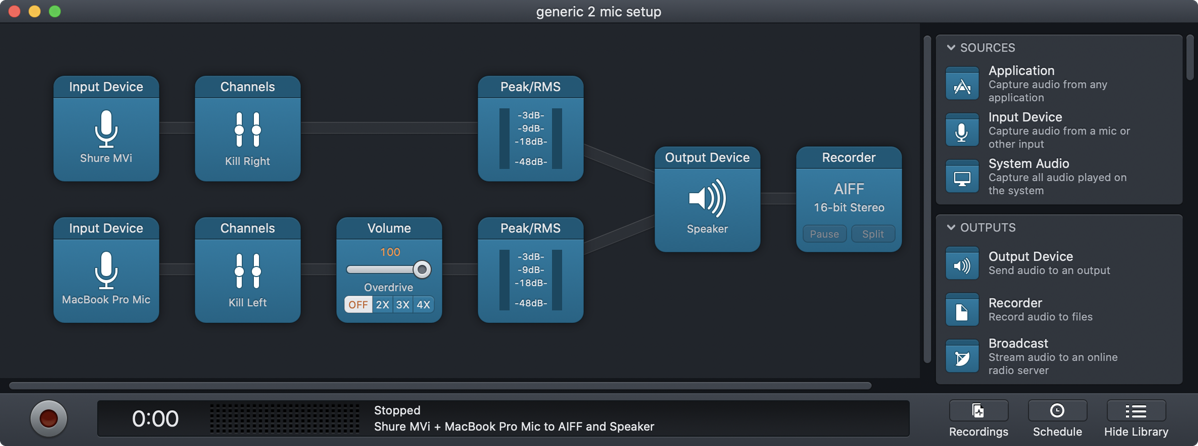
In Audio Hijack you can add as many input sources as you like. Inside the Sources option, we can choose the Input Device block that looks like a microphone and drag it in twice, one above the other. On the upper one, we’ll choose our own mic, and on the lower block choose the second mic. If you wanted the simplest possible setup, we could then drag in a recorder block from the Output options and be in business.
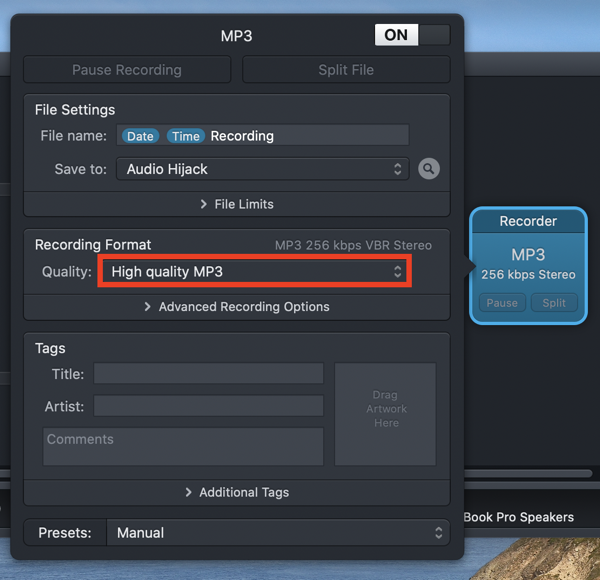
By default, this recorder block is set to 256kbps stereo MP3. Hit the red button and you’re hijacking both mics and recording this high-quality MP3. There’s only one problem. If you’re wearing headphones (and you should, to make sure you don’t get feedback into your own mic), you won’t be able to hear the other person. There’s an easy solution. You simply drop in an Output Device after your mics and before the Recorder, and set it to your headphones. To change the recording format, tap on the Recorder block and then select the pulldown for Quality under Recording format.
In this simplest form, both mics are being recorded on both channels into the stereo file. Because they’re both on both channels, you can’t fix problems separately by voice. Let’s say I start eating some popcorn while Maryanne is busy crushing my dreams about how flawed my memory is. I can’t go back and cut out my crunching from the recording or it would cut her voice out too. There’s a solution to this problem.
Audio Hijack has what’s called the Channels block under Built-in Effects. Channels blocks allow you to do a few different things, but I use it to simply kill one channel on each mic. So on my upper track, after my mic but before the recorder, I can tell it to kill the right channel. Now my audio is only on the left channel in the stereo recording. On the lower track, I drag in another Channels block and tell it to kill left. Now I’m on the left, the other person is on the right. As long as Dr. Garry’s mic doesn’t pick up my popcorn crunching I can eat away and edit later. Which I never do, by the way. Eat while recording OR edit my recordings.
Now it’s doing everything we wanted, right? Sure, but we could make it better. That recorder set to MP3 would work just fine if this is your final output, but that’s a compressed audio format. If I’m going to drag this audio into another application and top and tail it with an intro and outro, I will be compressing the recording a second time on export and that’s never good if you can avoid it. I select the Recorder block and change it to an uncompressed, 16-bit stereo AIFF.
With two people on a recording, you never know if the other person is going to be right up on the mic or maybe they lean back and get real quiet as a result. I’m looking at you, Maryanne. I like to drop in a Volume block from the Built-in Effects onto the other person’s track. This lets me go to 2X volume and then drag the slider back and forth until they are the same volume as me. How do I know they’re the same volume? I accomplish that by dragging in a meter from the Meters section. I favor the Peak/RMS meter because I can see the audio bouncing up and down to see if they’re the same level on both of our mics, and I will see it turn red if the speaker is hollering into the mic and peaking, which sounds very harsh to the ears.
I know I said this was the least complex of the interesting sessions and then I added all kinds of complexity. But remember you could use Audio Hijack to drag in two mics and a recorder and you’d probably have a pretty darn good recording. With these extra tips maybe it can be even better. And remember you can download the sessions I’ve created, and use them pretty much out of the box. You’d only need to change the mic inputs and the outputs to match those available on your system and you’d be ready to go.
Record a VOIP call into a stereo, uncompressed audio file
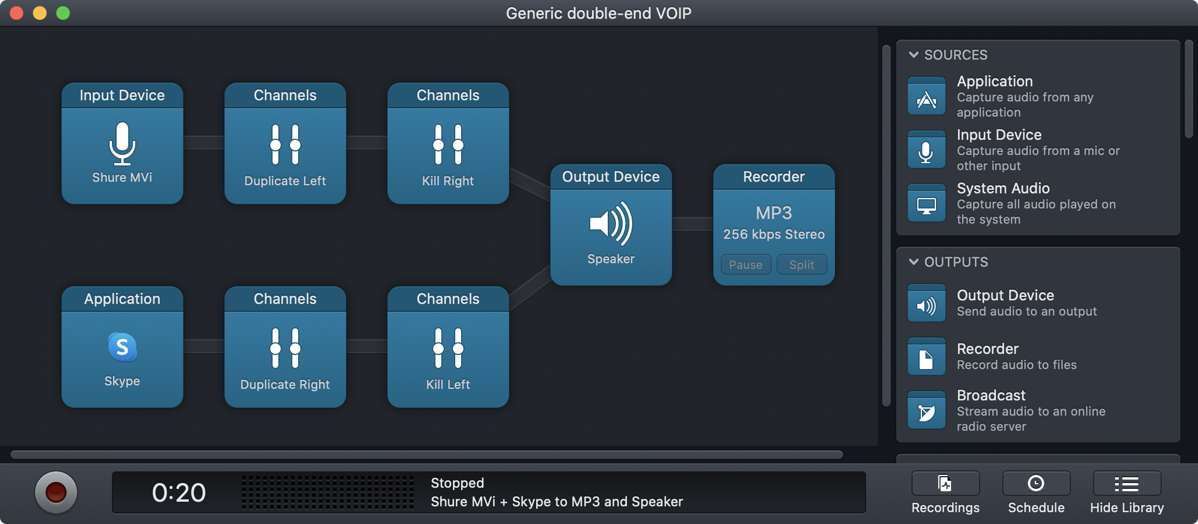
Now let’s say you don’t have a pesky in-home partner for the recording and instead you are going to talk to someone on Skype, Discord, Zoom, FaceTime or any other voice over IP (VOIP) communication method. As before, you might want to record the two sides of the conversation on separate tracks so your voice is on one channel and theirs on the other channel. This way if a dog barks at their house, or you sneeze, you can edit that out without wrecking the other channel.
Remember how in our in-home example we killed the right channel for one voice and killed the left channel for the second voice, and that lets us record into two separate tracks, one for left and one for right? When you’re talking to someone on a VOIP call, it’s kind of disconcerting to hear them out of only one ear. So for this setup, I like to add a duplicate channel block on each audio source. It sounds complicated but for my mic I can add a duplicate left block, followed by a kill right block. Then for the VOIP caller, I’ll do the opposite, adding a duplicate right, then kill left. Now I can hear my caller in stereo and not hear my own voice.
Just to change it up, in the recording session I have available for download, I left the recorder set to record a 256kbps MP3 stereo file.
Create Real-Time Transcriptions of VOIP Calls with Rogue Amoeba and otter.ai
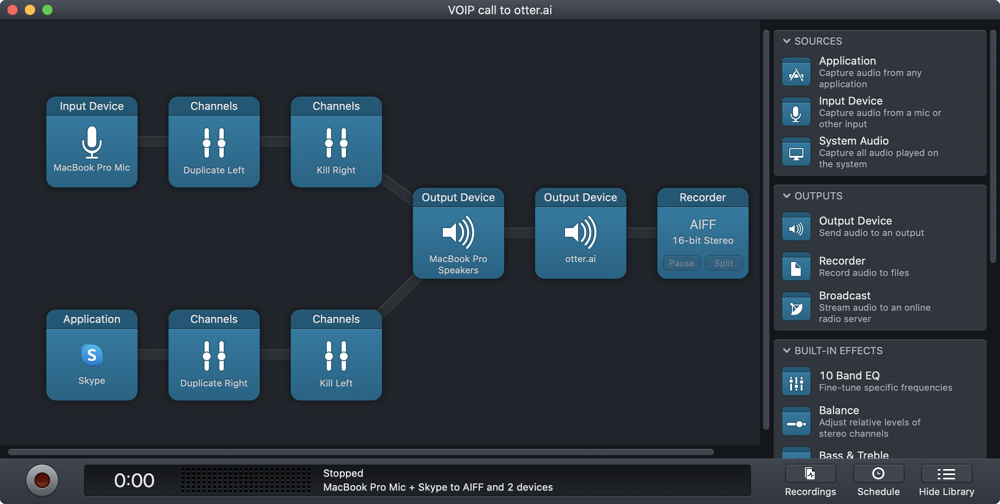
I recently discovered a really cool service called otter.ai that transcribes audio into text for free. I wrote an article explaining the otter.ai service on www.podfeet.com/…. You can upload an audio file after recording, but they’ve also got a record button right on the site so you can talk to it real-time and have it transcribe what you say.
Bu then I got to thinking about my slick VOIP call session in Audio Hijack and wondered if there’s a way to have otter.ai hear the call real-time and create the transcription while I’m also recording. That would save time at the end of the production. This requires the use of Rogue Amoeba’s awesome Loopback software to create a virtual source to use as an input to otter.ai. Then in Audio Hijack you just add one more Output Device block and point it at that virtual source.
If you want all of the step-by-step instructions for Loopback, Audio Hijack, and otter.ai, I wrote up a blog post with the details on www.podfeet.com/….
How to Record Skype Call Including Audio from iOS
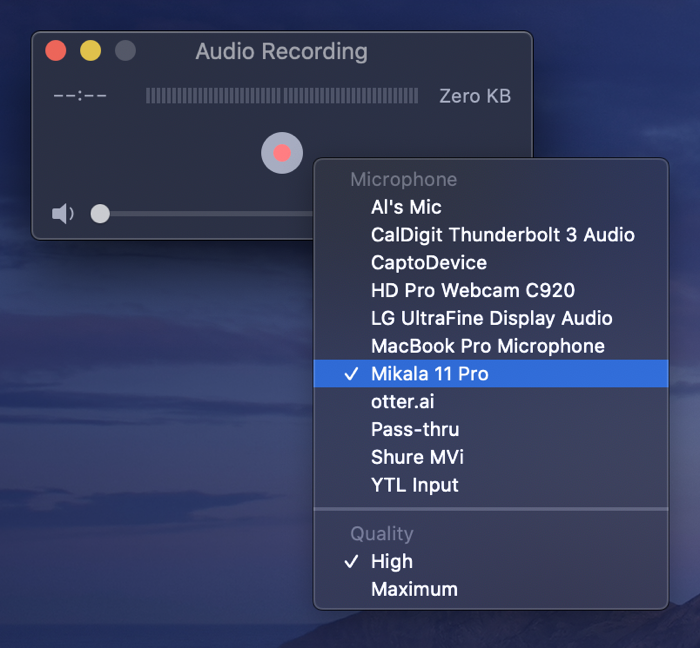
Here’s the most interesting problem I solved with Audio Hijack. I was going to have author Shelly Brisbin on my show to talk about her book iOS Access for All. Shelly wanted to demonstrate using VoiceOver on her iPhone during the interview.
I wanted to play along as well with my phone as she explained things. We could have tried to keep our iPhones close to our mics so the audience could hear what the phones were saying, but that would have created less-than-ideal audio.
I’m going to walk through the steps we followed to capture the audio directly from our iPhones as second sources. In our case, we were listening to VoiceOver speaking, but you could use this for any iOS audio you wanted to send to a VOIP call. Maybe you want to play a song for them or a podcast. Any audio created by your iOS device will come through to your compatriot.
Step 1 – Combine Mic and iPhone to One Output
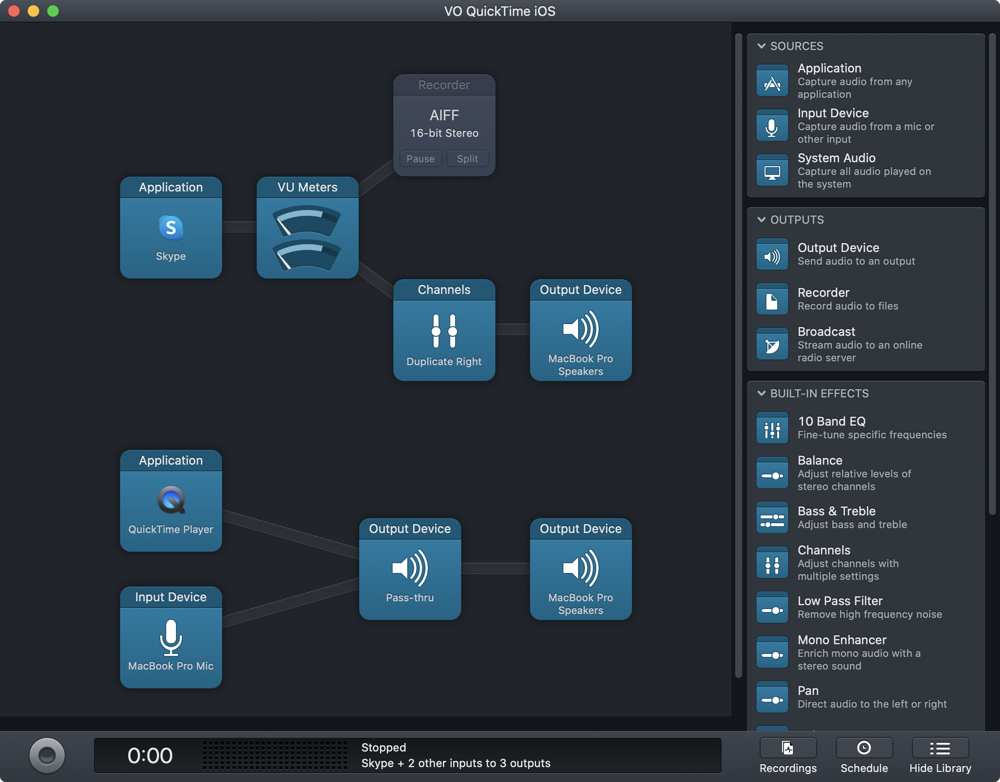
Imagine for the moment that your only objective was to record your mic and the audio from your iPhone. We’ll add in the VOIP call later. Audio Hijack allows you to capture audio not just from physical microphones but also from applications. In our example, the application we want to capture is QuickTime. That might seem like a curious choice but here’s why.
Plug in an iOS device to your Mac and launch QuickTime. In the menubar, select File, New Audio Recording, it will default to using your internal microphone as the input. Now here’s the cool part. Next to the red record button, there’s a little chevron that allows you to choose which mic to use. One of the mic options will actually be your iOS device! I know, it’s crazy, right?
You can test this right now yourself without using any other tools. Just play some audio on your iPhone or iPad while QuickTime is using it as a microphone and you’ll see the little audio levels start bouncing in QuickTime.
Next, in Audio Hijack pull in an Application source, click on it and choose QuickTime Player as the application. Then pull in an Input Device and choose your microphone. Add an Output Device and set it to your headphones or speakers and when you engage Audio Hijack, you should be able to hear the audio from your iOS device and your own voice at the same time.
This is great, but we’re going to need to pipe this combined audio as an input to our VOIP application. We need to create a virtual source to do this. We’ll again use the awesome and easy-to-use software Loopback.
In Loopback, the very simplest virtual device is simply a pass-thru device, which is all we need. In Audio Hijack we can add an Output Device to our QuickTime and Microphone chain, and select the newly created virtual Pass-thru as the device. We now have the power to send our voice and the audio coming from iOS anywhere we like, just as though it was one hardware device.
Step 2 – Add VOIP Track to Session
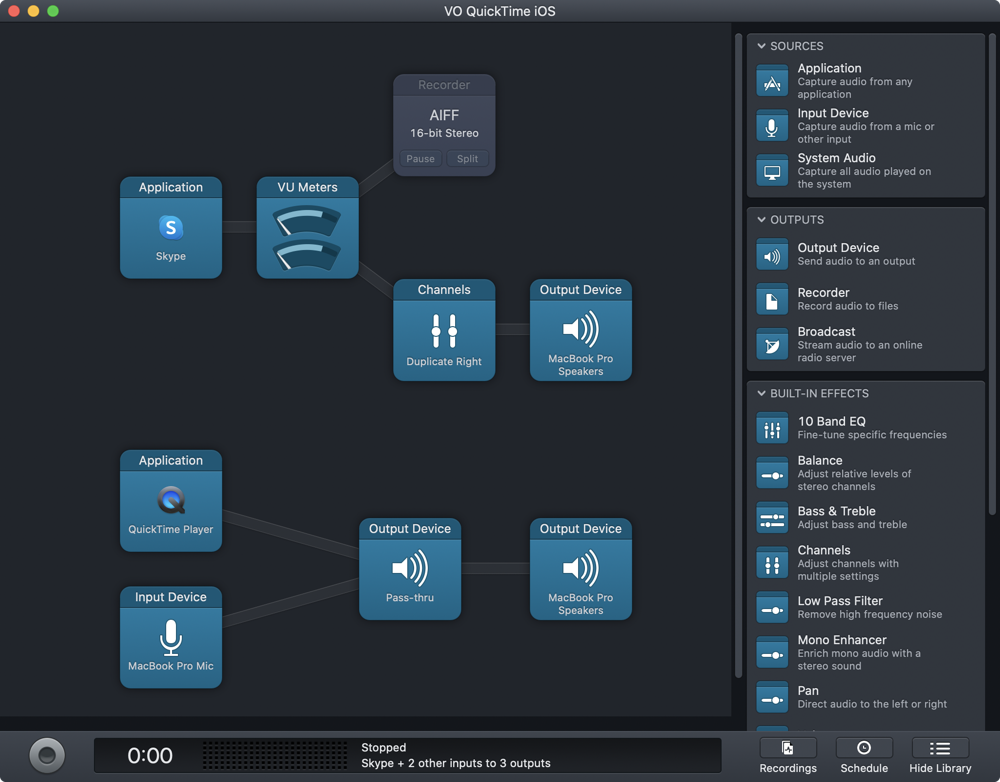
The first half is done. Now we’re going create an entirely separate and parallel path in Audio Hijack for Skype. These two paths won’t ever touch each other; they’re completely independent but are created in the same session. We’ve already gone into great depth on how to work with a VOIP call so I’ll be a bit more brief in my description.
I used Skype as an Input block, threw a VU Meter block in to watch the levels, duplicated the right channel and sent it out to my speakers and then added a recorder block.
In Skype, I need to set the mic input to Pass-Thru so that the other person can hear my voice and my iOS device when it’s making noise. In this configuration, note that you do have to hit the red button so that the person on the VOIP call can actually hear you and your iOS device.
In my example with Shelly and me both wanting to send our iPhone audio to the call, we had one more step. Shelly needed to have an identical setup on her end. Of course she’s an avid Audio Hijack fan and she had the skills to create the session, but we didn’t need to have her do the work. I simply sent her my session by dragging and dropping it into Messages. She opened it in her copy of Audio Hijack, and then changed the mic input and audio output to match her devices. As soon as we both engaged our copies of Audio Hijack, we could both hear each other’s voices and our iOS devices as VoiceOver jabbered away.
I created a tutorial back when I figured this out, but it was before Loopback existed. I was using Soundflower instead, which is no longer supported. I do highly recommend Loopback but if you are funding-restricted, you might want to check out the open source replacement BlackHole on github.com/…. I couldn’t figure it out in the short time I spent with it but maybe you’re more clever than me.
In any case, even though my tutorial references Soundflower, I think the settings for the blocks will help so I’ve included a link to the tutorial: www.podfeet.com/…
Bottom Line
It’s highly probable you may never need to solve the exact same problems I had to solve, but my hope is that it helps stimulate ideas of problems you could solve with Audio Hijack. I’d sure like to hear about it if you come up with some interesting Audio Hijack sessions.
And don’t forget – you can download all of the sessions I described here so you don’t have to recreate them in your copy of Audio Hijack.

Thanks for the post. Will be using this for our “Shelter in place shows”. Hell, if it works out well, we may stick with recording remotely forever (saves gas).
I find it so odd to think of recording in the same place, Terrance! I guess 99% of my experience doing the shows has been remote from people. Bart and I once recorded in person and it was so weird!
Since you’re used to seeing each other, you might want to do video while recording the audio of the show only, just so you can keep your timing right and watch each other’s expressions.