I was asked recently by a software developer to provide feedback on their redesign of their user interface. It’s a product I know really well and rely on regularly so I jumped at the chance to provide any feedback.
They had a list of specific tasks they wanted me to execute, and then questions about whether I found it difficult to find the commands, was it clear and intuitive, and what could be changed to make it easier.
One of the really tedious parts of doing testing like this is stopping the task and then filling out a form with your explanations. I used to do this at work for internal development projects, and the forms never had enough room to write, didn’t allow any free-form explanation of the experience, and didn’t allow for coloring outside of the lines.
This developer suggested a far different approach to giving them the feedback they desired. They suggested that I record my screen and video from my webcam. I think the strength of this is that they can watch my mouse as I move around, see if I hesitate, or choose the wrong menu first, and at the same time catch the expression on my face. Am I looking pleased? Are my brows furrowed in confusion? In addition to the video, they wanted me to capture audio as well which would give them a running commentary on what I was experiencing.
As you probably know, I’m quite familiar with capturing video with the high-end tool ScreenFlow, and I very often make short video clips with tools such as Parallels Toolbox’s built-in screen recorder https://www.podfeet.com/blog/2017/07/parallels-toolbox/ or Capto https://www.podfeet.com/blog/2019/12/capto/.
When I read their suggestion to record video I had to really decide how much I wanted to provide this feedback because this would mean a lot of work. It’s not that hard to make the recording itself, but then you have to figure out the right compression so it’s not a TB in size and figure out how and where to share it with them.
But in the email from the developer, they suggested I try out a free service for screen recording called Loom, from https://loom.com. You know me, I immediately jumped to see what this Loom business was all about. Spoiler: Loom is amazing.
What Makes Loom Unique?
Before I get into the details of how Loom works, the most important thing to know is what makes it stand out from all of the other screen recording options we have at our disposal. The big difference is that as it records your screen appears to also be uploading it to the Loom web service.
I recorded for over 15 minutes straight and when I was finished, the video, recorded at 1080p resolution was already available on Loom’s website and ready to share with a link. That is simply astonishing. Now that we know why we care about Loom, let’s get into those details.
I created a free account and was offered a download of the app for my Mac. There’s of course also an app for Windows, iOS and Android. I’ll get to the mobile app in a bit but let’s start with Loom on the Mac.
Loom installs as a normal app but you can also choose to see it as a menu bar app. I only had 22 menu bar apps showing (another 12 hidden on the second Bartender menu) so of course, I installed loom in my menu bar!
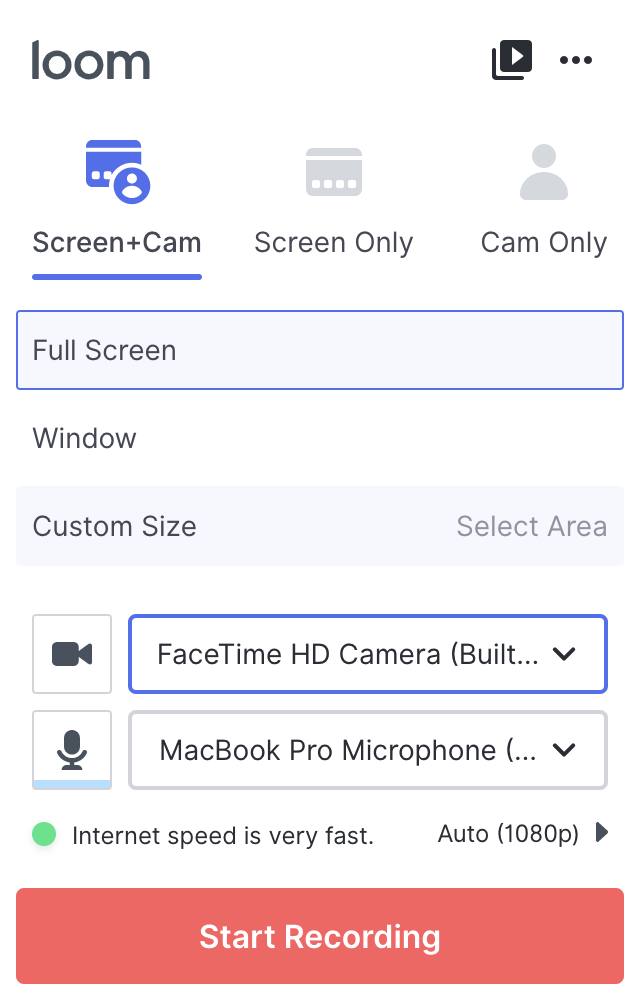
Loom launches with three large and intuitive buttons across the top: Screen+Cam, Screen Only and Cam Only. Starting with Screen+Cam you get the option to choose between a full-screen recording, a single window recording or you can select an area to create a custom size.
As you would expect, your next options are to choose which camera to use to record the view of you, and which microphone. For most people, this will default to your built-in devices, but if you have a big-girl mic or webcam you can choose them here.
If you chose the Screen+Cam option, while you’re configuring Loom, it will show a small circle in the bottom left corner of your screen showing your webcam. If you hover over the circle, even while recording, you can drag it around to a different position on screen, and even make it a larger circle or full screen.
Before you start recording, you also have an option to upload a static PNG image to be displayed in the webcam circle instead of your live video. Once you’ve got one or more images uploaded, during recording you can switch the webcam view to the static PNG. This might be a good way to put a splash screen up of your company logo using the full-screen option, or if you’re doing a video recording and would prefer not to be live on video during part of it you could put up a static image.
The last option is to choose the resolution of your recording. By default, it is set to Auto where it chooses the highest resolution your Internet connection will allow. As I’m viewing it, it says “Internet speed is very fast” and then says Auto (1080p). You can change the resolution from this area or in preferences. This reveals the options to go to lower resolutions of 720, 480, or 360p, or If you want up to 4K HD it shows those higher resolutions as a Pro feature. Oddly it does show 1080p HD as pro feature, and yet on my free plan, it is giving me 1080p. I’m glad to see that they do have a business model because we definitely want to avoid Freepi services, so it’s good to know that Loom has a business model for this freemium service.
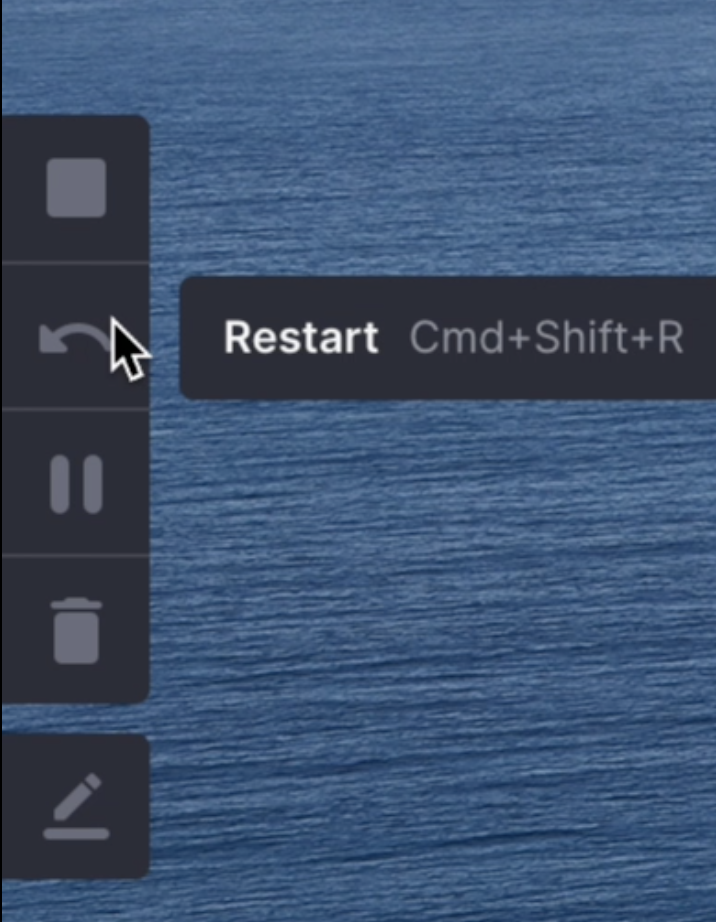
When Loom is launched, before and during the recording, you’ll see a small menu sticking to the left side of your screen. This menu isn’t captured in your video but it gives you quick access to some super important tools. The first button is to stop, which of course you’ll need for every video. The second button is probably equally important, it’s a restart button that lets you abandon what you’ve recorded and started over. There’s a pause button which is super handy when you want to gather your thoughts instead of saying “ummmm” or hunting around on screen for a menu. You’ve also got a trash can so you can completely abandon what you’ve recorded.
The last button is a pencil, and when chosen reveals a color palette to allow you to scribble onscreen to draw the viewer’s attention. Quite reasonably the scribbles disappear after a second or two. Personally I suggest measured usage of such a tool, and to use your words as much as possible to draw attention to the pertinent parts of your screen.
Once you’ve got your camera, mic, and video resolution sorted, you simply tap the giant, red Start Recording button and go to town. When you’re finished and hit stop, nearly instantaneously your video is ready to view in your Personal Library at Loom.com. Name your video, grab the link offered to you, and send it off. No messing about with compressing videos, no making sure you have enough online storage for the size video you just created, no waiting 45 minutes for it to upload. You’re already done!
Sometimes you end up with a smidge of dead air at the beginning of a recording, or you capture your mouse looking for the stop button, so Loom allows you to trim your video right through the web interface.
You can allow or disallow comments and email notifications, you can allow emoji reactions, and change whether the viewer can download your video. You automatically get access to how many views you’ve gotten on a video and you can choose whether viewers can see that data as well.
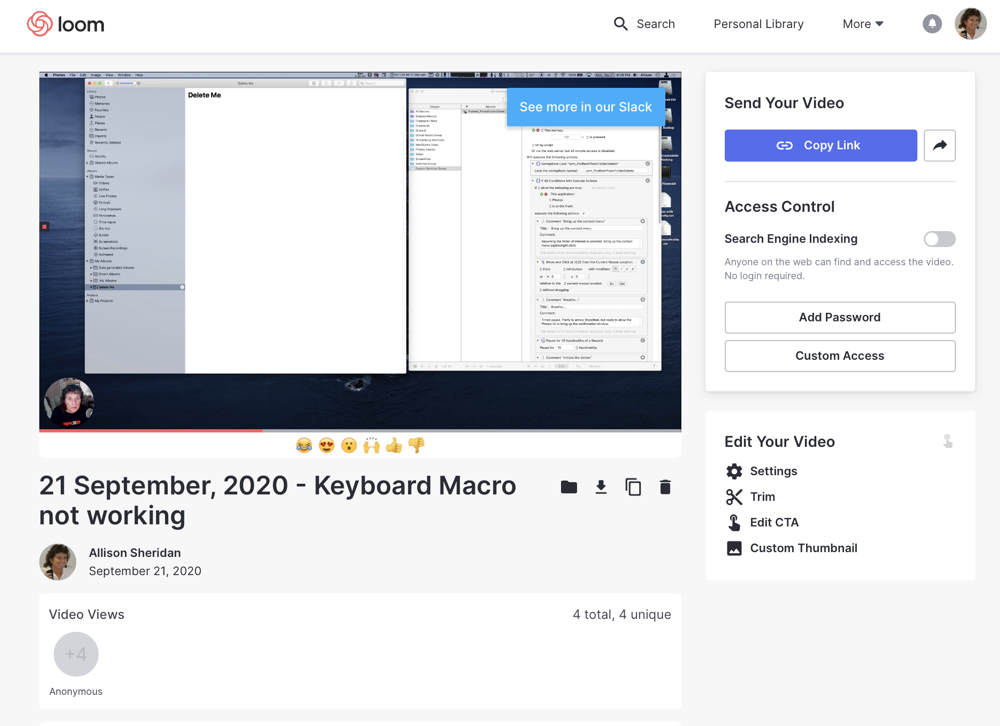
You can create what they call a Call to Action button that will be viewable while someone is hovering over your video. This button can link viewers to an external site. I was recently asking some questions about using Keyboard Maestro in our slack to add missing functionality to Apple Photos. I was testing a Keyboard Maestro script Mike Price made for me and it wasn’t working so I used Loom to demonstrate the problem I was seeing. I was able to add a Call to Action button that linked directly back to the original question in Slack. I thought that was awesome.

If you’ve got something recorded that you don’t want the general public to be able to view, you can add a password or set the privacy to custom access where you enter the email addresses of the people you want to be able to view your video.
Going back to the app on the Mac, there are a lots of settings but I’d like to highlight a few of them for you. By default system audio is not captured, but sometimes you really would like it captured so you can turn that on. You can highlight mouse clicks which is a much better way of drawing attention than scribbling with a pencil.
By default, the camera is set to flip. This is a tricky setting. If it’s not flipped then it’s not a reflection of you, and if you try to point at anything in your surroundings you’ll get it wrong 100% of the time. On the other hand, if it is flipped, then any text will be reversed. This sounds unimportant for your webcam but it can be very distracting if there’s text in view.
By default Loom sets your Mac to Do Not Disturb, which I think is an awesome feature. I can’t tell you how many times I’ve had to start over on making a recording because I forgot to turn on Do Not Disturb. Quite politely, Loom turns notifications back on when you’re done recording.
Shortcuts
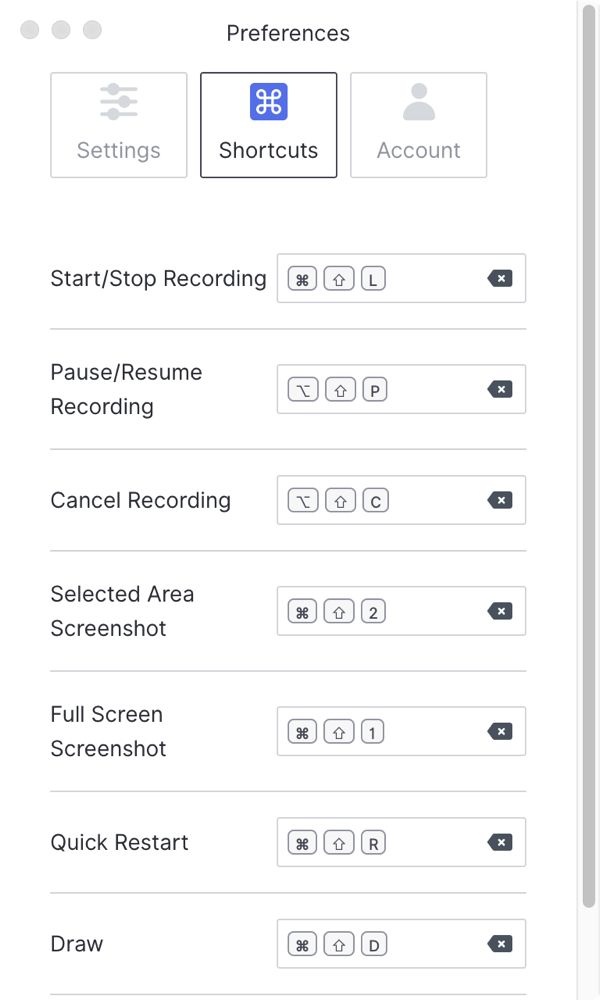
If you prefer to use keyboard shortcuts, Loom has you covered. They have keyboard shortcuts for toggling start/stop of recording, pause/resume of recording, cancel recording, restart recording, and draw with the colored pencil.
They’ve also got two keyboard shortcuts I don’t understand. You can supposedly take a selected-area or full-screen screenshot, but for the life of me I wasn’t able to invoke either of those options whether I was recording or not. It’s possible I took 28 screenshots while testing this and they’re buried somewhere on my disk!
I only have one bad thing to say about Loom and it’s that if I’m not mistaken, it’s 100% inaccessible. I can’t get VoiceOver to read out a single thing on the menu bar app. You might think a blind person has no need to make videos, but you couldn’t be more wrong.
Whether I can see or not, I need to be able to demonstrate what’s going on on my computer screen to send to developers ,or teach people, or whatever darn reason a sighted person would need to do with a video.
Mobile App
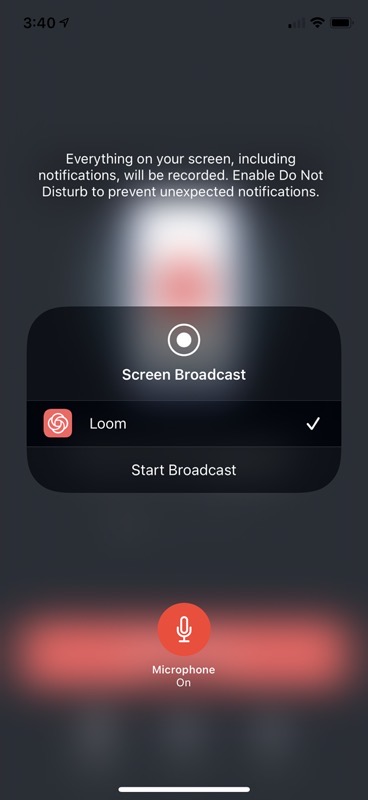
Now that I have that off my chest, I’ll switch gears to tell you that I was delighted to find out that Loom has iOS and Android apps as well. You can’t record picture-in-picture like you can with the desktop app but rather they harness two built-in features of the mobile operating system. On iOS, you can obviously record video from your camera and store it locally, but if you start from inside the Loom app, it is automatically put on the Loom website. They call it broadcasting and I think that’s how it’s actually up on the website nearly instantaneously.
The other built-in capability they use on iOS is the ability to do screen recording. Normally you have to know to open Control Center (and figure out where Control Center is on your particular model of iPhone) select the unnamed icon that represents screen recording, enable recording of your voice, and then start recording and swipe Control Center away.
With Loom, tapping on screen recording automatically launches essentially what looks just like the built-in screen recording function. However, in the middle, it shows you’re going to save the broadcast to Loom. They remind you to enable Do Not Disturb, and I’m presuming that’s because Apple’s sandboxing doesn’t allow them to do it for you.
When you’re done recording using the Loom app on iOS, you don’t get many options to modify the video other than renaming, downloading, or deleting the video. To do the fancy stuff like trimming and changing access controls you’ll have to go to the website. Not a big deal but I wasted a bit of time searching for those capabilities in the Loom app.
Sadly, I have to report that the iOS app isn’t accessible for VoiceOver users either. A few of the elements are accidentally labeled but the important buttons like choosing whether to record with the screen or the camera are not accessible at all.
You can bet that the developers of Loom will be getting a helpful suggestion for improvement from me. I find that angry finger wags are not as successful in bringing change as thorough explanations of the problem with improvement ideas.
Pricing
I’m sold on using Loom for recording videos when I need to share them with someone quickly. Let’s talk about the pricing before I close this out.
The free, basic plan allows you to record and keep up to 25 videos along with the features I’ve described. If you go for a Pro account at $8/moth you get unlimited videos and you get more advanced recording and editing capabilities. That’s bananas for $8/month. If you’re in education (Terry and Marty) the Pro version is free.
They’ve also got Loom for teams which gives you everything in Pro plus a team video library, custom branding, and more. If you’re an enterprise customer, they say, “Let’s talk.”
I am so happy they have a variety of well-priced paid plans to help support the free tier like this. It’s a very cool service and when it’s made accessible I’ll be able to give Loom my 100% badge of approval. You can find Loom at https://Loom.com
2020-10-14 Update on Loom
This week Loom came out with some fairly significant changes. They still have a free tier, but they’re incorporating some business/team stuff into it. According to their blog post announcing the changes, you now get a team library, a shared library, and unlimited viewers can join your workspace. You can have 25 creators in your team as well. However, the free plan is now limited to 5-minute videos.
For the occasional user who just wants to show a bug to a developer, or teach a short task, I think 5 minutes is a reasonable length limit for a free service. It might mean really planning out what you want to demonstrate and make your videos crisp and to the point, but hey, that’s better for your viewer anyway.
I also discovered something else after doing the review – I was on a free trial of their $10/month plan. That explains why I was getting 1080p video uploads which I mentioned, even though the free tier was only supposed to be able to do 720p. I also discovered that the free tier doesn’t have the video drawing tool (which I suggested you use very sparingly so as to not annoy your viewers). The calls-to-action are also only available on the $10/month plan. That’s the tool that allows you to embed a URL into a video.
They also simplified the plans so there’s just Starter (the free plan) and Business (the $10/month plan) and they emphasize that it’s still free for education.

