Last year I wrote an article explaining why I use five different apps to take notes. One of the apps I talked about was Ulysses for writing my draft blog posts. I have found that writing on my iPad Pro with the Magic Keyboard is a great way for me to focus, and Ulysses is cross-platform between Mac and iPadOS. There are lots of cross-platform options, but Ulysses wins because it supports TextExpander on the iPad.
I’m not talking about the TextExpander keyboard for iOS, which works but is a bit clumsy, I’m talking about native support within the app with the normal onscreen or external keyboard, just like on macOS. It’s glorious, but only if you can figure out how to enable it. Oddly, this feature does not appear to be very well documented, either from the TextExpander side or from the Ulysses side, and you need to do things in both apps to enable this capability.
I find myself wasting a great deal of time trying to figure out how to get it to work, so I decided to write it up for myself and share it with everyone else.
Finding TextExpander Settings Menu
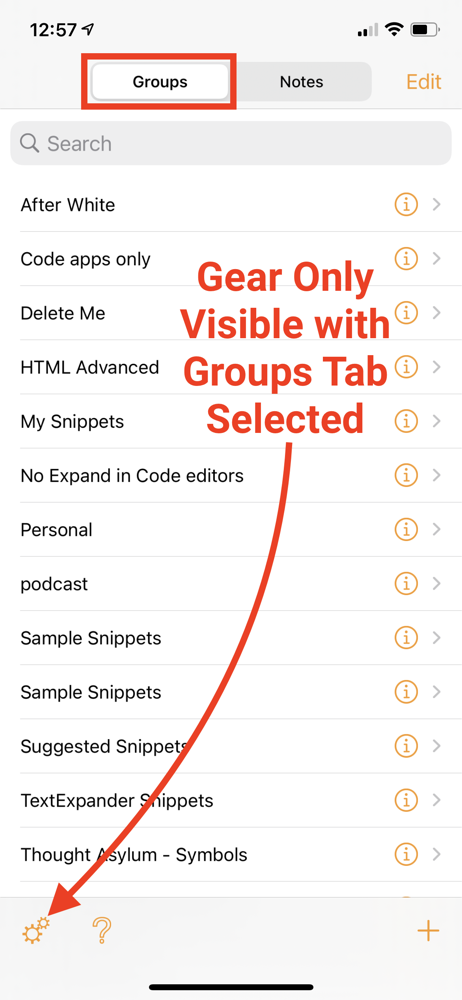
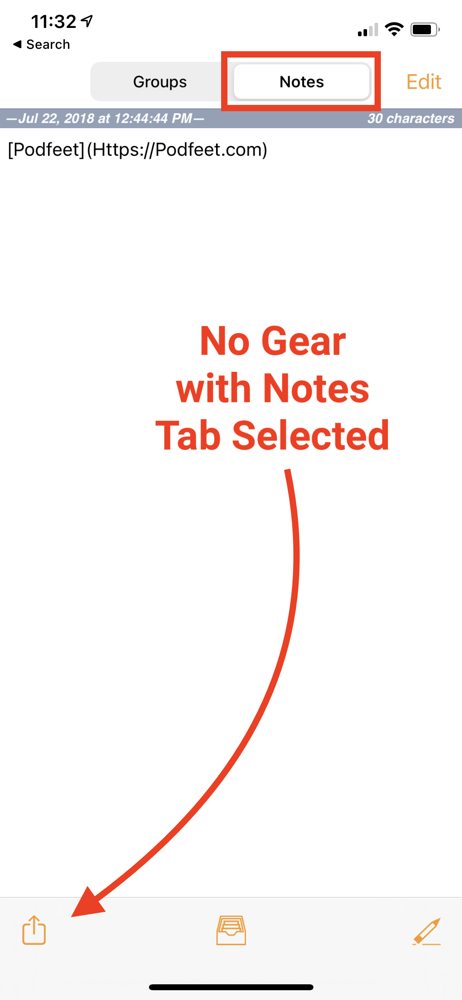
The initial setup on the TextExpander side is documented in a support article called TextExpander-Enhanced Apps for iOS (74 and counting…)
The purpose of the article is to tell you how to flip a switch to allow TextExpander to share snippets with TextExpander-enhanced apps, one of which is Ulysses.
But even this article doesn’t really give you the step-by-step process. It says “Under TextExpander’s Settings” as the first step, but where is that? It’s not in the Mac app and it’s not in Settings on iOS. You have to open the TextExpander app on your iOS device to find the settings they’re talking about.
When you first open the TextExpander app on your iPhone or iPad, there are two tabs at the top. Groups, and Notes. If the app opens to the Notes tab for you as it does sometimes for me, you won’t be able to find the Settings menu.
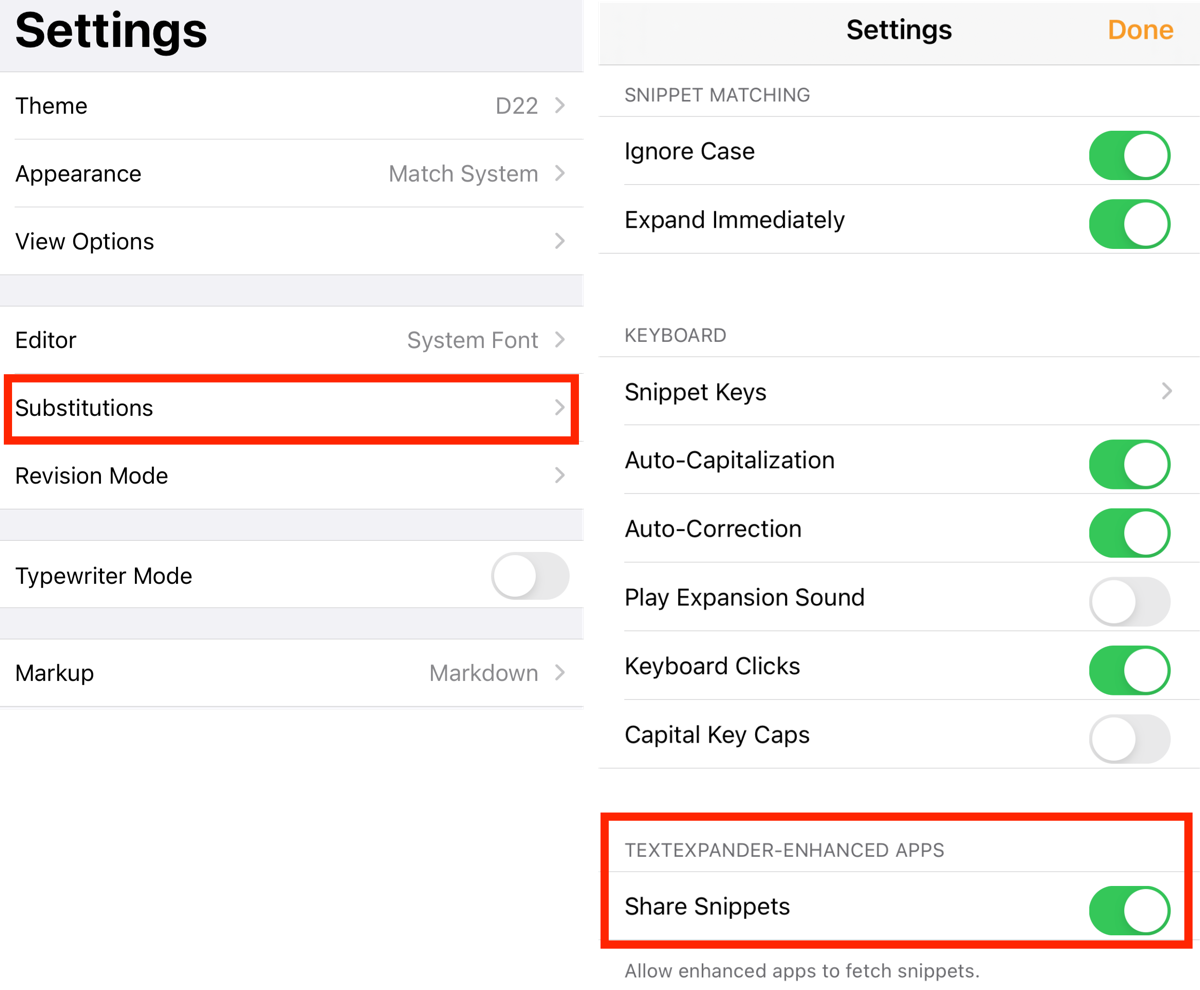
If you switch to the Groups tab, only then will you see a gear in the bottom left for Settings. Once you’re in Settings, then you can see the section for TextExpander-enhanced apps and you can finally toggle on Share Snippets.
Finding Settings for TextExpander in Ulysses
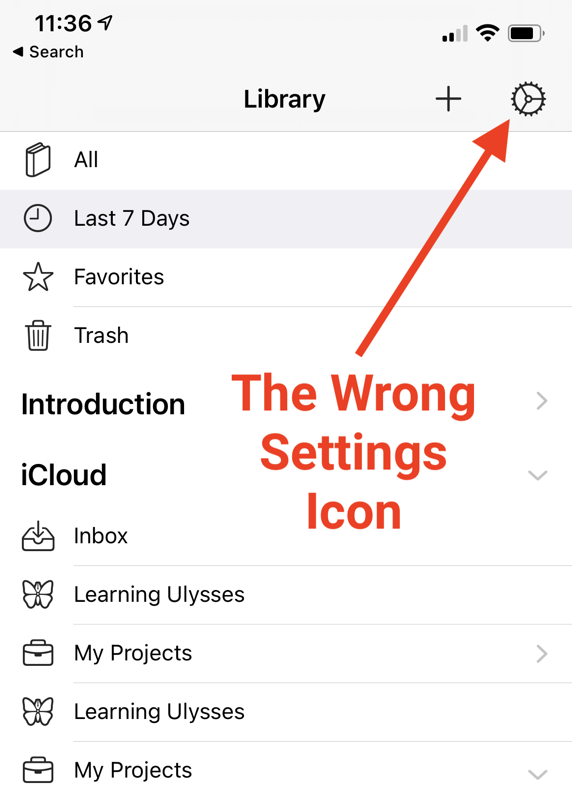
That was the easy part. Now we have to uncover the hidden secret of enabling snippet syncing inside Ulysses. If you’ve been around for a bit, you know that enabling features is done through some sort of settings screen. Ulysses makes finding settings a bit of an adventure.
You might understandably be fooled by the gear in the upper right on the Library view, but you can dig into that menu as long as you want and you won’t find the settings to enable TextExpander snippet expansion.
Instead, you have to go into a note to get to the settings. How weird is that? If you open any new or existing note, you’ll see an icon in the upper right that looks like a circle with 3 dots inside it.
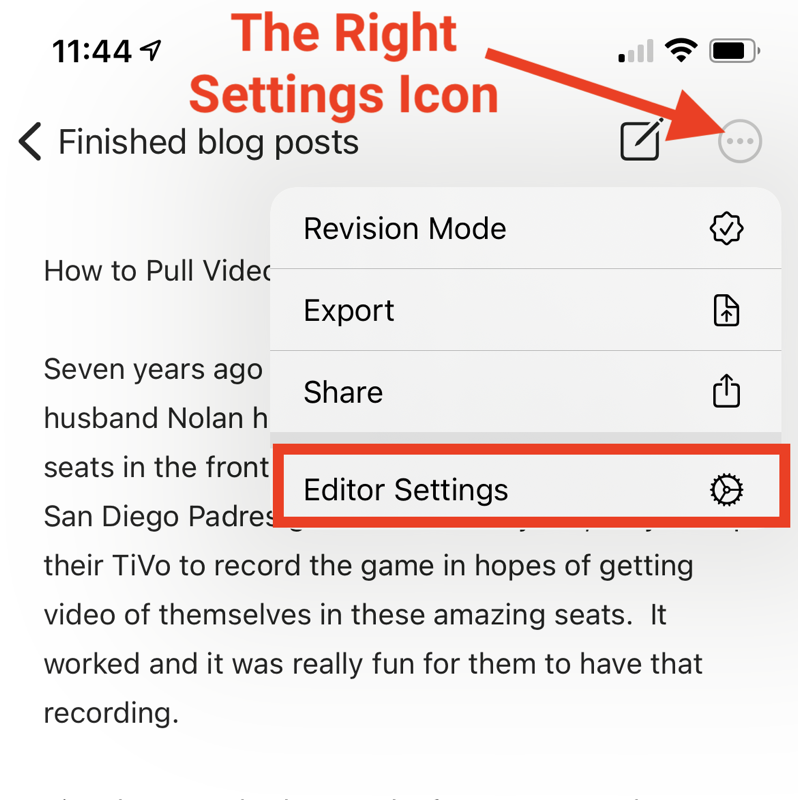
When you tap the circle 3 dot icon, one option in the dropdown is Editor Settings. I cannot explain why Editor Settings isn’t in the main settings under the gear, but that’s why I’m writing up this tutorial.
Even when you look at Editor settings you might be baffled. You’re looking for an option called Substitutions. Inside Substitutions, you’ll find toggles for things like Auto-Capitalization, Auto-Correction, and Check Spelling.
Below that, you’ll find two things we need to enable. The first is a simple toggle that says Enable TextExpander. But the second is a button that says “Update Snippets…”
The first time you tap on Update Snippets… you’ll see a flash where TextExpander briefly comes up on screen and then disappears. And then you’re back to the Substitutions menu. Once you’ve done the update snippets dance, you have glorious access to all of your snippets within Ulysses.
Updating Snippets
Now you’re happily writing away in Ulysses with access to your snippets. Months go by and then one day you try to type a snippet and just that one snippet doesn’t expand and while other snippets do expand. I suspect this is caused when you add a new snippet on your Mac in TextExpander, and Ulysses doesn’t automatically get the update.
This is precisely when you’ll need this blog post. You have to remember to open Ulysses on your iOS device and:
- Create a new note or open an existing one
- Tap the circle with the three dots
- Select Editor Settings
- Select Substitutions
- Select Update Snippets
Now you can start writing again with access to all of your glorious snippets.
Bottom Line
The bottom line is that I love Ulysses because it syncs between my iPad Pro with Magic Keyboard and my Mac, and because it lets me write with TextExpander. Now that I’ve documented how to update my snippets, I won’t have to dig around figuring it out again. Assuming I remember that I wrote this blog post that is!


Thank you! Without this article I would not have even known that TextExpander support existed in Ulysses. I’m moving back to TE after using Typinator because of this. I’ve started using Ulysses for a book project and TextExpander support will be a huge help.
p.s. – I enjoyed your Mac Power Users episode!