Jump to Tips
- The Magic Option Key
- Drag Folders into the Sidebar
- Why Do Some Apps Launch at Login?
- Focus Mode Everywhere
- Copy and Paste Between Devices
- Screenshare Right from the Finder
- Quickly Get to the Top/Bottom of a Page
- Group in Finder
- Opening Unsigned Apps
I’ve started a series of Tiny Mac Tips for Jill of the Northwoods who just recently switched from Windows to the Mac. It’s easy to use a Mac but there are a lot of little tips and tricks that will make you more productive and enjoy it even more. This is part 2 of this series, and you can find part one at Tiny Mac Tips – Part 1 of X.
I doubt that any of these tips will be truly life-changing, and if you’ve been using a Mac for a long time you may even know a lot of them, but when you learn them all you may feel that you can use your Mac like a boss.
The Magic Option Key
The first tip is to try holding down the Option key when you click on things. You’ll often see menus change and new capabilities be revealed. Here are just a few examples of where the Option key reveals hidden options (get it?)
Option + Bluetooth
If you click on the Bluetooth icon in the menu bar, you get a list of available Bluetooth devices. But maybe you want to know whether your AirPods have updated themselves to the latest firmware you just heard about.
Hold down the Option key when you click the Bluetooth icon and you’ll be able to see the firmware version and MAC address on every one of the available Bluetooth items.
About this Mac → System Report
If you ever need to know anything about your Mac, from hardware to software, you have access to that information in just two clicks. If you select the Apple Logo at the top left of the menu bar, the first item is “About this Mac”. This window by itself is pretty useful, telling you the model of your Mac, its serial number, and its configuration. But to dig deep, on the Overview tab, select System Report.
From this report you can find out things like exactly which SSD is installed, what Bluetooth accessories are recognized, you can see the Thunderbolt/USB4 device tree of what’s connected, detailed network information, and more. When the Mac converted to requiring apps to be 64-bit, System Report was where you could go to sort your apps by whether they were 32 or 64-bit. It’s a really interesting place to poke around to learn about your system.
That by itself is a fun Mac tip, but you can get to the System Report even more quickly with our friend the Option key. Before clicking the Apple logo in the menu bar, hold down Option and then click and the first choice in the list changes from About this Mac to System Information.
Detect Displays
Macs are pretty good at detecting attached external displays, but once in a while, you need to tickle things to get your Mac to recognize a display. Open Displays in System Preferences, and in the bottom right you’ll see a button that says Night Shift. Don’t click it, just hold down the Option key and the Night Shift button turns into Detect Displays!
Option-Drag to Copy
You know you can drag a file to move it from one folder to another, right? Did you know that if you hold down the Option key when you click and drag, it will copy the file to the new location instead of moving the file? When you option-click-drag, you’ll see a green circle with a plus sign on it while you’re dragging indicating that it will copy instead of move.
Here’s a sub-trick to quickly duplicate a file. Hold down the option key and drag the file to another location but don’t let go of it. Drop it back in the original location and it will duplicate the file. I know that using ⌘-D is a much easier way to duplicate a file, but I discovered this tip accidentally when testing the option-drag copy method so I thought I’d tell you about it.
Option Reveals Library
Apple seems to spend a lot of energy hiding things from us. For example, they don’t want you to worry your pretty little head about seeing your Library folder. I suppose that for most people that isn’t the worst thing, but if you want to be a power user, you’re going to want to know where your Library folder is and you probably want to be able to access it quickly and easily.
In the Finder, if you click on the Go menu in the menu bar, you’ll see a list of locations such as Recents, Documents, and Downloads, but you won’t see Library in the dropdown. Let go of the menu, and this time Option-click the Go menu and now Library will be visible in the list.
The main lesson here is to hold down on the Option key while clicking menus and you’ll often be surprised by hidden capabilities that may be very useful to you.
Drag Folders into the Sidebar
When you first start up a new Mac, the Finder has a list of folders in the left sidebar. Among others, you’ll see your user account, Desktop, Documents, Downloads, and Recents, which is a smart folder of your most recently opened items.
It turns out you can add and remove any folder to the sidebar for quick access. Navigate to the folder you need to get to often, then click and drag it into the sidebar. As you move it up and down in the list, you’ll see a black line showing you where it will land if you let go. If it drops into the wrong place, just click and drag it to where you wanted it to go.
I use this feature of macOS all the time, adding and removing folders as I need them. For example, if I’m working on planning a trip, I make a folder for all of the documents for the trip, and I keep that folder in my Finder sidebar for easy access.
Remember that with the Mac, the Save As dialog box shows the same left-hand sidebar. When I save a confirmation from an email or print a ticket to PDF, my newly-added trip folder is right there in the sidebar so I don’t have to navigate deep into my folders to find the folder in which I want to save them. When the trip is over, I only need drag it out of the sidebar to remove it. The folder is safe and sound in its original location; it’s just not in the sidebar.
Remember the tip about using the option key when selecting Go to reveal the Library folder? If you find you need the Library folder pretty often, you can drag it into the left sidebar of your Finder window just like any other folder.
Why Do Some Apps Launch at Login?
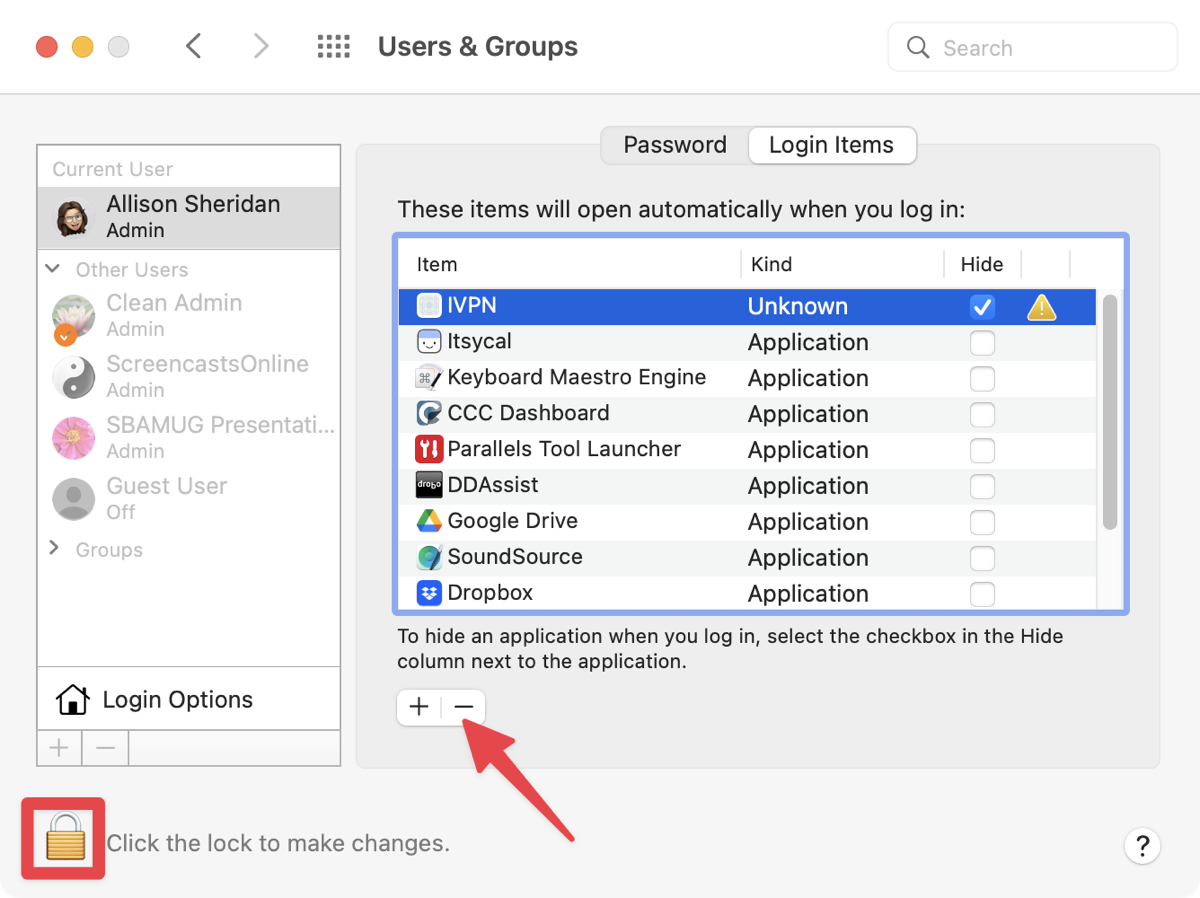
You may notice that an app you’ve installed launches itself at login, but you don’t remember telling it to do that. While some apps are quite polite and ask your permission, and might even have a toggle box within their own preferences to control whether to launch at login, some apps are less respectful.
The macOS-level control for login items is a tad bit buried. Open System Preferences, Users & Groups, and then click on your account name in the left panel. Near the top of the pane, you’ll see that your account opened to the Password tab, but there’s another one for Login Items.
On this tab, you’ll see a list of all the applications that have decided to automatically launch upon login. Some may have asked for permission, and some definitely need to be launched at login, but once in a while, an odd one slips in.
In the screenshot provided, I can see that the VPN app called IVPN added itself to login items when I was testing it, which makes sense. But it’s got a yellow alert because I actually uninstalled the app.
To control this list, click on the lock and enter your login password, and then click the minus button down below the list to remove an item, or click the plus button to add a new application to the list. In some cases you really want an app to launch at login, but you don’t actually need to see the app. There’s a little checkbox column to hide selected applications. I do that with TextExpander. I can’t live without it running, but I don’t need to see it to use it.
Focus Mode Everywhere
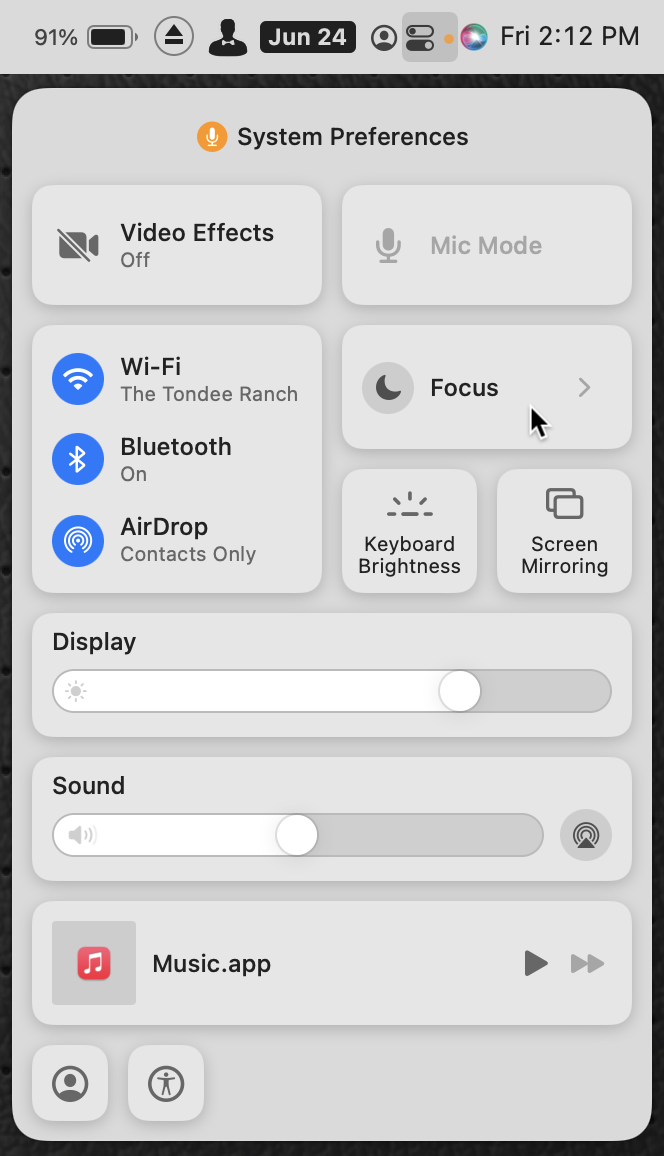
I’m not a huge fan of the new Focus Modes for Apple devices, but it’s probably because I really like notifications. I’m in the all-or-nothing camp. When I’m recording a podcast, I want nothing disturbing me, and the rest of the time I want all the notifications. I miss the old Do Not Disturb toggle, but I can live with clicking three times to tell my devices to leave me alone indefinitely.
As a Mac/iPhone/iPad/Apple Watch user, I love that all of my devices are interconnected through my iCloud account. That advantage is quite helpful when setting a Focus Mode. If you have an Apple Watch, swipe up and tap the little moon and choose your Focus Mode. When you do that, all of the devices logged into the same iCloud account automatically go into the same Focus mode. Your Mac, iPhone, and iPad will all follow along.
Likewise, on your Mac, if you tap on Control Center in the menu bar (the two little toggle switches going opposite directions) and choose a Focus Mode, your Apple Watch and iPad and iPhone will all go into the same Focus Mode.
I love that I can grab whatever device is closest to me and easiest to change and all of my other devices switch along with it. And of course, you can turn off Focus Modes on any device and they all follow suit.
Copy and Paste Between Devices
Continuity is the name Apple uses to describe this concept of allowing all devices in one Apple ID to be able to work together www.apple.com/…. Continuity has a lot of features that hog all the publicity, such as SideCar to use an iPad as a second screen for your Mac, and Universal Control which allows you to drag your cursor from your Mac to your iPad and use the Mac’s keyboard on the iPad.
While those splashy features get all the glamour, the feature of Continuity I use the most is copy and paste between devices. It’s a real pain to type on the small keyboard of an iPhone (at least for those over 30), but with Continuity you can type long-form text on your Mac or iPad with a proper physical keyboard, copy it, and then simply tap on a text field on the iPhone and select paste. It’s magical.
Screenshare Right from the Finder
As my friend Dean says, deciding to justify the cost of your first Mac is very difficult, but justifying the cost of the second one is quite easy. Before you know it, they’ll be littered about your house. You’ll have bought them for your spouse, your children, and maybe an extra one for yourself.
From time to time, it would be handy to be at a different Mac, but maybe you’re too lazy to walk all the way upstairs to fix something on your kid’s Mac. With macOS, you can screen share into other Macs on your network right from the Finder.
Before you have the need to screen share, on every Mac you want to connect to, open System Preferences to the Share Preference Pane, and click the On checkbox for Screen Sharing. From there you can allow access to specific users or all users.
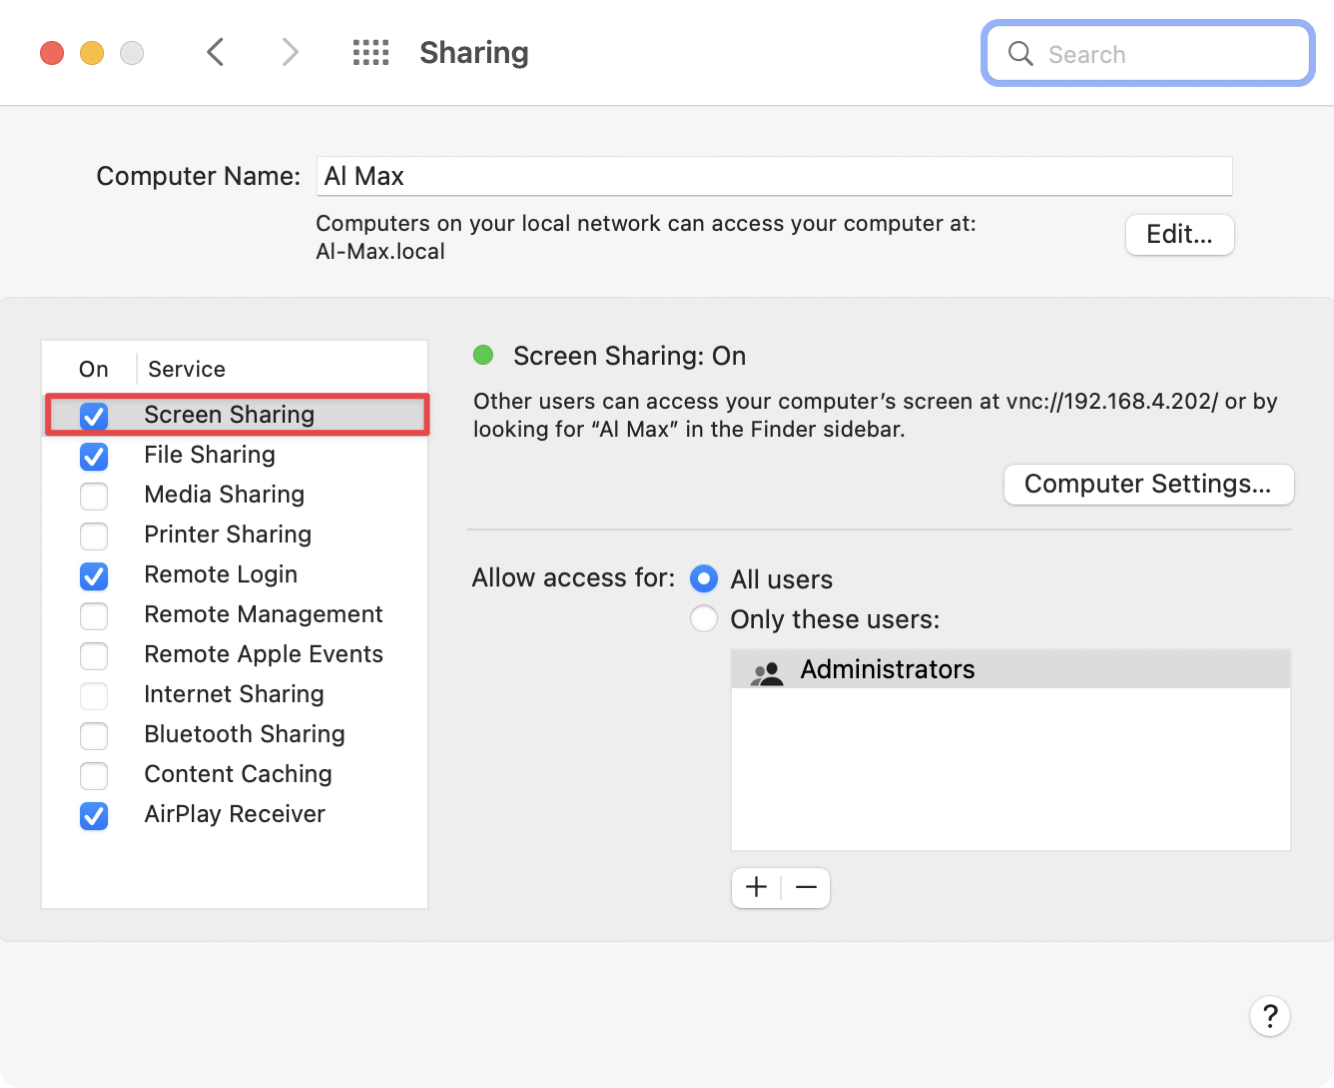
Once that is enabled, on your Mac, simply open a Finder window, and scroll down in the left sidebar to where it says Network. If the other Mac is available on the network, you should see it listed. Once it’s selected, you’ll see two buttons: “Connect As…” which lets you see into the file system of the other Mac, and “Share Screen…” which does what it says on the tin.

Quickly Get to the Top/Bottom of a Page
When looking at long-form content in many apps, including browsers and Preview with PDFs, the command-down arrow will jump you immediately to the bottom of the page. Even more useful, let’s say you’ve scrolled down a bit on a page and want to get to the top. Simply use the command-up arrow to jump to the top of the page. If you’d like to scroll down and up just one page at a time, try Option-down/up arrow.
Group in Finder
Finder is designed to help you find things, but sometimes that isn’t as easy as it sounds. Scrolling through a long list of items in alphabetical order can take a long time. What if you know your file is really big, or you know you modified it just recently? Depending on the Finder view you’ve chosen, you could use the column headings to sort the files, but some of the views don’t even have that.
To the right of the name of the folder you’re viewing in the Finder is a strange-looking icon. It has a horizontal line then three boxes, another horizontal line, and another three boxes. You may see the word “Group” underneath it. That little icon is designed to let you see the folder items in groups with little lines separating them.
You can choose to group items in a Finder window by name, kind, application, size, tags or four different date criteria: last opened, added, modified, or created. I keep my Downloads folder with Group set to Date Added, so that when I download a file, it’s always at the top of the list view.
You can use Group on your Applications folder in the Finder as well, but the options are a little more limited. You can group by name, application category, date last opened, date added, size, or tags.
Opening Unsigned Apps
In the past few years, Apple has been on a path to protect us more and more from the evil that lives on the Internet. I wholeheartedly approve of these measures and I also know that sometimes it makes sense to go around those protections.
In the old days, you could download any old installer from any old website (or even from an email), and install it on your Mac without any challenges. If you were super-knowledgeable and knew how to avoid dangerous sites and installers, this wasn’t a problem. Unfortunately, the vast majority of users were at significant risk. In order to protect us from our own trusting behavior, Apple created a System Preference pane called Security & Privacy.
On the General tab, you have two radio button options to allow apps downloaded from:
- App Store
- App Store and identified developers
The App Store-only option is great for people who are unlikely to need anything else, but for more sophisticated users, you might want the freedom to download from outside of the App Store. An identified developer is one who has notarized their app, which means any problems with it can be traced back to them. It’s not a foolproof method but malware developers are unlikely to want to notarize their apps. Apps from identified developers aren’t vetted in any way like App Store apps, but they can still be really good apps.
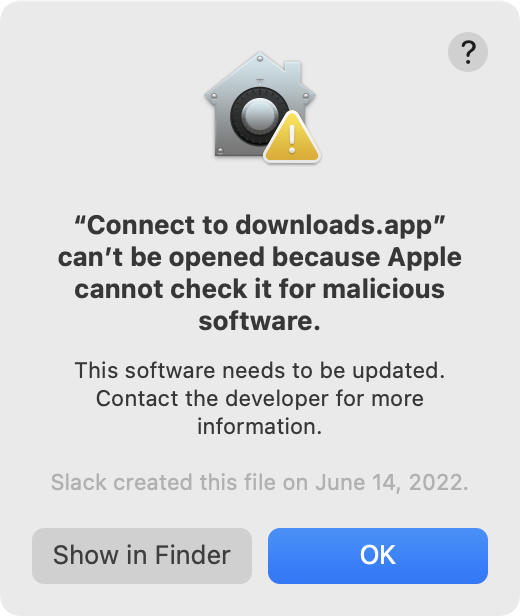
All this is great, and I’m glad these protections are in place. It doesn’t come up often, but sometimes you know an app is legit, but it is not from a signed developer. I’ll give you an example. Automator lets you use drag-and-drop actions along with text-based scripts, and then save the workflow as an application. Lewis Butler in our Slack sent me an app he created using Automator as an example of how I could solve a problem. When I downloaded the app and tried to run it, I was denied. This makes sense because Lewis didn’t go through the notarization process just for this little demo app.
Sometimes the Security & Privacy Preference pane will have a button letting you open the unsigned app, but there’s a much easier and more dependable way.
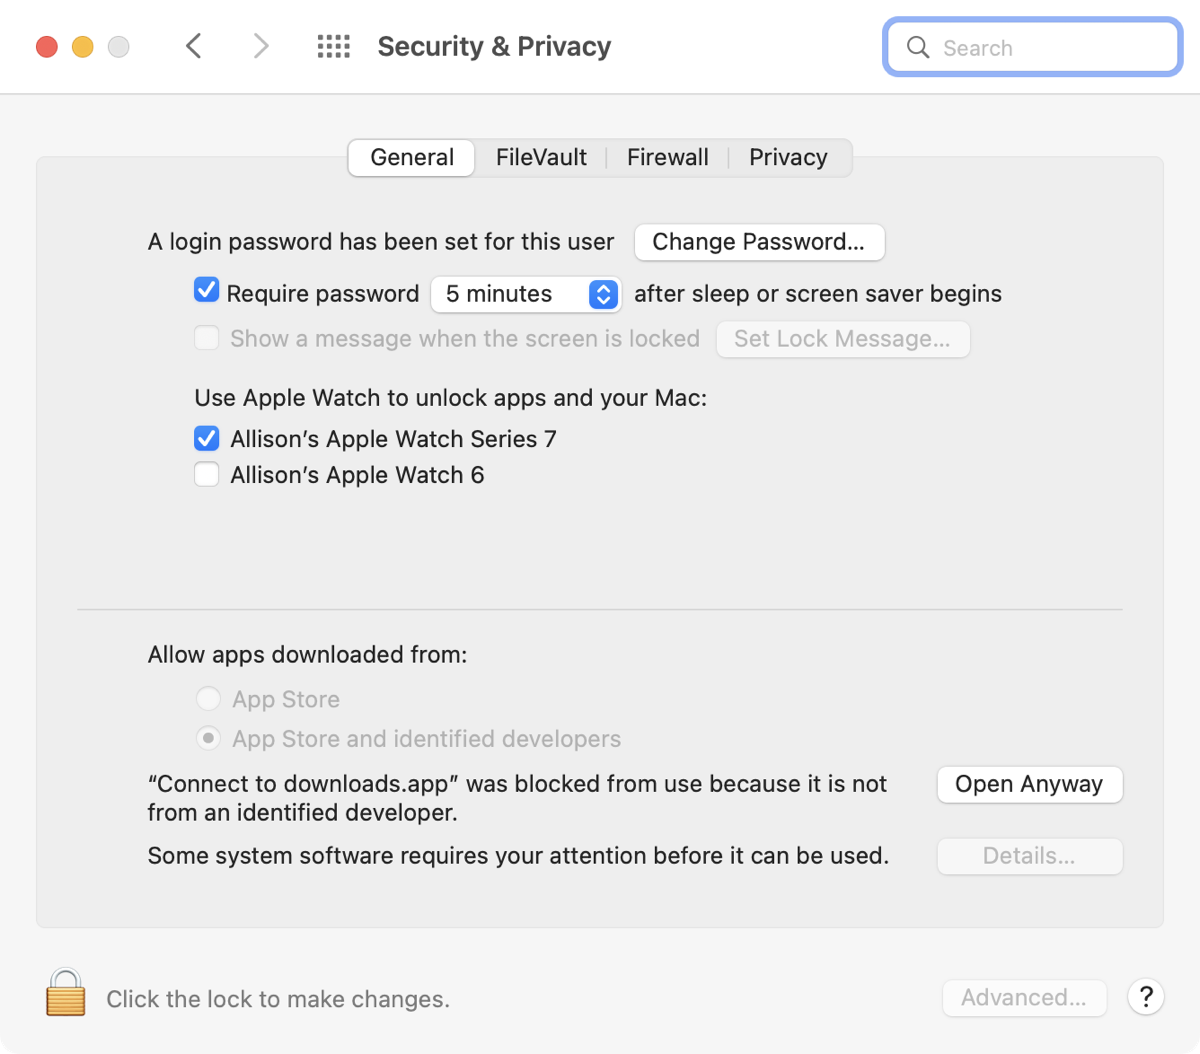
I could open Lewis’s app in the Automator application to look at what it does and verify that it’s not doing anything nefarious, but Apple won’t let me launch the app by double-clicking. Now for the tiny tip.
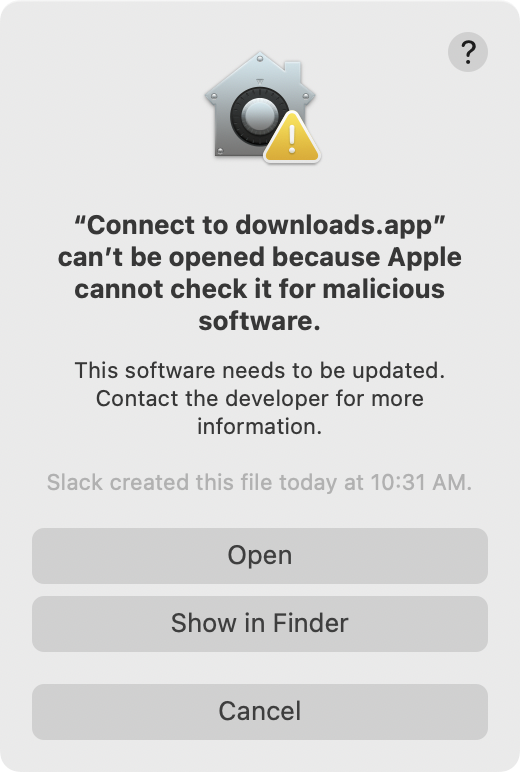
If you get into this situation and you really truly know that the app you’re trying to launch is safe, it’s super easy. Simply hold down the control key and click the app once to bring up the contextual menu. The top choice will be “open”.
This action will bring up a window telling you again that it can’t be opened because Apple cannot check it for malicious software, but you also get an open button. Click it and your app will open, and the Mac will remember that you’ve given it permission to launch from now on.
Now that you understand why Apple instituted this change, you can judiciously use this new trick only on apps you’re truly certain are ok.
Bottom Line
I hope you’ve learned at least one new trick from part 2 of my Tiny Mac Tips, and here’s a link to the next set of tips: Link to Tiny Mac Tips Part 3


A small clarification on dragging in Finder. Drag = move and Option-drag = copy *if* you are dragging within a single device. If you are dragging from one device to another — say from your internal SSD to an external drive — then the opposite applies: Drag = copy and Option-drag = move. It can take a bit of getting used to, but always remember to look for the green + on the drag and you’ll know what’s happening.
I tested that, Allister and my experience doesn’t mirror yours. Whether I drag to an external SSD or option-drag to it, I get the green + sign in both cases and a copy is made.