The hallmark of a good NosillaCast review is that we must start with the problem to be solved. There’s one exception to this hard and fast rule. Sometimes there’s something that’s just cool and doesn’t solve any problems at all.
The other day I was listening to a podcast where they were droning on and on about VR and AR. They talked about how even with LiDAR on the iPhones since iPhone 12, the whole virtual reality thing has really been kind of a bust.
We expected that developers would come out of the woodwork with amazing things because of this new capability. Instead, here we are a couple of years later and we have semi-functional replacements for a pull-out rule to measure things.
This got me curious about what kind of apps are available in the iOS App Store in the AR (augmented reality) category. I found something super fun and I bet you’ll think it’s fun too. I’m not sure it solves any problems for me, but it might for others.
Scaniverse
The app I found is called Scaniverse, and it’s a free iOS app that lets you scan objects and create three-dimensional models of them. Before I get into how Scaniverse works, let’s talk about why it’s free. I am always dubious of really cool free stuff.
In August of 2021, Scaniverse was purchased by gaming company Niantic. Niantic is best known for its game Pokémon Go. Niantic was originally part of Google but is now an independent entity with funding from many different sources. The CEO of Scaniverse wrote a blog post about the Niantic acquisition if you’d like to read more about it and why it is free. I’m glad it’s not owned by Google and that there is a business plan behind Niantic.
iPhones and iPads from 2018 Can Play
Scaniverse is very simple to use and yet creates extremely detailed models. It was originally only for iPhones and iPads with LiDAR (iPhone 12 and higher) but with the release of Scaniverse 2.0, they added support for non-LiDAR devices. They say it supports all iPhones released since 2018 as well as most iPads. I can’t speak to how well the models turn out without that extra depth data you get with LiDAR, but it’s super cool that pretty much all iOS devices can play.
How to Use Scaniverse
Now that we know why it’s free and we know who gets to play along, let’s finally talk about how to use Scaniverse to scan the world around you.
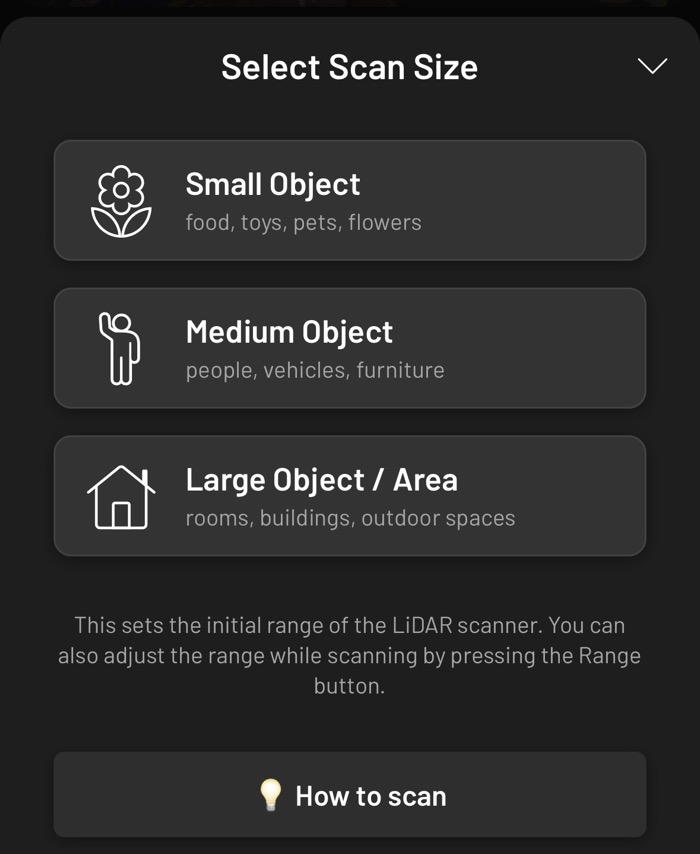
Scaniverse opens with a big red “New Scan” button. Before scanning, the app asks you to choose a scan size:
- Small Object – food, toys, pets, flowers
- Medium Object – people, vehicles, furniture
- Large Object/Area – rooms, buildings, outdoor spaces
Below those buttons is a button that says, “How to scan” which gives you some helpful tips along with a little video describing the process.
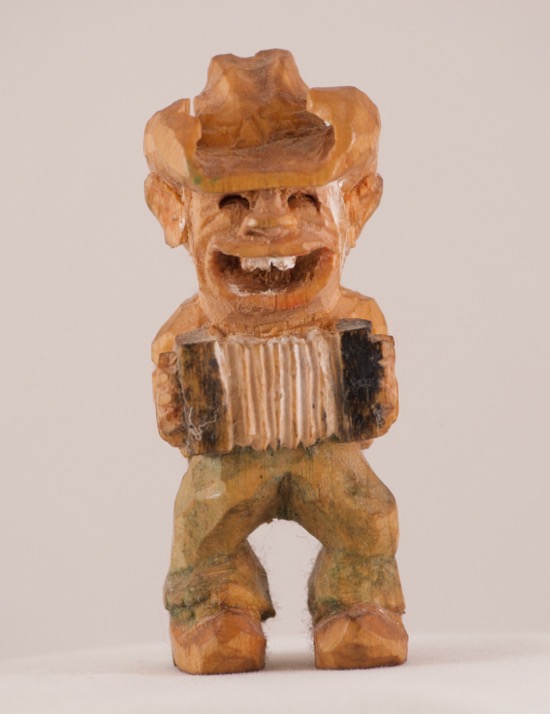
Let’s say I want to scan in the creepy-looking 3” tall accordion-playing cowboy my father carved. I’ll choose the Small Object option. You’ll be asked whether you want to enable location services or disable them which is what I prefer since I’d like to post these scans online for others to enjoy.
Next, you’ll see a screen inviting you to push the red button to begin to scan the object. Right above the red button is a tiny button that says “Range” followed by some number of meters. For Small Objects it defaulted to 0.8m. This range tells you how much of the area surrounding the object will also be scanned.
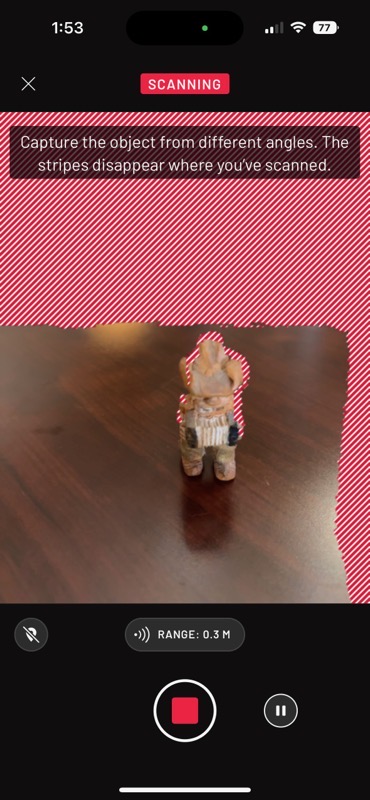
0.8m is significantly more surrounding area than I need for an object only .08m tall. I can either leave the range at 0.8m and edit the surroundings out later, or I can tap on that range and change it before I scan. The lowest it goes is 0.3m so I’ll give that a try.
As you begin to move your camera around the object, you’ll see red and white diagonal lines. Your goal is to view the object from every angle possible until the lines disappear. You can move your camera at any angle, even upside down as Scaniverse will be able to stitch it together seamlessly.
One caution on scanning – move slowly and deliberately. I tried scanning in my grandson Forbes and as I was worried a 6-year-old wouldn’t stay still long enough, I whipped the camera around too quickly. The resulting model looks like something out of the movie The Thing. I’ll have nightmares about it forever.
When you think you’ve captured the object from all angles, hit the stop button. Your model may look absolutely awful when you finish, but don’t give up. Scaniverse hasn’t yet processed the image.
You’ll be offered three different processing methods with one of them highlighted as recommended.
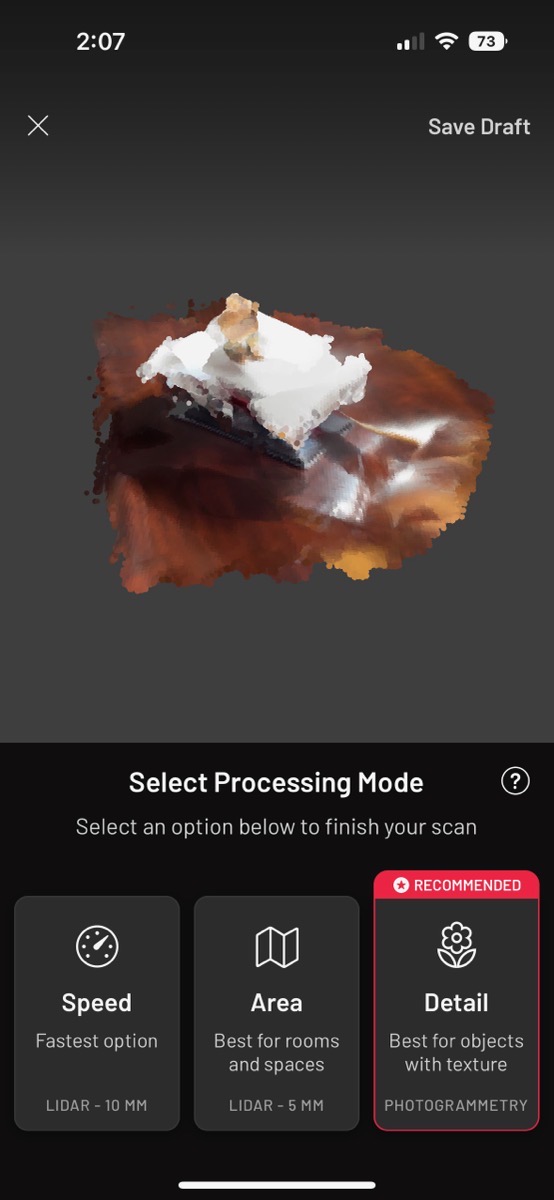
- Speed – Fastest option LiDAR 10mm
- Area – Best for rooms and spaces LiDAR – 5mm
- Detail – Best for objects with texture – Photogrammetry
While Scaniverse is processing they warn you to keep the app open or it won’t actually finish the job.
After the processing is complete, you can pinch and zoom in to see how good your scan looks after processing.
You can change the processing mode after the fact if you don’t like the results, or save the processed model. If it looks bad, hit the button to change mode and you can delete the draft model and start over.
In my experience, scanning little things is harder than scanning medium-sized things. It took me four tries to scan in my weirdo accordion-playing cowboy. My final effort isn’t great but it’s pretty good. In order to get a reasonably good scan, I had to put him on some sort of pedestal so I could scan under his cowboy hat, and all around his feet. Having him up higher also made it easier to be smooth in my camera movement.
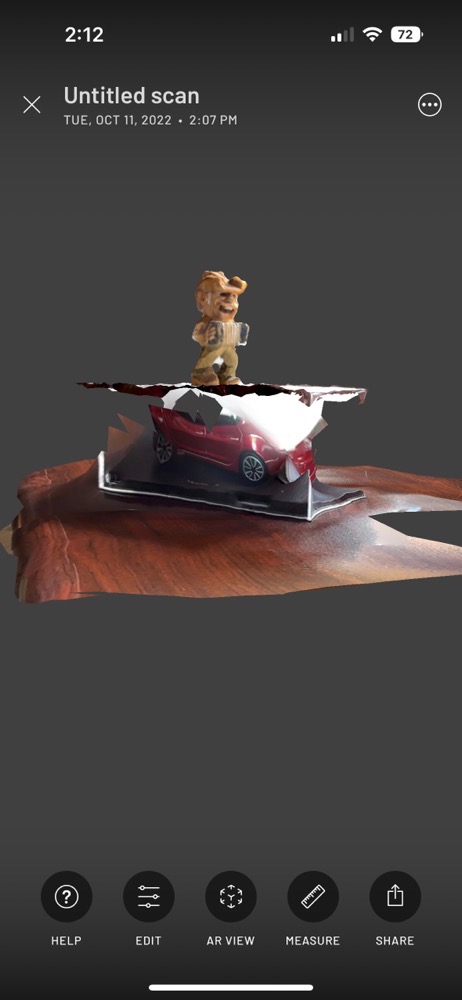
Once the scan is complete, there’s still a lot of fun to be had. The platform I created to scan him on was a clear, plexiglass box holding a model Model 3 Tesla, and I put a piece of white paper over the top so Scaniverse wouldn’t get confused. The scanning process still brought in the car and some of the desk. We’ll be able to easily clean all that up.
At the top of the screen, you’ll now see “Untitled scan” and a 3-dot menu on the far right. In that menu, you can add a title to your scan. You can also see the time and date it was scanned. You can see some stats on your scan as well. My little accordion man has 48K vertices and 85K triangles in the model.
That is insane. I remember building up 3D models to determine stresses and strains in the 1980s where I had to type in the coordinates of each triangle by hand. 85K triangles is mind-blowing.
I can see that the file size is 5.1MB, and the processing was done using Detail mode with 8K texture.
Across the bottom, there are five buttons to help you improve your model. The first is a valuable help button. The next button allows you to edit your model. The options for editing are crop, filter, exposure, contrast, and sharpness. Those last four options work exactly as they would in any image-editing application, except they apply to a 3D model instead of a flat image.
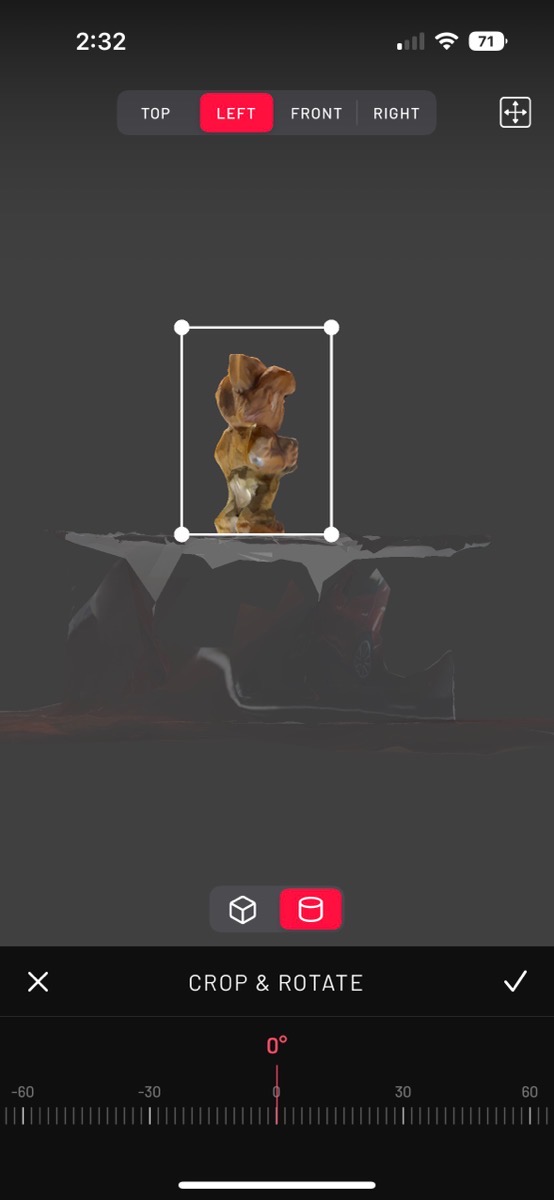
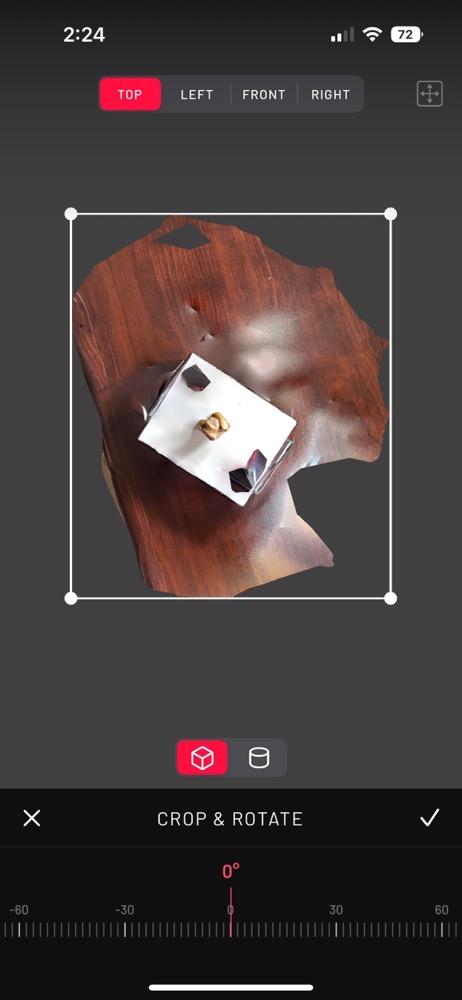
While those options are nice to have, crop is essential. As soon as you hit the crop button, you’ll be looking down on your model from above, and it will have a rectangle around it. You can drag the corners of the rectangle to crop in on the model. At the top, you’ll see four buttons that allow you to see it from all four directions: top (the default), left, front, and right.
Before you start cropping, you may want to rotate the model to make the rectangular crop align with some edges on your model.
As you flip through the different directions while cropping, you’ll realize that one of them crops the height. I need to make sure that I don’t crop off the top of the cowboy hat, but that I do crop out as much as I can of the plastic box underneath him.
Above the rotate slider, you can change to a cylindrical crop if that would make more sense for your particular scan. I think that would look much better for my cowboy.
Once you’ve cropped to your satisfaction, hit the check mark and save. Don’t sweat this part too much – all of this cropping and modifying of the lighting and sharpness is non-destructive. You can go right back into edit mode and change any of the options at any time.
AR View
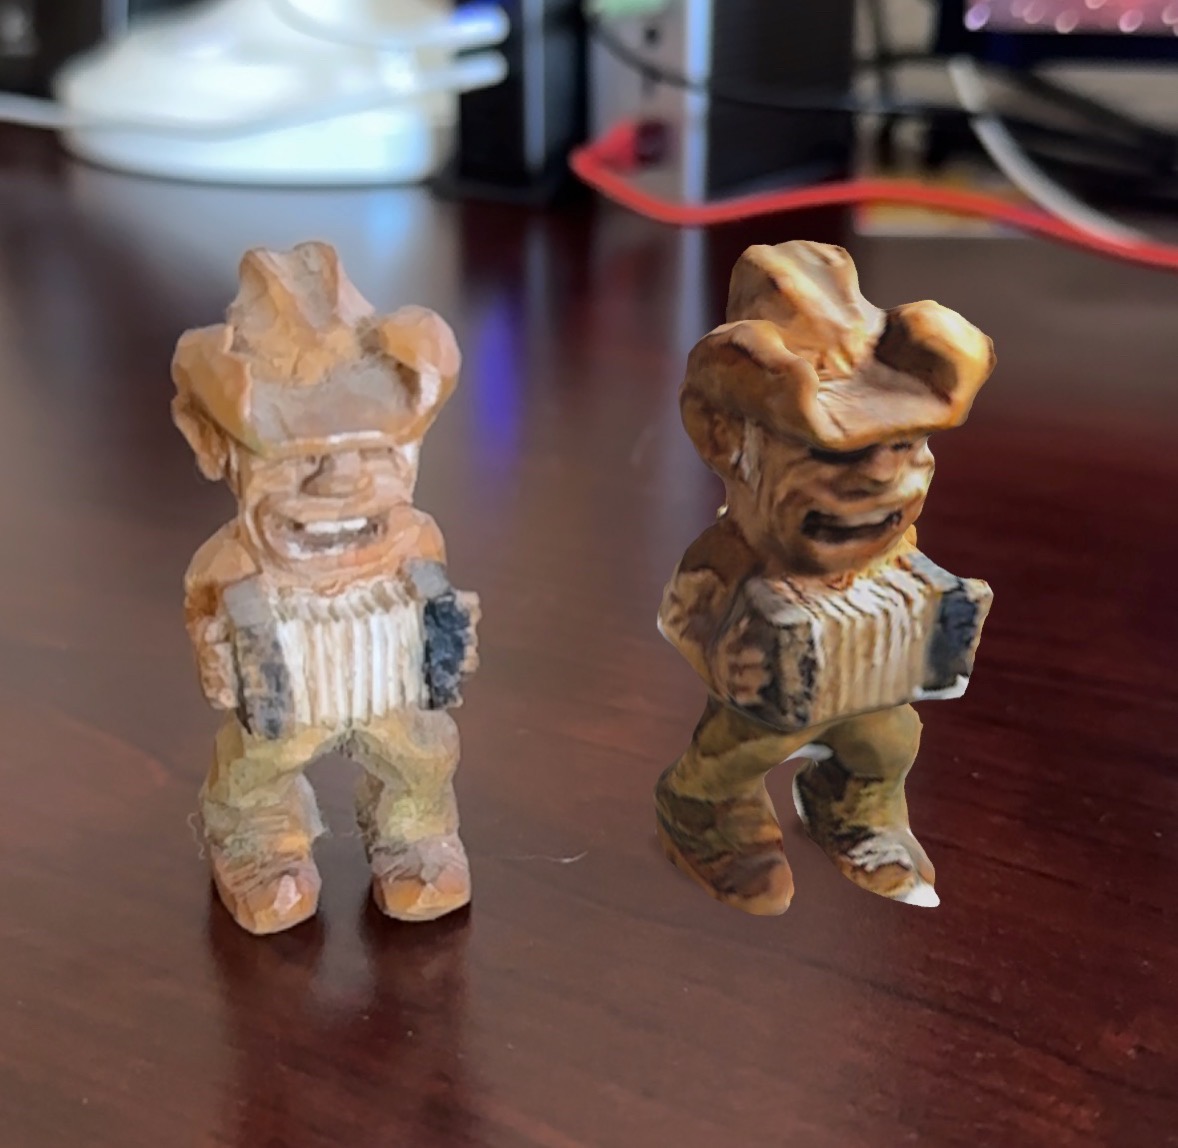
Now that you’ve done all this work, the real fun begins. The next button across the bottom is AR View. This launches iOS’s built-in AR QuickLook app. As soon as you tap on AR View, move the center of your camera to a flat surface, and your model will land on it and stick. From there you can move around with your camera to view it from all angles.
If you don’t like where it landed, grab the model with one finger and move it to another surface. You can even pinch in and out on the model to make it shrink and grow.
My description is accurate but so dry compared to how amazingly fun this is. When you’re in the AR QuickLook, you can even take a photo of your model in the real world. I took a fun photo of my little accordion cowboy standing on my desk right next to his scanned doppelgänger.
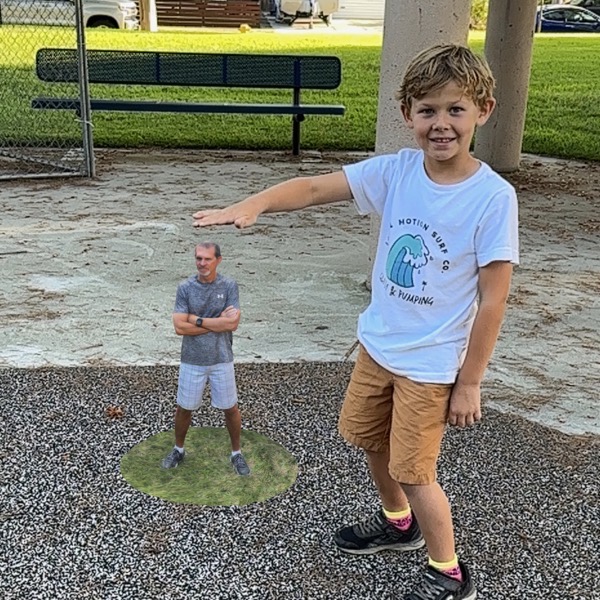
While scanning in my dad’s carvings has been fun, it’s even more fun to scan in people. I scanned in Steve and I’ve had oodles of fun with this model. Forbes and I went with Pat Dengler to the park without Steve, but we put the model next to the play set and I took a photo with Scaniverse of Forbes and Steve standing together.
Measure
There are two more buttons on the main view. One is Measure, which allows you to measure the distance between two points on the model. This is the one spot Scaniverse falls down. My little guy is nearly 3 inches tall, but Scaniverse is convinced he’s 2.25” tall. When I measured my scan of Steve it got his height to within a quarter of an inch. You might get a vague idea of how big something is but don’t depend on it for accurate measurements.
Sharing
Finally, you can share your model and this is super fun too. You have five sharing options.
The first option is to post to Scaniverse. If you choose to post your scan publicly, it will be added to the main Scaniverse feed and will appear on your profile page. If you choose an unlisted scan, only those with the link will be able to view your masterpiece.
If you follow one of these links, you can actually spin the model around and zoom in and out on it via the web. I put a link in the shownotes to my little accordion-playing cowboy with weird teeth on Scaniverse so you can see how it looks. I also posted a link to a six-inch tall farmer my dad carved . It’s not nearly as creepy.
In my neighborhood, there are a series of posts tied together as though they’re on a nautical-looking bridge. I scanned in one of them using Scaniverse and it came out really cool. I didn’t realize when I was scanning it that someone had put a pink Beanie Baby inside the post so it was a fun surprise. Thought that one was worthy of going on Scaniverse as well.
From the Share menu, the next option is “Share in Message” which opens up the regular iOS share menu, letting you send a .usdz file directly to someone. I assumed that would be really annoying because they’d have to open it in a specialized app, but guess what? Preview on the Mac or QuickLook AR on iOS can open these .usdz files directly AND you can spin them around and zoom in and out. How cool is that? I suppose a few of you have known this was possible for ages but I sure didn’t!
You can also post to Sketchfab which is another place to upload 3D models. They have a special Gallery section on Sketchfab specifically for Scaniverse scans. You can even download models from Scaniverse. I had a lot of trouble uploading to Sketchlab. I had to make an account and two different models would start uploading and then fail. I succeeded from the Mac but it was a little bit twitchy about it. I tried again on a third model from Scaniverse and it worked without issue. not sure what was going wrong. You can view and download any of my models at sketchfab.com/podfeet
Back in Scaniverse, there’s also an option to make a video of your model. You can set the type of motion from orbit to fly-by to spiral and more, change the speed of animation, as well as change the aspect ratio of the video along with the backdrop.
Finally, you can export the model in seven different formats, one of which is USDZ. They give you a little hint on why you’d want to choose which format. For example, they explain that the FBX format is supported by most 3D software and game engines.USDZ is best for ARKit and sharing to iPhones.
Bottom Line
I have had hours of entertainment with Scaniverse so far, and I’m still amazed that it’s free, and hosting it on Scaniverse and Sketchlab is also free. I don’t know that augmented reality is solving the problems of the world just yet, but I sure think Scaniverse is neat. Download it now to your iPhone or iPad from the App Store.

