One of the great joys of doing the NosillaCast for Steve and me is the live show on Sunday nights. Before I started producing the show in front of a live audience, it was just me, my script, and a microphone. It was ok, but it didn’t feel like I was talking to other people — I was talking to a mic.
The live show has evolved over the years and a big enhancement was when Steve became the producer. This took a lot of load off of me (and off of my Mac) so that I could concentrate on actually “performing” the show.
In the last few years, we’ve figured out how to host the live show even when we’re out of town and I thought it might be fun to pull back the curtain a bit and talk about the tech we use to pull that off. It would probably help if I described the tools at the home office first so you appreciate the shenanigans involved in doing it remotely.
Home Setup

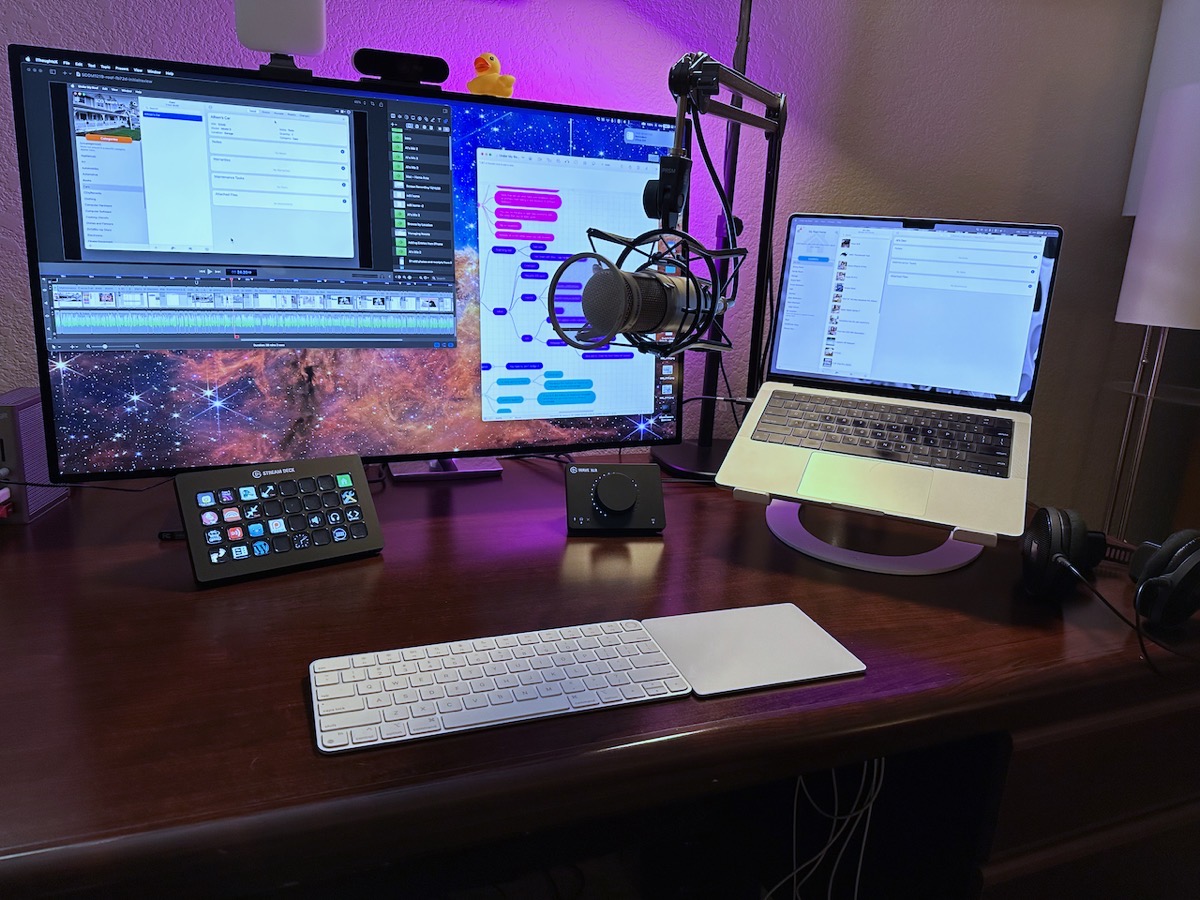
At home, I use my 14” MacBook Pro hooked up to the Pro Display XDR, which is a 32” (give or take) display. The laptop is up on a 12 South stand so it’s available as a secondary display, and I use a Magic Keyboard and Trackpad to control the Mac.
I’m on wired Ethernet through my CalDigit TS3+ Thunderbolt dock, with WiFi turned off. Video is much more stable over wired Ethernet no matter how good your WiFi is.
I monitor my audio (and listen to Steve) using a pair of open-back, over-the-ear headphones from Audio Technica (ATH-R70x). They’re super comfortable to wear for hours and hours and they have really good sound.
I use a Heil PR 40 XLR microphone. We spent a grip on the Heil mic but it’s been a workhorse for well over a decade so I think the investment was worth it.
I connect this XLR mic to my Mac using the Elgato Wave XLR to USB interface. Speaking of Elgato, I have an Elgato Stream Deck XL to give me quick access to a lot of functions for the live show. To be honest, I do enough work away from my desk that I still use keystrokes for a lot of functions so I don’t really miss the Stream Deck when I’m on the road.
For video, I use the Logitech 4K Pro Magnetic Webcam that was designed for the Pro Display XDR. It’s just like their Brio 4K camera, but instead of a clip to the display, it has a magnet that pairs up with the center of the top of the XDR.
Steve has a Mac Studio with a 27” 5K Studio Display and a 27” 5K LG display. He uses a Heil PR-20 microphone (we only spent half a grip on his), and he also uses an Elgato Wave XLR as his USB interface. He’s on wired Ethernet as well, but the Mac Studio and Studio Display have so many darn ports he doesn’t even need a dock.
He has three options for broadcasting video. His Studio Display has a built-in camera, but as I’m sure you’ve heard, it’s not very good. His LG 5K Ultrafine display has a much better camera. But he uses the tried-and-true Logitech C920 because it’s the best of the three cameras.
Lighting is very important when broadcasting video. At home, I have a standing LED panel called the Elgato Key Light Air. This $129 light panel stands pretty high up (above my displays) and shines a nice even light on my face. I also added the Logitech Litra Glow to add some additional lighting.
The Logitech Litra Glow is a very light USB light panel that sits on top of my display, and Steve uses one as well to help him have a consistent light source.
We’ve gone through a lot of different software tools in order to broadcast video of me, video of Steve, and video of my recording software or the chatroom to the live audience over the years. Right now we’ve settled on a web app called StreamYard to do the job. It doesn’t have all of the features Steve would like, but it has one redeeming quality. It is not fiddly.
Steve fires up StreamYard, gets a link from the session, sends it to me, and then I join his session. He has to let me into the live video and then I set one application to be shared. I could share my entire screen but that would be chaotic, so I share just the video of my digital audio workstation software, Hindenburg. If Steve wants to show the live chatroom, he shares it from his own Mac. Steve in turn uses a link from StreamYard to pipe the video stream to YouTube, and the video stream along with a chat client are both routed to podfeet.com/live.
Currently, we run the live chat through Discord, and the two of us join a voice channel so the audience can hear us through Discord if they don’t want to listen in the video. The video is delayed by 20-30 seconds from our audio, so if people want to jump right on things we’ve said they tend to listen in Discord.
On the Road
Now let’s switch gears and talk about how we do this on the road.

Microphones
I’ll start with microphones. Technically I could unplug my big-girl mic and put it in the giant protective case it came in to take it with me. Unfortunately, it’s actually really hard to unplug and wrangle loose from the vibration isolation mount in the boom arm. Steve doesn’t wrestle his big-boy mic out of his boom arm either.
Instead, I bought a couple of Shure SM-58s from B&H Photo that are very sturdy and designed to be thrown into a travel case without worries. They’re not as good sounding as our Heils of course, but they get the job done.
I needed a stand for the mics and went with a recommendation for a collapsible tripod-type stand recommended by Guy Serle. It’s the Hamilton Nu-Era Tabletop Mic Stand I’m not in love with this stand. The problem is that the mechanism that allows it to collapse for easy packing also creates tripod legs that are very wide when the mic is low enough for my short torso. It’s perfect for Guy because he’s 6’5″ tall (or maybe taller?) For me though, these legs spread out are very difficult to work around with the laptop.
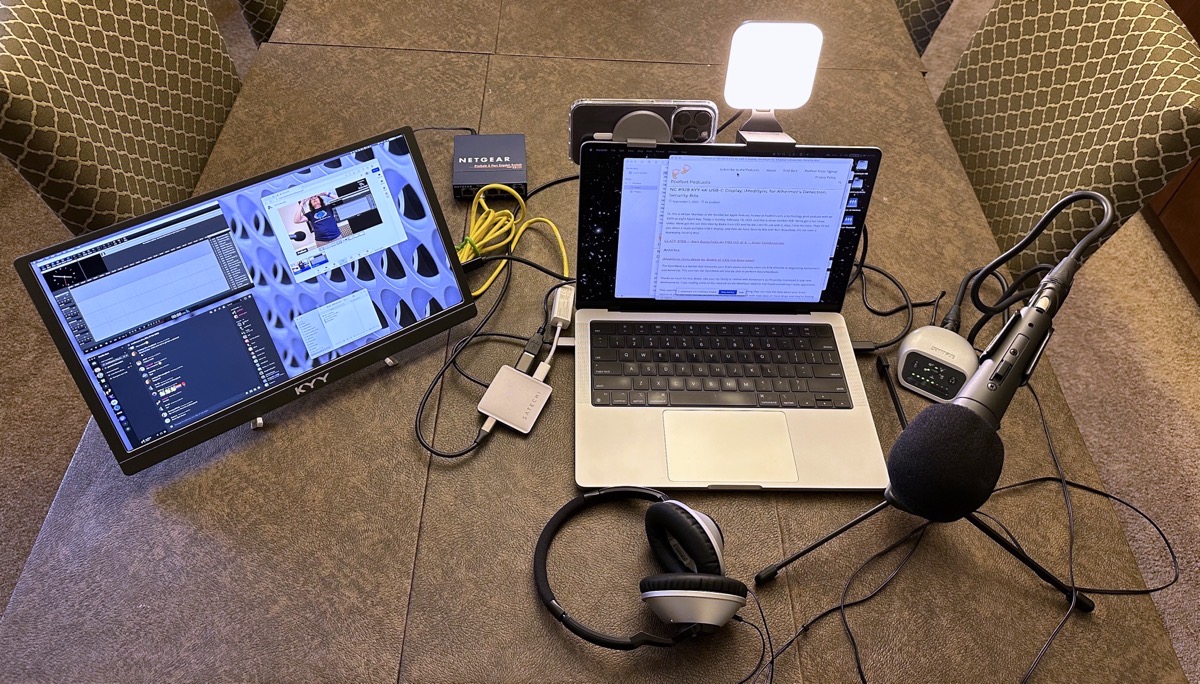
There’s a photo in the shownotes of the entire live show setup and I’d like you to try to figure out how you would type on the laptop’s keyboard with the mic’s legs in the way. It’s really hard!
I was looking for a link to the Nu-Era mic stand on Amazon and I found several alternatives that are much shorter when folded up, and have much shorter legs when spread out. They also have little rubber feet to keep them from sliding around. I bought a pair of them from a company called Mictop for the grand sum of $25 on Amazon. I haven’t gotten them yet but I’m hoping they’re easier to work around.
USB Interface
Like our mics, we could bring our Elgato Wave XLR mic interfaces, but we have spare interfaces so they’re easier to bring. We keep our previous Shure MVI USB interfaces packed with our mics. The Shure MVI is still for sale for $100 from Shure, and they worked well for us for many years as our primary interfaces so they make for good road gear. The only downside is the Shure MVI requires a micro-USB cable, but that’s always in our go bags so we don’t forget such a specialized cable.
On the road, I don’t carry my giant over-the-ear Audio Technica headphones, and instead, I carry a pair of Bose Triport TP-1A around-ear headphones. I bought them in 2005, so they were one of the first purchases I made for podcasting.
After about 10 or 12 years of constant use, the ear cups started falling apart. I was really bummed because I loved my headphones. Steve went on a hunt for replacement ear cups and he actually found some and made the headphones as good as new. They’re great for travel because they’re much smaller to pack.
When we did the live show from Lindsay’s in early February, I discovered the ear cups were falling apart again. Here’s the fun part. I remembered that when Steve bought the replacement ear cups ages ago, they actually shipped us two pairs of them. But get this – I remembered where I put the second pair! I replaced the cups and again they’re soft and supple and new life was breathed into these 18-year-old headphones.
Lighting
When you’re on the road, lighting is often a problem. We’ve tried using house lamps that are too yellow and hard to put in the right place, and overhead lighting makes you look ghoulish.
One of the reasons we bought the Logitech Litra Glow light panels is that they are super light and easy to pack in our go bags and they can easily rest on the top of a laptop display. This little device has vastly improved our lighting when on the road. Better lighting means smoother, less smeary video.
External Display
I use my 14″ MacBook Pro for everything at home and the road, and Steve has a 14″ as well for when he’s traveling.
However, it’s nearly impossible to do the live show on a laptop screen. Both of us need many windows open at once. Lindsay has a nice standing monitor in the room where Steve works, and I bring along my USB-C display. It was a real joy to do the live show the last time we went to Lindsay’s using my new KYY 4K USB-C display that I told you about last week.
In order to make sure I remembered everything I set up for the live show, I did a reenactment on my dining room table.
In my reenactment, I tried to rearrange Hindenburg for recording the show, Discord for reading the live audience chatter, a Finder window to drag in audio files to Hindenburg, MarsEdit with multiple windows for the blog posts I’d be reading, Microsoft Edge with StreamYard showing the video of Steve and me. Even having that external display with my 14” MacBook Pro was not enough screen real estate. I have to see many of those windows at the same time, and they were overlapping in a way that made them hard to see what I was doing.

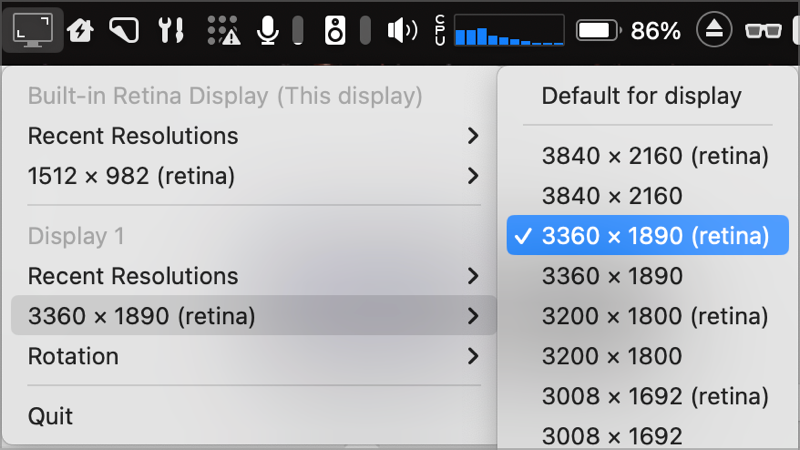
It was during my test setup that I got the idea to see if I could use Parallels Toolbox’s Screen Resolution tool to push the limits of what the KYY display could do. When I described the display in my review, I told you the native resolution was 1920 x 1080, using 4 pixels per point. With Parallels Toolbox, I wasn’t able to push it to its native resolution of 3840 x 2160, but I did get it to go to 3360 x 1890 (retina).
While the text was pretty teeny at that resolution, I could actually still read it with my post-cataract-surgery lenses. I think that is a testament to the quality of the display panel. I was able to get a lot more on-screen. I might not run it quite this high next time we’re away from the house for a live show but I’ll definitely be driving it higher than 1920 x 1080. There were a lot of retina options available in Parallels Toolbox to drive the KYY display so I’m sure I’ll find a good balance of screen real estate and readability.
Video
Our solution for our cameras on the road has evolved over time. We used to both use the Logitech C920 on the road. But when we both got M1 MacBook Pros, we tested their internal cameras against the Logitech C920 and they actually looked a bit better! That was a nice surprise and meant we didn’t have to lug along that extra gear and deal with plugging in a camera.
The last time we did the live show from Lindsay’s house, I decided to try the new Continuity Camera capability built into macOS Ventura and iOS 16. This allowed me to use my iPhone 14 Pro as my video camera and it was a marked improvement over the internal camera.
Pat Dengler made me a little adapter with her 3D printer that allowed me to mount the phone to the top of my laptop display with MagSafe. The magnets worked, the adapter worked, and the video looked fantastic. There’s only one problem – the display isn’t strong enough to hold up the phone at a good angle for the video. I ended up shoving the MacBook Pro farther away from me so that the laptop’s lid was propped up against the wall. This let me see it at a better angle and allowed the camera view to be at the correct angle.
I’m thinking that the next time we travel, I should tote along my keyboard and trackpad. If I had that with me, then I could put my MacBook Pro as the secondary display and the KYY 4K display as my primary display. I could then hang the phone and the Logitech Light on the external USB-C display. Looks like I’m going to have to ask Pat to make me another adapter to accommodate the slightly thicker external display.
Wired Ethernet
I mentioned that at home we’re both on wired Ethernet which makes for a much more stable video stream. This gets a bit tricky at Lindsay’s house but we have a solution.
Lindsay has an Eero wireless mesh router system. We’re miles away from the gateway router so we can’t be directly plugged into Ethernet. But here’s the funny thing. If you hard wire to one of the satellite mesh routers, somehow it tricks the video signal into being more stable even though the satellite talks to the gateway over WiFi. I’m sure Dave Hamilton could explain why and he’d use words like “backhaul” but I’m just glad it works.
The closest Eero to the two rooms where we record is around the corner and down the hall in the dining room. We bring a 4-port gigabit Ethernet switch Pat Dengler gave me years ago when she got a big-girl 8-port switch. We plug the switch into the Eero with a very long cable and then two medium-length Ethernet cables to the two rooms. This means miles of cables dragging all over the place, which is super great when you get a toddler involved.
I had an idea that would help out with this mess. I bought a new Eero Pro 6E for my house, and I’m going to give Lindsay one of my original Eero Pros. We can put it in the guest room where Steve records, and he can run a very short Ethernet cable to it from there. Then we’ll only need one medium-length cable to go from the guest room to Forbes’s room where I record. This will mean only one cable going between the two rooms, and we won’t have to bring the Ethernet switch Pat so generously gave me.
It seems extravagant to buy a new Eero just for the live show, but it solves another problem. Lindsay’s house is a very long L-shape, and while they have an Eero in their bedroom at one end of the L, the signal isn’t great to the Eero in the dining room which is the mid-point to the other end of the L. By giving her another Eero in the guest room, I’m hoping they get better coverage in their bedroom.
You’re also probably wondering why I need an Eero Pro 6E if I have regular Eero Pros in the rest of my house. It’s future-proofing, baby! I figure someday I’ll upgrade the mesh system at my house, and I might as well buy the best I can get today to go with the future system.
Dongle Town
I’d be remiss if I left this story without noting that it does take quite a few dongles to make this setup work. The Shure MVI is from an era when micro USB was the bee’s knees, so I have a micro USB to USB-A cable with a USB-A to USB-C dongle to connect to my Mac.
Luckily Apple hasn’t forced an Ethernet connector onto my Macs (yet) so I have an Ethernet to USB-C dongle to give my Mac that wired connectivity goodness.
By this time I’ve run out of USB-C ports with the external display, mic interface, Ethernet, and the Logitech light. Technically I could run the Logitech off of a battery or a power plug nearby, and I could use HDMI for the display, but instead, I use the Satechi 4-port USB-C hub to make sure I have maximum flexibility.
I know people don’t like Dongle Town but I’d rather be able to build anything I want with my dongles than have specialized ports that go unused.
Bottom Line
The bottom line is that it takes a lot of gear and ingenuity to get the live show to work while we’re on the road. It’s a testament to how much Steve and I enjoy doing the live show and have such fun with the audience that we are willing to do this much work to make it go. It truly is a highlight of our week to visit with our digital family every Sunday night at 5 PM Pacific time at podfeet.com/live.


I actually have a couple of those Mictop stands and they do work well. Heavier than the Nu-Era ones but really solid which is a must for traveling. My kids got me a few small square lights powered over USB and the stands they came with are not great, but get the job done. Continuity with the iPhone 13 is fantastic though I carry 2 Elgato Facecams too in case I’m talking to another person. Travel mics have varied over the years, but currently use Rode NT-USB-Minis and the Rode Connect software to put it all together. Rode Connect also records each source seperately so editing is easier after.
That’s good to know you like the Mictop stands, Guy. I just got them and they are denser for sure, but more compact and with that smaller leg dimension we were looking for.
Ok here’s a funny thing, Guy – I weighed the Nu-Era and the MicTop, both with the holder for the mic attached. Even though the MicTop’s holder is actually bigger, it still weighed less. The MicTop weighed 9.0 oz while the Nu-Era weighed 11.3 oz, or 25% more! The smaller Mictop feels heavier because that weight is distributed over a smaller volume.