Hey, I’m talking over here – HUSH… just HUSH
Hi there fellow castaways this is Terry from Texas with another (long overdue) review.
First, the problem to be solved.
As an online professor, I record videos for my students. As previously mentioned, I live in Texas where it gets hot. To solve the HOT problem we use an air conditioner. Air conditioners make noise. Noise ends up in my videos.
I also live very near Fort Cavazos (you might know that better by the old name of Fort Hood). My house is right in the middle of the training flight path for both cargo and attack helicopters. They don’t respect my recording sessions at all. So, often helicopters fly right over in the middle of my recordings. Again, noise ends up in my videos.
We all know what makes a good video good, is clean, well-done audio. So noise in the audio — yeah that’s a problem. A problem we need to solve, or at least a problem I need to solve.
That brings me to the app of concern – Hush. (Yes just HUSH). Hush uses state-of-the-art Artificial Intelligence (AI) to suppress background sounds and room reflections.
Hush is available on the Mac App Store or from the developer’s (Ian Sampson) website at HushAudioApp.com where you can try it for free.
As the website states, Hush will mute all the noise, make every room anechoic, dechirp, debark, dehonk, automate your workflow, stay cool with Apple Silicon, and (you) own it for life.
The developer has Hush app priced for a one-time purchase of $49.99 rather than a subscription model. I actually prefer that for this type of purchase for this app. I’ll use it all the time and I don’t mind paying.
I listened to the sample he has on his website and immediately bought the app.
It’s been less than a week and I’ve already cleaned up all of my new videos, and have even started going back through my old library of videos that I’ve previously done for my students.
The way this works is you make some audio, or you make a video and render out JUST the audio file.
Open the Hush app, set some very basic parameters, pick a folder for the cleaned audio to end up, and then drag your raw audio onto the app’s target window.
Reach into the folder where you told Hush to send your clean audio and you’ve now got the clean audio file. If you’re working on a video, like I am, drag the clean audio track in to replace the original noisy track and render your video.
If you record audio or video you might just want to check out Hush.
Now that you have listened to me talk all about Hush you might want to hear how well it works for yourself. So I will ask Allison to play you a short audio clip.
First, you will hear a short bit of audio I recorded with two fans and a TV running in the background. THEN you will hear a clap for an audible separator. Finally, you will hear the EXACT same bit of audio after a quick trip through HUSH.
Allison – HIT IT!
Allison here…

I often get teased by listeners that I cost them a lot of money with my reviews. I now know how you feel. When Terry sent me this review of Hush, he bet me that Steve and I would both want this app. Without even knowing the price, I was dubious that I needed it. I have a very controlled environment for my recordings, with lots of sound absorption, a really good microphone, and a clean audio interface.
But what I don’t have is control over the recordings from listeners. Most of them are really good quality but even the best ones often have room echo or fan noise or air conditioning noise. Heck, Terry himself sent in a recording once where the refrigerator was running the background and it was highly distracting.
After hearing Terry’s review, I decided to download the free 21-day trial. 21 days is a very generous trial period for developer Ian Sampson to offer. Later in the show you’ll be hearing a quick review from the lovely Sandy Foster. She’s worked really hard to create a good environment for recording (no more fan noise) with a big-girl mic, so her recordings are very clean.
When I listened to Sandy’s recording for this week’s show, my very picky ears heard a very slight room noise. That’s hard to describe – it’s not a fan or anything like that, just the room itself reverberating at a low frequency. 98% of you would never have noticed the room noise. I thought I’d give Hush a try.
I downloaded the free trial from hushaudioapp.com/…. When it opens it tells you the trial is 21 days (yay again). As soon as you click the “start trial” button, you see the very simple configuration options for removing noise from your audio.

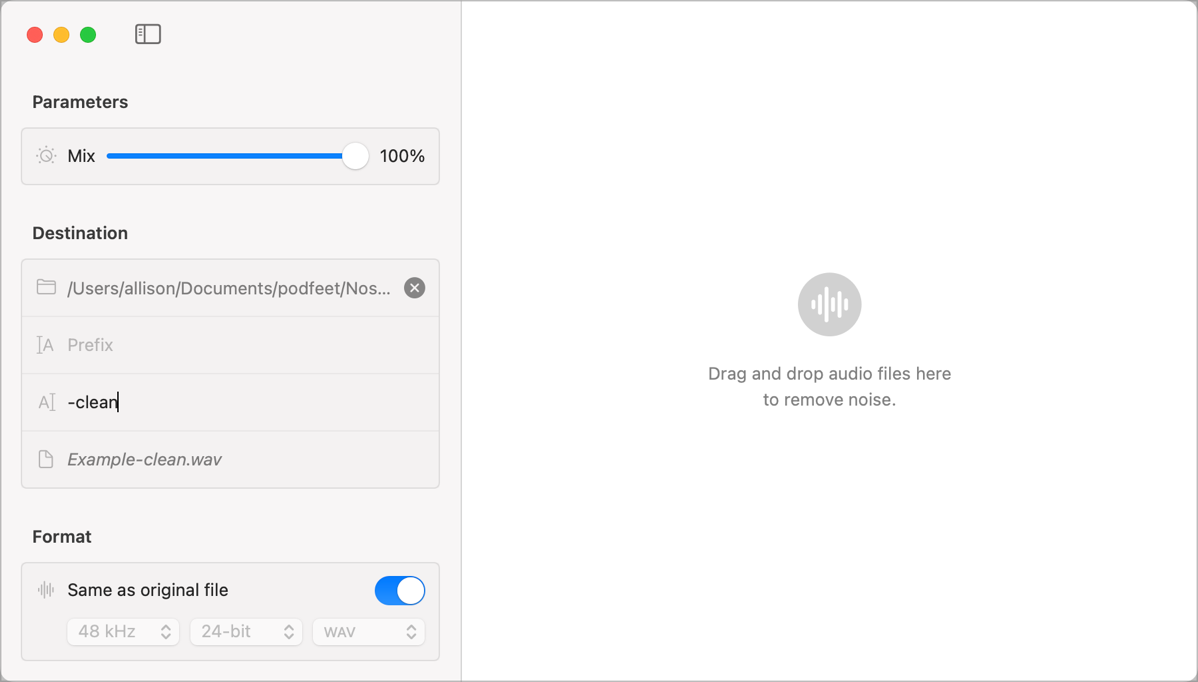
In the upper left, there’s a slider from 0-100% labeled Mix. There’s no explanation of what “Mix” means, so I asked the developer Ian Sampson. He explained that it simply blends the processed output with the original input. He said that if the AI inside Hush completely erased a dog bark, and you set the slider to 50%, it would be about half as loud as in the original. The reason you might want to set the Mix to anything other than 100% is if the resulting clean recording sounded artificially clean.
We’ve got another interview from the CSUN Assistive Tech conference this week and since as I’m sure you’ve noticed in previous recordings, there was a fair amount of ambient noise in the exhibit hall. I ran the latest recording through Hush 3 times — once at 100%, then at 50% and finally settled on 75%. At 100% it sounded like the interview was conducted in a super quiet but large room. At 50% the noise level was still more than I wanted but at 75% it sounds natural. Steve and I were talking about how the CSUN environment wasn’t super loud, but if we ever get to go back to CES, Hush will definitely be set to 100%.
Hush has just a couple more settings to play with. It asks you to tell it where to put the resulting denoised file, and it gives you the option to add a prefix or suffix to the resultant file. Finally, you can set the sample rate and file format (e.g. WAV, AIFF, or FLAC) or you can toggle a switch to set it to the same as the original file.
After setting up Hush, you simply drag your audio file onto the main area on the right and Hush immediately gets to work.
I tested Hush for accessibility, and the Mix slider, file info fields, and formatting controls all worked well. There are graphics next to each one of these settings and they’re not well-labeled, so I let Ian know he might need to do some cleanup on them. A bigger issue is that drag and drop is problematic for those who use VoiceOver. I thought that might be the case so I sent out a toot on Mastodon asking if there was some trick I didn’t know about.
Kevin wrote:
“Most screen readers have a way to drag and drop, but they are often not as efficient. You can do it, but it’s annoying. Or sometimes you can select a file in something like Launchbar or Alfred and then send it to the app that only has drag and drop. Most of the time drag and drop with a screen reader is not enjoyable as it seems to be for sighted people.
Allison wrote:
“In my experience, this would make it functionally inaccessible. On the Mac, for example, drag and drop is possible with VoiceOver, but it rarely behaves the way I would expect it to.”
I passed along my feedback on accessibility to Ian and based on my first conversation with me, I’m confident that he’ll work on these issues for VoiceOver users.
One file point I wanted to make. Hush really does want an uncompressed file. I tested running an mp3 file through it and it took a very long time and actually spun up my fans, and even though I told it to save as my original format, it saved it as an AIFF. I also tried it with an AAC M4A file which is a lossless format but it is compressed. Hush did save it with the .m4a extension but the file was triple the original size so I suspect it was exported as an ALAC (Apple Lossless Audio Codec), not an AAC. I’m getting into the nitpicky details of audio codecs here which is pretty much the road to madness so I’d better stop.
On hushaudioapp.com, Ian says that when you buy Hush, you own it for life. He says, “Neural networks with this much power usually require a server — along with hefty usage or subscription fees. Instead, Hush runs entirely on your Mac. Your data stays private, and the app is yours forever.”
While $50 is a lot for an app, Hush is in the Mac App Store which means I can share it with Steve for his videos, which made it more palatable for me. The fact that on the first day I tested Hush, I found two good uses for it tells me Hush will be a tool that lives in the top drawer of my toolbox.
I’m very cross with Terry for costing me $50 today but you’ll all be the beneficiaries. And I bet a lot of you are grinning knowing how much I’ve cost you over the years.


Great find, thanks!
I’m thrilled I could share my own solution to this problem and that others found it useful!
My NEW problem was to be solved: When I bet Allison, I actually need to set the stakes for the bet!
How can you tell if the audio file was actually processed through Hush? There is nothing different in the name. I make a copy of the file, put it through hush and the name is exactly the same as before hush!
Andrea – in the interface you tell Hush where to save the file and can add an extension to the file name so you can tell them apart. Also, if you have any significant noise in your file you should be able to hear the difference.
Thanks Allison. I want to tell Hush to put the file back in the same folder it came from (I’m using Studio One and a folder with the name of the file is created automatically when I start creating a new title.) I’m putting the post-Hush file back in the same folder with the original pre-Hush version. That’s where I’m getting confused. I tried adding .hush as the extension, but the file still comes out as .wav without .hush in the title. Thanks again!
Ah you gave me the clue I needed, Andrea. You shouldn’t try to change the extension of the file. it IS a WAV file which is the container for the audio codec. Instead, add a suffix with a different character than “.” In the left sidebar, choose your original location, skip over Prefix, and in Suffix type “-hush”. Below that you’ll see the example of how the file name will come out has changed to “Example-hush.wav”.