I’ve been talking a lot lately about different methods of running Optical Character Recognition (OCR) on PDFs using only free open source tools after George from Tulsa taught us about OCRmyPDF. All of the methods I’ve described work, but they’re pretty high on the nerd scale.
OCR PDFs with Open Source Tools on Linux by George from Tulsa
OCR PDFs using Free Open Source Tools with a Shell Script and Keyboard Maestro
OCR PDFs with Free Open Source Tools on a Mac with a Shell Script
Instead of having to run a shell script or buy and configure Keyboard Maestro, what if you could just right-click on a file and choose a Quick Action to OCR your file all for free? Wouldn’t that be sweet?
As you might expect, I want to tell you the story of how I finally made this super simple Quick Action using Shortcuts on macOS. But if you want to just get the Shortcut and not follow along with my adventure, this time I’ll just give it to you upfront.
After you download the Shortcut, read the instructions or you’ll be sorry and sad when it doesn’t work. The instructions tell you how to download two things using the Terminal but after that, it should be clean sailing.
I know you’re not going to read the instructions in the Shortcut like I just told you so here are the first two required steps:
- If you don’t already have it, install Homebrew: Go to https://brew.sh, copy the command they tell you to copy using the little copy button. Open Terminal, paste, and hit Enter. Ignore the glop that flies by on your screen
- Install OCRmyPDF: In Terminal type
brew install ocrmypdf. Ignore the even more voluminous pile of glop that will fly by on your screen (unless you see errors)
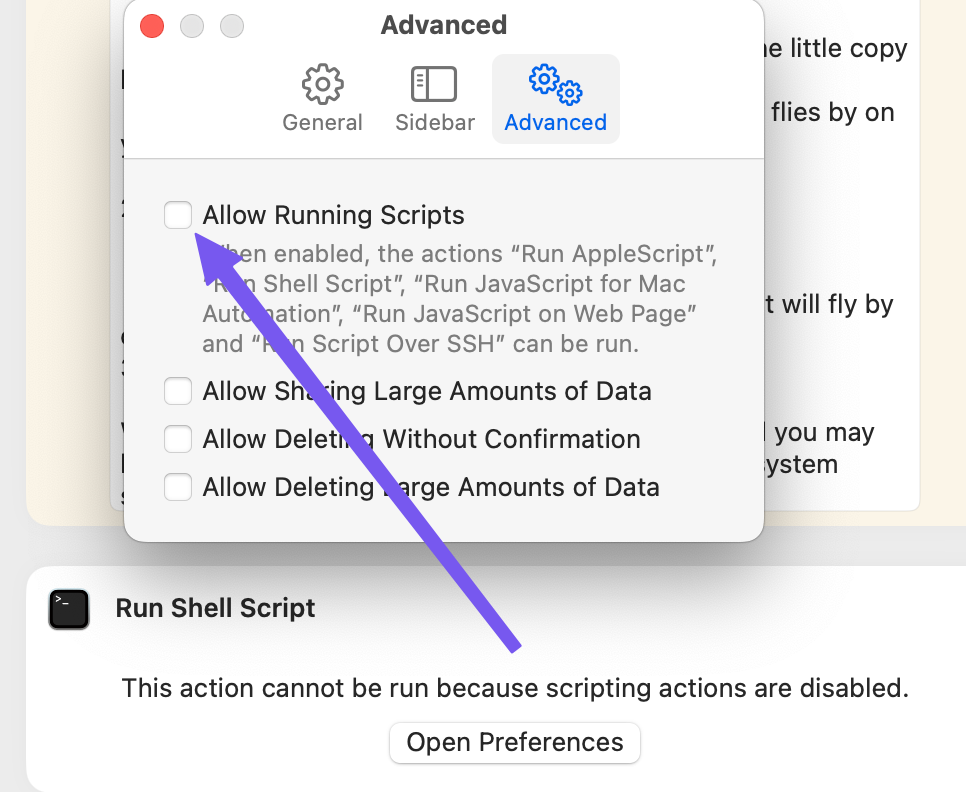
When you try to run the Quick Action from the Shortcut, you may get a notification saying it didn’t work because you haven’t enabled running scripts in Shortcuts. Simply open Shortcuts Settings, and on the Advanced tab check the box that says Allow Running Scripts.
Why am I doing this a third time?
You may remember the end of the last story where David Roth was able to run the Keyboard Maestro macro to OCR his files, I asked him whether there was anything else he’d like, and he said he doesn’t normally run Keyboard Maestro and could I do it a more native way. And that’s when I decided to try to do it with a Quick Action, which is what Mike Price said I should do way back at the beginning.
As I go through my story of discovery, I’ll actually explain two paths I went down, both of which create a Quick Action where you can just right-click on a file, but the Shortcut method is the easiest method for the “normal” user.
Automator Can Run Shell Scripts to Become a Quick Action
For my first path to create a Quick Action, I used the application Automator. While Automator isn’t the shiny new kid on the block for Automation, it can still get the job done.
I’ve mentioned before that Apple have been terrible about changing the names of things and not doing a thorough job of it. That becomes very obvious in working with Automator to create Quick Actions. The inconsistencies can get very confusing.
When you launch Automator, you see a set of eight different file types to choose from, including Workflow and Quick Action. You want to choose Quick Action because the resulting file will automatically be saved into the correct location to be opened as a Quick Action.
I mention Workflow because when you save your Quick Action, the file type will be .workflow. To access Quick Actions, you right-click on a file in Finder and choose Quick Actions. In the not-so-distant past, you used to right-click and choose Services. And guess where Quick Actions are stored? They’re stored in a folder called Services in your home Library. Seriously, Apple, pick one name and stick with it, or at least change it everywhere!
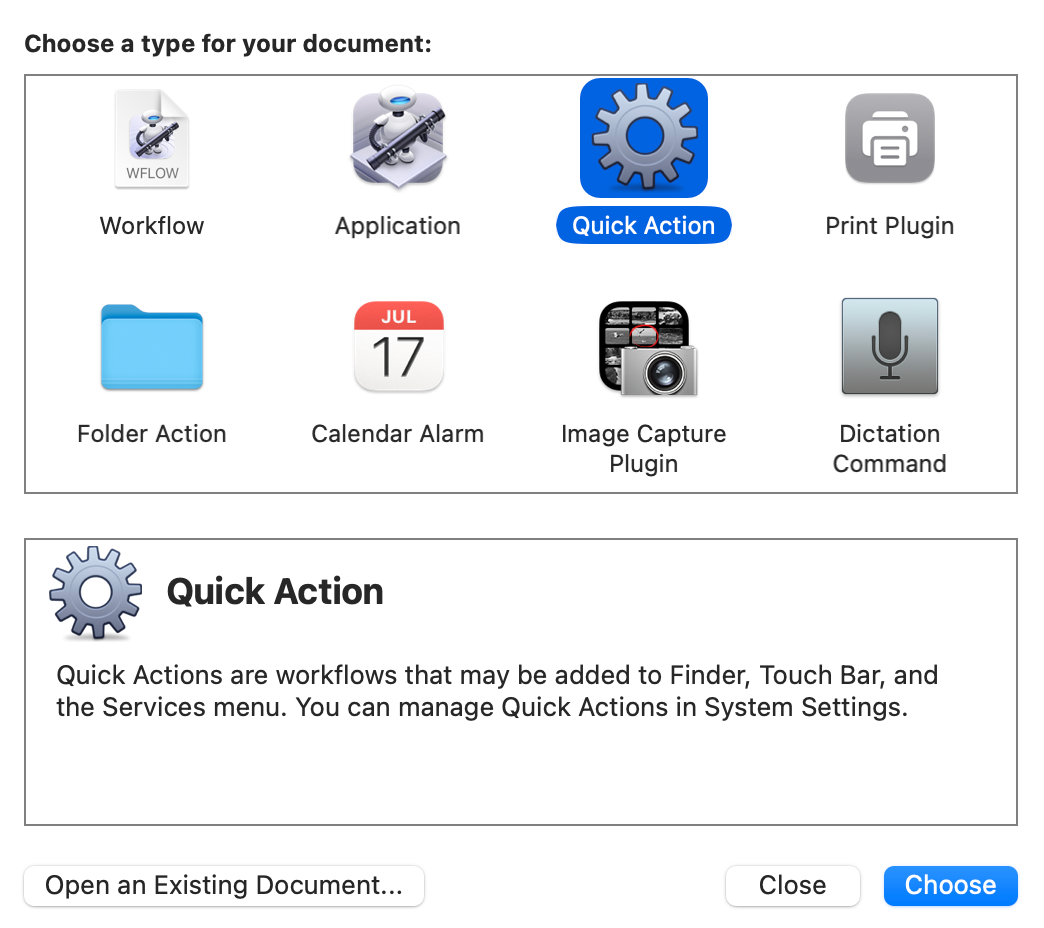
With Quick Action chosen as the document type in Automator, we can drag in Actions from the center column and build up our little workflow. The main basis for our Quick Action will still be the little Bash shell script I wrote.
You’ll remember that the basis for all of the methods I’ve worked on to OCR a PDF is the shell script that runs the open source library ocrmypdf which we learned about thanks to George from Tulsa.
That Pesky PATH Again
I dragged in a Run Shell Script action to my workflow in Automator, and pasted my shell script. The shell script will try to run ocrmypdf, so just like the previous solutions, we need to tell Automator the path to find this Homebrew library and all of its dependencies.
On my Mac, Homebrew installs in the directory /opt/homebrew/bin, so I hard coded the path to the command ocrmypdf with that path:
/opt/homebrew/bin/ocrmypdf
I thought I was very clever until I stumbled across a tiny tidbit of important information. Evidently the folks at Homebrew made a decision to have Homebrew install libraries in a different location on Apple Silicon Macs than on Intel Macs! On Intel Macs, it installs libraries in /usr/local/bin.
I had a choice at this point. I could abandon all of my Intel-owning friends and not let them play along with OCR’ing their PDFs for free with a Quick Action, or I could try to figure out how to run an if/then statement in my shell script that checked which type of machine was running the code and to use the appropriate path to the Homebrew libraries for Apple Silicon vs. Intel.
I found several solutions on Stack Overflow for how to query the system to find out which processor was inside the Mac running the shell script and Klas Mellbourn was even kind enough to put the command inside an if statement. I really love the Internet and especially the open source community!
The Terminal command to determine your processor is pretty easy, it’s simply uname -p. If you’re on an Apple Silicon Mac, it will return arm and if you’re on an Intel Mac it will return something a little more specific, such as i386. I created an if statement (using Klas’s beautiful example) that checks to see if the command returns arm and if it does, it sets the variable homebrewPath to /opt/homebrew/bin, otherwise it sets the variable homebrewPath to /usr/local/bin.
if [[ $(uname -p) == 'arm' ]];
    then homebrewPath=/opt/homebrew/bin
else
    homebrewPath=/usr/local/bin
fi
At the end of my script where I actually finally run ocrmypdf, I can slap that path variable $homebrewPath on the front of it and no matter which kind of Mac you’re on it should work. This would be a much cleaner way to run my Keyboard Maestro macro too.
Sorry Older Macs
I said it “should” work, and it did for some Intel Macs and all Apple Silicon Macs I had people use to test. However, when Dorothy tried to run it on a 2015 Intel Mac running Big Sur, the ocrmypdf library simply wouldn’t install. The error was pretty curious. Remember I said that installing the library would install lots of dependencies? One of them downloaded with a mismatch of the SHA256 encryption and with it not matched you know something has gone wrong. It could be that the older library required for the older Mac had some bad stuff injected into it, so we don’t really have a path forward to make this work for Dorothy’s older Mac. I tested on my 2015 MacBook adorable and got the same error.

In addition, the Homebrew installer sent this clarifying message:
Warning: You are using macOS 11.
We (and Apple) do not provide support for this old version.
It is expected behaviour that some formulae will fail to build in this old version.
It is expected behaviour that Homebrew will be buggy and slow.
Do not create any issues about this on Homebrew’s GitHub repositories.
Do not create any issues even if you think this message is unrelated.
Any opened issues will be immediately closed without response.
Do not ask for help from Homebrew or its maintainers on social media.
You may ask for help in Homebrew’s discussions but are unlikely to receive a response.
Try to figure out the problem yourself and submit a fix as a pull request.
We will review it but may or may not accept it.
I asked Ed Tobias and Steven Goetz to try installing on their more recent Intel Macs running fully-supported OSes (Monterey) and the installation of ocrmypdf worked just fine. This was great news. I now had a script that ran successfully on both Intel and Apple Silicon as long as the operating system was fully supported.
Documentation with Comments
I like to document my programs, and in Keyboard Maestro there’s an action called Comment that lets you add documentation. You can even color-code the actions so I added the color red to the requirements comment in Keyboard Maestro to make sure people noticed the importance. Sadly, Automator doesn’t have any actions designed for commenting your work.
I went on the hunt for how people put comments into Automator, and I found all sorts of recommendations. It sounds funny, but most people recommended using shell script actions but making every line of the shell script be a commented-out line of code. Talk about a clumsy workaround! I went down a slightly different path but it’s just about as silly.
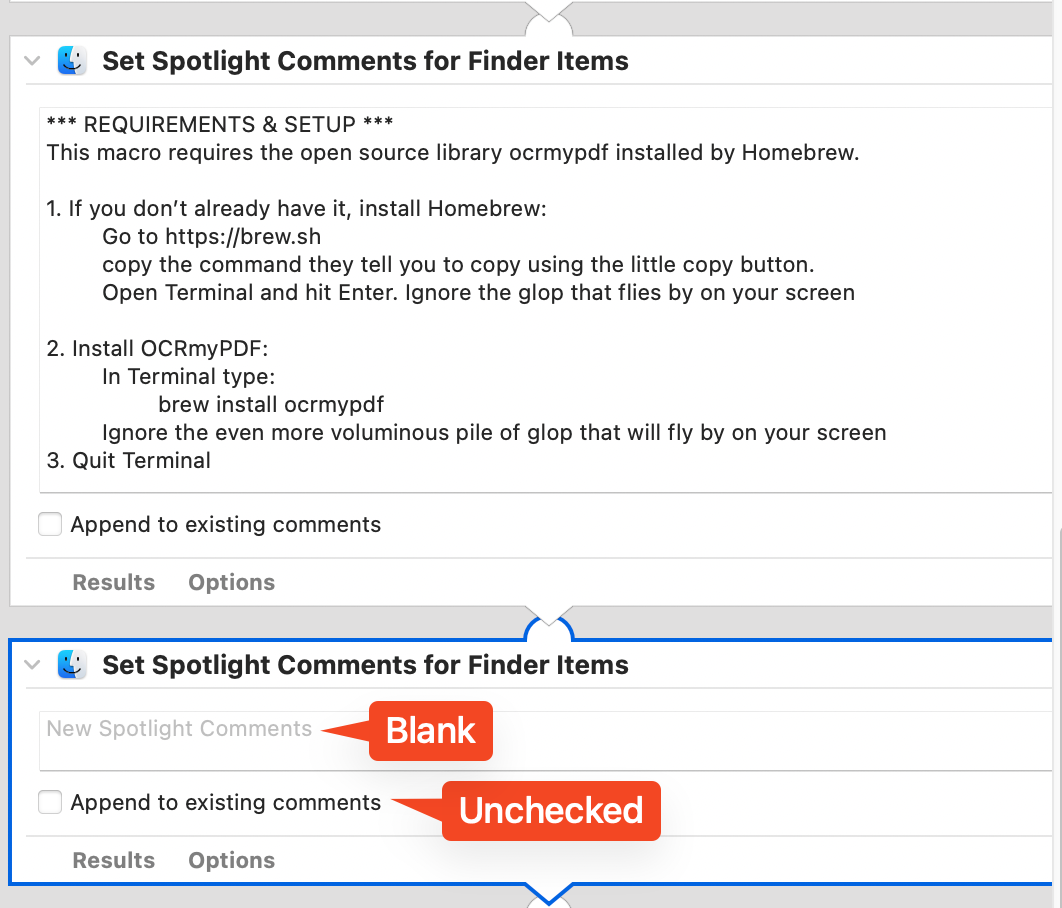
I used the action “Set Spotlight Comments for Finder Items” which gives you a free-form text field to put in comments. It works but it also does what it says on the tin – it puts your comments from Automator into the Spotlight Comments for the input file. I didn’t want the input file to be changed at all so I came up with a hacky way around the problem. I noticed that the action had a little checkbox to allow you to append your text to existing comments which gave me the workaround idea.
First I wrote out my Requirements and Setup instructions in one Set Spotlight Comments for Finder Items action, but then I followed it with another Set Spotlight Comments with no text at all in it. By unchecking the “Append to existing comments” checkbox, I knew it would erase what the first action wrote. I felt rather clever coming up with that idea!
There’s really not much else to my Automator Workflow Quick Action other than setting a few things at the very top. They’re not critical to be set this way, but I set the Workflow to receive the current PDF file in Finder.app, I gave it a little image icon and set it to pink. I’m not sure why that’s an option because everything is pretty much in greyscale in macOS these days so the pink was a lie.
The last thing I added was a sound to be played when the Quick Action completes. When I didn’t have any success finding a “play sound” action in Automator, I turned to the googles as one does. Imagine my delight when the very first hit I got on my query was to bartb.ie/… and a post he wrote on August 30, 2014 entitled “Play a Sound in Automator”. I distinctly remember him writing this because he’d been teaching me something in Automator and I wanted a sound to notify the user when it was done!
The basic trick of it is you tell Automator to Get Specified Finder Item and drag in one of the built-in system sounds like Glass.aiff. Once Automator has the sound you want to hear, you run a tiny Bash shell script that says:
for f in "$@"
do
    afplay "$f"
done
I saved my Quick Action, and now when I right-click on a PDF in the Finder and go to Quick Actions, I can see my ocrmypdf Quick Action. It churns for a bit and then a new file appears with “-OCR” appended to identify the new searchable and accessible PDF.
The only thing left was to find some guinea pigs to test my shiny new Quick Action. David Roth was the one who asked for an easier way, so he was giddy with excitement when all he had to do was right-click on a PDF and choose ocrmypdf from the Quick Actions menu and the magic happened. His happiness is what I live for.
How to Install and Use a Quick Action to OCR PDFs
If you’d like to use the Quick Action built by Automator, here are the steps you have to follow.
- If you don’t already have it, install Homebrew: Go to https://brew.sh, copy the command they tell you to copy using the little copy button. Open Terminal, paste, and hit Enter. Ignore the glop that flies by on your screen
- Install OCRmyPDF: In Terminal type
brew install ocrmypdf. Ignore the even more voluminous pile of glop that will fly by on your screen (unless you see errors) - Download and unzip the workflow I created called ocrmypdf.workflow.zip and put it in your user Library → Services folder. (I’d also open it in Automator to make sure it’s legit!)
- In System Settings → Privacy & Security → Full Disk Access, make sure Automator shows Full Disk Access toggled on. If you don’t see Automator under Full Disk Access, use the plus button to add it and toggle it on
- Select a PDF in Finder, right-click, select Quick Actions, and then select ocrmypdf
- You may not see ocrmpdf in your Quick Actions menu. If you don’t, select Customize from the Quick Actions menu and you’ll be able to add it.
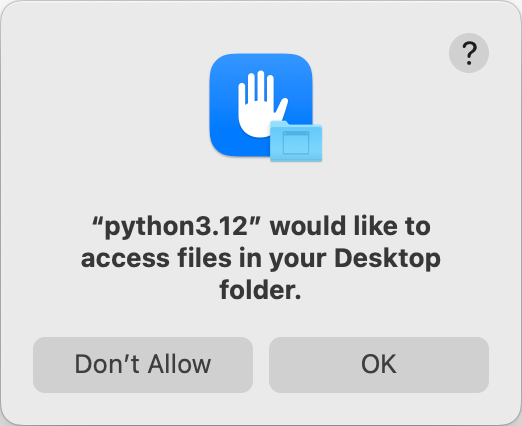
- You will get a popup saying that python3.12 would like to access files in your Desktop folder. Evidently Python gets installed and is part of the process. I’m not entirely sure why this surfaces now, but if you want to proceed, click OK.
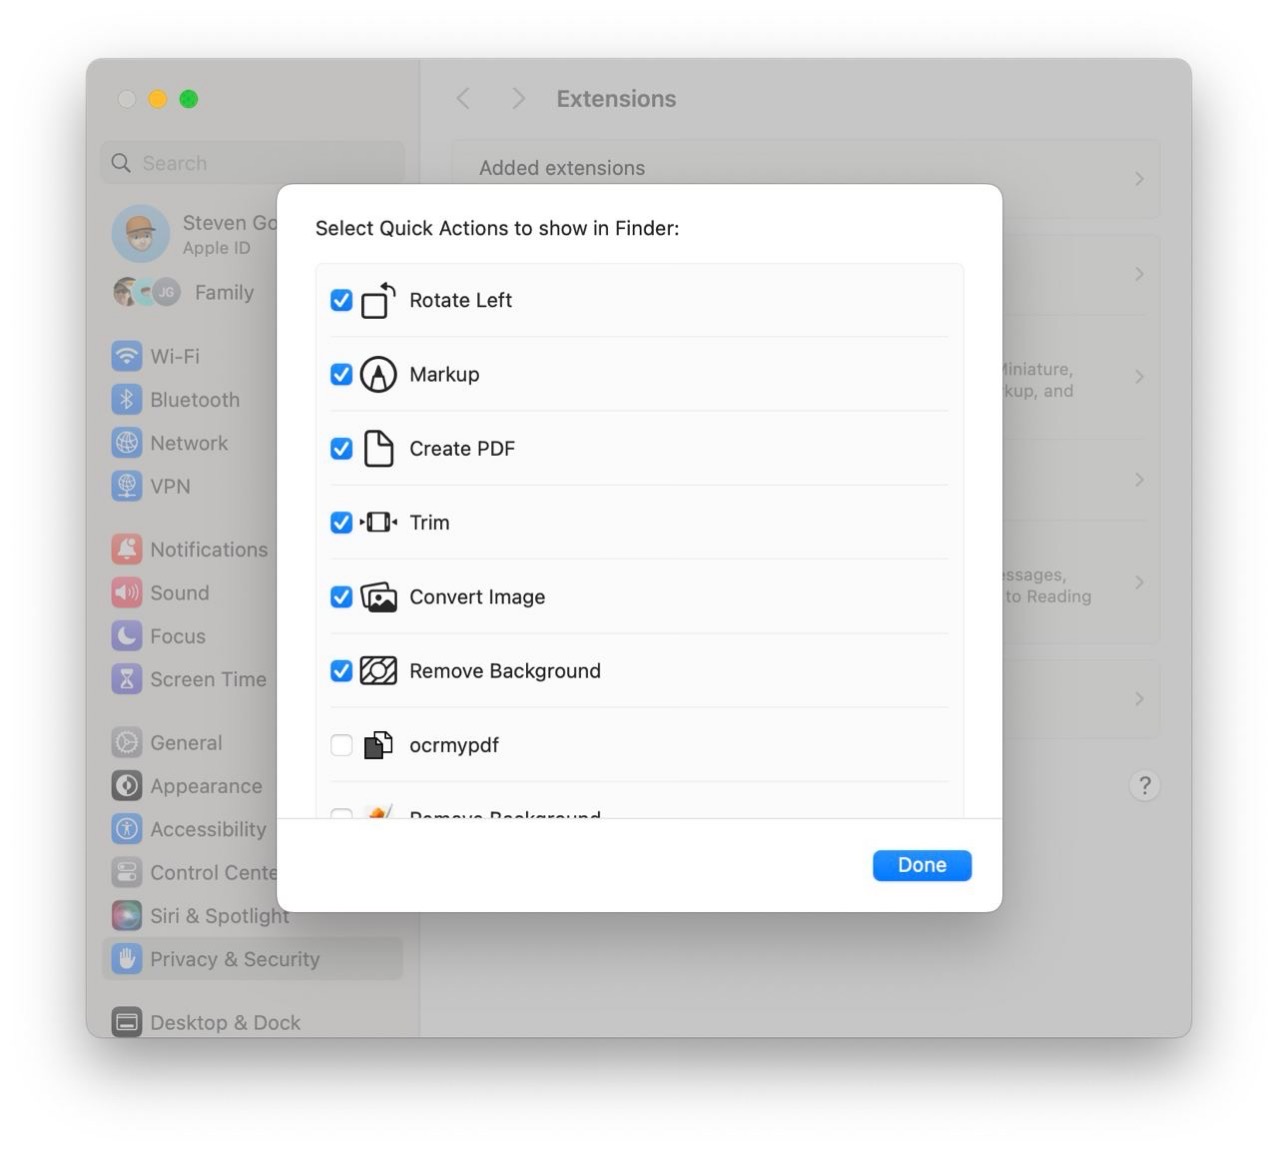
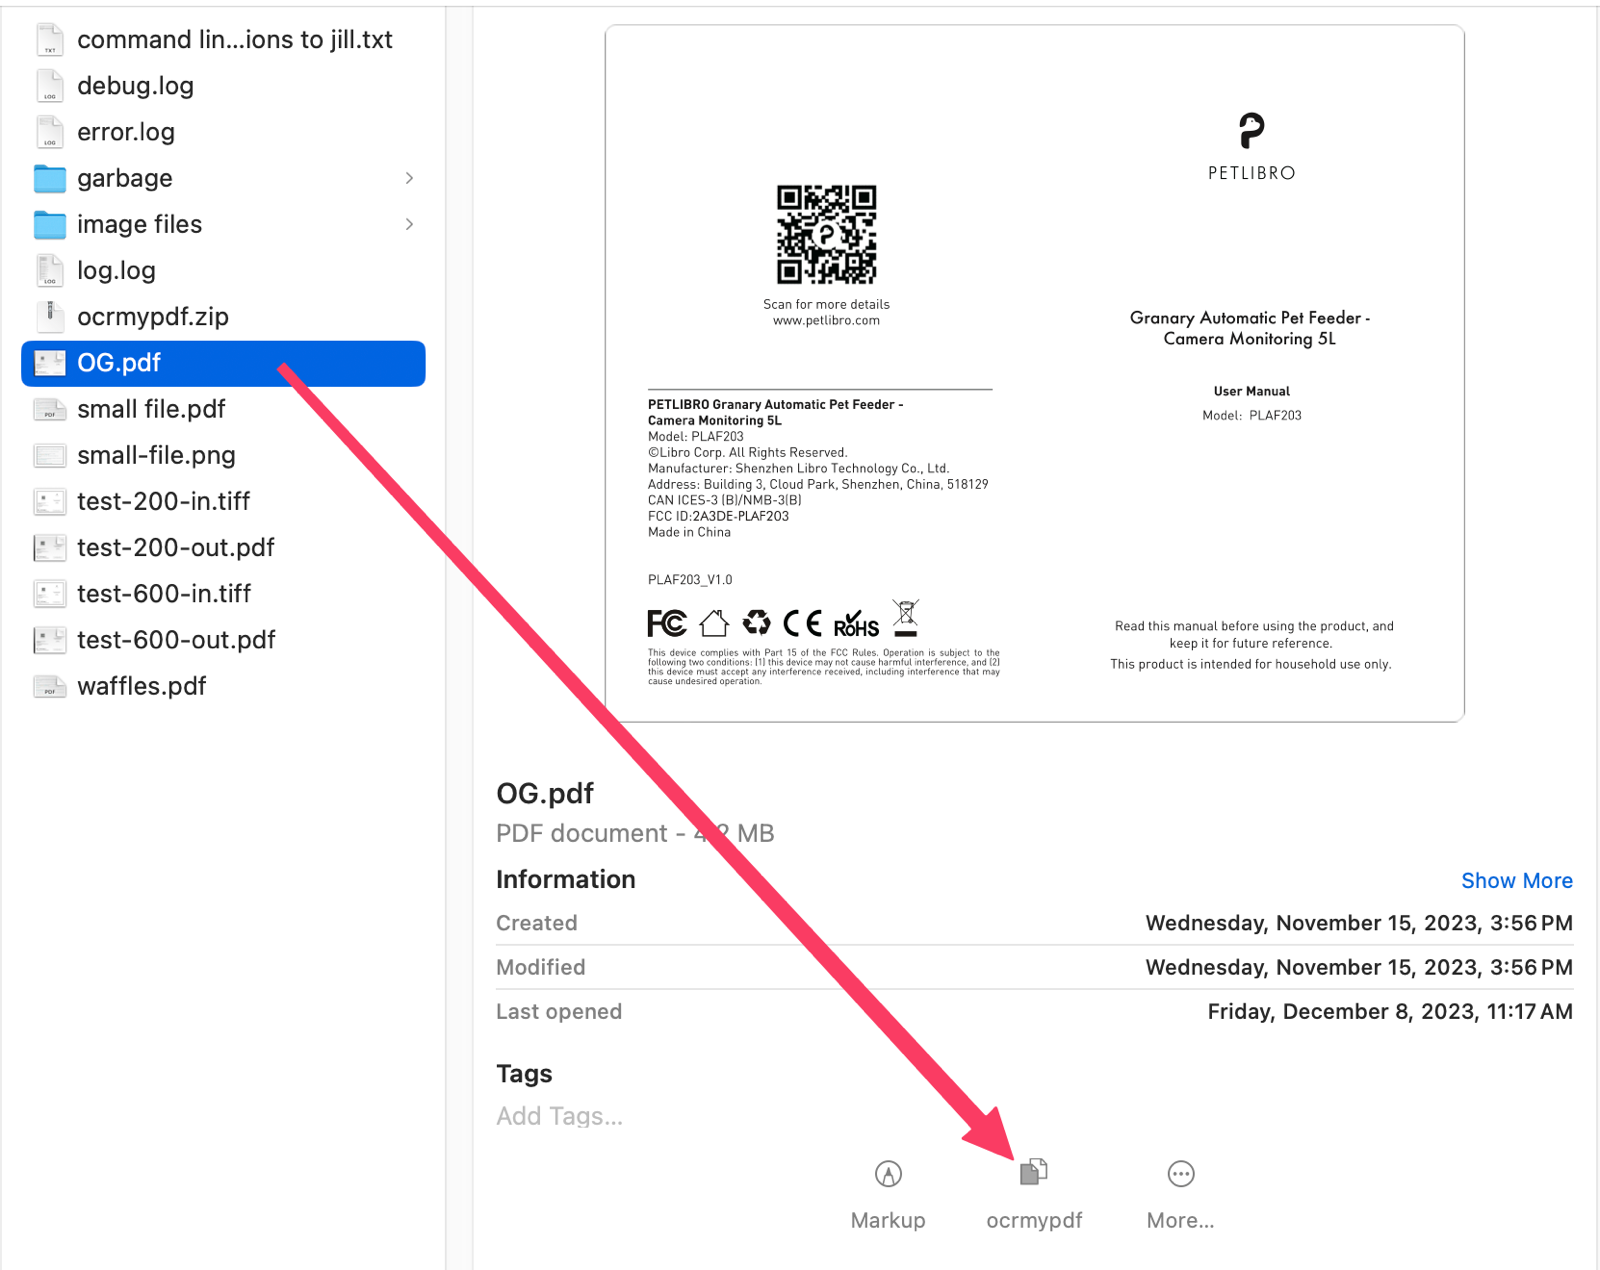
I’ve mentioned several times that Quick Actions are available by right-clicking on a file, but there’s another way to execute a Quick Action. If you happen to like the column view in Finder (and you should like that view because it’s the best view), when you select a file, you can see a Preview of the file, and below that you’ll get some tools. One of them is a Quick Action and if you don’t have other Quick Actions that have to do with PDFs in Finder, you should see ocrmypdf as a simple button. This saves you from right-clicking, choosing Quick Actions, and then choosing ocrmypdf.
Creating a Shortcut for ocrmypdf
After my success using Automator, I sent the Quick Action to Ed Tobias. After he played with it, he created a Shortcut instead to run the ocrmypdf command. Dagnabbit, I was ready to declare victory, but now I had to learn to do it with a Shortcut too! While I am compelled to thank him for sending it to me (and coming up with a better name than mine), his script was a single line hard-coded it to his machine. It did give me kind of a framework for how to write a generic Shortcut though. This was crucial because I find Shortcuts baffling and I’ve literally never gotten any of them to work on the Mac.
The first step of Ed’s Shortcut was to tell it to receive the file. Seems like a reasonable place to start. The action he used said, “Receive PDFs and Apps input from Sharesheet, QuickActions”.

I searched the action list for “Receive” to find the one Ed used. Guess what? Not one single action in the entire list of Shortcut actions has the word “Receive” in it. This is what I really hate about Shortcuts. After a lot of time searching the ‘net and messing around in Shortcuts, I had an idea. Since the second action will be Run Shell Script, maybe the script itself triggers the creation of the receive action?
I was able to find a Shell Script Action, and when I dragged it in, it informed me that I had to enable scripting actions in Preferences if I wanted to actually add or even run a script. I mentioned this when I described how to run the Shortcut at the beginning but this is where you may need to know about it if you write your own.

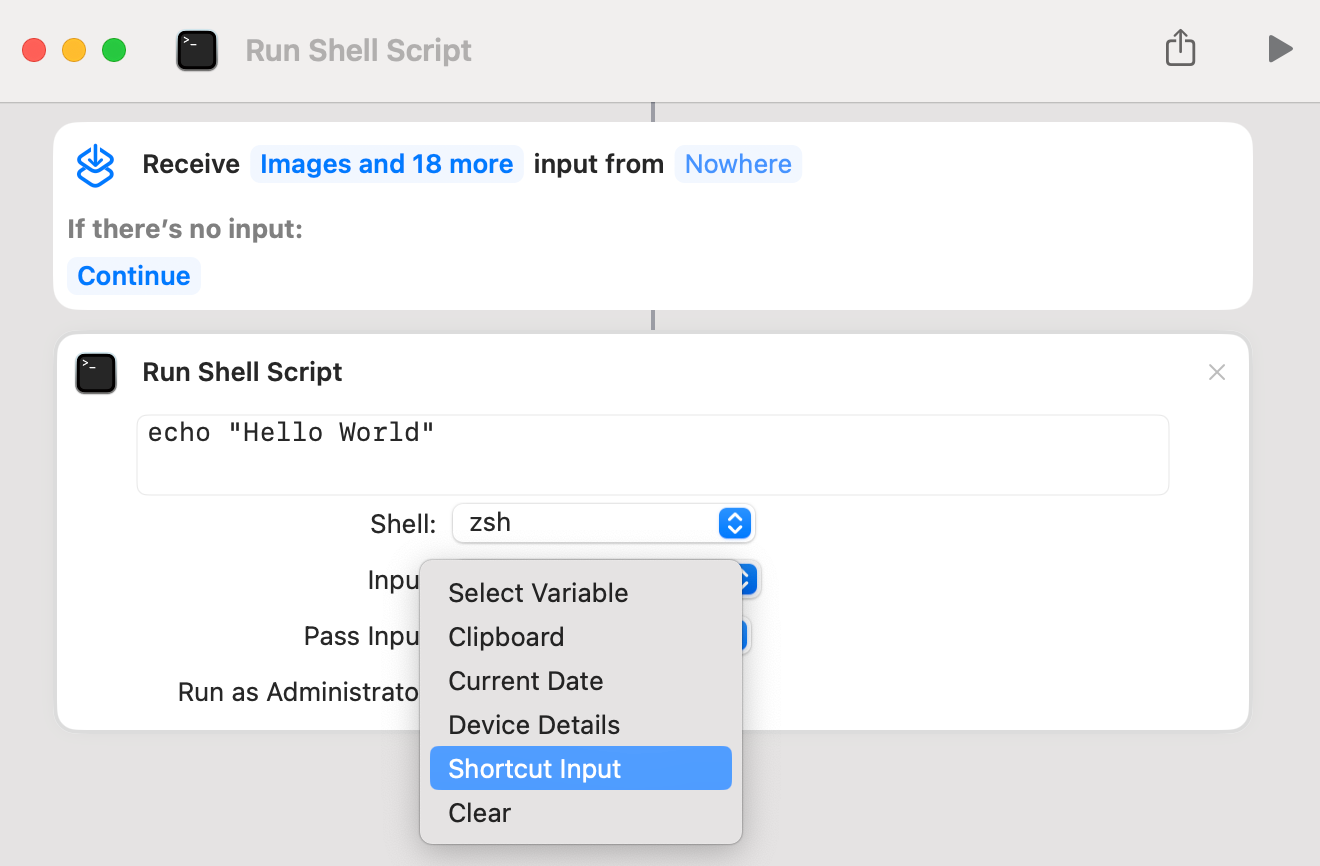
Once I had allowed scripts in Shortcuts, the Run Shell Script block changed to create a little “Hello World” script. Among a few other dropdowns, one was for Input with the selection helpfully set as “Input”.

As soon as I changed the Input dropdown to “Shortcut Input”, an action was inserted before my Run Shell Script called Receive. While I was pleased I figured it out, it was awfully unintuitive. The rest of the Receive action includes changing what to receive, where the input should be coming from, and what to do if there’s no input.
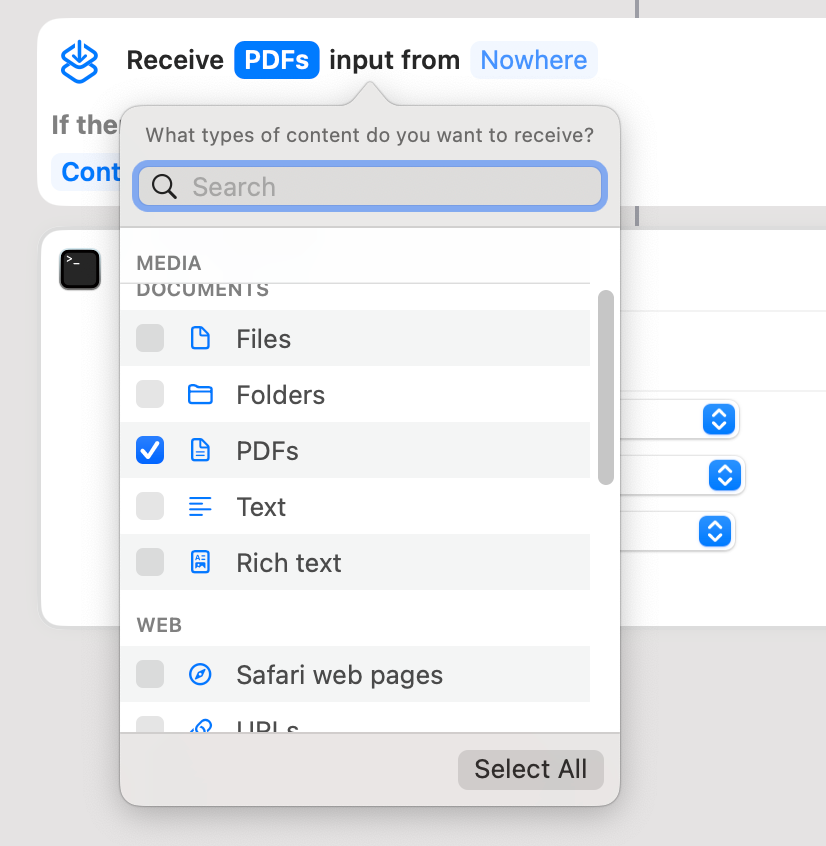
Now that I had the Receive action, I needed to narrow down the types of files it would accept. By default, it had 19 different file types with selected checkboxes. I hit the select all button hoping it would change to a deselect all which it did, allowing me to just select PDFs as the input type.
“Input From” was the next field to change. I wasn’t sure what it meant until I selected it and learned it was how to allow you to run the Shortcut. This opened the details tab of the info pane on the right side. There are a lot of good options here and I saw no reason not to give you as many as seem useful. I checked Pin in Menu Bar, Show in Share Sheet, and Use as Quick Action both from Finder and the Services Menu. The Share Sheet sounded fun because right at the point when you’ve opened a PDF and realized it’s not searchable, you could go to Share and choose the Shortcut and create your new OCR version of the PDF. Having it in the menu bar might be fun too.
I’m going to spoil your joy here though – while the Share Sheet option appears to run the Shortcut up to and including playing the sound to tell you it’s done, it doesn’t actually create a new file that’s been OCRd. The menu bar option is even worse. With the PDF selected in Finder, using the menu bar method to get to the Shortcut causes it to fail asking you to select a PDF. For now I’ve disabled it for the menu bar and the Share Sheet but if anyone knows a solution to get it working I’ll fix it and put those options back.
The last piece of the Receive action gives you the option to choose what to do if there’s no input. I chose “Stop and Respond” and set the response to, “Please select a PDF you would like to OCR”. Now I can finally work on the script part of the Shortcut.
After pasting in my script, I set the Shell dropdown to bash, and I changed the Pass Input dropdown to “as arguments”. This was critical so that the file name that came in from the Receive action would be available to the script for manipulation and running the ocrmypdf command against it.
I’ve gone into great detail here as I always do, so let’s describe the simple steps I followed:
- Drag in a Run Shell Script and ensure scripting is enabled in Shortcuts
- Change the Input to Shortcut Input in the Run Shell Script action
- Change the auto-created Receive Input action to accept the file types desired and the response if no file is supplied
- Change the Shell script dropdowns to correspond to the shell you’re using and how to handle inputs
At this point, my Shortcut actually worked!
But of course, I didn’t stop there. Remember I stressed the importance of documentation with comments In Automator? I had to hijack a nonsense action to put in comments, but in a sign that Shortcuts is in more active development, there’s actually a Comment action you can drag into your Shortcut. It wouldn’t let me change the color the way Keyboard Maestro does but it’s still better than Automator.
Even though the Shortcut was functioning, I still wanted to have the little sound to tell the user that it was finished. In Automator, I used Bart’s instructions to play the sound of Glass.aiff from the system Library using a tiny Bash script. I could have done that here, but my goal in this exercise was to use as much native functionality of Shortcuts as possible so I searched for “sound” in actions. I was rewarded with a Play Sound action.
Since Glass.aiff is a system sound, I expected I’d be able to simply point the Play Sound action to the file in Finder, but Play Sound didn’t have that option. My options were: Select Variable, Clipboard, Current Date, Device Details, Shortcut Input, Shell Script Result, and Clear. How those are sounds I’ll never know. It was obvious I would have to work backward again!
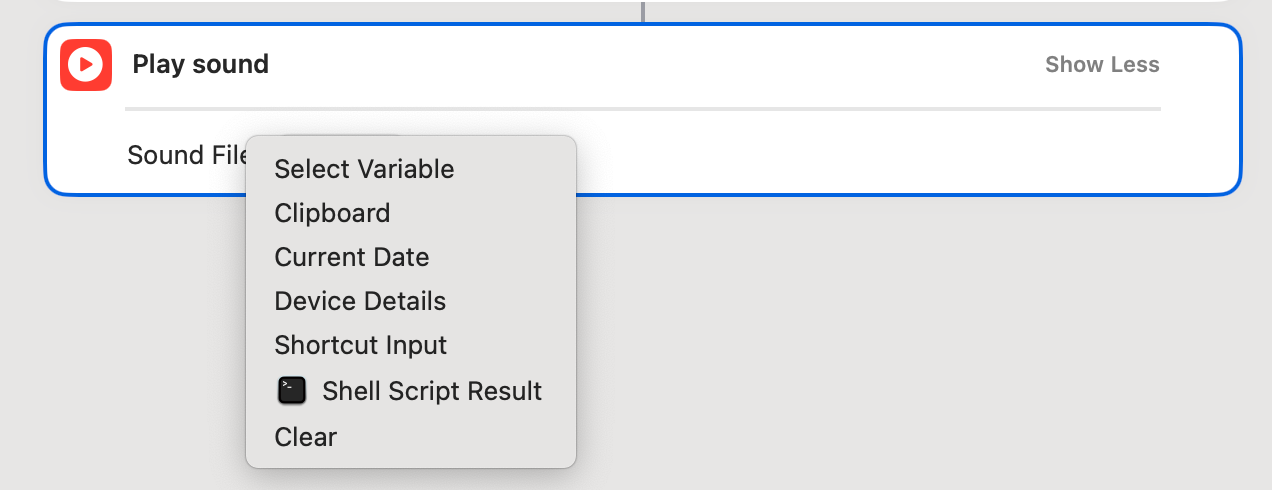
I played around with several of the options, like Select Variable, but none created an input action before the Play Sound Action. I took a chance and set the Play Sound action to Shortcut Input and then dragged the Glass.aiff file in from Finder (System/Library/Sounds/Glass.aiff) before Play Sound.

That was the trick to telling Play Sound how to play the correct audio file. Though it works perfectly, it looks a little bit weird. It shows the full path to the file I just described but it says the sound file is called Glass.aiff.aiff. Just another weirdness in Apple land I guess.
I named the Shortcut OCRit (stealing Ed’s name) and then I was able to easily copy an iCloud link to share with you.
Bottom Line
I sincerely hope nobody thinks up yet another way I should solve the same problem, but don’t be surprised if I enhance the Bash script to handle image files as the input to convert to OCRd PDFs.
I’d like to thank everyone who helped test and gave me ideas and I hope I don’t forget anyone. Thank you to Ed Tobias, Steven Goetz, Jill from the Northwoods, MacLurker Dorothy, and Mike Price for their testing and ideas, George from Tulsa for showing us OCRmyPDF in the first place, and to David Roth who actually needed this done. Though many of you would think that this was too nerdy, I had a lot of fun learning how to write the script, how to work with that pesky PATH thing, how to work in Keyboard Maestro and Automator and even how to beat Shortcuts into submission in the end.


Hi.
This is great. One thing. The command to get the prefix for a homebrew installation is ‘brew —prefix’. This outputs “/usr/local’ on my Intel Mac. It will be ‘/opt/homebrew’ on Apple silicon. This is documented in the brew man page.
So the shell script variable would be:
$(brew —prefix)
Using this variable should make your script architecture independent.
Thanks for the nice post!
@Tom, that doesn’t always work in a script. In order for that to work the Brew directory must be available to the script in the system environment path variable.
I run into this in an AppleScript I made for processing images with help of ImageMagick. I have two Macs, one Intel and one with a M1 processor. On one Mac the script failed because of that.
To clarify the brew command on an Intel Mac is in /usr/local/bin and on a Arm Mac in /opt/homebrew. So if the script doesn’t have access to the system environment path variable the command “brew —prefix” will fail.
Yep. You are right. I obviously didn’t think this through.
Thanks!
I run into a problem with an AppleScript program when I tested for the cpu.
uname -p returned i386, even though the program ran on a M1 processor.
On Stack Overflow I found out that if a program runs under Rosetta (shell) the test uname -p will return i386 on Apple Silicon.
This test should also work under Rosetta:
#!/bin/zsh
if [[ $(sysctl -n machdep.cpu.brand_string) == “Apple M” ]]; then
homebrewPath=/opt/homebrew/bin
else
homebrewPath=/usr/local/bin
fi
The reason why I test on “Apple M” is that there are several M-processors (Apple M1 Pro, Apple M2, Apple M2 Max etc)
In my AppleScript program I now use the following test:
set Processor to do shell script “sysctl -n machdep.cpu.brand_string”
if Processor contains “Apple M” then
set homebrewPath to “/opt/homebrew/bin/”
else
set homebrewPath to “/usr/local/bin/”
end if
Looks like Markdown changed the bash script. It should be:
#!/bin/zsh

if [[ $(sysctl -n machdep.cpu.brand_string) == *"Apple M"* ]]; then

   homebrewPath=/opt/homebrew/bin

else

   homebrewPath=/usr/local/bin

fi
Frank – I fixed the script (in the last comment) by adding triple back ticks above and below the code to turn it into a Markdown code block.
This is very interesting. I like your solution. What I don’t know is why an AppleScript would be running under Rosetta. I saved my workflow from Automator (with the embedded AppleScript) as an Application named “deleteme”. Then I opened System Information, opened the Applications tab, and searched for deleteme. It shows the “Kind” for the deleteme app as Universal. If it was Rosetta, it would show Kind as Intel, right?
I found out why.
If I compile an AppleScript to make it a program with ScriptDebugger 7 (a development environment for AppleScript coding), then I get an Intel App bundel. I downloaded the newest version of ScriptDebugger 8 and if I compile the same script with it I get a Universal App.
I have a licence for version 7, not for the new version. The new version is $ 99. I have to think about it, because I don’t program that much in AppleScript anymore. Luckily there is another way to compile a script to an App, with the official Apple Scripteditor.
Ah! Thanks for posting your original solution (which is more robust than mine) and for following up on the root cause.