While I was at Macstock Conference and Expo, a lovely gentleman named Bob asked the table for advice on how to clean up his Contacts. He explained that he had a few things he wanted to fix. The first was that when he chose the Resolve Duplicates option, it showed that he had over 500 duplicates. He wanted to click the button but it gave him pause.
The second problem was that he has many contacts from previous employment. He doesn’t want to lose them forever, but he also doesn’t want them cluttering up his personal Contacts file.
Finally, he has many contacts who have passed away. He definitely doesn’t want to lose that contact information but he also doesn’t want to face them in his Contacts.
While I’ve been working on instructions to help him clean things up, I happened to hear the folks on the Accidental Tech Podcast talking about how we should have an “archive” option in Contacts, and a “deceased date” field so we wouldn’t be reminded to wish someone a happy birthday when they’re gone. Sounds like a lot of people would like to solve the same problems Bob is experiencing.
I’ve written up a series of steps that will ensure he preserves the history and give him the easiest way I can think of to clean up his contacts. He’ll still have to do some tedious work, but my solution isn’t technically difficult. I thought I’d share them with the audience.
Step One – Back Up Contacts
The very first step in this process must be to back up your contacts. In Contacts on the Mac, select File → Export → Contacts Archive… This will save a .abbu file backup. Put this file in a safe place and make a backup of it.

Step 2 – Verify Only iCloud
It’s not uncommon for people to end up with some contacts in iCloud and some that only live on your Mac. Before cleaning things up, I would suggest ensuring everything is only in iCloud. I recently helped someone with a crazy number of duplicates, and it turned out he had the same person multiple times in both iCloud and on his Mac.
If you don’t use iCloud for your Contacts, you can skip this step.
Open Contacts on your Mac, and select the On My Mac section. If it’s empty, you’re golden. If there are any contacts in there, drag them to the iCloud section, and then delete them from On My Mac. This might create even more duplicates but we’ll get to that soon. There’s no danger in doing this step because you did back up Contacts first, right?

To prevent contacts from getting added locally to On My Mac, in Contacts open Settings → General → Default Account and Make sure it’s set to iCloud for the future.
Step 3 Resolve Duplicates
Now we’re ready to attack those duplicates. In Contacts on your Mac, go to the Card menu and choose Look for Duplicates.

You’ll be told some number of duplicates have been found with an offer to merge them. Select Merge. This is scary, but you did back up Contacts first, right?

Believe it or not, after it is complete, again choose Card → Look for Duplicates. In my experience, it’s quite likely that it will tell you there are more duplicates to resolve. I know that makes no sense, but keep repeating this step until Contacts finally tells you there are no more duplicates.
Step 4 – Create Lists
As your next step, I would suggest creating some Lists to categorize your Contacts. Apple used to call these Groups, and in fact, you’ll run across references to Groups throughout the Contacts app that they never bothered to call Lists, but they’re the same thing.
The List categories that would make sense to create would be:
- Deceased
- Keepers
- Old Work
If you already have Lists in your contacts, I’d suggest putting an underscore at the beginning of those three names so they sort at the top. You’re going to want to be able to get to them quickly.
As a sidenote about Lists, it’s important to remember that Contacts can be in more than one List. For example, I have a List called Family and another one called Christmas Cards, and my family members are in both Lists.
To create a List, go to File → New List in the menu bar. This will create an untitled list in the sidebar waiting to be renamed. As soon as you rename the list, you’ll be taken into this empty list.
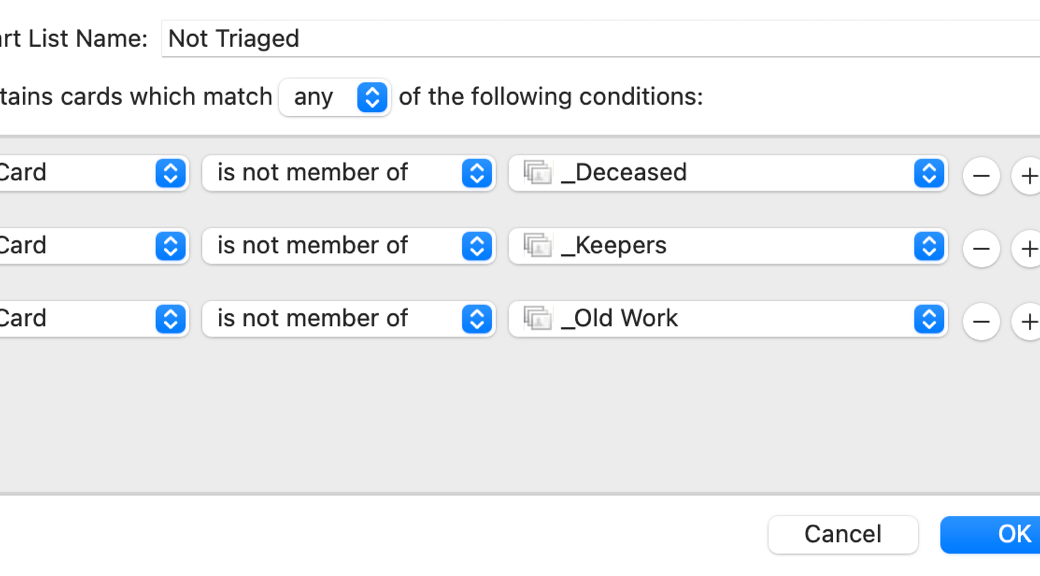
Step 5 – Create a Smart List
You’re going to go through your contacts one by one and drag them into one of these three Lists. This kind of process is tedious but it’s the most important step to make sure you preserve your contacts the way you want them.
One thing that makes this process difficult is that it’s hard to remember which names you’ve dragged into these Lists. When you look at All Contacts, they’ll all still be there. But I’ve got a trick that will make it easier and will allow you to see your progress.
I would suggest creating a Smart List that contains only those contacts you have not yet triaged into one of the three folders. In the File menu, choose New Smart List. This will open a window inviting you to name your new smart list.

I suggest naming it “Not Triaged”. Below the name, you’ll see a dropdown that says “Card”, and one that says “contains”, and an empty field next to it. Change the contains dropdown to “is not a member of”. This will trigger a third dropdown to be displayed which will be blank, but in the dropdown, choose _Deceased.

Tap the plus button to the right of the dropdowns to add another condition to the Smart List. Repeat the steps and this time set it to Card is not member of _Keepers. Add another condition, and set it to Card is not member of _Old Work.
When you’re done, you’ll notice that a new line was inserted below the Smart List Name that says Contains cards which match “any” of the following conditions. That dropdown can be changed, but we want to leave it at “any”. This will create a Smart List that will be only Contacts that are not in any of the three Lists.

When you hit OK, the Smart List “Not Triaged” will show at the bottom of all the other Lists under “Smart Lists”.
Step 6 – Start the Hard Work
Before you start the hard work of moving your contacts into one of these Lists, I suggest scrolling to the bottom of your _Not Triaged Smart List to see how many total contacts you have to triage. Knowing this number at the beginning of the project can help scope out the work. It will be helpful to set up reasonable goals on a project like this.

Let’s say you have 1000 contacts in Not Triaged to start. You could set a goal of triaging maybe 50 contacts each day without losing your mind. You could create a recurring Reminder to triage 50 contacts each day, and in three weeks you’d be done. If you did more than 50 you’d be ahead of the game and could take a day off now and then.
Personally, I’d probably create a nice little Numbers spreadsheet where I recorded each day’s total left in Not Triaged and graph my progress … but that’s me!
I should mention that if you drag a contact into the wrong List, you can select the card in the incorrect list and hit the delete key. You’ll get a prompt where the default is to just Remove from List so it doesn’t delete the entire contact.
When you’re triaging, you may also find Contacts that you don’t need anymore at all, and you can use the delete button to truly delete them.

Step 7 – Export Triaged Contacts
Now that you’ve spent a couple of weeks triaging your contacts, it’s finally time to clean things up. Select one of the Lists you no longer want to keep in your Contacts database but want to keep for posterity. Let’s say it’s the Old Work List.
Option One to Export
There are a few ways to export contact cards from Contacts. You could select all of the contacts in this one Smart List, and then from the menu bar choose File → Export → Export vCard… This will create one vCard file (with extension .vcf) with all of the contacts smashed into it. I don’t think this is a good option because to bring back one contact or even view just one contact, you’d have to bring all of them back in. So let’s abandon that whole path.
Option Two to Export
The second option is to choose File → Export → Contact Archive. Unfortunately, even though you’ve chosen just this Smart List and just the contacts inside this Smart List, I’m pretty sure the Contacts Archive is your entire Contacts library. I tested exporting Contacts Archive from a 3-person Smart List and again from All Contacts, and both archive files were the same size of 45.8MB. There’s no way 3 contacts would take up 45.8MB. So that’s not a good option.
Option Three to Export
A better method to export these folks you don’t need in your Contacts is to send them into an Apple Numbers file. Believe it or not, this is one of the ways Apple recommend you export contacts, but it’s pretty clumsy in my opinion. I assumed they’d have an export to CSV (comma separated values) file for import into any spreadsheet program, but was surprised to learn this option does not exist. Here’s how Apple suggests you export Contacts to Numbers.
Open Numbers to a blank spreadsheet so you can see Numbers and Contacts at the same time. In Contacts, select the Smart List, and select all in the list using ⌘-A or go to the menu and choose Edit → Select All.
Now drag all of the selected contacts from the Contacts app into the Numbers spreadsheet and let go. It doesn’t matter where in the spreadsheet you drop the Contacts, Numbers will sort it out very nicely.

When you let go of the contacts, Numbers will auto-create column headings for each of the fields that were in the original contacts, and drop in the contacts below those headings. In the mini-example I created with three imaginary friends, the titles of the columns are the superset of what information was in my imaginary contacts. I had an image in one, Last Name, first name, and home and work email, so those are all of the columns imported into Numbers.

I also tested this on my personal list of over 1200 contacts and the columns went all the way out to GD! I asked ChatGPT to do the math for me to figure out that’s 186 columns. Hopefully, you’ll have a manageable number of columns when you do your export.
I want to make one comment about the exported images in the first column of the Numbers spreadsheet. I’m glad Apple preserves the image in the export, but it’s rather hard to extract that image out of Numbers. It’s wee tiny by default, but you can view the full-sized image by stretching the column width and the row height for a given image.
Even though you can see it in its large form, you can’t copy the image out of Numbers, or I should say I can’t figure out how to do it. I tried a right-click and copy, I tried Copy snapshot which was another option, and yet nothing copied into my clipboard. I was unable to drag the image out either because dragging just started to select more rows and columns.
The best advice I can give is to embiggen the image as much as you can by increasing the size of the cell, and then take a screenshot of the image and save it.
In any case, you now have a handy-dandy spreadsheet of all your former work colleagues outside of Contacts.
Option Four to Export
The fourth option is to export to PDF, which is easier and might be all you need. The format of the PDF is a little bit cramped but it’s not bad. It has a super wide column for the person’s name, then a very narrow column that contains their physical and email addresses, websites, and any notes you may have had in their contact card. The final column is for phone numbers, but it truncates any custom names you may have created for any numbers. The column is exactly the width of the word “iPhone” and no wider. Luckily the phone numbers don’t get truncated, even if they have an extension listed.
This is a searchable PDF and even supports data detectors, such as if you hover over an address it will give you a downward chevron which when clicked will show you the address on a map. However, the images aren’t expandable or retrievable in a bigger format.
This might be the simplest way to keep a list of former colleagues for future reference.

Step 8 – Delete Unwanted Contacts
The final step is the scariest and that’s to delete the unwanted contacts. Let me ask one more time, you did create a backup of your entire Contacts database, correct?
Do not delete the list first or you’ll undo all the hard work you did triaging into this list.
Open the list for Old Work, select every card in this list, and hit the Delete key. You’ll be prompted to Remove from List like I described earlier, but this time we want to actually hit Delete. Once you’ve deleted all of the contacts in the list, now you can delete the list itself.

If you discover that you’ve made a terrible mistake and deleted someone you didn’t mean to delete, there is no “recently deleted” as there is in Photos. However, if you use iCloud, you can restore your entire Contacts database back to an earlier date. Apple explain in a support article that you can log into iCloud.com, scroll to the bottom of the page, and choose Data Recovery. This opens a page offering to restore Files, Bookmarks, Contacts, and Calendars.

I chose Contacts and I was shown a list of 10 archives with the dates of the archives. The page explains, “When you restore to a new archive of contacts: The archive of contacts you select will replace contacts on all your devices. Your current contacts will be archived so that you can get them back if needed.”

Bottom Line
The bottom line is that this is a big task but it’s probably a task we should all consider doing to clean up our digital lives. I highly encourage you to follow my advice to set a daily or weekly goal of how many contacts to triage so you don’t give up on the task and never finish. And don’t forget to export a backup of your Contacts first!
Good luck, Bob, and I hope you keep me posted on how this works for you.
Another solution to this problem is to purchase (or use the limited free version) of an app called Exporter for Contacts 2, available in the Mac App Store. I’ve used it several times when I needed to share a list of contacts for my quilt group. It’s handy, because you can specify which fields you’d like to export, and it all comes out in a CSV or XLSX format, among others. There is a very limited free version, but the one-time price for it is only $9.99 — a bargain in terms of convenience, if you will need to use it more than once or twice. It solved a problem for me!
That’s a cool find, Sandy. I downloaded Exporter for Contacts 2 and with the free version, you can export individual vCards which is very valuable. You can’t view them in this format but you can bring them back into Contacts one-by-one. It requires the minuscule $10 one-time payment to get the fancier formats.
Here’s a link to the Mac App Store for those interested: https://apps.apple.com/us/app/exporter-for-contacts-2/id1526043062?mt=12
Want to know which lists a specific contact belongs to? Stretch your Contacts window so it’s tall enough to view all of your lists. Click on All Contacts at the top of your lists. Scroll your contacts until you find the specific contact and click on that contact. Then hold down the OPTION key and all of the lists the specific contact belongs to will appear in blue.
This tip is very useful when working with lists. BTW, I have 37 Lists and 12 Smart Lists. I have 6,674 contacts. I don’t bother deleting contacts… that’s why I have so many. I’ve found that the weight of my iPhone stays the same no matter how many contacts I squeeze into it. And the performance doesn’t slow down, so why spend time deleting?
I do have a Smart List named Dead. And in the Notes app I have a note named Dead People where I record the name, date of death, and age at death. People in that note are listed under several categories such as Grammar School, High School, Family, Hometown, Employers, etc. Unfortunately, the Dead People note is growing faster the older I get (I’m now almost 80).
I first started collecting contact info with my Sharp Wizard OZ-7000 thirty-five years ago. My contacts migrated to many devices over the years including several Sharp Wizard models, a Psion Series 3a, a Psion Series 5, a Sony Magic Link PIC-1000, several Palm Pilot devices, a Handspring Treo 600, a Kyocera 6035 and finally the iPhone in 2008.
David – your commentary is awesome on so many levels. I love what you said about your phone not getting any heavier! I think the problem is when you look for a contact and you don’t know whether the duplicates might have different info and one is out of date.
I LOVE this tip about holding the option key down! I’ve never seen that and I can definitely use it. I have a list called Vacation Emails (I send out a travelogue) and people seem to fall off the list unintentionally, or I have a card for a person but a card for the same person but with their partner, and I don’t know which card is in the list. thank you!
This is going in my next Mac Tiny Tips segment with full credit to you!
Great Info!
I’ve been wanting to do a major cleanup with my contacts for some time now, and this has got me started.
But… weirdness with Contacts App… It seems like it is buggy, and I have to quit and restart often as things stop working — can’t drag contacts or rename lists, or other sticky bits….
Plus, leaving the “Any” option on the smart list just didn’t seem to work, I had to change to “All” or, there is an “any group” option, so didn’t need the Any/All … but alas, this stopped working when another smart list contained the contact….. sigh… I will have to spend some time trying to doc/verify after a reboot (for Sonoma 14.6.1 update)