I recently explained how I used the app Presentify to annotate my screen during a workshop I taught at the Macstock conference. The problem to be solved was that the audience was spread out in a large room and I needed them to see the detail I was showing on screen. While using the built-in accessibility of control-scroll to zoom in on the screen combined with Presentify did a lot to help the audience, there was one more thing I needed to solve.
The workshop was teaching my Tiny Mac Tips series and a lot of the tips involved using keyboard shortcuts. I’m pretty good about saying things like, “Hold down control-t with your cursor between two characters you want to swap”, it would be more vivid if they could see the keystroke when I was talking about it.
I’ve used various tools over the years to display keystrokes, but they were generally inside tools for creating screencasting tutorials. I needed a tool that was independent of any other application. In my hunting, I found an open source, free tool called Keycastr.
I don’t want to scare you off if you’re not a programmer, because the way you get Keycastr is a teeny bit nerdy. However, the app itself is not one teeny bit nerdy. You don’t get Keycastr from the Mac App Store and you don’t download it from the developer’s website exactly. You have two options.
Imagine you’re on a normal site for an app. You’d see a big button highlighted that says “Download”. A single click downloads the app, perhaps as a zip file. You double click the zip file and you’ve got your app ready to move to your Applications directory.
With Keycastr, it’s exactly like that, except the website is the developer’s GitHub repository. You click a link to download the zip file, open the zip and move the app to your Applications directory.
The only difference is that there isn’t an obvious single Download button.
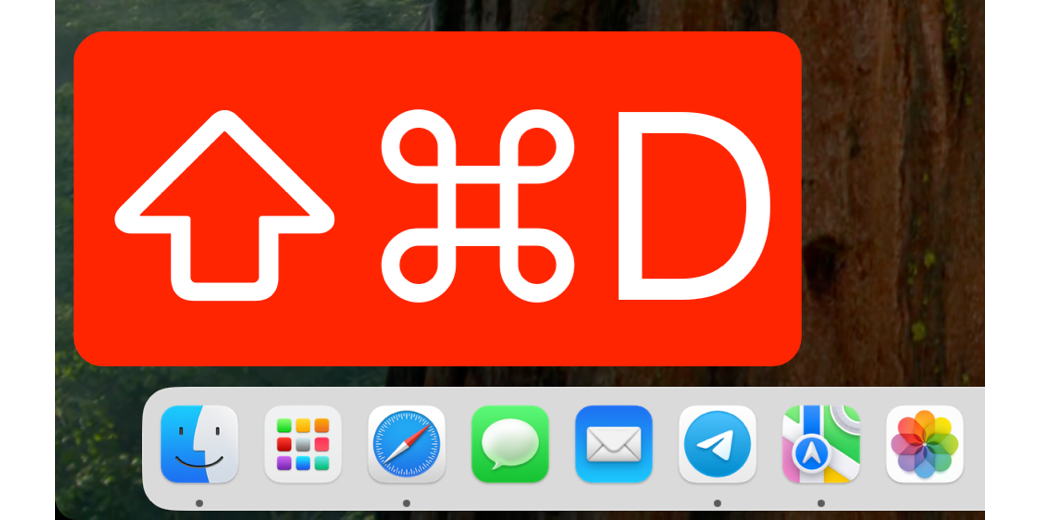
I put a screenshot in the shownotes of the GitHub repo for Keycastr, but let me explain what you’ll see. You’re on the Code tab in GitHub with the Releases subtab highlighted. That makes sense, right? We want the released version of the software.
The obvious attention-grabbing section on the page currently says “Fix modifier detection on Intel”. This is the name the developer gave when committing the changes to the app that fixed the latest bug. It has zero meaning to you, and might even make you give up because you’re running on an Apple Silicon Mac, not an Intel Mac. It might even say something completely different by the time you read or hear this article because it’s the notes on the latest bug they fixed in the current release.
But I assure you, you are in the right place.
Below this headline, you’ll see a section called Assets. Under Assets, you can see three links. The second two both say Source Code and unless you’re a developer who wants to change the tool, you don’t want Source Code. That leaves the first option which says, “KeyCastr.app.zip”. This is the link you want to click.
Remember that all you’re really doing is going to the developer’s “site” and clicking a link to download the app’s zip file. I went to such lengths to describe the page because I used to run away when I was sent to a GitHub repo because I didn’t know what to click or what all this glop on the page meant.
Once you have Keycastr installed, it acts like any other Mac app. In fact, today I got a popup when I launched Keycastr telling me I had an update to the app. I don’t have to go to GitHub and mess around in there, I can just agree to install the update.

The second option to install Keycastr is through Homebrew. We’ve talked about Homebrew before and how it’s nerdy but easy. If you have Homebrew installed, the command on the Terminal is:
brew install cask keycastr
Instead of starting at the installation page for Keycastr, you can take a look at the home page of the Keycastr repository where they explain a bit about the project and include some cursory usage information. The home page for the repo is at github.com/keycastr/keycastr.
What Does Keycastr Do?
That was an awfully long lead up so let’s finally have some fun with Keycastr. Once you launch the app, It can run as a menu bar app or as a “normal” app. As soon as you choose to “Start Casting”, when you use a keystroke using a kind of modifier key, in the bottom left corner of your screen you’ll see the keystroke. It’s very small and subtle by default. The tiny white font is on a black bezel background. After you type the keystroke, it fades away in about 2 seconds.
While technically Keycastr has fulfilled its promise of showing our keystrokes on screen, I don’t find the default settings to be nearly as dramatic as I need them to be so that Dr. Drang can see what I’m typing from the back of the room at Macstock.
Preferences
That’s where the Preferences for Keycastr come into play. The first tab in Preferences is the General tab where you can choose whether to run Keycastr as a menu bar app, as a regular app (which is referred to as “in the Dock”), or as both. I like it as a menu bar app since there’s not much to it.
By default, you can toggle capturing/casting using the keystroke control-option-command-K. Also by default Preferences will show at launch and of course, you’d want to turn that off almost immediately. The second tab, Display, is where the meat of Keycastr lives.
Color, Font Size, and Other Sliders
At the bottom of the Display Preferences, you can change the color of the bezel and the text. ScreenCastsONLINE tutorials are created using an app called ScreenFlow, which can record and display keystrokes automatically. We use a nice transluscent very dark grey with white text, and that’s great for these professional recordings.
But to keep the Macstock audience awake, I changed the bezel color to dark red. By default, the Font Size slider is almost all the way to Tiny, so I dragged it up to Huge. Now on my 13″ MacBook Air, the keystrokes are more than 20% of the height of the screen. Anyone watching my demos would be able to see these keystrokes from the International Space Station.

I explained that the keystrokes fade away after about 2 seconds. You can change how quickly they fade using the Linger Time slider. You can slide it all the way down to Instant, which isn’t very useful, or all the way up to Long, which is around 7 seconds which could be very distracting. I find the default around the middle is just right, but you can mess around with it to see what works for you.
While you’re messing around with the Linger Time, you might as well play with the slider for Fade Duration. You can have your keystrokes blink off instantly, or you can make them fade, and I’m quoting here, “Fast-ish”.
There’s one slider in Display Preferences that baffles me. It’s entitled Line Break Delay, it goes from short to long, and the tip says “Length of time before the line breaks”. Ok, what line? And why is it breaking?
Display Mode
To try to crack the code on this critical line break issue, I played around with some other useful settings.
Command Keys Only
Display Mode by default has the radio button selected for Command Keys Only. I’m not sure where they got the definition for “Command Keys”, but this means if you use either the Command Key or the Control Key with any other key, it will be displayed on screen.
If you just hold down say, Option-D, Keycastr won’t display anything onscreen. But if you hold down Command-Option-D, both the Command and Option symbols will be displayed along with a capital D (even though you held down just “d”.
All Modified Keys
If you switch the Display Mode to All Modified Keys, now any modifier key you use will be displayed. In addition to Command and Control, Shift and Option both display when you add a character to the keystroke.
All Keys
Want to really drive yourself and your audience nuts? Choose All Keys under Display Mode. Keycastr will literally display every single key you hit. If you type fast enough, you can type out entire sentences that will fill your screen. You’ll even see the symbol for the space key between your words.

This option was the one I thought might give me a clue on what Line Break Delay changes. I hypothesized that if I set it to Long, when I typed so much text that the characters went to the edge of the screen, there would be a delay before it broke to the new line. Nope. Short and Long on the Line Break Delay slider had no effect. I think it’s going to be left a mystery.
I’m glad I experimented with the All Keys Display Mode, though because I thought of a use for it. I have to get my eyes dilated twice a year and I hate how long it takes for my pupils to shrink back to normal. I even make them give me a half dose because the medicine is so effective on my eyes. One of the main reasons I find it irritating (other than that I can’t go outside because the sun hurts too much) is that it’s hard to play on my computer because I can’t see small text.
With Keycastr, I could at least have my own text blown up huge on screen as I type so I could see if I was making typos. If I see a problem while I’m typing, I could use the Control-Scroll accessibility setting I told you about to find the mistake and fix it. It’s worth a try as a solution.
Apply Modifiers
There’s another option I don’t understand from the Display Mode Settings. It’s a checkbox that says “Apple Modifiers” and this checkbox can be added to any of the three Display Modes we just talked about – Command Keys Only, All Modified Keys, and All Keys.
I tried toggling Apply Modifiers on and off with the other three options and for the life of me I can’t see what it’s supposed to be changing.
Move Onscreen Display
One thing you might expect to find in Display Preferences is a way to tell Keycastr where onscreen you’d like to display the keys. It’s a hidden feature, but you can simply drag the display anywhere you want on the screen and Keycastr will remember it for the next time it’s invoked.
You might want to slide the Linger Time up a bit so you have enough time to drag the display into your desired position.
Mouse Events
In my review of Presentify, I explained how the app can show your cursor as a big colored ring as you move it around on screen. Maybe that’s a little too much distraction and you’d just like to highlight where you’ve clicked on the screen.
Keycastr has this option under a dropdown called Display Mouse Events. It’s off by default, but you can choose from 3 options. The first is called With Mouse Pointer means wherever you click, a thin red circle will briefly appear. I wish it would show a bit longer or at least be controlled by the linger time slider, but it has no options.
The second option is With Current Visualizer and this one is kind of odd. When you click, you see a representation of the Apple no-button mouse where you normally would see your modifier keys. It shows modifier keys as well but it’s a shared interface. I guess its job is to alert people that you’ve clicked, but it doesn’t show them where.

If you want to really confuse the audience, you can choose With Pointer and Visualizer. This will give you the thin red ring where you click and give you the representation of the mouse. It’s very busy especially if you’ve made your visualizer giant and red like I have.
Selected Visualizer
Finally, I’m going to tell you about the very first option on Display Preferences. It says Selected Visualizer and there’s a dropdown with default selected. In other words, everything I’ve been teaching you about changing is the default method of working with Keycastr.
The only other option in this dropdown is Svelte. With Svelte, you can’t change the font size, or the bezel color. You can’t change the Linger Time or Delay.
Instead, you get a medium-sized dark grey translucent box that shows the modifier key symbols across the bottom – Shift, Control, Option, and Command. When you hold down one of these keys, they light up in the Keycastr floating display.

You have one toggle to work with and that’s to display all keystrokes or not. You can also set whether to Display Mouse Events.
I have to say it’s very clean, but also whatever you type only shows for a brief instant in the Svelte display. I’d have to say it doesn’t solve the problem I was trying to solve because the keystroke isn’t up there long enough for anyone but the most alert to notice.
Bottom Line
The bottom line is that Keycastr is an open source solution under the BS3 license, and it’s been freely available for the Mac since 2009. It’s a wee bit quirky to install if you’ve not done a GitHub installation before but it’s only a matter of clicking on the right thing. Since my Workshop at Macstock was filled with keystrokes I wanted to teach, Keycastr was the perfect tool to keep the hecklers in the back row engaged.
If anyone figures out what Apply Modifiers and Line Break Delay mean, I’d love to hear from you.
This is fantastic! I’m new to macOS, and this app is incredibly helpful—it makes the transition from Windows to Mac much easier.