When Steve and I retired, people asked us if we planned to travel. We immediately said, “No…” But we were wrong! We’ve really enjoyed traveling all over the world, and our recent trip to Africa was our 7th continent. We went to South Africa, Zimbabwe, Zambia, and Botswana. Every time we take one of these long, complex trips to distant lands, I learn more about how to deal with tech challenges. This year was no exception, so let’s talk about Tech on Travel, the Africa Edition. This won’t be a coherent story, but rather a series of observations and solutions.
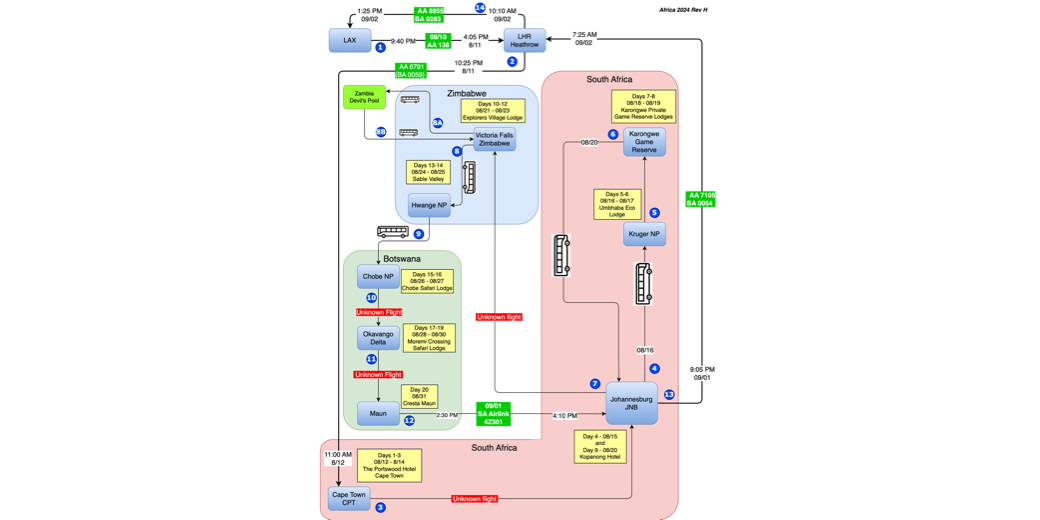
The Diagram
Starting many years ago, whenever we are preparing for one of the more complex vacations, I create a diagram of the entire trip. I use a free, web-based app from Diagrams.net to create these diagrams.
I started making these diagrams when we went to the Galapagos Islands, then to two cities in Peru and finally to hike Machu Picchu in southern Peru. When I diagrammed out this trip, I discovered that in two instances, the travel agent hadn’t arranged any flights for us. In her written documentation, we just magically appeared in a new city. When I queried her on this, she said, “Oh, you’re supposed to book those.” To which I answered, “Exactly when were you going to tell me that, sweetie???” Also, “No, you’re booking them.”
When we went to the United Arab Emirates, India, and Nepal, the diagram I created was invaluable in answering the constant immigration question, “Where have you been, where are you staying and for how long?”
Since our trip to Africa was going to go through four countries with multiple inter-country flights and 9 different accommodations, the diagram was again invaluable.
On my diagrams I have a standard formatting. I use light blue gradient boxes for the name of where we’re going, such as Kruger National Park. In a yellow box next to each location, I put the name of the accommodations, such as Umbhaba Eco Lodge, along with the date range and the day numbers. I use day numbers because the travel agents usually provide the days’ activities based on a day number.
An arrowed line takes us from location to location, and next to each arrowed line is a blue circle with a white number in it. This number allows you to “follow the bouncing ball” on the diagram. If there’s a flight to be taken between locations, there’s a green box with the date and flight number. Often these flights cross days so the departure time and date are on one end, and arrival date and time on the other end.
I had Ron and Steve check me as I built the diagram (and they found errors that I was able to correct), so by the time we got home I was on Revision H. This diagram was invaluable as we worked our way through four countries (including an unplanned jaunt to Zambia.) We pulled it out before flights to find our flight numbers, we pulled it out to remember what day we were on, we pulled it out to write our letters and social media posts, we pulled it out to figure out how to spell Karongwe, and we pulled it out for immigration. We also gave it to our friends and family so they knew where we were in case of emergency.
I put a copy of the diagram in the article so you can see how it looks, and if you’re interested in copying it for a trip you might go on, I’d be glad to share the original file with you for you to modify.

Keep Travel Documents Local
An important tip for a trip out of the country is to make sure you set all of your important travel documents to be stored locally on the mobile device you’ll be traveling with. Steve and I use Google Drive for all of our travel documents like flight confirmations, itineraries, proof of travel insurance, and the all important diagram. Before departure, we opened that drive on our phones and Macs and on my iPad and told Google Drive to make them all available locally.
Android, WhatsApp and eSIMs
The majority of the big trips we’ve been on have been organized by the UCLA Alumni Association. On these trips, the vast majority of the people use iPhones. I remember being on the ship in Antarctica, and after we’d been out for a day’s adventure with the penguins, everyone would collect in the cocktail lounge and use AirDrop to send photos to each other. Even when we went up into Brazil to see Iguazú Falls, it was the guide who showed us the fastest way to turn on Airdrop for Everyone.
Swipe down from the upper right to get to Control Center, then press and hold in the middle of the section that shows WiFi and cellular (not on any of the icons) and then you’ll see an icon that says AirDrop Contacts Only, or maybe Receiving Off. If you tap that you can change it to Everyone for 10 minutes.
Our trip to Africa was managed by GAdventures, which manages tours for National Geographic. With this trip we were surprised to find the mix of Android and iPhone to be about 50/50. We also found a vast array of camera quality on the Android phones. At Victoria Falls, two women saw our buddy Ron take a cool artsy photo of us with the falls in the background and asked us to do it for them. Their cameras were dreadful. I mean seriously bad. I could not come close to exposing both them and the falls in the background. They seemed happy enough but I felt bad for them.
On the other hand, a couple of people had snazzy new-ish Android phones and their cameras were great. I noticed that both the Android and iPhone users all used pinch-to-zoom to take photos. We know that pinching to zoom and going between camera magnifications actually does a digital interpolation (not purely optical) but they were very happy with their photos so I didn’t say a word.
Having a mix of Android and iPhones presented a bit of a challenge sending photos back and forth since we couldn’t use AirDrop.
The solution was the cross-platform app WhatsApp. I know folks outside of the US use this for pretty much all text communication, but in our circles we don’t know anyone who uses it. Luckily I already had it installed and I was logged in, so when the guide made us our first WhatsApp group for that segment of the tour, I got to play along with everyone.
However, Steve did not have it on his iPhone. No worries, a quick download and he should be sorted. But there was a problem. In order to get into WhatsApp you must register with your phone number, and be able to receive a text on that number.
eSIMs
Since we were in foreign lands and we use AT&T which charges pretty close to the cost of a kidney to use your number overseas, we had gotten eSIMs for travel. If you haven’t ever done this before, it’s really quite easy. We went to esimdb, looked up the countries where we were going, and then chose a duration and amount of data that we expected would meet our needs. We chose a company called GigSky, which we’d used with success in Argentina.
Once you choose a company (and get a discount code from esim.com.db), you download their app and actually buy a plan. The plan we chose was 10GB for 30 days for around $25. AT&T is $20/day per device! To be fair, we chose data only (not voice) since we didn’t think we’d use voice and it would have been much more expensive.
The app installs the eSIM for you but there are a lot of toggles and switches to make it work just right. I wouldn’t say it’s hard for a geek but it is a bit challenging if your nerd muscles aren’t flexed.
Now here’s Steve with a data-only eSIM from GigSky and needing a text sent to his home cell number in order to play with the cool kids on WhatsApp. We toggled on his home line for data and tried to ask for the code, but it didn’t come through. Afraid of causing a house payment-sized charge from AT&T, we turned it off. About an hour later it came through. He rushed into WhatsApp and plugged it in, but of course it had expired by then. We tried several times with no joy.
A couple of days later we tried again, and I don’t know what was different but this time he was able to get the code quickly and get into WhatsApp. He was so happy!
The takeaways here are to get an eSIM to save money on travel and yet stay connected, but also if you’re traveling out of your own country and you’re not already a WhatsApp user, be sure to install it and get it connected to your phone number before you leave.
Back on the eSIM, you don’t have to buy nearly as much data as we did. I actually ran out of my 10GB, but Steve let me tether off his phone for the last couple of days, and our buddy Ron who was traveling with us didn’t run out of his data either. The other interesting thing about the eSIM was that while GigSky worked flawlessly, it did not cover the country of Zimbabwe. I don’t know what it is about the network there, but none of the companies that covered the rest of Africa included Zimbabwe. We bought two different eSIMS ($9 for 7 days) that said they worked in Zimbabwe, but neither of them worked.
One more thought on not having access to your phone number while on travel. Make sure you pay all of your bills before you go because many financial services use text messaging as a second factor to verify you’re you. Without access to SMS on that line, you may not be able to get in.
What Devices to Bring
Almost everyone on this trip brought only their phones and smart watches with them. You’ll be shocked to find that Steve and I brought slightly more tech than the rest of the group. Steve brought his 14″ MacBook Pro, a big-boy camcorder, and his Insta 360 X3 camera.
I carried my 13″ M2 MacBook Air, my 13″ iPad Pro with Apple Pencil, and my Big-Girl Camera, the Olympus EM5-MarkII mirrorless camera with a 300mm effective zoom lens.
Looking back, I didn’t use my iPad Pro hardly at all. I use it for cross stitching, which sound funny, but using Apple Pencil to mark off what I’ve done on a pattern is dreamy. I also use it to watch video podcasts, especially Daily Tech News Show. I didn’t have the bandwidth to download any podcasts though and I had no downtime to cross stitch, so the iPad Pro went largely unused.
While we’re on our big vacations, I send an email travelogue every day including photos and color commentary on what I’ve seen. Much to my surprise, more than 100 people have chosen to be on distribution for this letter. If it sounds fun to you after I describe it, feel free to shoot me an email with the address you’d like to use to receive it.
My promise to the readers is that I won’t give you a lot of factual information, I’ll make silly and snide comments, and the pictures will be entertaining.
You may ask why I don’t just bring the iPad on these trips, but it turns out the letter is nearly impossible to do on the iPad. Multi-tasking is clumsy at best, and embedding photos in text in email is super hard. I tried this on the long bus rides in Chile when we were driving between observatories and it was not fun at all. Having the light and thin MacBook Air for this task was delightful this year.
But to talk about the letter, I need to talk about photo management on a trip like this.
iCloud Photo Library, Big-Girl Camera, Syncing Photos & Backups
When Steve and I are at home with our FiOS internet service, syncing photos from our phones to our Macs is a seamless process. We also use Shared Photo Library when we’re away from home. We like it because now we don’t care who takes a photo as we know we’ll both have access to it in Photos.
But on challenging networks, that’s not practical. When we went to Antarctica, we were forced to share photos back and forth manually, and the result when we got back home was massive duplication of images. I went through them all (twice) and deleted the duplicates, but they all came back.
On this trip I was bound and determined to not have this happen. In locations with poor Internet service, I needed a better plan.
Steve primarily took photos on his iPhone, and I primarily took photos using my big-girl camera. When I needed a photo from his phone, I had him AirDrop it to my Mac rather than my iPhone because I could force it to save to the Finder instead of into Photos. I kept these images in a delete-me folder in Finder, knowing that eventually when we got on good Internets, his images would come into our Shared Photo Library.
Big-Girl Camera Pre-Barting Process
I was particularly proud of how I managed the large RAW+JPG photos I took with my Big-Girl Camera. You can imagine that I took just a few more photos than necessary, capturing giraffes, elephants, antelope, the lilac-breasted roller (my favorite bird), cheetahs and lions (not to mention dozens more.) For every sighting of an animal I took dozens of photos. Bart has taught us the importance of trimming down the photos we keep but barting this many photos was going to be very hard.
Instead of dragging all of the images into Apple Photos from my memory card (via an SD card to USB-C adapter), I first dragged them into folders by date on my Mac. An important part of this process was to make sure those folders of images was not in any location that would sync with the cloud. If they went on the Desktop, in Documents, in Dropbox, or Google Drive, then I’d cause massive bandwidth issues.
Backups
At this point, I have one backup of my Big-Girl Camera photos on my Mac. But we learned from our trip to the Galapagos and Peru that having a backup that’s in the same bag where you carry the original is not a backup. Steve’s backpack was stolen in Peru which included his cameras and his laptop.
Luckily, in a rare moment of foresight, I had gotten us both SSD backup drives, had us run backups on those drives before we left for the trip home, and most importantly, I carried Steve’s backup drive and he carried mine. Rather than having lost all of the photos and videos he took on the adventure of a lifetime, all he lost was stuff.
Needless to say, I’ll never travel without swapping backup drives. So to add to the process I described about moving the photos from my Big-Girl Camera to my Mac, I then added them to my backup drive and hand it back to Steve. That reminds him to run his own backups.
There was one more complication to managing photos on this trip. Our last big adventure was in an amazing place called the Okavango Delta. Our accommodations were at a place called Moremi Crossing. This place was a series of tent cabins with views over the water where warthogs, elephants, giraffes, hippos, and antelope played. The tents were really nice – you’d probably call it glamping.
The other thing about Moremi Crossing is that they want you to really embed yourself in the environment and experience your surroundings. So they only turn on the Internet twice a day for them to download and upload billing information and such. We had no Internet for three full days. As you can imagine, I was horrified at the concept, but as you can also imagine, we loved it.
Not having Internet did mean that photos I took on my iPhone would not go up to the cloud for those three days. What if I lost my phone? I noodled this for a bit and came up with a way to back them up.
I connected my phone via USB-C to my Mac, launched the application Image Capture (located inside Applications → Utilities), and exported the day’s photos to a big pile in to a non-syncing backup folder on my Mac. I was rather proud of thinking of this idea.
Now think about all of the folks who only traveled with their phones. Gives me a cold chill to think of not having backups of all those precious memories.
Back to Pre-Barting
Now that I had the photos from the Big-Girl Camera on my Mac, rather than drag them all into Photos and then delete the ones I didn’t want to keep, I came up with a much better process, inspired by our buddy Ron. Since I took both RAW and JPG, there were two of every file. I tapped on the first JPG, and hit the spacebar to open it in Quicklook.
Let’s say it’s of a group of elephants and it’s a pretty good shot. I then hit the down arrow on my keyboard twice (skipping over the RAW version of the photo) and look at the next picture. Chances are it’s of the same group of elephants. I keep tapping the arrow key twice until I’m done looking at the elephants. I choose the best of the series that I consider worthy of pulling into Photos. I could drag it right then, but that interrupts the flow of choosing the best one. I would also not have any way of remembering which one I pulled in.
My solution is to use tags. I’m not a big ol’ tagger, but it’s the perfect way to just add a dot of color next to a file name to designate it as a keeper. I don’t remember how I learned this, but you can tag using a keystroke. Using the Control key and adding numbers 1-7 you can set a tag by color.
- red
- orange
- yellow
- light green
- dark green
- purple
- grey
I’m a fan of light green, so I used Control-4 on the keeper images. The cool thing is you don’t have to get out of QuickLook for this to work. I kept the Finder window to the side of QuickLook so I could verify the green dot had been applied. By the way, if you mis-tag a file, hitting the same Control number will erase that tag, or Control-0 will erase all tags.
After my little green tags had been applied to the JPG, I used Command-click to select each pair of images (RAW+JPG) and then drag the selected items into Photos. I should mention that I had precreated albums by date and event name so that I’d be able to find the images later. In Photos, you only see one image, not two when you have RAW+JPG, but it gives me access to the best version of each photo.
Repeating this process let me quickly triage a giant pile of photos into just the best of the best. It was so successful that I usually pulled in no more than 30% of the photos I’d taken that day. In one case, I had taken 130 photos and only brought in 30. I know for a fact that if I’d dragged them all in and then gotten rid of what ones I didn’t like so much, I’d have kept an awful lot more.
Once I had the Big-Girl Camera images in a folder, I wanted to make sure they would sync over to Steve through Shared Photo Library. While my iPhone’s camera automatically puts them in the shared library, the imported images don’t get that privilege. I used Command-A to select all in the new album and right clicked on one and chose, “Move to Shared Library”.
I also wanted to make sure that all of the iPhone photos for the same day were in this new album. I created one single smart album and entitled it just the day number of the date. So if the photos were for August 22nd, the smart album was entitled 22. Then I set the criteria to Date Captured is 8/22/2024, and Camera Model is iPhone 15 Pro.

I then selected all in this Smart Album using Command-A, and dragged them into the album for the 22nd of August. It was very important that I did this while I was in Africa, because there is a 9 hour time difference and if I did it at home, the Smart Album would grab the wrong date in some cases.
Once I had the 22nd done, I changed the Smart Album name to 23 and changed Date Captured to 8/23. Being rigorous doing this on the trip reduced the chances that I’d lose track of which images were taken during which events on our trip. I’m sure I missed some but I think it worked pretty well.
Video
As I mentioned, Steve carried his Big-Boy Camcorder on the trip and it was the right decision. With his 20:1 optical zoom lens, he was able to get amazing video well beyond anything you could get with a phone’s camera. He paid special attention to how long he was recording, making lots of smaller clips rather than 10 straight minutes of an elephant herd knocking over a tree.
Every day when I was feverishly going through my photos and writing up witty commentary for my letter, Steve was reviewing his video clips, editing them down to the best scenes, downsizing them to 480P so they’d squeak through the tiny Internet pipes we had, and posting them to Facebook and Instagram. There were so many that I wished I could put in my letter but it just wouldn’t have worked.
One of the coolest things we saw was a pack of endangered African Painted Dogs. The 19 adults went off to hunt, while the 14 puppies were left on their own. We watched them with delight for a while, and then the adults came back from the hunt. It turns out that these dogs have two stomachs. After a kill, they gobble up the food, and it goes in big, unchewed chunks into their first stomach. Then they go back to the puppies, regurgitate the food, everyone scrambles to eat it, and it goes into the second stomach for digestion. I know that’s a bit graphic but it sure is an efficient way to transport food to the puppies.
Anyway, the adults came back, barfed up the food, and the puppies went bananas. You could barely tell this swirling pack of colorful puppies from one another. The whole time they were yipping in a high pitch that sounded like sped up sound. I wished I could get that into my letter, but as I mentioned, bandwidth was a problem. But then we had an idea. Steve extracted just the audio, and that was small enough to include in my letter. I bet you want to listen to it, don’t you?

Isn’t that crazy?
Making a Pages Document of the Travelogue
A few years ago, it occurred to me that I should take all of these letters and put them into one document for each trip. Each time I wrote a letter, I copied the title as a new chapter and pasted in the letter with all of the images. I made a big mistake though. I kept that document on my desktop. Each day I was adding a lot of data to the file, and most of the way through the trip I realized the file was over 300MB.
Remember I said earlier that I sync Documents and Desktop to iCloud? Yeah, every time I added to that document with the new day’s adventures, iCloud was syncing the entire thing again. If I left it there, it would clog what little Internet pipes we had, so I moved it to the top level of my user account which is one of the very few places on my Mac that isn’t syncing.
Image-Stabilized Binoculars
One of the most useful pieces of tech Steve brought with him was his Fujifilm Techno Stabi image-stabilized binoculars. You may remember Steve reviewing them two years ago when he first got them. While other folks had very good binocoulars, when he let them look through his they were amazed at how much better they could view the animals. With a 12X magnification, the image stabilization made a huge difference.
We had so many safaris and they were so long that we often had extended periods of time to just watch the animals so looking through these binoculars was a real treat. There’s a new version out now that’s a whole kit worth of stuff, and the binoculars are now waterproof. They’re $750 on Amazon including a 64GB SD card, a soft backpack, an LED flashlight, a cleaning kit (which we could have used in all the dust), and even a wrist strap for in the water. If you do look into getting one of these sets of binoculars, bring spare batteries on the trip. Including an SD card in the kit implies these binoculars capture digital images but they don’t – it’s just an extra they throw in.
Our buddy Ron bought the same binoculars on the trip on Steve’s recommendation and every time he used them he thanked Steve for the recommendation.

Charging
When on a trip to distant lands, one of the tricky bits is that the countries you visit may not use the same plug/outlet configuration as your home country. I’m lucky that I have a pocket engineer in the house, but it’s still not a guarantee of success. We’ve used a lot of different solutions to solve this problem over the years.
I still laugh remembering when we were going to travel to England, Ireland, and Belgium to visit Don McAllister, Bart, and Knightwise. I called Bart on Skype to show him the adapter we’d bought and asked him, “Is this the right plug for the UK?” He confirmed that it was. When we got to our accommodations near his house, the plug did not match the outlets. I’m sure you see the flaw in my question. I was so uneducated about his part of the world that I thought Ireland was part of the UK. Face palm on that one for sure.
For this trip, we bought two universal travel adapters (one for each of us) from a company called VINTAR. The adapter allows you to slide on different plug configurations, and then on the front it has one US grounded outlet, two USB-C and one USB-A connections. On the top it has another US (ungrounded) outlet. That combination gave us lots of flexibility. The VINTAR adapter is $36 on Amazon.

Exercise
This trip was one of the most sedentary trips combined with lots of food that we’ve ever taken. They would wake us up at 5:30 AM, and at 6:00 AM they’d escort us in the dark from our cabins. You see, at that hour the elephants and warthogs and other beasts are still up and about so it’s not safe to walk by yourself. We’d have first breakfast at 6:00 and then walk a few steps to the jeeps.
We’d go on a 3-hour safari, and come back for second breakfast. We’d have a rest up, then have lunch, and then it would be too hot to do anything so we’d have a siesta. This is when I would write my travelogue, and Steve would work on his videos.
After naptime, we’d have High Tea. I think we should institute High Tea in the US because it’s a lovely excuse to eat again. We’d then waddle to the jeeps again for another safari. At sundown, they’d pull the jeeps into a good position to watch the sunset, and pour us gin and tonics and give us snacks because we hadn’t been fed in forever. After that we’d drive back maybe a half hour to our lodging … where we’d have dinner. Five meals a day was just right.
In that entire time, we probably walked 2000 steps a day if I’m rounding up. But if you chose to sit in the back of the jeep, it was really bouncy. I thought it was fun back there and the visibility was great, but the best part was how our Apple Watches counted our steps. Ron got the highest count – 20,936 steps!

Have you heard that muscle weighs more than fat? I can prove it – I lost 2.4 pounds on the trip!
WiFi Passwords
None of the people we traveled with had bought eSIMS so they would immediately ask for the WiFi password of every hotel and restaurant upon arrival. I was really pleased to see that every single one of them was a complex password. They all had upper and lower case letters, numbers, and symbols in them. I know that didn’t make it secure for me, but I was pleased they all knew enough to make it secure from folks using it without being a customer.
The one exception was really funny. We went to a restaurant called The Duck. I asked the waitress for the password, and she simply turned around. On the back of her shirt, it said, “quackquack”. Isn’t that awesome?

No SOS
When we went hiking up in the High Sierra’s this year with our friends Bill and Diane, we were out in the wilderness enough that we didn’t have Internet. However, we were able to use the Apple SOS feature on our phones to drop pins as we hiked along. Our other friends are nerdy enough that we knew that if we didn’t report in after a few days, they’d look at Find Friends to see our locations.
But in Africa, Ron tried to do SOS, but alas, it hasn’t come to Africa yet.
Safari Tracker for the Win
I mentioned how bouncy the vehicles were on the trip, but the guide did his best to go slow most of the time to minimize knocking fillings out of our teeth. On our last day, we had just fjorded a river (the vehicles have snorkels for air intakes) when our driver got a message on the radio that a pair of leopards was fighting over a kill. He told us to hold on and he took off much faster than we’d ever gone. I’m not exaggerating when I say that we caught air a few times as we bounced over the terrain.
After about 15 minutes they found the leopards and we had quite a show. After we watched for awhile, they started to drive away. The spotter started looking around the cab for something he’d dropped, and someone said it was his phone he was looking for. Steve said, “Speaking of phones …” and realized he couldn’t find his.
We had them stop and began to search the vehicle. I tried using my Apple Watch to see if I could ping my own phone and it worked, so I had Steve try it on his, but sadly his phone didn’t answer, which confirmed it was no longer in the vehicle. We also tried Find My but of course it didn’t work because not only did we not have cellular service in this area, there were no other iPhones hovering around where the phone fell out to tell us its location.
Remember how clever I was to back up my iPhone photos when we had no Internet? Well, Steve hadn’t done that step, which meant he was going to lose some photos.
The spotter and tracker on this trip were very skilled. They’d seen a lion trapped on top of a termite mound by a herd of African Buffalo about 3/4ths of a mile away. They tracked the Painted Dog prints to the den where the pups were holed up. Earlier, they had even found the tracker’s own glasses he’d lost on a previous trip. So they started painstakingly crawling our way back to where we’d first driven so quickly in hopes of finding Steve’s phone.
Steve was bummed about losing the phone (and I was bummed it was right before a new model was coming out) and was not hopeful they’d find it. He was bummed about losing the photos. And he was bummed about wrecking the last day of safari travel for everyone else.
After 45 minutes of crawling along, the tracker found Steve’s phone!

Bottom Line
The bottom line is that like every big trip, we learn more tips and tricks about how to use technology to capture our experiences. This might have been the coolest adventure we’ve ever been on and we made the tech work for us.
Really enjoyed this writeup, Allison. You do many of the things I do or have tried. On a trip to England last summer I backed up my iPhone photos and my photos from my Sony DSC HX99 travel zoom camera to an external SSD using my MacBook Pro… that was very simple. In the fall on a trip to Japan I used an iPad instead of the MacBook Pro. On last month’s trip to Alaska I used only my iPhone, along with a GEDDIE USB-C multiple port adapter that let me insert the microSD card at the same time I connected the SSD (the trick is to get this to work is to plug power into the multiple port adapter).
Also, thanks for the tip about using tags to weed through your pics. Excellent!
What camera make and model is Steve’s Big Boy camcorder?
Glad you liked it, David. The camcorder he uses is this one: https://amazon.com/Panasonic-HC-V770-Camcorder-Wireless-Smartphone/dp/B00RBG5J02/. Looks like it’s not for sale any longer but it gives you the idea of the specs.
Interesting idea on the SSD using an adapter that takes USB-C and power. Do you have a link to the GEDDIE? And don’t forget to put the SSD into a different location when you move about!
David, I inadvertently gave Allison outdated info about my current camcorder. A few years ago, I replaced my Panasonic HC-V770 camcorder with the Panasonic HC-WXF991 camcorder. The improvements in the WXF991 over the previous model are:
– Records in 4K rather than 1080p
– Has a Leica lens for better image quality
– Has optical image stabilization, important for recording highly zoomed video
– Has a viewfinder in addition to the pop-out display, useful for recording outdoors since the display is hard to see in bright light
I can no longer find the WXF991 on Amazon but an equivalent (or slightly better) model is the Panasonic HC-WXF1 https://www.amazon.com/Panasonic-HC-WXF1-Cinema-like-Camcorder-Stabilizer/dp/B078J1BJXV/
I don’t know what software you’re using to do the photo copying to the external drive, but Ikve had good luck the the free Copy That utility from OWC (https://www.owc.com/solutions/copy-that-mobile). It lets you get very specific about what to copy (photos, videos, screenshots) and even set a date range.