I participate in an Apple user group through email where I often answer questions from those requesting help. I can’t resist the urge to share my expertise if it will help others. Recently a woman posted that someone had emailed her a document and she wanted to open it, sign it, and send it back, all without printing it out. She understood this could be done but she didn’t have any idea how to do it. This was something I could explain.
You may receive a PDF and want to do the same thing, but I’m going to start one step backward. She had received an editable text document, not a PDF, so I’ll explain how to quickly create a PDF that you can sign.
I’m going to go through in detail how to do this on a Mac and on an iPhone. Because I’m going to give you the details (with screenshots), it might be easy to get lost. So here at the beginning, I’m going to give you the outline, then the detail, and then the outline again at the end.
Outline of Steps
- Open the text document
- “Print” the document to PDF
- Open the PDF in either Preview on the Mac (or Files on iOS)
- Use the Markup tools to create a signature
- Add the signature
- Send the document back
Open the Text Document
The woman I was helping had received a Microsoft Word document and I explained to her that she could open it with Apple’s free Pages app. If you don’t already have it installed, it’s a quick download from the App Store. A huge advantage is that Pages runs on iOS too so you can follow these steps on the Mac, iPad, or iPhone.
There is one caution about opening Word files with Pages. You may run into some formatting problems caused by the translation between the apps or missing fonts. If it’s terrible, I’d suggest asking the sender to give you a PDF instead. In fact, if someone sent me an editable document, I’d be tempted to change it to make the terms more favorable to me before signing! That’ll teach them!
Let’s assume for this exercise that you can open the document in Pages without issue.
The process to create, sign, and send a PDF is slightly different between the Mac and iOS, rather than flipping back and forth between the two operating systems, I’m going to first walk through the solution on the Mac, and then explain it again on iOS.
macOS Create PDF and Sign
Print to PDF
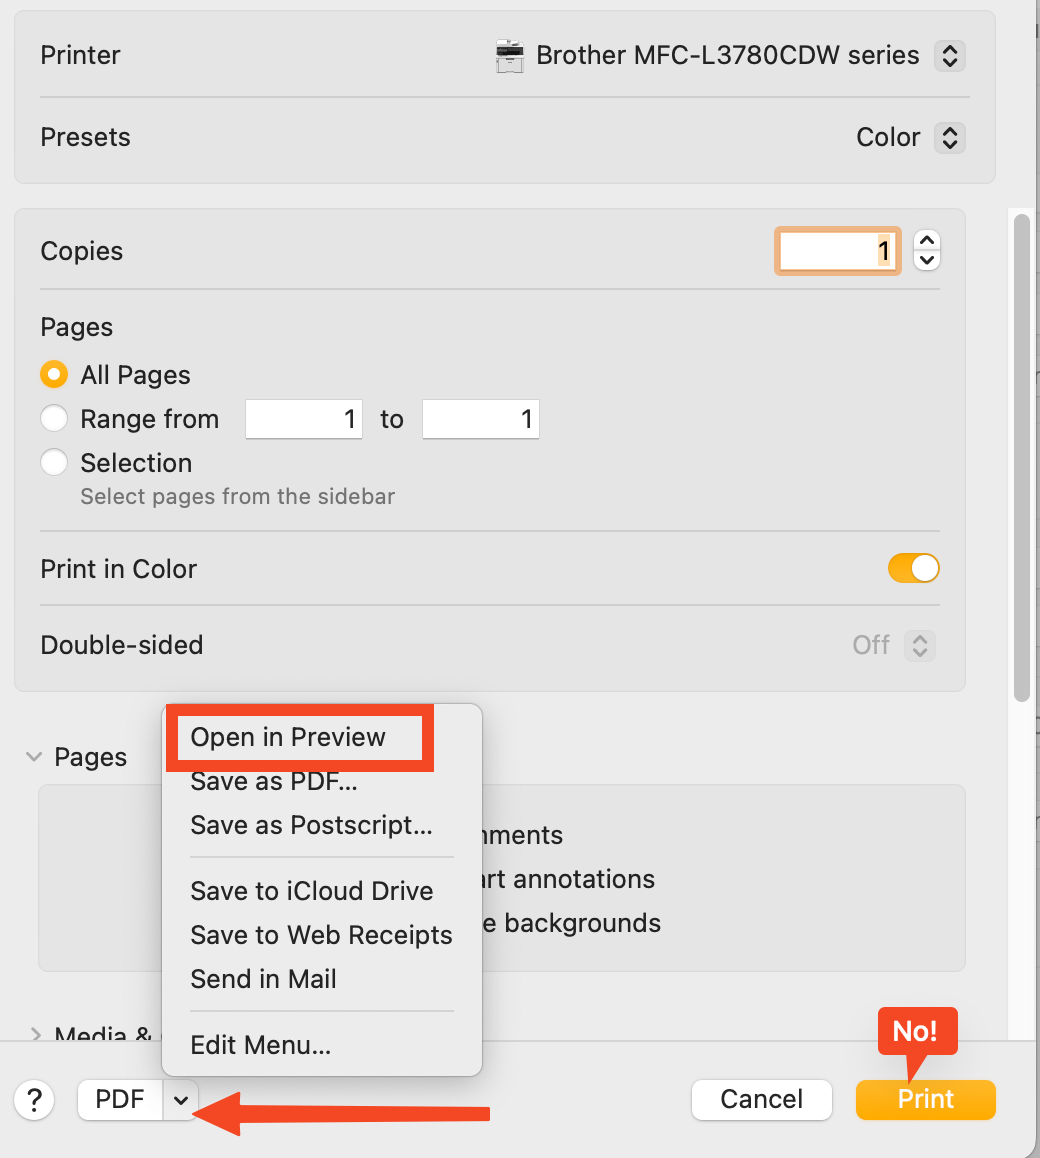
Once we have the document open in Pages on the Mac, we need to get it into Preview to add the signature. It’s very simple to create a PDF on the Mac, because it’s built into the Print function. Within Pages, choose File → Print (Command-P). Do NOT hit Print in the bottom right. Instead select the down chevron next to PDF. If you want to save it as a PDF you can, but our goal is to never save a copy. Instead, you can choose Open in Preview.
Now for the fun part. In Preview select the pen in the circle to show the Markup Toolbar.

In the Markup Toolbar, select the Signature tool. It looks like a line with a scribbly signature above it.

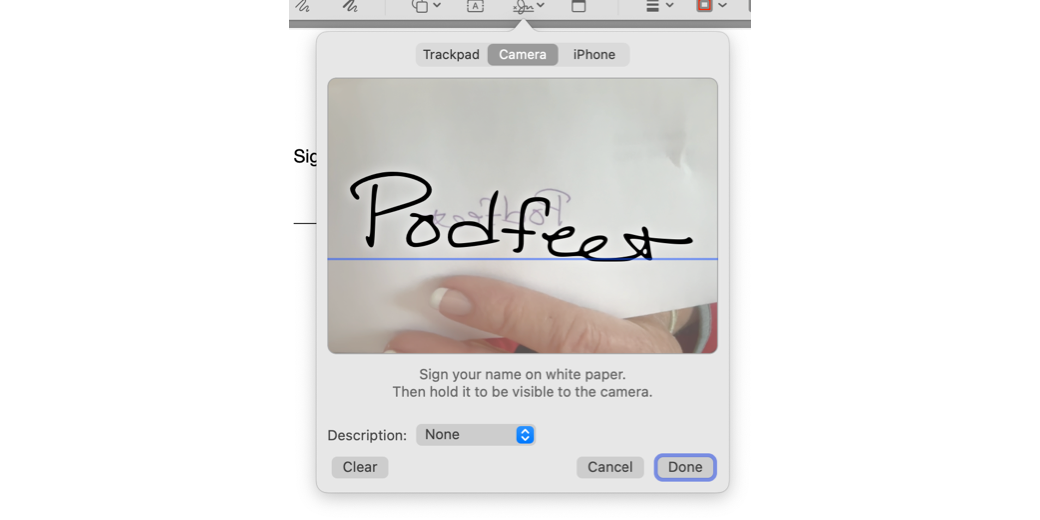
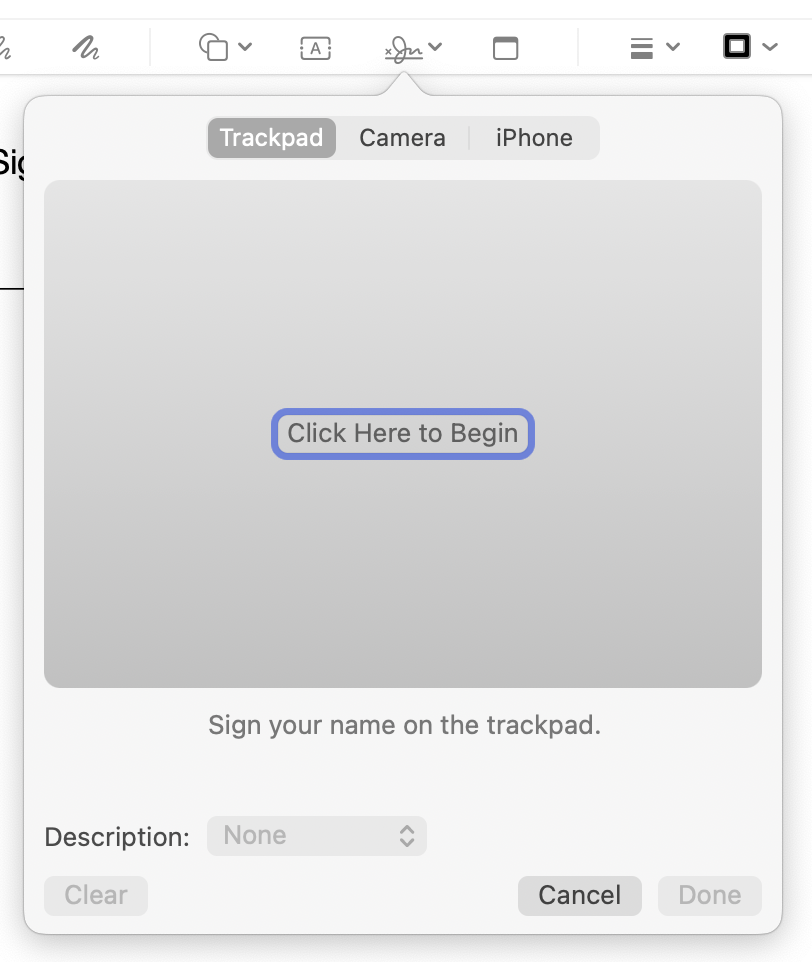
The Signature icon will reveal an option to create a signature using one of three options. You can scribble your signature using the trackpad so it looks like a 3-year-old signed it, or you can use the Camera on your computer to take a photo of your signature on a piece of paper you hold up to it, or you can scribble your signature on your iPhone’s screen which will also look like a 3-year-old signed it.
I prefer creating a nice-looking signature by signing on a piece of paper with a real pen and holding it up to the camera. Note that you can also use the Description dropdown to assign a stock name for it or to create a custom name. I never bother to do that since I can see visually which signature is which.
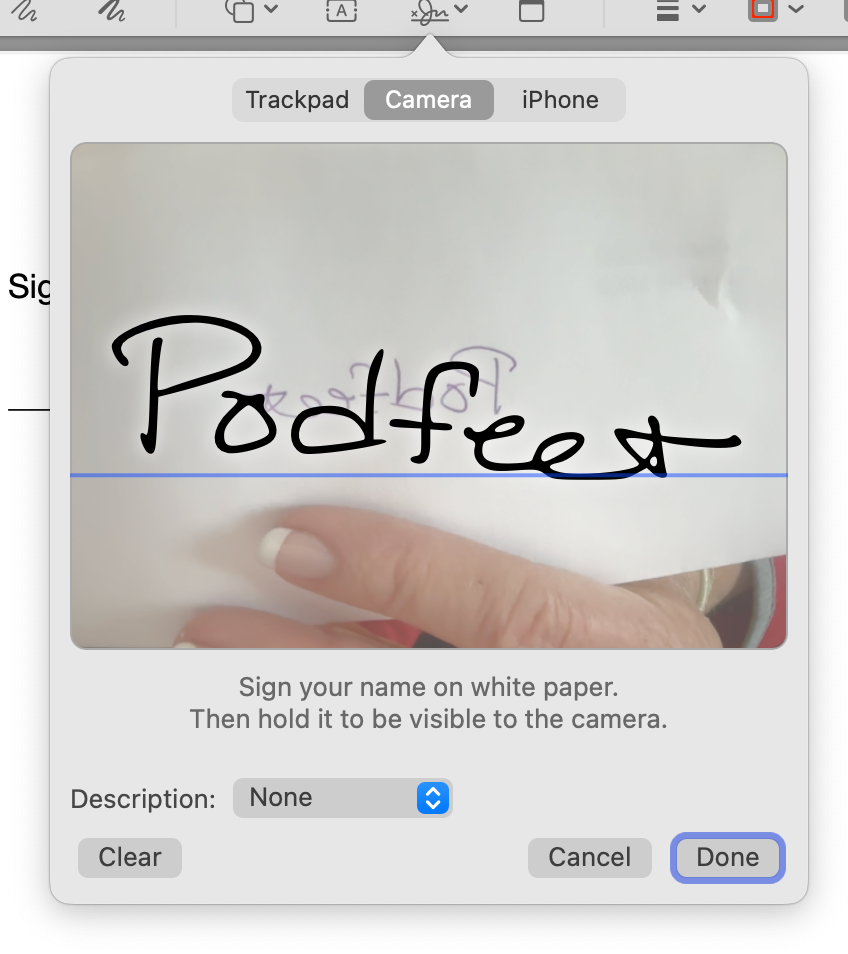
Once your signature is stored in Preview, you never have to do this step again. Simply tap on the signature you made from the dropdown, and it will plop into the document you have open in Preview.
Because we opened the Pages document directly into Preview, it’s not actually a proper PDF yet so you’ll get an error saying the document has changed and has to be saved. We’ll take care of that later so just ignore the error message. Now drag the signature onto the signature line and resize as required.
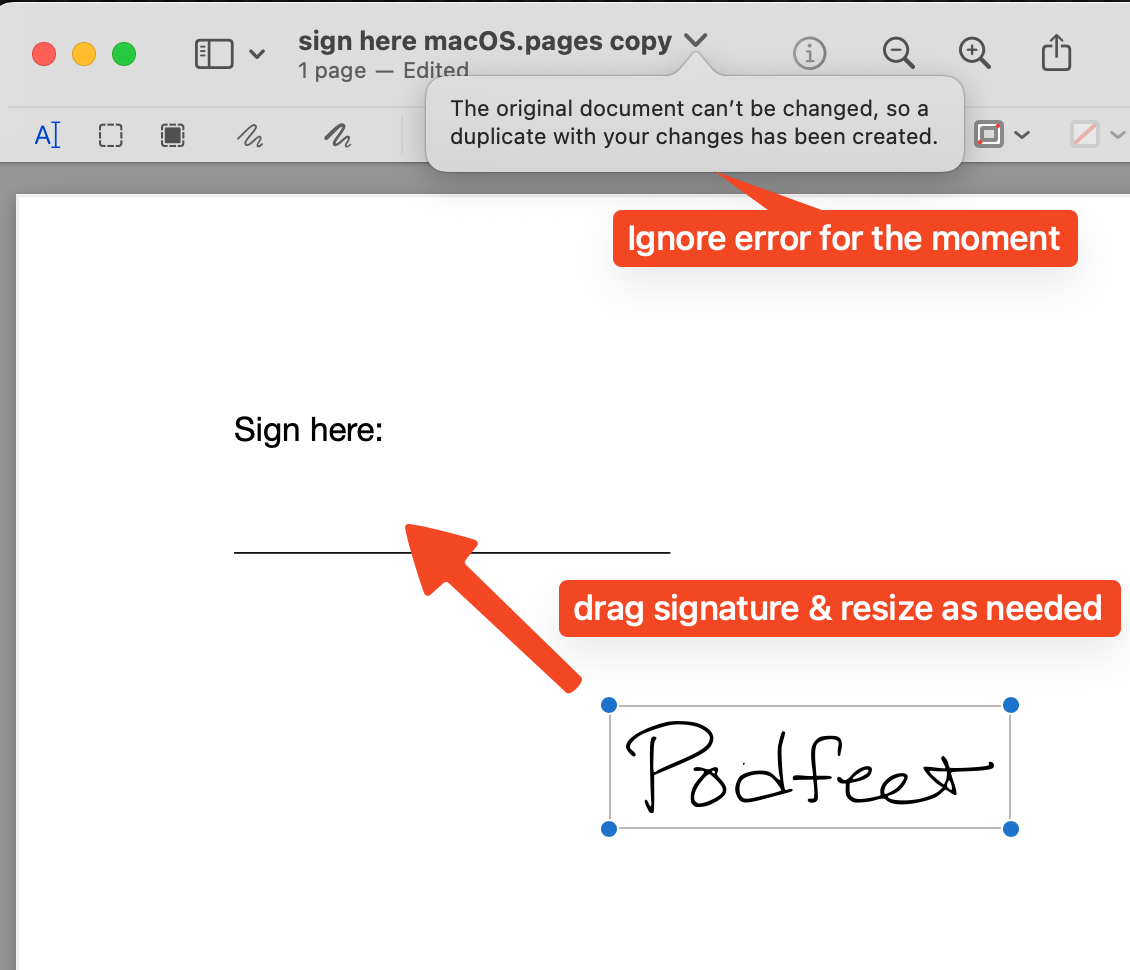
The original request was to do this entire process without ever saving the PDF, so from Preview, we can select the sharrow and then select Mail. This will launch Mail.app and attach a PDF of our signed document. Even though we never saved it as a PDF, it comes into existence when we select Send to Mail.
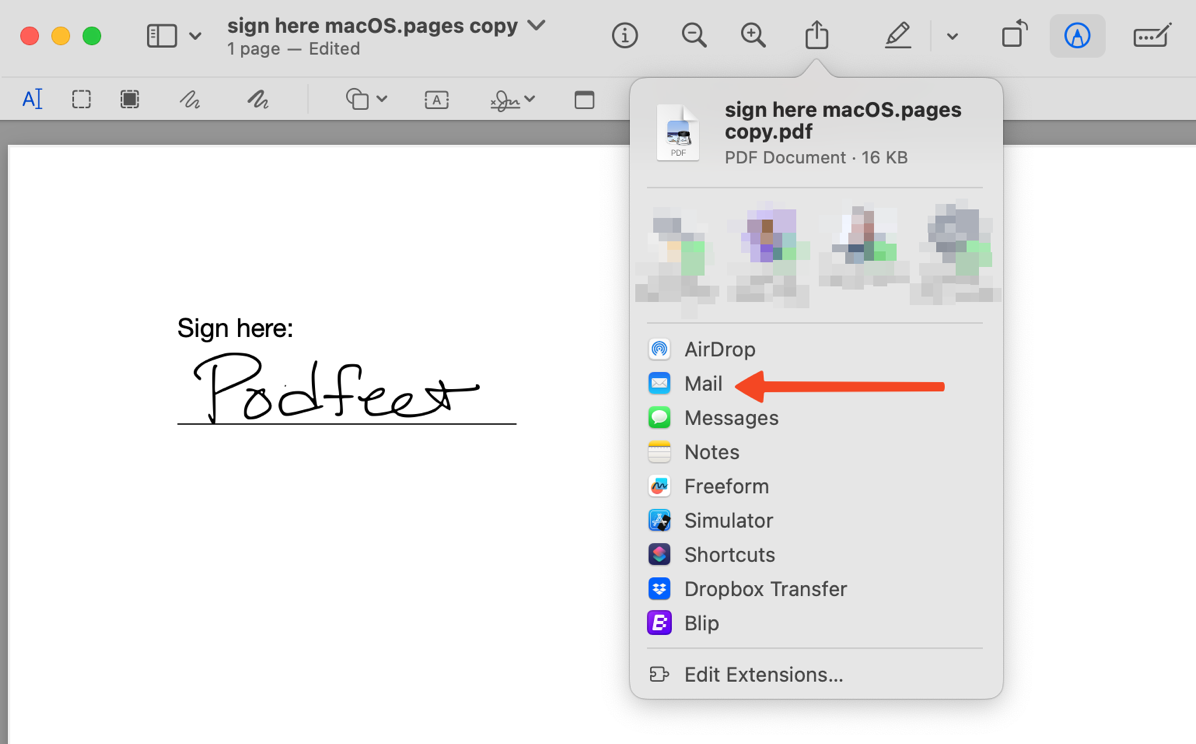
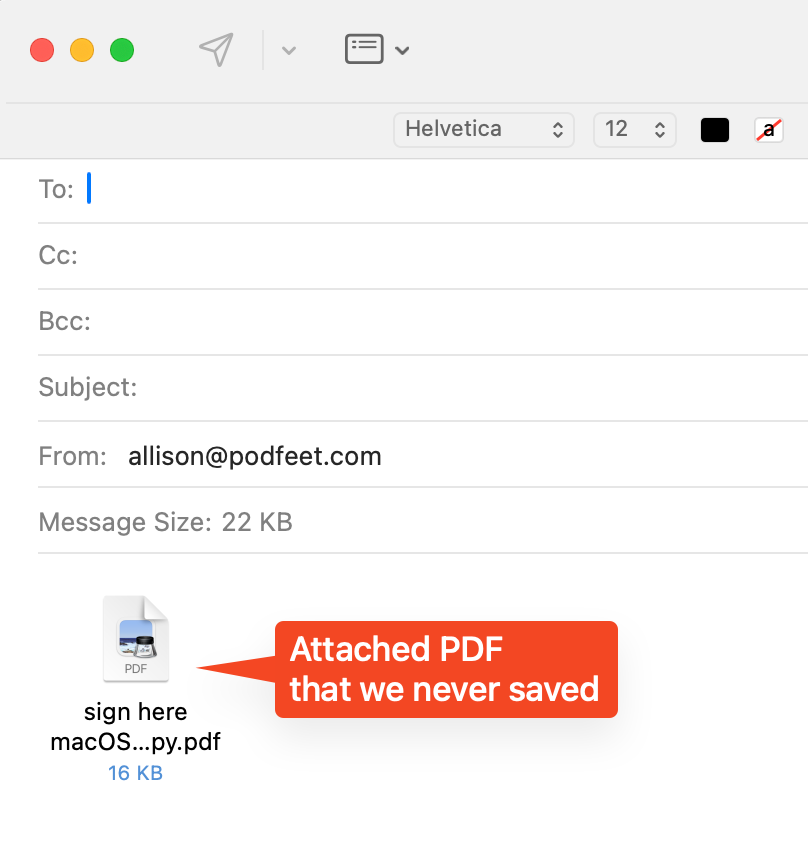
Personally, I would recommend saving a copy of any document you sign for your own protection in case of a dispute, but I still thought it was nifty we can do all of this without ever saving any documents.
Keep in mind that Preview stores your signature, so you only need to do that step once. From now on, any time you need to sign something, you’ll have that signature available from the Markup toolbar.
iOS Create PDF and Sign
Let’s switch gears and go through the process on iOS.
If you already created your signature on the Mac, you can use it on iOS too but let’s go through the process assuming you’re starting from scratch on iOS. I’m thinking about when Lindsay the Daughter and her husband were with us on vacation and they only had their iPhones with them. They got a document from their realtor that had to be signed right away as they were closing on their first house, and we used this technique to help them sign the document and send it back all from just an iPhone.
Let’s assume that you, like Lindsay, received a text document in email. Like with the Mac, you can install Pages on the iPhone.
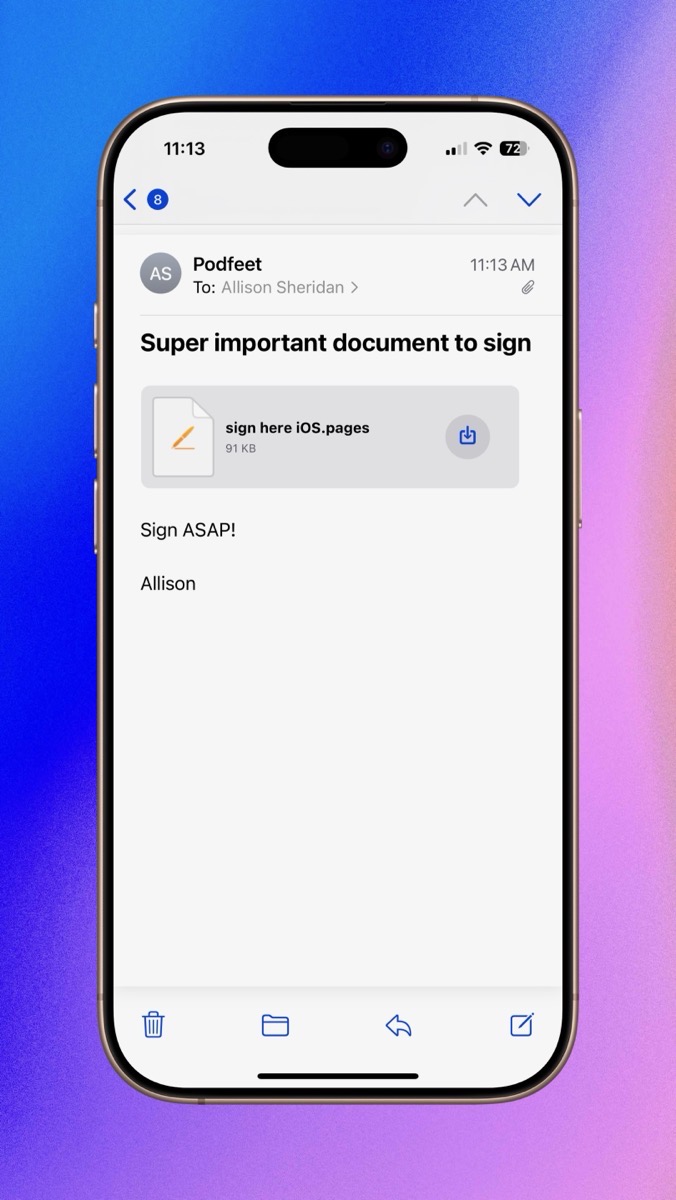
In Mail.app, If you tap on the download button next to the document, could choose to save it to Files. But let’s see if we can do it without ever saving the file.
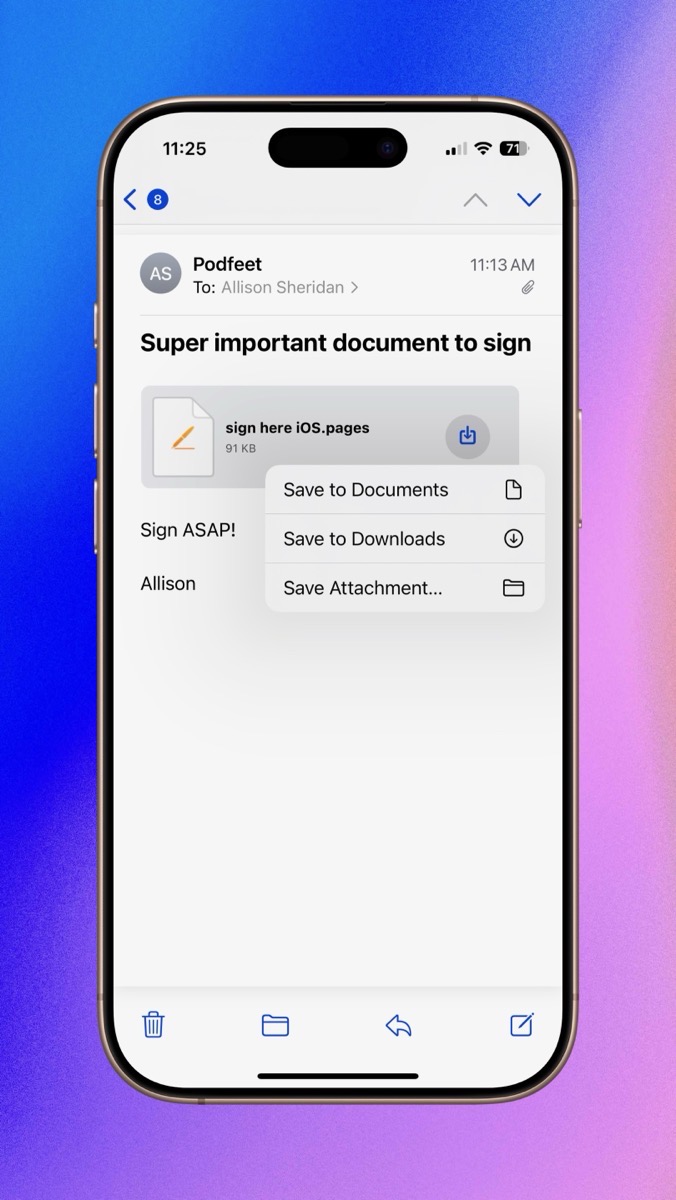
Instead of tapping on the enclosed document in Mail, press and hold on the document and you’ll get a little preview of the document with options to open it in QuickLook, Save to Files, Share, or Copy.
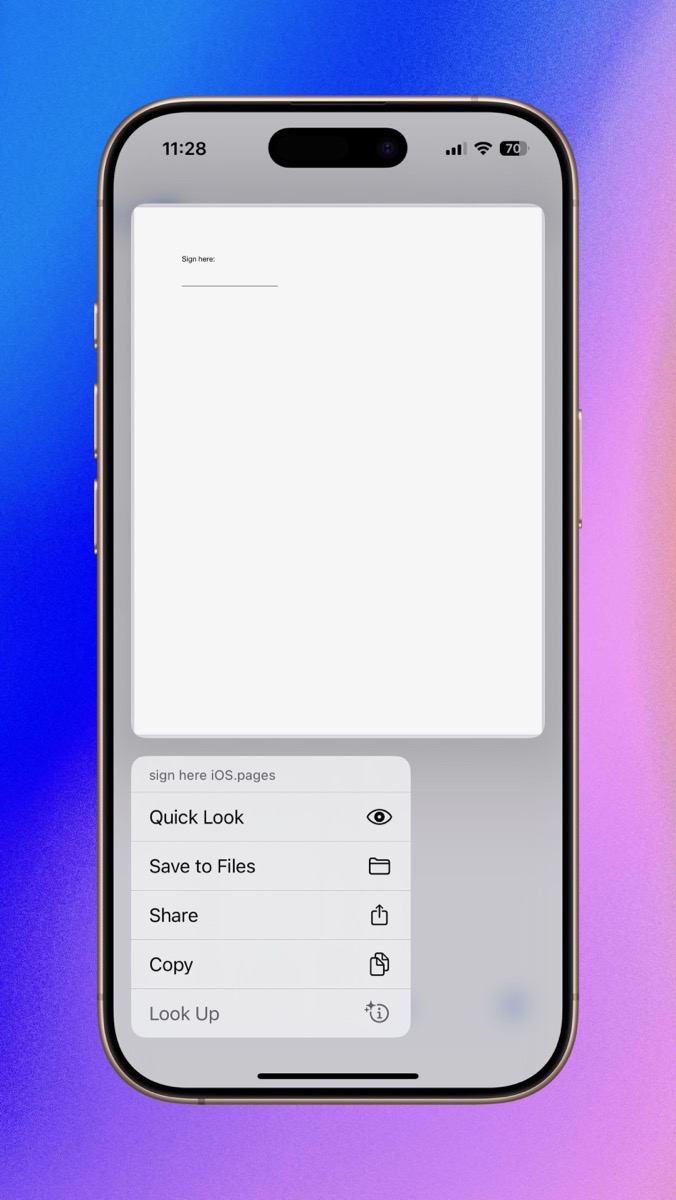
We’re not going to use any of those options. Simply tap the preview of the document to close those options.
Open in Pages
We still see the preview of the document, but now we can see an option to Open in Pages at the bottom.
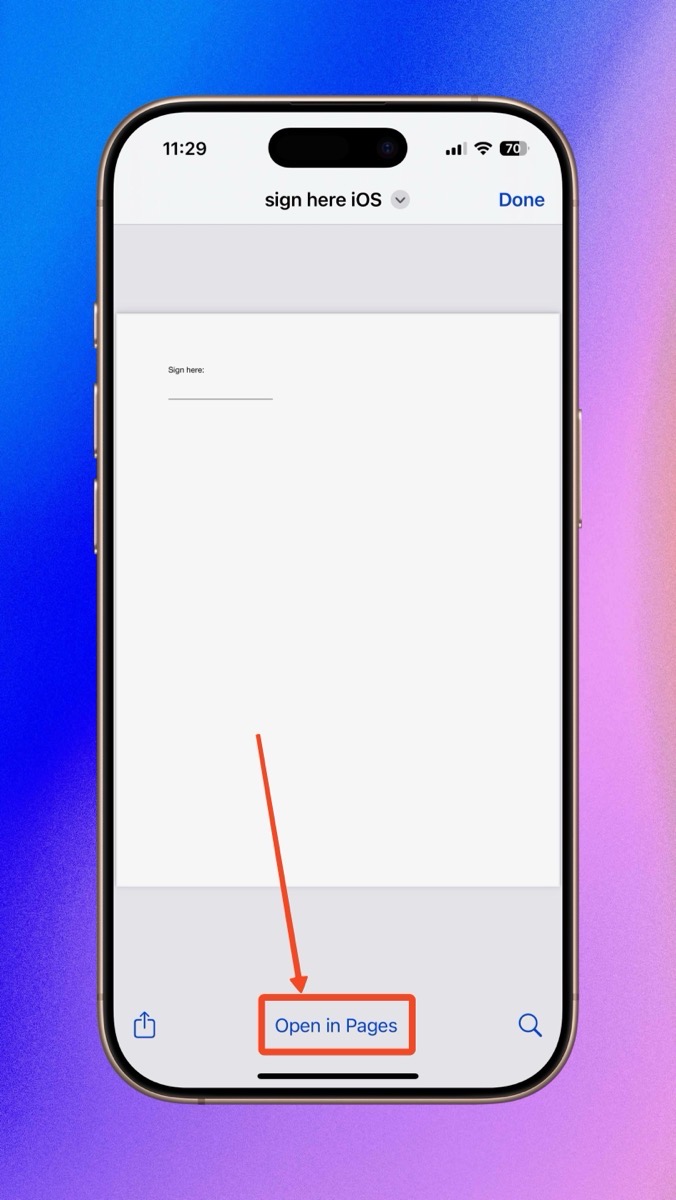
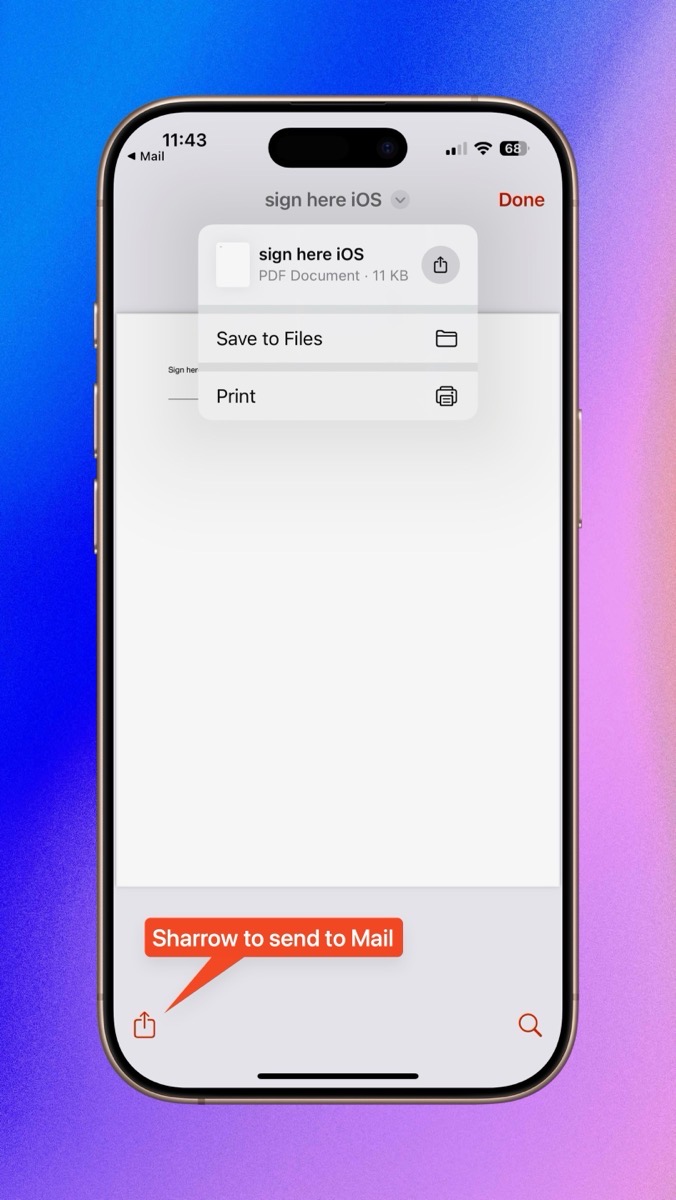
Once we have it open in Pages, we’re going to do the same thing we did on the Mac – we’re going into the print menu so we can create a PDF. With the document open in Pages, use the sharrow to select Print.
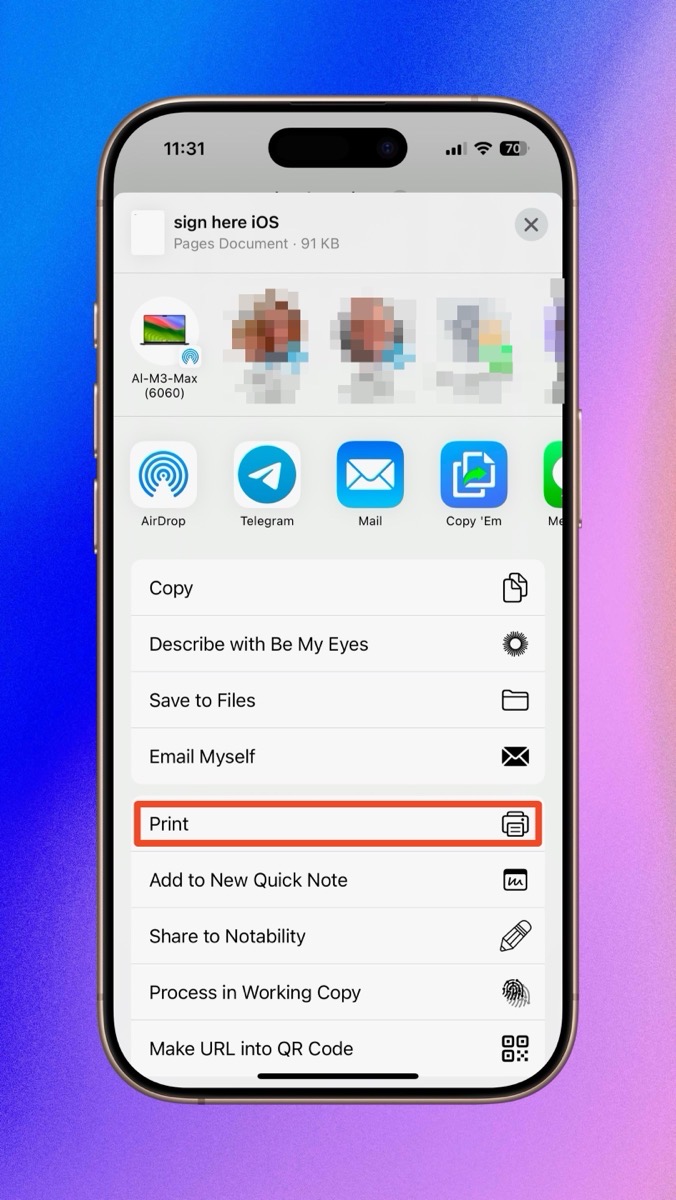
You’ll see a print dialog box with no clues that you can save a PDF from here. The hidden secret is to pinch out on the screen.
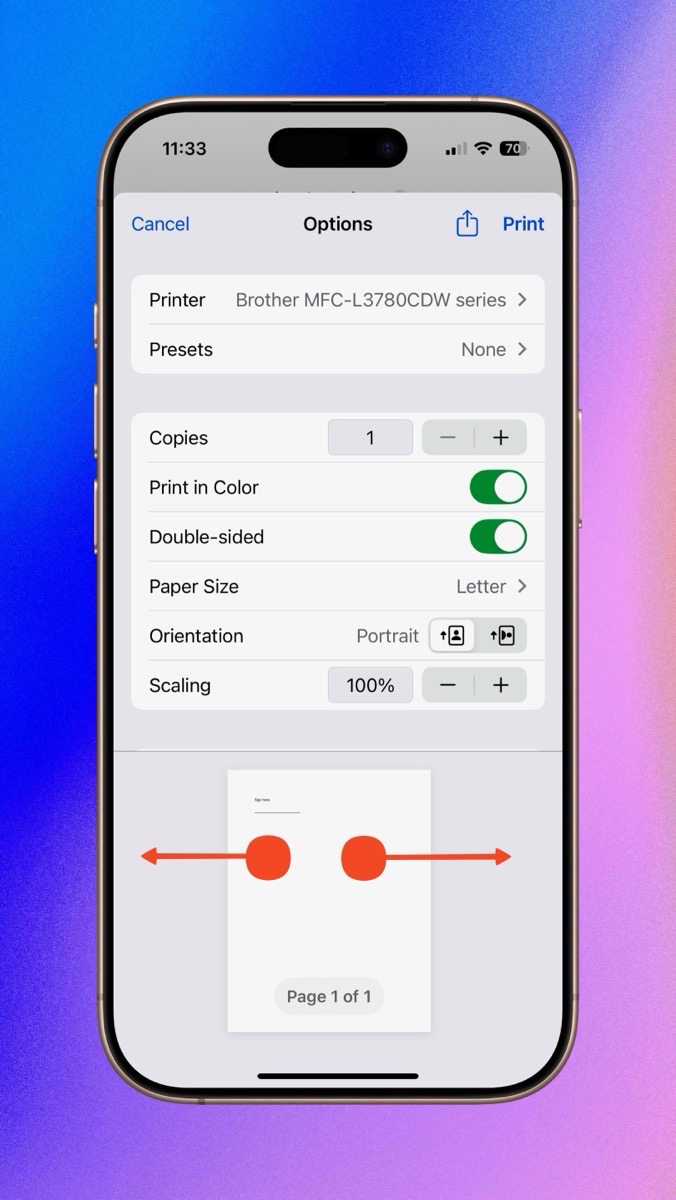
All of the print dialog information will disappear, and you’ll be looking at a nearly identical preview, but this isn’t a Pages document, it’s a PDF. If you want to prove to yourself, tap on the chevron at the top next to the name of the file and you’ll see it’s a PDF. Tap away to close it.
Markup within Mail
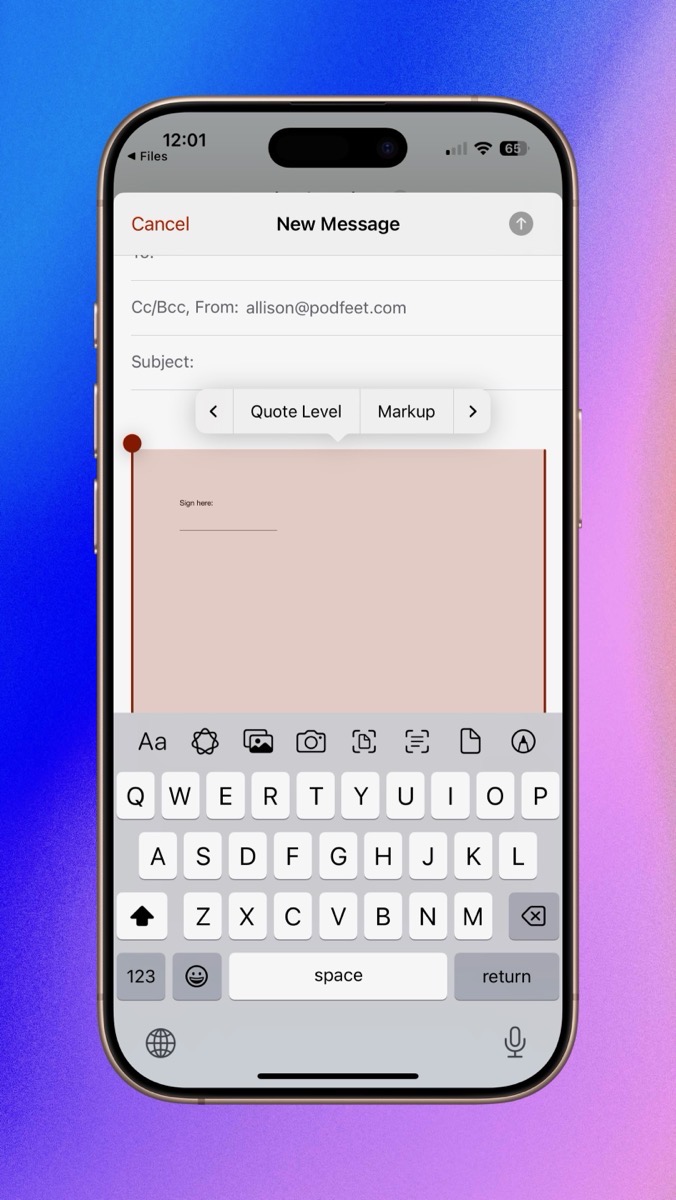
Tap the sharrow from this PDF, and choose Mail. The PDF will be attached to a new email. Double tap on the PDF inside Mail, and you’ll get a popup menu that says Cut, Copy, Paste, and Writing Tools. To the right of that is a chevron. Keep tapping the chevron to slide in new menu options, and eventually, you’ll see Markup.
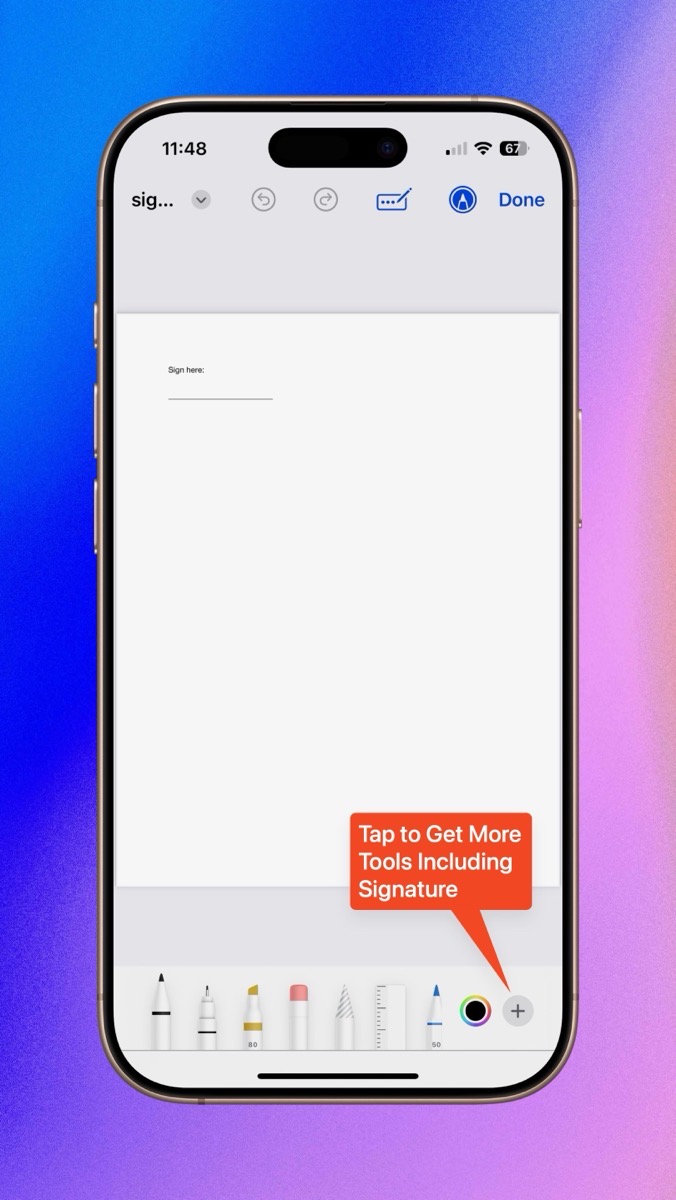
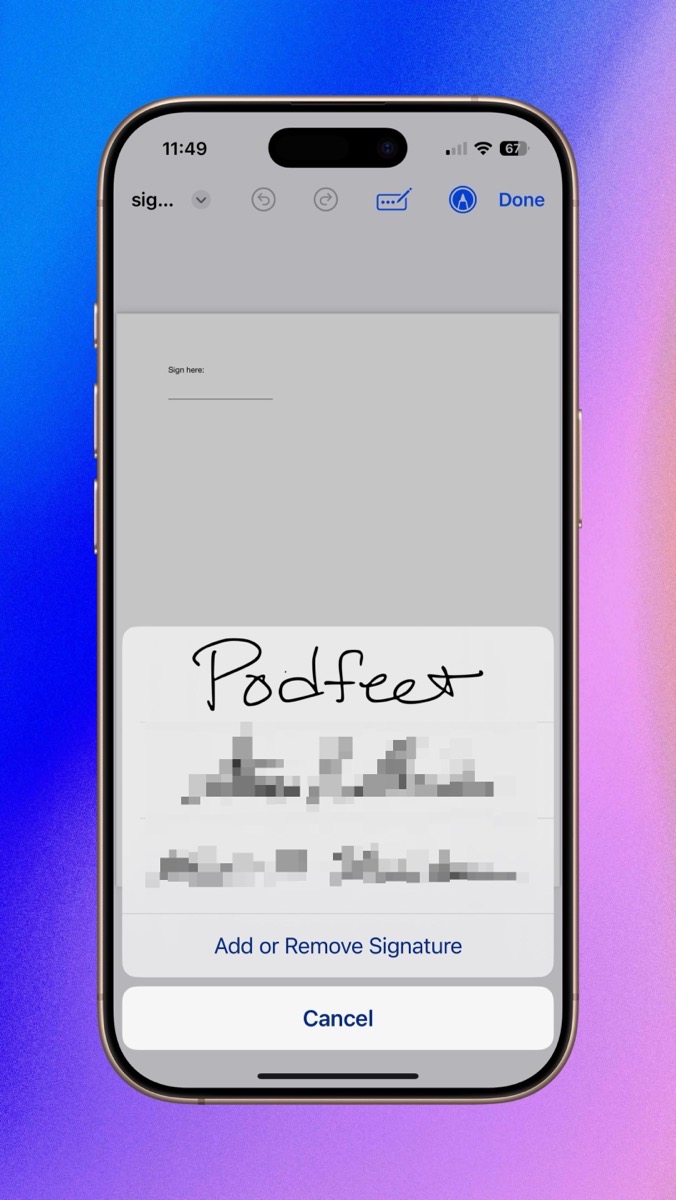
In the Markup tools, you’ll see the pen, pencil, and eraser tools across the bottom but on the far right I want you to tap the plus button. Within this list of tools, we can select Add Signature.
If you’ve previously created a signature on your Mac or iOS device, it will be available to you here. You’ll also see the option to add or remove signatures. From this menu you’ll see any signatures you created previously with red buttons to remove them, but also a plus button to add a new one.
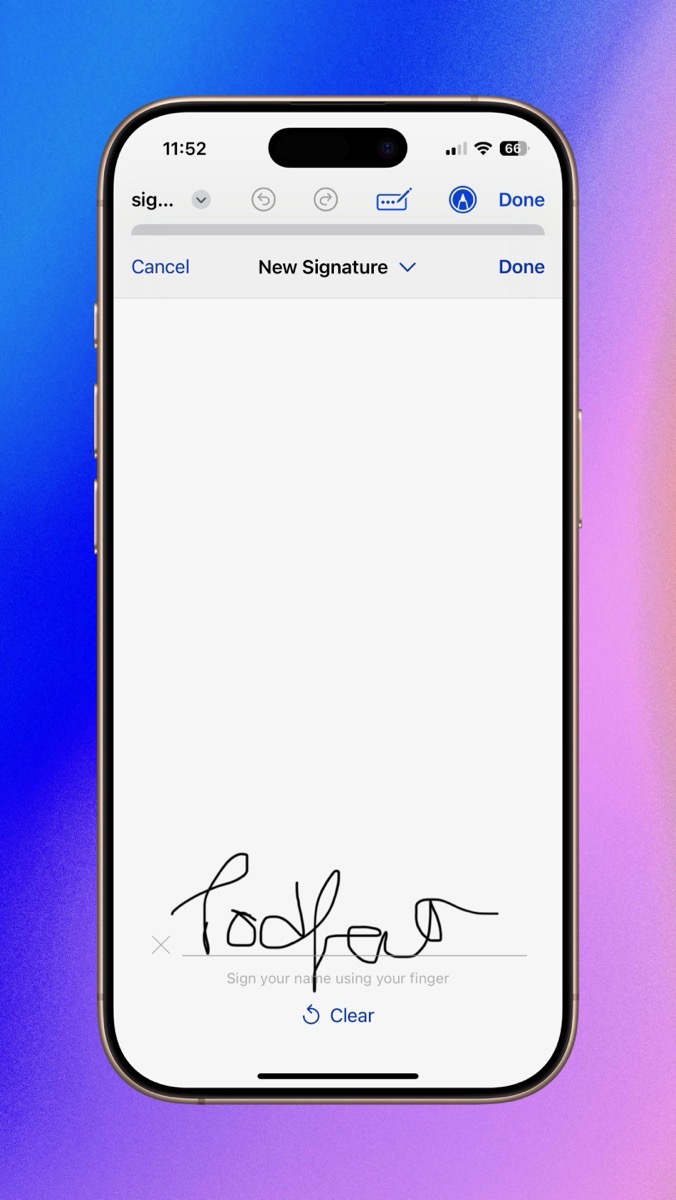
Unlike the nice option on the Mac where you can scan a signature you wrote with a pen on paper, on iOS you only have the option to sign like a three-year-old. I know a lot of people are comfortable with a signature that’s just a squiggle, but I like it to look like my name! Do your best, and notice there’s a Clear button to let you start over if it’s not representative of your real signature, and then tap Done. If you’re using an iPad with Pencil, you’ll probably do an admirable job on this step.
As soon as you finish creating the signature, it will plop into the middle of the PDF just like on the Mac. You can drag and resize your signature, but there’s also a little line you can tap on to change the color and line thickness of your signature. I made my signature purple and significantly thicker. It still looks like a three-year-old signed but at least it’s pretty now.
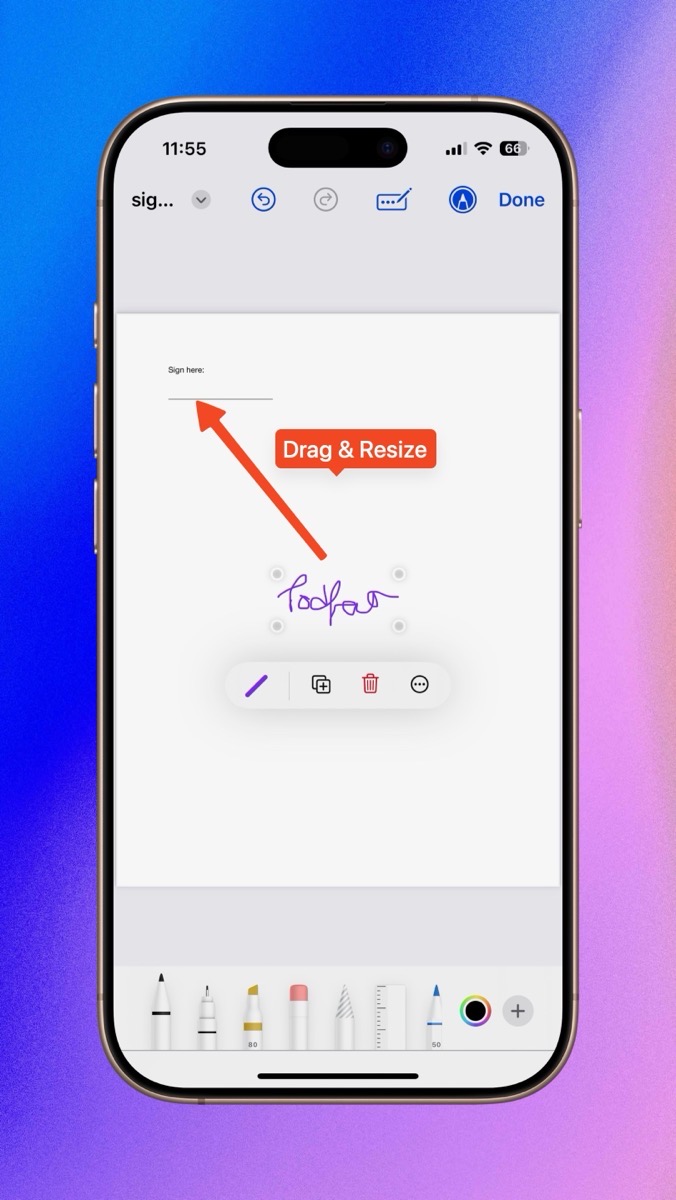
The stored signature is still thin and black so you’ll have to prettify it every time you insert it into a document.
Tap done, and your PDF with your lovely (or childish) signature appears on the document in Mail.
Bottom Line
The bottom line is that it’s really easy to add your signature to a document you’ve received and send it right back. I promised I’d review the steps at the end. You can come back and review the details but remember the process is simple.
You receive a document, print it to PDF, and use the built-in Apple Markup tools to add a signature. You can create a signature once and use it across your Mac and iOS devices.

