The Problem to be Solved
When Bart and I record an installment of Programming By Stealth or Security Bits, we both record both sides of our conversation. We use Audio Hijack to record the files in stereo, so he’s on one track, and I’m on the other. We do this for two reasons. The first is so that if, for some reason, something goes wrong with my recording, we have his as a backup.
Secondly, this method provides higher-quality recordings for you. In my recording, my voice will be direct from my mic, but his voice will be recorded from the Zoom call. Any artifacts induced by the voice over IP service will be included in my recording. On the flip side, Bart will have his original recording from his mic, and mine will be through Zoom. Because we have these two stereo recordings, I can take my voice from my recording and Bart’s from his recording and discard the two Zoom-side recordings.
The problem to be solved is finding the best method for Bart to send me his 6-800MB recording. For years we’ve been using Dropbox for this process. For a long time, he didn’t pay for Dropbox, which meant he could only have it on one Mac, and it wasn’t the Mac where he made the recordings. He saved the file on the recording Mac and synced it to his second Mac with Dropbox running, which then synced the file to the cloud. After the giant file made it up to the cloud, that shared folder synced the file down to my Mac, and finally, I could start working with the file.
There were a few failure points in this process, such as Bart remembering to sync the file from one Mac to the other, and it required us both to have Dropbox running. I can’t tell you how many times I accused him of not sending me the file, but it would turn out Dropbox had stopped syncing on my end for some reason. Even after he started paying for Dropbox, it still takes a long time for such a large file to make its way across the Atlantic.
The Solution is Blip
Recently, Bart found a much better solution to transferring files—a tiny app called Blip from blip.net. Blip provides point-to-point file transfers without any servers involved. Because there’s no server between the two devices, it’s fast. The speed is only limited by the sender’s upload speed and the receiver’s download speed. It also uploads and downloads simultaneously, not as two operations in series.
Before I explain how to use Blip, you may wonder about the cost. Blip is free. The FAQ “Is Blip really free?” is answered with, “It’s completely free to use while we continue to roll out Blip. Going forward, we want to keep Blip free for personal use. We may introduce paid plans for commercial use or special features.” For now, that’s good enough for me.
Another FAQ says: “Will Blip show me ads?” The answer made me smile; it said, “Absolutely not, don’t be silly ;-)”
Another cool feature of Blip is that a file transfer can survive drive disconnections, network interruptions, and even full disks. It remembers where it was until you rectify the interruption, and it starts back up again.
No file size limitations exist because the files are never stored on anyone’s servers. Not only can you transfer massive files, you can even transfer folders without zipping them. The FAQs even say you can transfer project files such as a Final Cut .fcpbundle file without needing to be zipped first.
Blip is Platform Agnostic AirDrop
Think of Blip as AirDrop, but for everyone, whether nearby or not, regardless of their platform of choice. Mac, Windows, iOS, and Android all have supported Blip apps. I thought they had a Linux app, too, but the link is to “sign up for Linux,” which asks why you want it. Looks like they’re still gauging how much interest there is before they build the Linux version.
I tested Blip with VoiceOver and could access all the features.
Now that I’ve explained the cool promise of Blip let’s discuss its simplicity. Both sender and receiver need to download the Blip app on their devices. They also need to have a Blip account, which can be created by providing an email address and verifying ownership of that address.
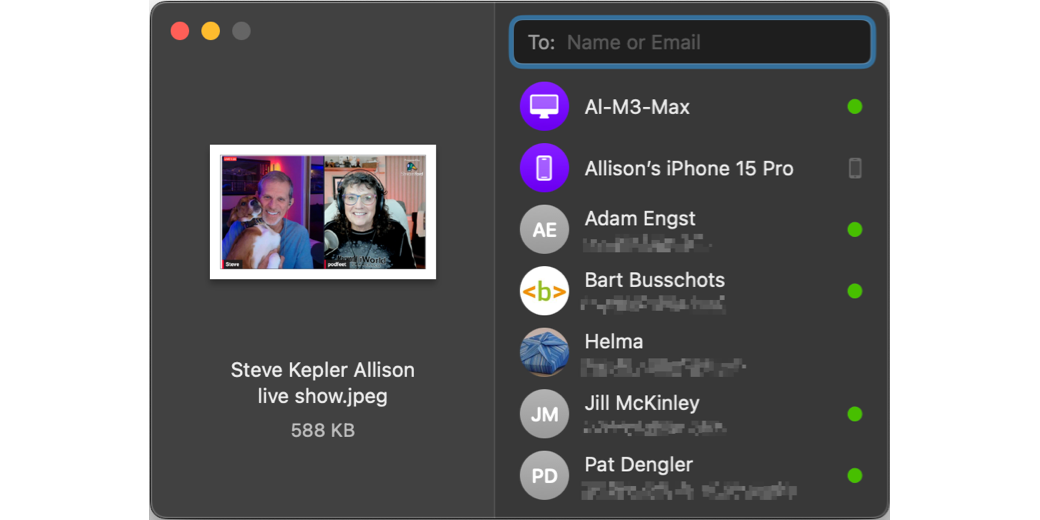
Since my primary use has been from the Mac, we’ll start with the process there. From the Blip menu bar app, the sender types in the receiver’s email address (or if they’ve previously connected over Blip, they can select the name from their list.)

This opens another window in which Blip waits for you to select photos or files to send to the recipient.

On the other end, the receiver sees a notification asking whether they’d like to accept or decline the file transfer.

The file begins to transfer as soon as the receiver hits the “Accept” button. Remember, it’s sending and receiving at the same time. On both ends, you can see the progress and speed of the transfer. Between Bart and me, with pretty good connection speeds, it’s less than a minute for the 6-800MB file to be transferred between us. It’s magical. I think I squealed like a little girl when it worked the first time. We’ve been using Blip for several months, and it has been delightful every single time.
When I want to initiate a transfer, I usually have the file visible in Finder. Rather than going to the menu bar, I select the file, right-click, select Services, and then Blip. This pops up a window showing the file I want to transfer and the list of my contacts who use Blip. It’s the same process as using the menu bar app, but in reverse order which is a few seconds faster for me.

I was enamored enough about Blip that when Adam Engst joined as the primary guest on Chit Chat Across the Pond, I suggested he try using Blip. It took him all of 28 seconds to be all in on Blip. I think he enjoys saying, “I Blipped you!”
Blip on iPhone
With all the terrific features of Continuity between iOS and macOS and syncing of Photos and Documents, I don’t often need to transfer files between my Mac and iPhone. Still, for science, I tested using Blip with iOS in the mix.
I installed Blip on my iPhone, entered my email address, and acknowledged the email confirmation. Then, I selected a file on my MacBook Air and used Services to open Blip. Since I registered a new device, I can see my iPhone and MacBook Pro in my contacts list in Blip.
When I tapped the iPhone, Blip on the MacBook Air told me to open Blip on the phone. My iPhone already had a notification from Blip, and tapping on the notification automatically opened Blip and accepted the file transfer. In the Blip app on the phone, I could see my list of devices and Blip contacts, along with a “Received” section showing the file. Below it, I was told the device from which it was received.

This was swell, but where did it store the file? I opened the iOS Files app, backed all the way out to the top level where you choose the cloud storage service, and searched for the file name. It found the file, and a long-press revealed an option to Get Info.
At the bottom of the info pane that told me things like the file type and size, it showed that it had created a folder called Blip in the section entitled “On My iPhone” (not in any cloud storage). Inside the Blip folder, it created a subfolder. The name of the subfolder is the name of the device that sent the file appended with the date and time of the transfer.
My first thought was that it was a very specific folder to create that would only ever have one file, but then I realized you can send multiple files simultaneously. Instead of splattering them all over the file system on the phone, they will all be nicely filed by the device that sent them and the precise time.

I asked Jill from the Northwoods to Blip me a file, and I used my iPhone to accept it. Again, it stored the file in the newly created Blip folder. Unlike when transferring between my own devices, the subfolder was her name appended with the date and time of transfer. It makes perfect sense.
The iOS app for Blip has settings that allow you to enable notifications and hear a sound effect when you’re being Blipped. By default, the auto-accept toggle was flipped on, but only from my own devices, which explains why the file automatically transferred from my Mac. If you don’t like it, you can toggle it to “never”.
In Settings, you can see where Blip plans to save the files, and it acts like you can change the location. You can select the “Save Files To” setting, and it opens the Files app, but from there, I couldn’t figure out how to select a new location. I feel like I must be missing something; why would the option be there if you can’t choose an alternate location?
By default, if you Blip an image or video to your phone, the image will also be imported into Photos. With iCloud Photo Library, that’s overkill, so I toggled it off.

I said earlier that with all the joy of Continuity in the Apple ecosystem, I didn’t need Blip between my Mac and iPhone. Yet, I found it quite natural to take a screenshot on my iPhone and send it to my Mac via Blip instead of Airdrop. I don’t know if it’s the reliability or the fun of a shiny new app, but it worked quite well.
Settings on Blip for Mac were trickier to find. As I described previously, clicking on the menu bar app opens the dropdown menu to choose who to send to. In that same dropdown, there’s a tiny gear. When selected, it shows another dropdown menu for how to email or join the Discord community and an option to choose Settings. However, the secondary dropdown vaporizes faster than I can select any options from the dropdown.
I found a workaround: Launch the app using Spotlight. This way, instead of the dropdown menu from the menu bar, you get essentially the same dropdown menu from the upper left corner of your Mac’s screen.

Luckily, from this dropdown, you can select the gear to open Settings. For example, on the Mac, you can choose whether to auto-accept files from your other devices. You can change where received files are stored, have it play sound effects, and set it to launch at login.

I convinced Jill from the Northwoods to dust off her old PC and test using Blip from Windows. She’s always game for a tech experiment. In a few minutes, she had Blip installed from the Windows store and was Blipping me files. I thought it would be fun to see how Blip looked on Windows so I asked her to send me a screenshot … and it looks almost exactly like it does on the Mac. It’s a fresh, clean interface.

Support on Blip
Right when I was testing Blip on my iOS devices, something got borked, and I couldn’t Blip myself or Bart. I shot off a note to the tech support email, and in less than a day, I had a nice email from Tomaž asking if I could try logging out and back into my devices to see if that cleared up the problem, and it worked. I’m glad I had a glitch because knowing that there’s tech support even on a free app is great information.
Bottom Line
The bottom line is that Blip is amazing. It’s fast, it’s free, it works on nearly everything (except Linux), you can transfer huge files, it’s accessible, and there’s even good tech support. If you need to transfer huge files quickly or files between different platforms, I suggest you head over to blip.net and give Blip a try.