When I was purchasing my new Peak Design Everyday Backpack Zip, I made sure to add another Peak Design product to my cart. I’d seen it mentioned previously, but the product demo for the backpack explicitly mentioned its use on the backpack.
The product is the Peak Design Capture. The problem it solves is how to carry your camera when you’re not actually using it, but might at any moment.
I had previously purchased the Peak Design Cuff, which is a sturdy wrist strap that attaches to my camera quickly and easily with one of Peak Design’s Anchor Links. This is a snap connector that is used on multiple Peak Design products that is essentially a tether with a connector that snaps together in the middle. This is easy to connect and disconnect, but will not do so by itself.
The wrist strap is great for a quick session. It ensures I won’t drop my camera onto the ground, but it does mean I am always carrying it. For longer sessions, I want something more hands-free.
This role has previously been filled by a BlackRapid Blackline body strap. Unlike many body straps, this has an under-shoulder strap which stops it rotating around my body. But it’s difficult to get the camera attachment high enough to not risk my ‘junk’ when using my giant telephoto lens. The camera also tends to move around a lot. I have walked over a kilometre, on a rough track with frequent elevation changes, and I’ve not been concerned with the safety of the camera. However, the bouncing around means I often ended up cradling the end of the lens at times.
The Peak Design Capture solves this quite cleverly, though with the caveat that the Capture alone will not do the job. It must be attached to something. Like, say, a backpack strap!
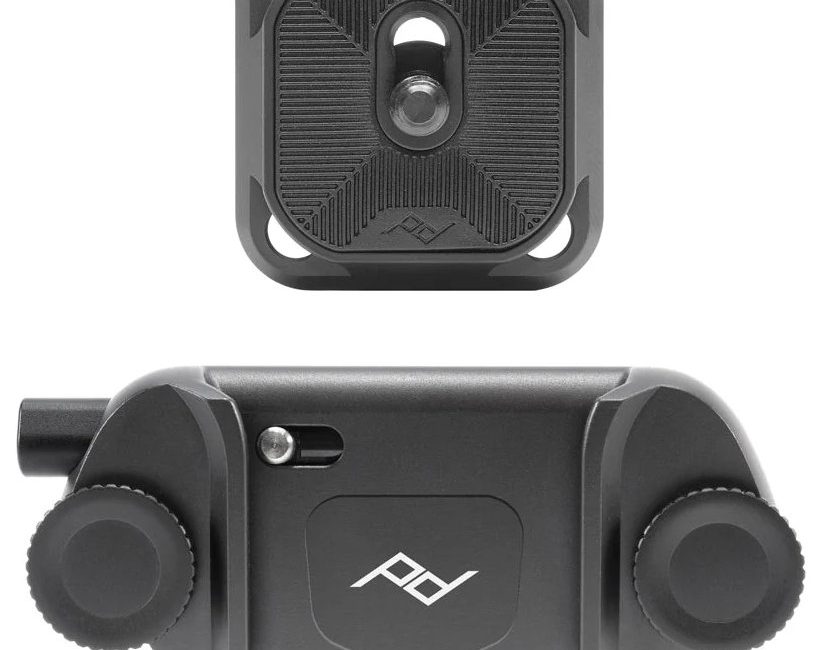
Capture has two parts. The first is an Arca-standard quick-release tripod plate, which you firmly attach to the bottom of your camera using the tripod mounting hole. This attachment is solid thanks to a hex-drive bolt that you can tighten with the supplied Allen key.
The second part is the functional one. They call it a clip, and it comprises essentially two metal plates which sandwich around the backpack strap, or a belt or other kind of strap. These two sides are held together by strong thumb bolts or, optionally, two more hex-drive bolts for a more permanent mount. When I attached it to my backpack strap, I used the hex-drive bolts for a more permanent mount. Though, also, the thumb bolts seemed like they were barely long enough to account for the strap thickness.
Once securely attached somewhere, this clip serves as a docking station for the tripod plate. You slide the plate into the clip, and a spring-loaded locking pin automatically grabs it securely. Although you can only slide the plate into one side of the clip, because the plate is square, it can be in any of four orientations. This fact is useful depending on mounting direction. On a backpack strap, you slide down from the top. On your belt, in from behind. In either case, you can ensure your heavy lens faces downwards, or if you have a light lens, that your heavy battery compartment faces downwards.
Removing the camera from the clip is achieved by pressing in a release pin on the side, when strap-mounted, or bottom, when belt mounted. Technically, you can have the clip any way up, but these are the recommended configurations. The release pin can be rotated through 90 degrees to prevent inadvertent release, although the amount of travel required suggests this is unlikely.
The removal can feel a little fiddly and like it needs two hands. The company’s demo video suggests that, with practice, it’s practical to do one-handed. I’m still in the two-handed phase. Inserting the camera is really simple. There is a little attention required to alignment, but once you get that right, it seats with a resounding click.
Given the ease of insertion, you might wonder how securely the camera is attached. The demo videos I’ve watched show the user repeatedly, and energetically, jumping on the spot with nothing holding the camera but the clip. This tiny, 84g clip can safely hold well over 90 kg of weight!
Back to my problem statement. How does this work for my ‘long carry’ situations? The answer is very well. It achieves this in two ways.
First, it is stupidly simple to insert the camera when I am ready to do some walking and, once it’s attached, I have both hands free with zero concern the camera needs any more support for safety.
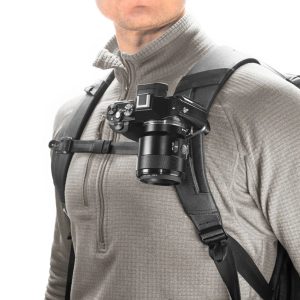
Second, the clip is positioned just below my collar bone. This means, with a short lens, the camera sits against my chest and doesn’t really bounce much. With my giant lens, the tip of the lens is down over my stomach, but because so much of its length is against my chest, it doesn’t move anywhere near as much as with the body strap. What’s more, even my arm closest to the camera has almost completely free movement past it. Great for balance on a rough track, or even just to be able to walk more naturally on flatter surfaces.
Perhaps the best part of using the clip is when I actually want to use the camera. Part of the body strap bounce issue is that I have to leave enough play in the strap to actually lift the camera to my eye. With the Capture, this is a non-issue. When I remove it from the clip, I have free range to move the camera anywhere.
Notwithstanding I will need to be wearing my backpack to make use of the clip, I think this is a huge upgrade for me. I don’t even need to have much in the backpack, so extra weight is not a necessity. If I had another backpack (see my separate review to answer that question!) then I can purchase another clip without the plate and can then clip into whichever one I am wearing. Conversely, if I had another camera (OK, I do, but may not for long) I can buy a separate plate to attach to it.
The Capture even solves a problem I had not previously been able to solve. Sometimes when I’m out with my giant lens, I like to take a monopod with me. The body strap attaches semi-permanently into the camera’s tripod mount, where the monopod requires a mounting plate on a special “foot” that attaches to the lens. At first glance, this doesn’t seem like a problem, as the strap can attach to the camera while the plate remains on the foot. However, getting enough play in the strap to get it on the monopod in any useful way is troublesome.
With the Capture, I’ll have one plate each on the camera and foot. To move to shooting mode, I release the camera from the Capture and snap the foot into the monopod. When done, I release the foot from the monopod and snap the camera into the Capture. I do also need to rotate the foot before letting the lens rest against my body, but that’s true with the strap also.
On my first outing with the Capture, I spent nearly two hours walking the tracks of my beloved Zealandia Te Māra a Tāne with my new backpack on, holding two extra lenses, and my camera with giant lens attached to the Capture. Given my history of back problems and the fact I currently suffer from a frozen shoulder — on the same side I carried the 2.8 kg camera — the fact I was feeling only slightly fatigued when I returned to my car makes this purchase an unqualified success. I even got fairly adept at releasing the camera quickly.
There are other versions of Capture that fit slightly different needs, such as carrying lenses, or phones. The standard Capture is available in black or silver for USD$79, or a special bright orange model, co-branded by Carryology, for $84.95. It’s available directly from Peak Design or from many good photographic stores.