 Today everyone can be a great photographer, simply armed with a good phone camera. You may not care about your photos and only take them for your own enjoyment, or you might be quite serious about your photography.
If you’re in the latter camp, you take great care to get the lighting right, to frame your subject, you painstakingly edit your images and then you want to share them. If so, you might want to add a subtle watermark to your images before posting them so people know that you were the artist who created these images.
Years ago I went on a valiant search for an app to add watermarks to my images. I found a plugin for Aperture that was janky at best and failed quite regularly the rest of the time. Then I learned how in Affinity Photo you can actually create a brush that is your watermark. It’s a pretty advanced technique and I’ve simply never gotten around to creating one.
There’s a new kid in town to add watermarks to your images, and it’s called PhotoBulk from Eltima. You may recognize that name as the people who brought us CloudMounter that I reviewed back in February. PhotoBulk does a lot more than just watermark your photos, you can also resize and rename your images. The “bulk” in PhotoBulk is there because it allows you to batch process a series of photos at once. Let’s start by looking at the watermarking features in PhotoBulk.
Watermarking
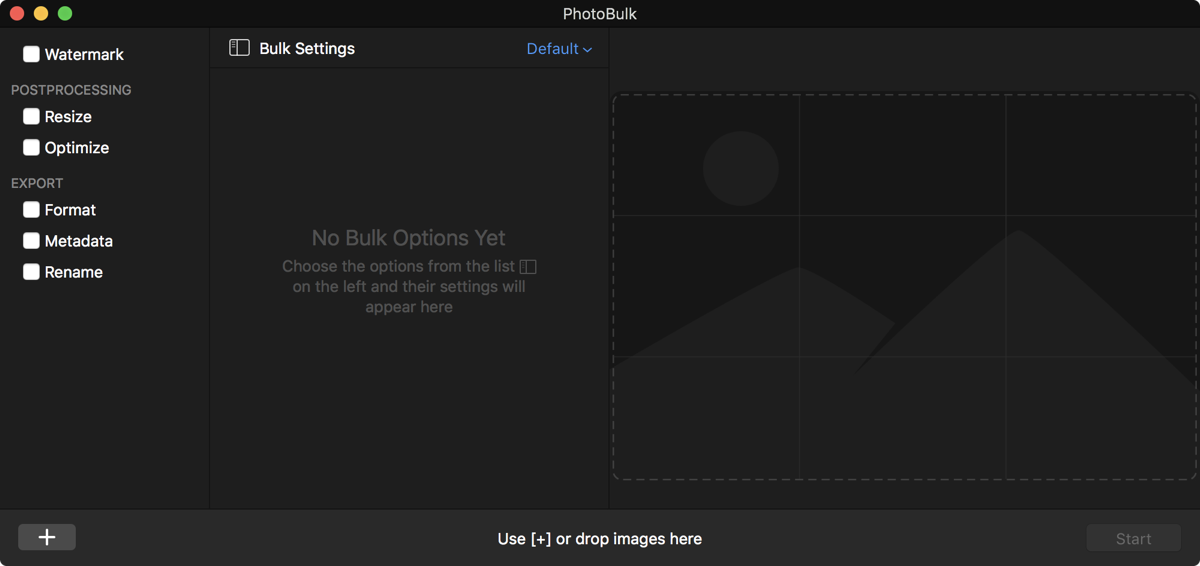 When you first open PhotoBulk, you’ll see three panes. The rightmost is a preview pane. The background of this empty pane has a dim image of a mountain with a moon or a sun on it, suggesting that this would be where you would preview your images. In fact, below the preview pane, it says to either select the plus button or drag and drop images right onto the preview pane. Images dragged onto this preview pane will become part of what they call the Gallery.
It’s probably the right idea to drag the images onto the preview pane before going any further, but I am actually going to explain it another way. It will eventually become clear why I’m going right to left and backward. At least I hope it will become clear!
The center pane is where you’ll be putting your Bulk Settings. These are the adjustments you want to make in batch mode to all of the images you add. When you start, it’s blank other than an invitation to choose options from the list in the left sidebar. In the list, you’ll see Watermark followed by two post-processing tools: Resize and Optimize. There are also three options under Export: Format, Metadata, and Rename.
Each of these options is applied by selecting the checkbox next to it. If you select Watermark, you’ll now see under Bulk Settings the default of a text watermark. On the preview pane for the gallery, you’ll see a giant text box has been plopped into the middle of the screen. It has very tempting blue handles, which you can use to resize, move, and even rotate the text box.
In the Watermark option, you just added in Bulk Settings, you can change the font, font size, color, and make it underlined. It’s very important to make your watermarks subtle so they don’t distract too much from your image, and you can accomplish this with an opacity slider on the same control.
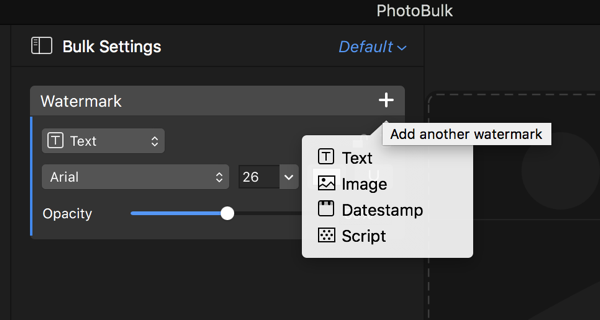 Now let’s say we’ve written @podfeet as our text. We’ve shrunk it down and placed it in the corner with 50% opacity. That would look nice but we want to dress it up a little bit. How about adding some actual podfeet? To add a second watermark, you tap the + button on the watermark block you just added. A nice pulldown shows you the option of Text, Image, Datestamp, or Script. We’ll choose Image this time around.
This plops in a 58 x 58px image icon, again with blue handles for resizing and moving and rotating. In the new watermark option, you’ll see a browse button to find your artwork. You can use the precision numbers in the block to resize the image, but we’re being artistic here so we’ll use the handles to resize and rotate and move as we did our text.
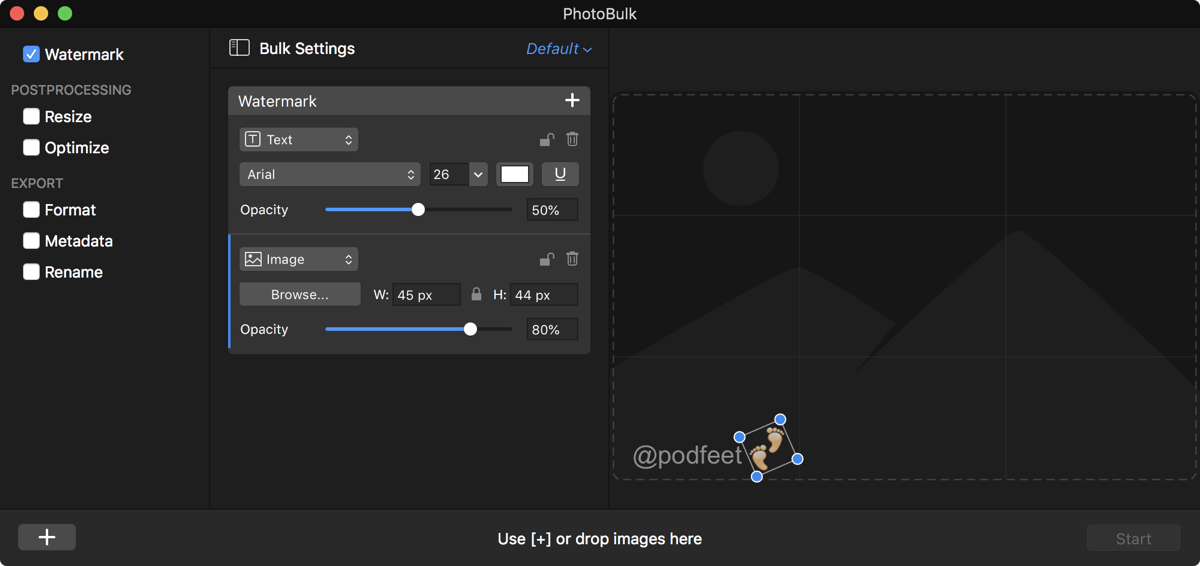 As you select your text or icon in the preview pane, it lights up the blue handles. At the same time, you get a matching blue line on the Watermark option so you can immediately focus your attention in the right element’s setting.
You can also add a date stamp to your images, which might be useful if you’re making a contact sheet for a client. If you’re creating images for a stock photo site, you might want a really obvious watermark that is all over the images. PhotoBulk calls this option Script. Instead of a subtle watermark in the corner, Script plops the same word all over the page spaced a bit apart. It has a circle with a radius line that has a blue handle which allows you to rotate the words till they’re at the angle you choose. I’m not working in that world so we’ll go back to our simpler example.
Let’s say we’re pretty pleased with our watermark now with some jauntily rotated podfeet next to the Twitter handle. It’s time to drag some images into the Preview pane. The first time I did this, I dragged in a handful of images of dramatically different dimensions and my watermarks turned into a hot mess! On some, the feet were on top of the words while on others the icon and text were so tiny I could barely read it. I thought at first that PhotoBulk was going to require us to only batch process images of the same size.
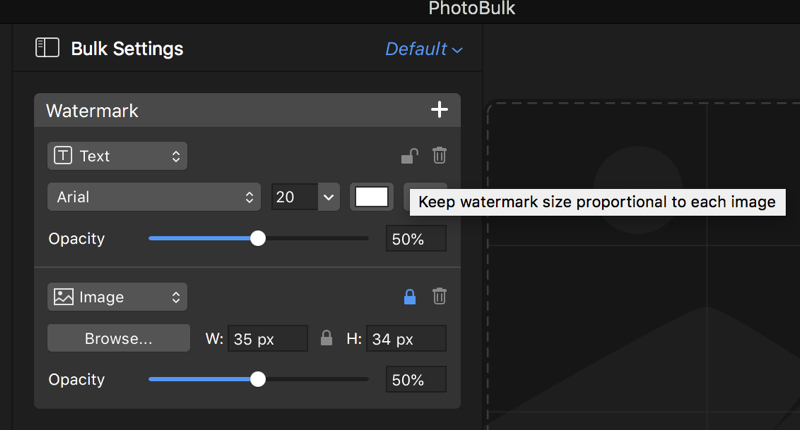 I was really bummed about that, but then I wrote to the developer and he pointed me to a tiny lock symbol next to each of the watermark elements in Bulk Settings. If you hover over the lock, it says, “Keep watermark size proportional to each image”. I rearranged my text and icon and then hit the lock and dragged in 5 disparate images and they all scaled beautifully.
At this point you can select start and PhotoBulk will very quickly add the watermark to your images placing them in a folder of your choosing. Let’s see what else we can do with PhotoBulk.
Resize & Optimize
The images that come out of our phones are huge, and those from big-girl cameras are even larger. Resizing images before upload can save on bandwidth, upload faster, and reduce the chances someone is going to improperly reuse your artwork for something commercial.
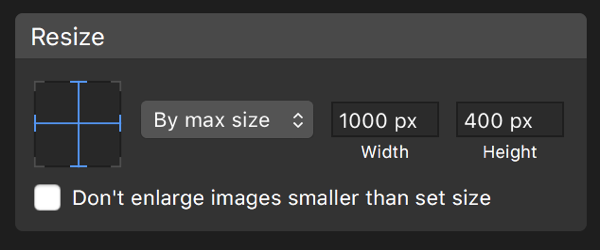 With PhotoBulk we can add a Resize block to our bulk settings. The options here are simple and intuitive. You can resize by width or height in pixels, which is pretty standard. We can also choose max size giving both a width and height maximum. If you prefer to resize by percentage, that’s an option as well. There’s a very odd option called Free size, and it does exactly what you might imagine. If you put in absurd dimensions, it will modify the aspect ratio of your image to match those absurd dimensions. I don’t really recommend that option. It seems like something they could put in, so they did.
Optimize
The Optimize option has a slider that goes from Min to Max. Below that it says, “Reduces file size, doesn’t deteriorate the image. Higher level of optimization may take more time.” I would take that with a grain of salt because my understanding is that there isn’t really a lossless optimization method out there for images. You may not be able to observe the difference in image quality, and that’s all that really matters.
Format
The Format option does exactly what you’d expect. It will convert your image to JPEG, PNG, TIFF, GIF or BMP. JPEG alone has a slider for the quality and a checkbox to keep the original quality if you so desire. I’m not sure I understand that checkbox though, because you can lower the quality with the slider and keep the checkbox on.
Metadata
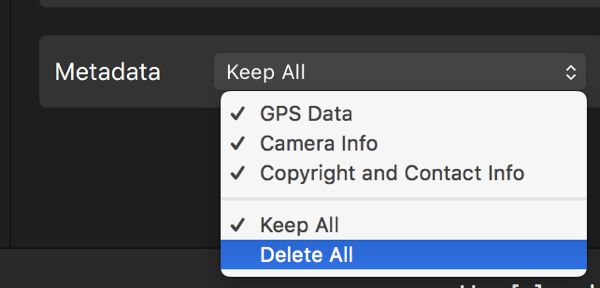 Before you upload your image, you may want to remove some or all of the metadata embedded in the image. If you add a Metadata block to Bulk Settings, you can choose to remove the GPS data so people don’t know where the image was taken, which can be nice if it would identify you in a way you do not desire. You can choose to remove the camera info and the copyright and contact info but I’m not sure why you’d want to do that. You can delete all metadata if that’s what you’d prefer. Oddly there’s an option to Keep All metadata, which is just like not adding the metadata block in the first place.
Rename
There are dedicated apps out there to rename files, and you can have some fun with AppleScript and Automator to do this. But PhotoBulk has it built in with the Rename block. I really like how this works. You give it a name and then choose a numbering scheme. You can add numbers as a suffix or a prefix. So many programs only allow adding a suffix and I really prefer them as a prefix. You can choose how many digits to use for numbering from one to four using a nice pulldown. You can also choose which number to begin the numbering. That last bit is super useful. Let’s say you process a dozen photos and later need to add a half dozen more to this batch. Simply set the batch Rename process to start at 13 and away you go. Could not be easier or more intuitive.
Saving Settings
After you export a set of photos with your chosen options, PhotoBulk offers to reveal the exported images in the Finder and it also offers to save your settings as a preset. Put in a name, and now those settings are available in a drop-down next to Bulk Settings. In an app like PhotoBulk, you’re very likely to want to apply the same settings again and again over time, so this is excellent. I can imagine having several versions of my watermark. I might want one left justified, one right justified, and an inverted color version of each to accommodate both light and dark photos.
Bottom Line
I found PhotoBulk to be beautifully designed and it did exactly what’s on the tin. The controls (with the exception of the little lock to keep the watermark sized properly) were intuitive and easy to use. If you need an app to add custom watermarks and also resize and rename your images on macOS, I think PhotoBulk is a great option. It’s $9.99 Mac App Store.


Hi, thanks for your very useful step by step on this.
I am trying to watermark 180 images, most are 4000 x 6000 size taken on a canon R10 but some are 6000 x 4000 instead (portrait not landscape) and some are even random sizes after cropping such as 3597 x 2450 for example… even by using the lock feature to try and get the watermark to remain the same no matter the image size, this doesn’t work for me. Am I doing something wrong or is it due to the odd image size of some of the photo’s I’ve imported?
I would appreciate your help if you know! I have raised a ticket to photo bulk directly and made sure I have the latest version of the app on my MacBook Air 2025.
I have a customer waiting for her photos so time is of the essence!
Many thanks,
Bekky
Oh gosh, Bekky, I wish I could help. I wrote this up seven years ago and I don’t remember pretty much anything about how Photobulk works. It sure seems like it should work for different orientations and different sizes. (I hate it when someone says, “it should work” though, because it’s not very helpful! This is probably no help at all, but I asked ChatGPT for some advice on this problem and it said to use percentages vs. exact pixel dimensions for the placement and size of the watermark. Probably something you would have thought of on your own. Good luck!