I’m trying to be one of the cool kids and use Instagram. I don’t entirely get yet what it offers that I don’t get from Facebook and Twitter, but I’m trying. My niece says it’s her happy place because it doesn’t seem to be as filled with as much anger as Twitter and it doesn’t feel as creepy as Facebook (even though it’s owned by Facebook.). I want to be happy too, so I’m trying to be better at Instagram.
My first act was to move Instagram out of a social folder and onto my home screen so I’d even remember to open it. Then I started adding people and looking at their photos. I have to say, there is something peaceful about scrolling through images and tapping the little heart. It feels good.
 I started contributing some images myself, and there are things I like and things I don’t like about Instagram. I like that I can select a photo, write a clever caption and then tell Instagram to post to Facebook and Twitter as well. Nice to have it in one step. But then I have to go back into Facebook and change Instagram handles to real names. On the Twitter side, you can’t edit the message so you just kind of hope that their Instagram and Twitter handles are the same. It’s a good thing that Steve is @spsheridan on Instagram and Twitter since he’s the person I’m most likely to include.
While the experience is pretty good on the phone, I spend a lot of time on my Mac and I’d prefer to do my ‘gramming from there. There’s no app for the Mac though. Heck, there’s not even an app for the iPad.
You can go to Instagram.com from a real computer, and at first it will look like you can only get links to download the app on the iOS App Store or the Google Play store, but there’s a button that says “continue as” and you can log in from there. At first I was happy!
Except when you get into your account, you’ll notice that you can only view other people’s content and heart or comment on their images. There’s no little plus button at the bottom of the screen so you can’t contribute your own images. I have to be able to contribute, it’s in my nature!
User Agents
I’ve got a solution to the problem with Instagram and as you learn about it, remember it’s not just useful for instagram.com. It might help you with any website that doesn’t want to let you play from a real computer’s web browser.
 You may remember Bart talking about how we have a digital fingerprint on the Internet, and how one of the ways we can be identified is by the information in the header of our web browser that’s sent to any sites we visit. One of the pieces of information in the header is the device and browser version you’re using. That information is called the User Agent String.
If you go to instagram.com using a mobile device, Instagram does include the plus button to add your own images. So all we need to do is trick the website into thinking we’re on a mobile device when we’re actually on our big girl computers. We need to change our User Agent to pretend to be a mobile browser.
This is a common technique used by developers as a way to see how their website looks on different devices, so it’s not too hard to do. I’m going to walk you through how to do this starting with Safari using the Developer tools, and then we’ll take a look at Chrome and Firefox.
Safari
Open Safari Preferences and select the Advanced tab. Check the box at the bottom that says Show Develop menu in menu bar.
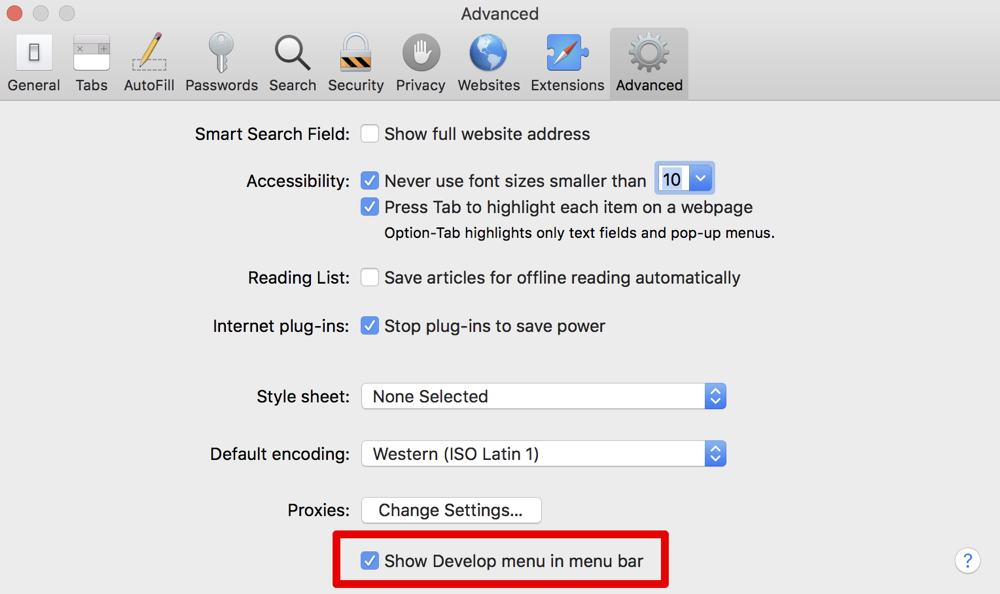
You will now see a new item called Develop in the menu bar of your Mac when Safari is open. Select Develop, pull down to User Agent, and then slide over and choose Safari iOS 11.0 iPhone.
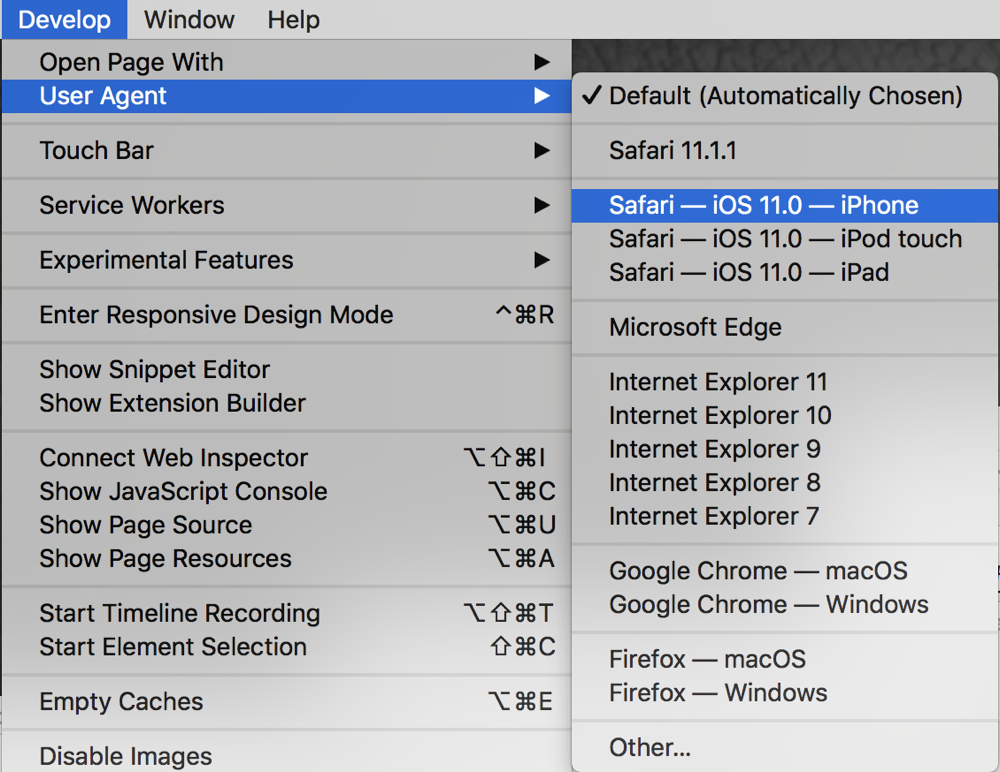
With your User Agent set to mimic the iPhone, instagram.com will refresh and now you have a set of menus at the bottom. There’s a home button, search, the + button we were looking for to add our own images, the heart, and the little person that shows you your own posts. It looks just like the real Instagram app.
 Now that we have our + button, we can add an image.
You probably know that Instagram was made to have square images, but they’ve recently decided to allow us to do rectangular images. If you’re on a mobile device, you’ll notice a little double arrow in the bottom left that you can tap to change from square to rectangular. On the desktop browser though, even when pretending to be an iPhone, the image might come in really big and you won’t see the double arrow. Simply scroll up (and maybe even to the left) and you’ll eventually see the button.
Finally, you can hit Next, write your clever caption and then share. Sadly you don’t get the option to share to Facebook and Twitter but at least you can post a photo to Instagram from your desktop!
By the way, once the developer tools are visible in Safari, you don’t have to mess with that again. However you do have to change the user agent every single time you open Instagram, but it’s not too hard once you get used to doing it.
Chrome User Agent
We don’t want to leave our Chrome and Firefox friends out in the cold, right? They should get to play on Instagram too! We’ll start with Chrome, which is surprisingly unintuitive.
The good news is you don’t have to turn on the developer tools because they’re always available in the menubar. In the far upper right of any Chrome window, you should see three vertical dots. Tap on the dots, and choose More Tools, and then Developer Tools. If you’re a keyboard junkie, just use option-command-I to open them. (I imagine that’s control-alt-I for our Windows brethren.)
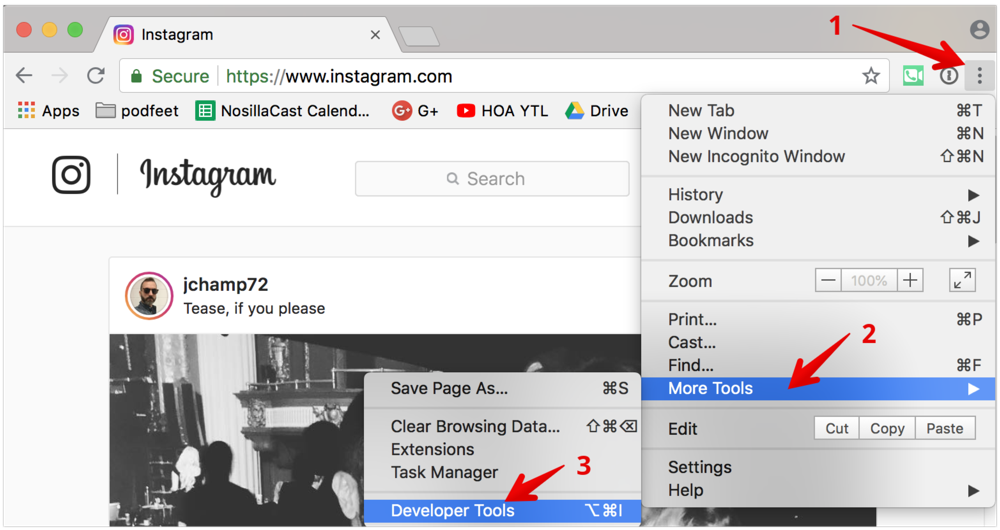
This turns on a big panel at the bottom of the Chrome window showing the Console which can be quite intimidating. It’s a confusing mess with many tabs and menus and other glop. If you can shield your eyes from all the glop, look for another set of three vertical dots on the far right side of this new panel you’ve opened. Choose More Tools again and this time choose Network conditions.
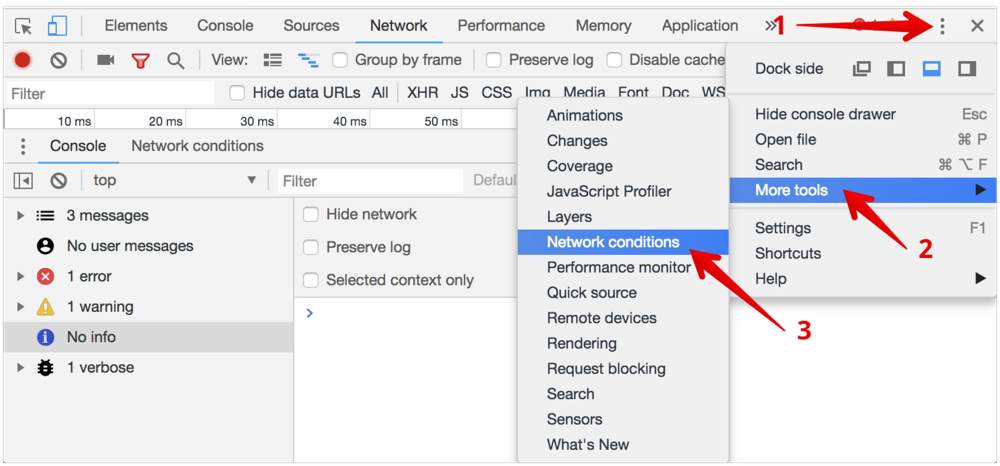
Things will get a little less intimidating (other than the 5 menu bars in this lower panel). You’ll finally see User agent and a checkbox that says Select automatically. Disable that check box and you’ll be shown a pulldown where you can choose your device. I chose Chrome iPhone.
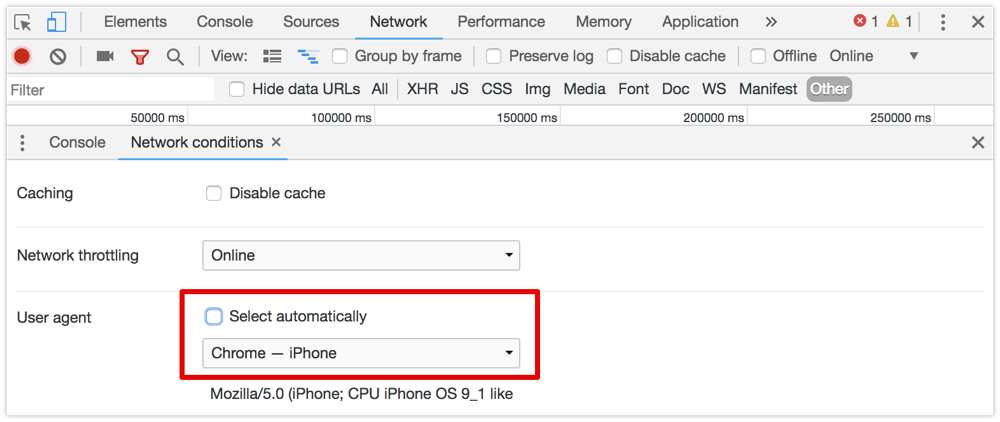
Unlike on Safari where it refreshes automatically when you change the User Agent, you will need to refresh Chrome to see the change to Instagram. You will now see the + button to add your images to Instagram. Sadly you have to keep this giant console pane open at the bottom while you play in Instagram. If you close it, Chrome refreshes and puts the user agent back to automatic.
I have to say, Chrome’s path to happiness is ugly and clumsy at best.
But one of the reasons people like Chrome is because of the vast extensions library. I did a quick search and found an extension entitled “User-Agent Switcher for Chrome“. With this extension installed, I now have a nice little button right in my menubar next to 1Password that I can tap and choose from an array of options, one of which is iPhone 6. This will give you the little + button on Instagram. If you love Chrome and you need to do this often, I’d sure consider using an extension instead of the glop-ridden Developer Tools Path!
Firefox
If you thought Chrome was complicated, it’s got nothing on Firefox! I found the instructions on howtogeek.com/… but they’re so geeky I didn’t even test them out! After how easy the extension was on Chrome, I went hunting for one for Firefox. I found User-Agent Switcher by Linder which is compatible with the latest version of Firefox (unlike some others.) It’s got 74K users and 3.5 stars so I gave it a whirl.
I have to say of all the solutions, this was the prettiest. Tapping on the extension in the Firefox menubar opens a pretty little grid of icons to let you choose mobile vs. desktop and which OS you want to use.
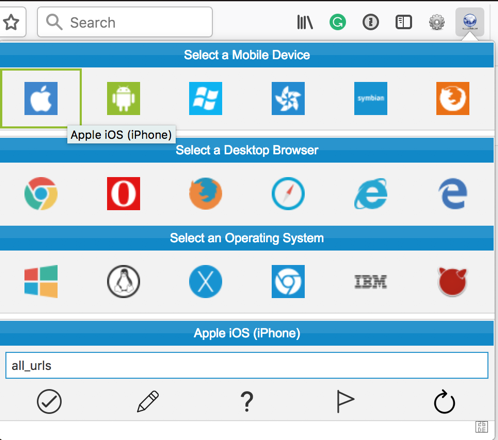
I tapped on the Apple logo under mobile, hit refresh on Instagram and there was my little plus button, ready to let me play like the cool kids.
Bottom Line
The bottom line is that I’m really annoyed that so many services are going mobile only. But in the words of one of my favorite geeks, Knightwise, we can make technology work for us! If you want to see pictures of Forbes and Tesla, and maybe a geek image from time to time, I’m @podfeet on Instagram.


That is a really nifty workaround.
I’ve been using Flume on my Mac to access and post to Instagram.
It can be a little buggy, but it’s nice having it in the menu bar.
What a great tip, Allison! Simple, yet effective!