A while ago a friend of mine contacted me because his father-in-law, Rich, had recently had a very sudden loss of vision. He knew that I dabbled in accessibility and wondered if I could help Rich get jump-started on what he could do to improve his situation.
I have to admit that I was a bit worried that they thought I was an expert in accessibility and that I would answer all of his questions and know everything there is to know and change his life. The risk of disappointing him seemed high, but I felt it was worth the risk to see if I could help him even with a few small things.
We went back and forth trying to find a good time for us to meet up, and months passed. Finally, last week we were able to arrange a meetup. I wanted to tell you about the experience in hopes that you’ll tuck some of these tidbits into the back of your brain for the future, just in case someone needs your help.
Environment
I deployed a few strategies that I think helped to make this a success. First of all, I went to Rich’s house rather than making him come to me. I wanted to see him in his own environment using his own tools in his own chair at his own desk. The other thing this caused is that I got to meet his family, and that also turned out to be important.
When I first got there, Rich and his wife very enthusiastically wanted to show me the tools he had gotten from the Braille Institute. The fact that it took ages to plan this meetup turned out to be advantageous because it gave him time to get some information from Braille, the people who actually know this stuff.
Magnifier
One very important thing to Rich was to be able to read a paper newspaper. At Braille, he’d acquired a hand-held magnification device. He was able to hold it over the newspaper, change the magnification and contrast for maximum clarity. He was quite taken with this device.
 I asked him to show me his iPhone, and he showed me that it was on a lanyard around his neck. His daughter had gotten him the lanyard and he found it very useful to keep from misplacing his phone.
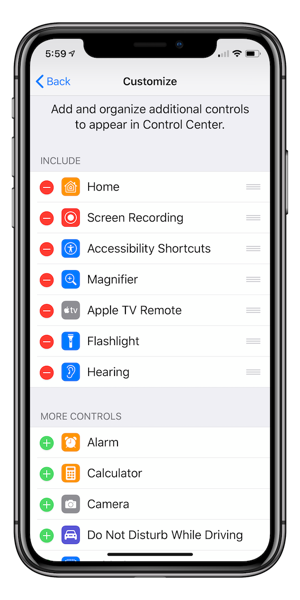
Not to take anything away from the device he got at Braille, I wanted to show him the built-in magnifier in iOS. I opened up Settings, Control Center and then selected Customize Controls. At this point, you can add and delete items from Control Center using the plus and minus buttons, and then use the hamburger buttons to change the display order of the chosen controls.
I added the Magnifier which looks like a magnifying glass with a plus on it in Control Center. Now when swiping up from the bottom of his iPhone 7 screen (it would be down from the top right on a more recent phone) he could select the Magnifier. The Magnifier is similar to the camera app, but it defaults to being zoomed up a bit. You can change the real-time zoom with a slider, and then more easily read whatever is under the camera.
I showed Rich how he could move the phone around and adjust the zoom to read his newspaper, just like he was able to do with his Braille-supplied device. He started using it but he didn’t get super excited about it. He thanked me for the idea but sadly said it just wasn’t going to work for him. He said it was far too blurry to do any good.
And then he realized that he was wearing the wrong glasses! He pulled out his reading glasses and exclaimed that the iPhone Magnifier was really great. We all had a good laugh about that.
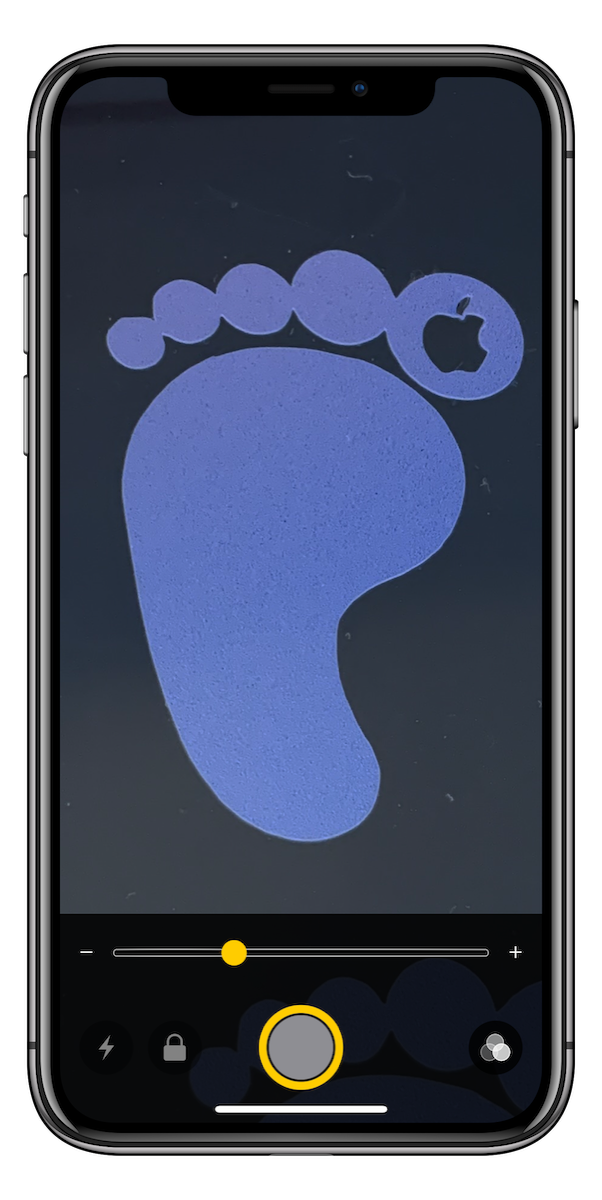 I showed him how with Magnifier you can tap the shutter button and it freezes the image. I use this all the time when I’m trying to read a MAC address or a serial number off of a tiny sticker on a piece of electronics. Once you freeze the image, you can use the zoom slider to zoom in and out on the image and you can pan around on the image.
I didn’t want to overwhelm him but there are a few other features I didn’t explain. You can turn on a flash inside the Magnifier, and there’s also a lock button which will lock the focus. You may be wondering why any of this is better than just using the camera app. Magnifier opens at a closer zoom than the camera app, and it’s designed to solve this specific problem. If you use the camera and take snapshots with it, you then have to zoom in manually and the shots fill up your camera roll with nonsense.
I didn’t notice it before writing this up, but there’s also a button to control brightness and contrast. Not only that, you can change the colors of what you’re viewing. With some forms of vision loss, notably macular degeneration, different color combinations are easier for different people. I tested Magnifier looking at some handwritten text in black on a white piece of paper. With the contrast controls, I could change the text to blue on white, or white text on a blue background. They have blue/yellow, inverted grayscale, black/yellow and black/red. I can’t wait to tell Rich about this!
Hearing
I mentioned that meeting Rich in person with his family was critical to how well this went. Rich is also quite hard of hearing and has Bluetooth-enabled hearing aids, but verbal conversations were still a challenge.
The family and I sat around the table chatting, and I could see a sort of disconnected look on Rich’s face as he sat quietly. After my father lost a fair amount of hearing, he used to get that same look when there was a lot of chatter in a loud room, which meant he really couldn’t follow what was going on. Knowing that Rich had the Bluetooth-enabled hearing aids, I had another idea.
We went back into Settings, Control Center, Customize Controls, and this time I added the Hearing control. Hearing allows you to enable what’s called Live Listen using AirPods or a vast collection of compatible hearing aids. I tapped on the Hearing icon, and it popped up a screen where I could select his hearing aids. I turned the feature on and placed his phone in the middle of the kitchen table.
I wish you could have seen the look on his face as he exclaimed with delight, “I can HEAR her!” At first, I didn’t understand, but the family explained that Rich simply cannot hear his daughter. She speaks quite softly, and evidently at a frequency that’s simply gone for Rich. But with Live Listen enabled on his iPhone, he could actually hear her again. They all chattered away to him with such pleasure that he could hear them all so much more clearly. That part of the visit made the entire trip worthwhile.
At this point, Rich’s wife exclaimed, “They didn’t tell us about that at Braille!” After a heartbeat, she said, “Oh wait, Braille is for the blind!” We all had a good laugh about that.
Listening to television when you’ve got hearing loss is a real challenge. Rich has a device that hooks up to the TV and pipes the audio over Bluetooth directly to his hearing aids. It works great, but when they’re in this mode, they don’t pass any ambient noise to his ears so he can’t hear his wife when she talks. We thought maybe Live Listen would work to solve the problem, so we put Rich’s phone between the TV and his wife and asked him how it sounded. Unfortunately, the TV didn’t come through clearly for him at all. To be fair, the TV audio was pretty bad, coming through the built-in TV speakers. Oh well, they can’t all be winners.
Mac Accessibility
It was time to go into Rich’s room where he works and plays on his iMac. My friend had done a lot to improve the readability for Rich, lowering the screen resolution and setting fonts as big as they could go. He’d turned on zoom for the dock so the icons were huge as he slid his mouse across allowing him to easily see which app he wanted to launch. My friend had also taught Rich to use ?+ to increase the font size on web pages and ?- to decrease the font size. So things were looking pretty good so far.
But then Rich opened Adobe Illustrator where he does a lot of artwork for his surfboard design company. Yes, he’s still designing and enjoys the heck out of it. He showed me how the layers panel is wee tiny and he can’t see anything there at all. Again, this is why going to his house was critical to figuring out what he needed.
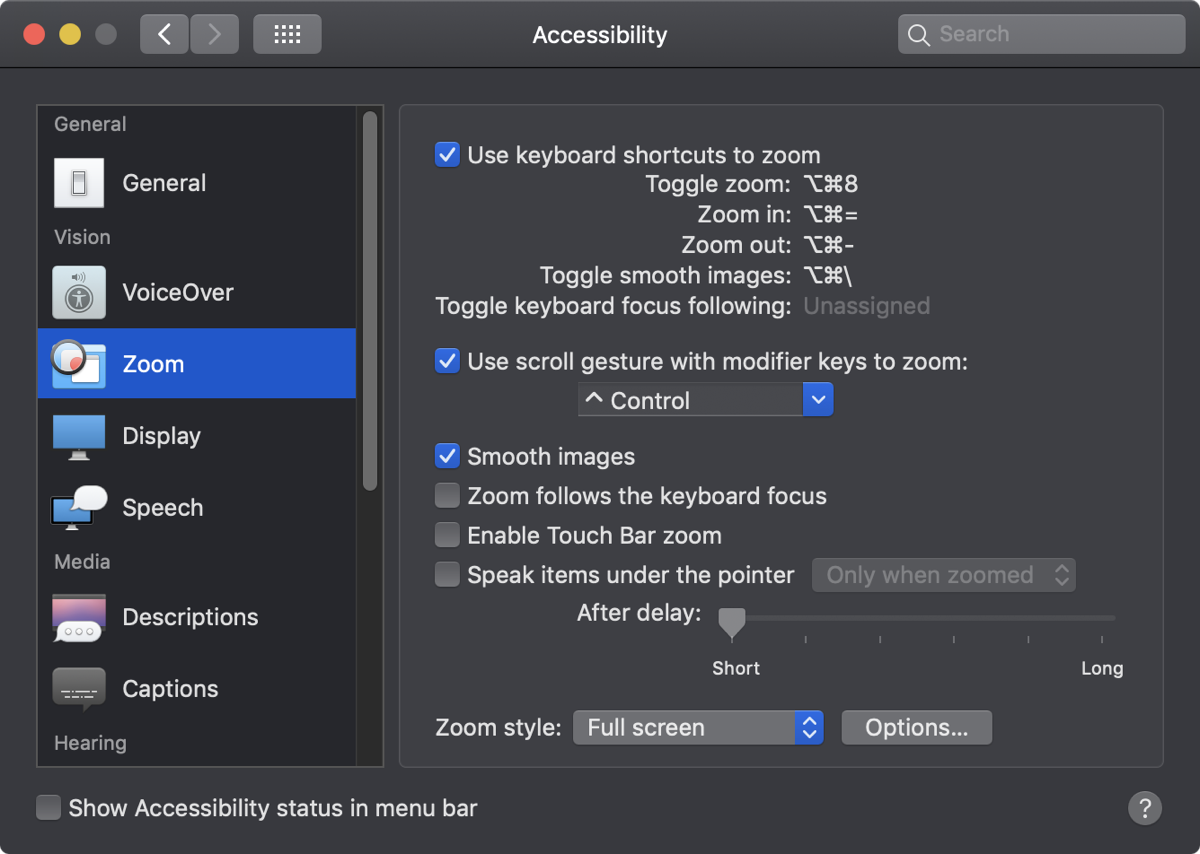 I turned on one of my personal favorite accessibility features of macOS called Zoom. I like to configure it as follows. In System Preferences, Accessibility, select Zoom in the left sidebar. Then find the checkbox for Use scroll gesture with modifier keys to zoom. By default, it will be set to use the Control key, or you can change it to Option or Command.
Once you have this checkbox turned on, you can set the Zoom style at the bottom of the window. I personally find it’s easiest to use when it’s set to Full Screen. With Zoom enabled as I’ve described, you simply hold down the Control key and scroll up on your trackpad or mouse to zoom in right where you’ve left your cursor.
It seems to be natural to leave your cursor where you’re trying to see something, so control-zooming to that point is natural. If you’re trying to click on a menu it’s even more likely that you’ve got your cursor near where you want to see. Once you’ve read what you need to see, you simply control scroll down to return to normal. I use this all the time and have for the last 10-15 years.
The other option, which I don’t favor, is to set the zoom style to picture-in-picture. This brings up a rectangular window in which the zoom is presented. It makes me feel claustrophobic like I’m using a magnifying glass instead of the whole window zooming up. I easily get lost. It’s good that it’s an option, but like I said I like full-screen zoom much better.
Zoom has quite a few other options, like controlling the minimum and maximum zoom and a lot more, but just that setting by itself works wonders for me.
I showed Rich how to use control-scroll and it took him quite a few tries before he got the hang of it. I actually lead him astray at first, because I use a Magic Trackpad and he uses a Magic Mouse so I think I told him to use 2 fingers instead of 1 to do the scroll. But he persevered and kept working at it to get the gesture right until finally, it started to be a natural motion for him.
Once he got the hang of it, he zoomed in on the layers on Adobe In Design and expressed joy that he could see the little eyeball to turn the layers on and off again. To be able to do this again was such a happy thing for him.
iOS Access for All
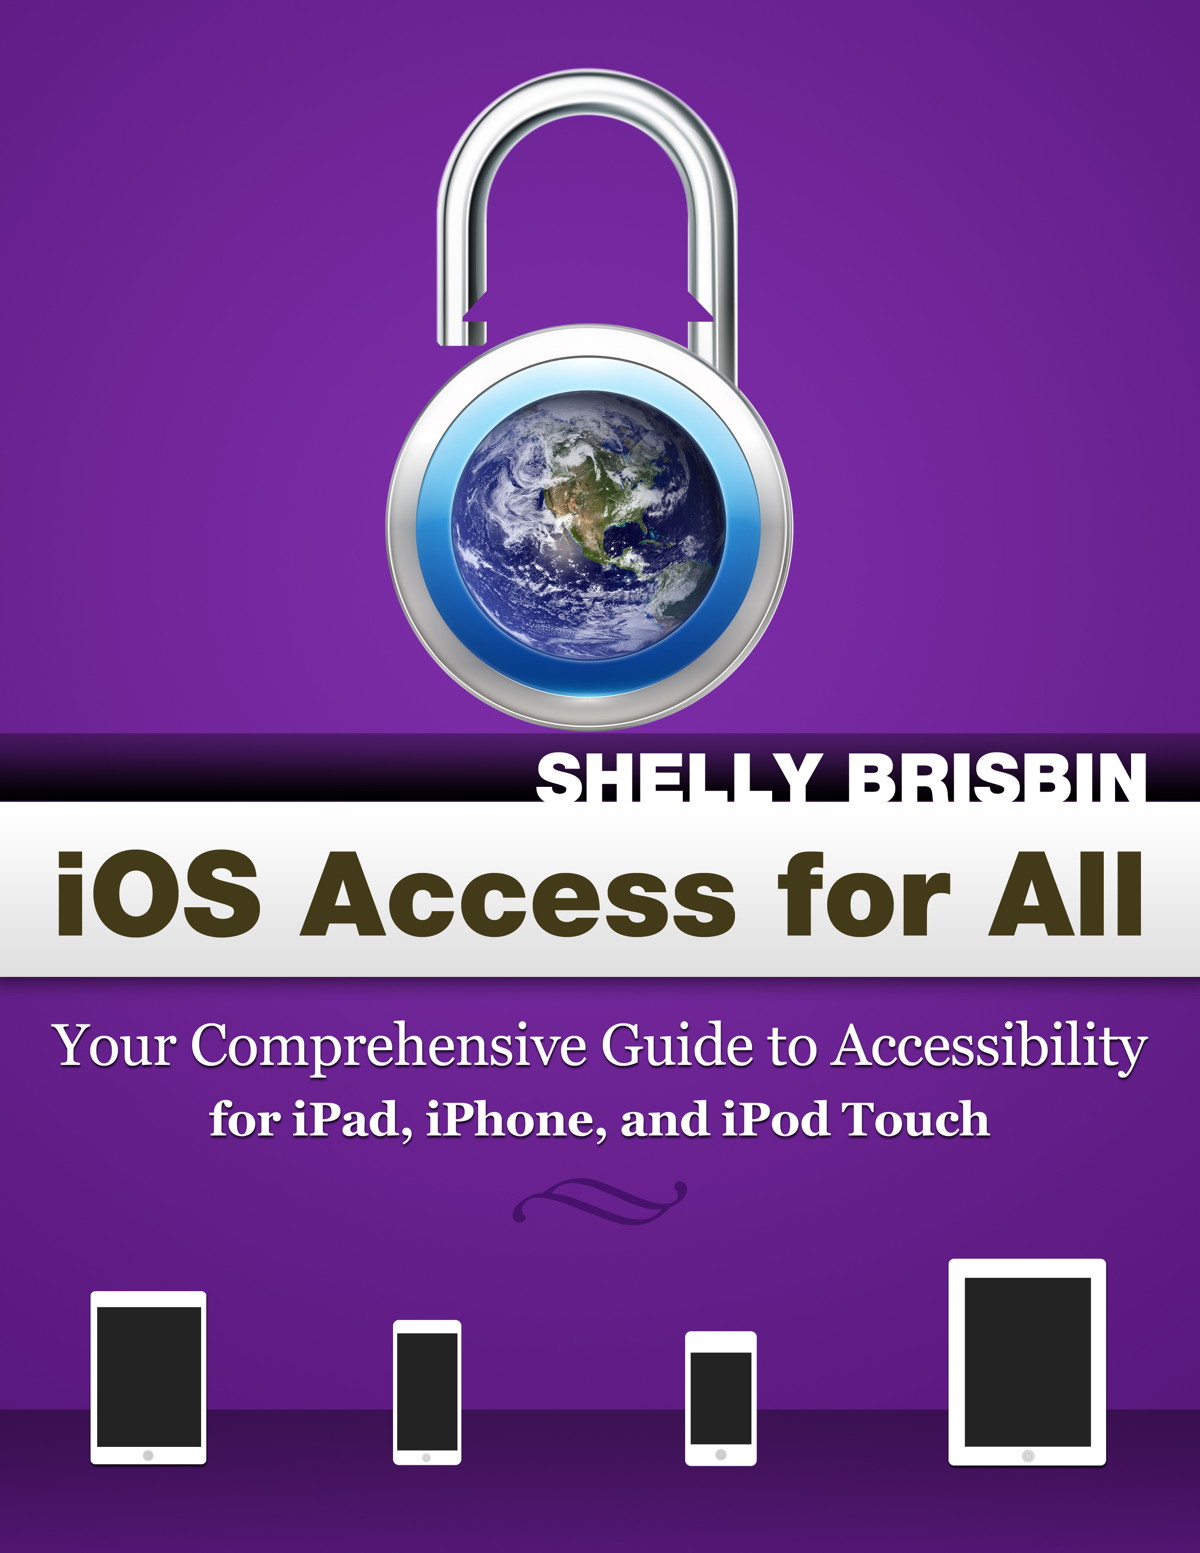 The last thing I did before I left, was buy him a copy of Shelly Brisbin’s book “iOS Access for All” from www.iosaccessbook.com/…. This book is sort of like the manual Apple should have written, all about the accessibility features of iOS. I imported it into Apple Books on his Mac and showed him how he could increase the font just like he does on Safari using ?+ and he was off to the races. I could tell if I left right then, he’d be absorbed in the book for quite a while. By the way, “iOS Access for All” is currently about iOS 11, but the iOS 12 version is going to be published any day now.
Success
I have to say that above all, the reason this effort was so successful was Rich’s attitude. He didn’t just try things once or twice and give up because it was too hard. He kept at it. He was motivated and he enjoyed learning. I have to say, I want to be like Rich when I grow up.


Zoom has quite a few other options, like controlling the minimum and maximum zoom and a lot more, but just that setting by itself works wonders for me.