I’m sure you think I’m on the payroll of Rogue Amoeba by now (I’m not). But this week I want to tell you about yet another great app they make called SoundSource. This week Rogue Amoeba released SoundSource 5 and it’s even better than before.
SoundSource is a menubar app that allows you to control not only your microphone input and speaker output, but it can actually control your application audio. I’ll explain more about that shortly but you may be asking what problem we’re trying to solve first.
The Problem to be Solved
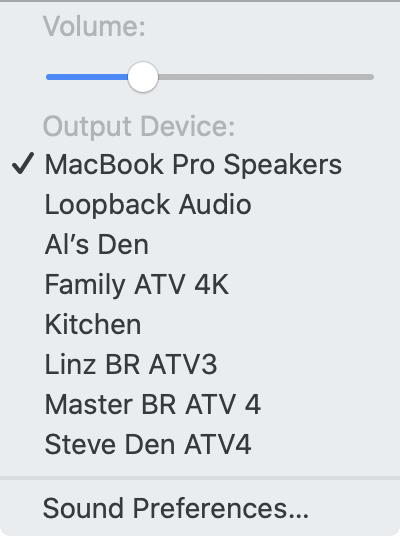 If you’ve been a Mac user for any length of time, you know you can control the input and output devices and alert sounds using the Sound Preference Pane. You probably know you can view the speaker controls in your menu bar to let you switch output device and change the volume. You may not know that holding down the option key while clicking on the sound icon in the menubar reveals the ability to switch your input microphone as well.
While this works just fine, it is cumbersome to open Sound Preferences, and the menubar app is so limited it’s not that useful. Another big problem these days is that audio is playing from so many different applications and we don’t always want their audio to go to the same output or be at the same volume. You may have YouTube playing in a Chrome window, audio from a VOIP call in Zoom or Skype, your iPhone rings on your Mac and you answer it there, and maybe you’ve got audio coming from Messages when you’re screen sharing, or using Discord for audio chat. Obviously you’re not doing all of these things at the same time, but each use case can require changing your output device and volume.
Another problem is that your Mac may have really low volume speakers and you wish you could turn it up louder. Maybe the speakers are tinny-sounding and you’d love to bring up the bass and make them sound better.
System for Output, Input and Sound Effects
Let’s see what SoundSource can do and whether it will solve these problems (spoiler, it does). SoundSource is a menubar app that will replace Sound in your menubar. Let’s walk through what you’ll find when you hit the SoundSource menubar icon. When it flips down you’ll see two major sections: System and Application.
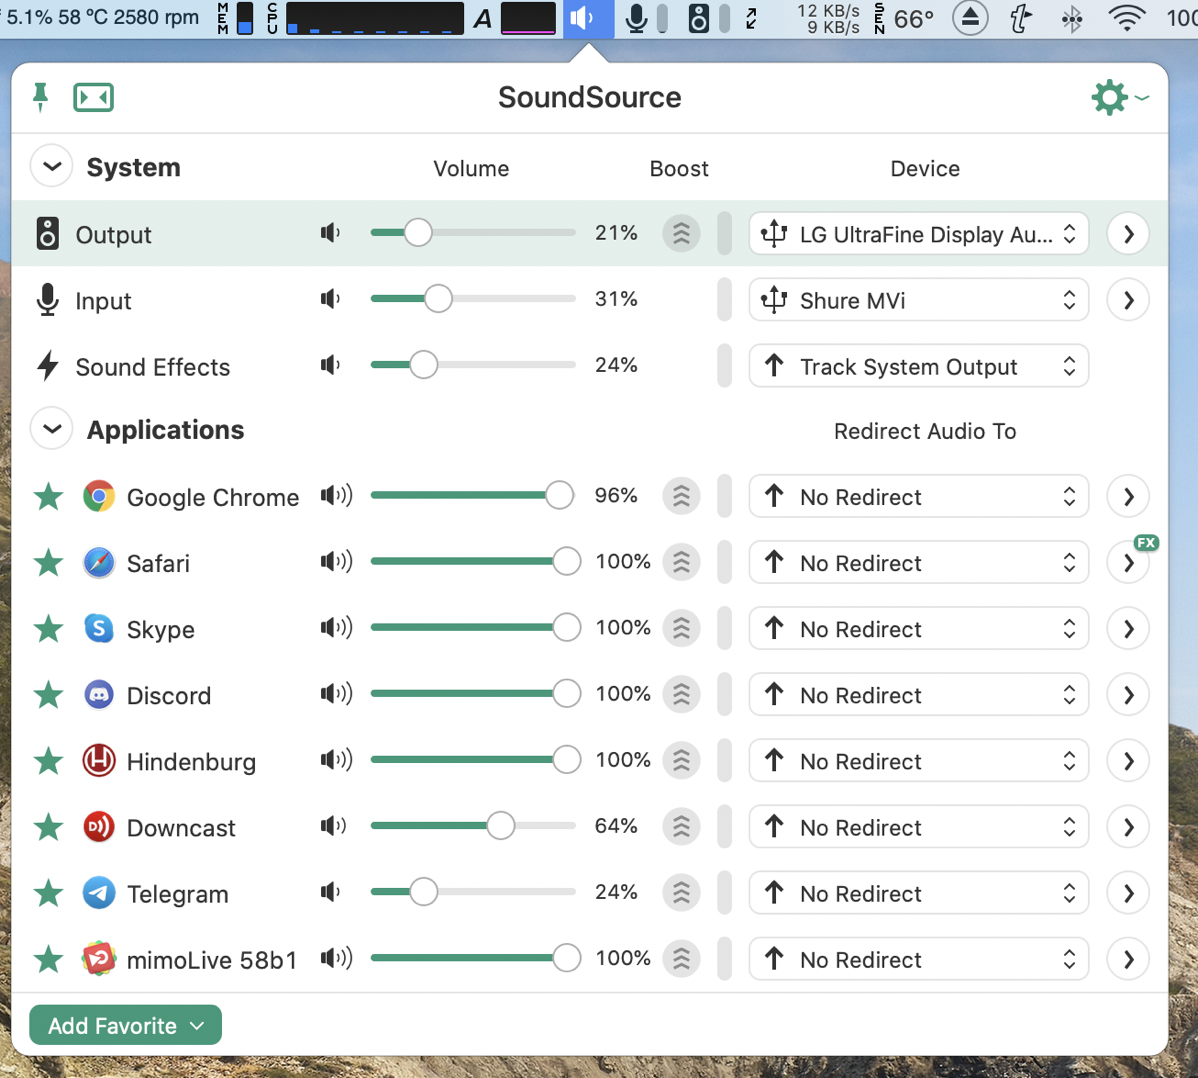
System is where you’ll find your Output (speakers/headphones), Input (microphones) and Sound Effects. Right off the bat you’ve got quicker access to the controls than opening Sound Preferences, by having all of this in your menu bar.
Just like Sound Preferences, with these three control areas in SoundSource you get can adjust volume and redirect which device is used for the audio, but you can do a lot more than that. For example, if you tap the chevron to the right of the Output controls, it reveals several options. You can change the balance of your speakers, you can change the sample rate from 44.1kHz to 48kHz, and you can add audio unit effects.
By default, SoundSource has a 10-band equalizer turned on, with the profile set to flat. If you tap on it you can change it to Bass Booster for example to make your tinny speakers sound better. Of course there are more profiles, and you can also modify every one of the 10 bands manually. You can add more Apple audio unit effects via a dropdown, effects like reverb and compressors, and more.

I want to mention right here that if you’re already a SoundSource user, I want to point out some of the improvements in SoundSource 5 over previous versions. The most significant difference you’ll notice right away is that the user interface has been drastically improved. In general, everything is much more compact. If I’d had one complaint about SoundSource 4, it was that the window was HUGE.
If we take the example of the 10-band equalizer I just mentioned for your Output device, in SoundSource 4 the equalizer controls for each band were embedded in the main SoundSource window. In SoundSource 5, tapping on the words 10-Band Equalizer pops it out to the side of the window instead so it’s not taking up space until you need it. SoundSource 5 is full of these space-saving improvements and I’ll mention more as I go along.
Applications
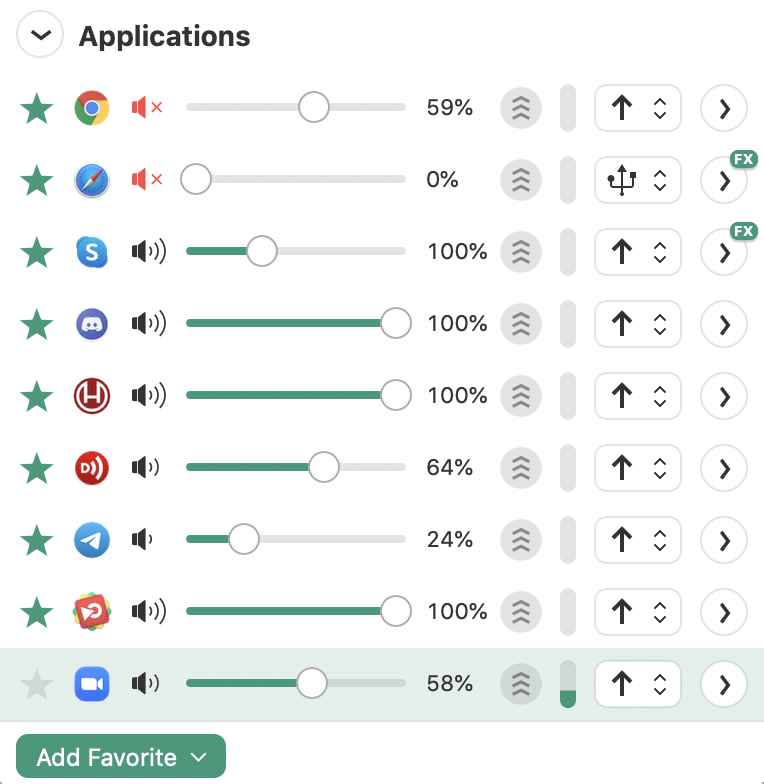
Below the System controls for output, input, and sound effects you’ll find a section for Applications. Speaking of space-saving in SoundSource 5, I love how now you can fold up the Applications section when you don’t need to see it. More than half the time I need to mess with my sound, it’s not a specific application I want to control, so having just the System settings showing is awesome. If you find you more often mess around with your Applications, then you’ll be happy to know you can hide the System settings and just see Applications.
Probably the coolest feature of SoundSource is that each Application has its own volume control and can be muted with a single click. I find this incredibly useful in my daily life. Here’s an example.
This week SpaceX had a test firing of their Starship test vehicle. The test was on again off again over the course of two days. Steve was keeping tabs on it the whole time and let me know when it looked like it might be about to happen. I launched Safari and went to the Everyday Astronaut’s YouTube channel, and set the volume on Safari to about 10%. If I concentrated, I could hear when things were happening but most of the time it was quiet enough that it didn’t bother me. I didn’t disturb my system volume which stayed set at around 50%. By the way, watching what looked like a giant grain silo fly was pretty cool!
You get to choose which applications show in SoundSource 5 by using the Add Favorite button at the bottom left, and you can click on the star next to an app to remove it from the Favorites list. You can also drag the Favorite applications up and down to put them in the order that makes the most sense to you. Even if an app is not a favorite, it will show up in the list when you start to play audio through the app and disappear when it stops.

In addition to being able to control each application’s volume and mute them individually, you can redirect each app to a different output. Maybe you always want Apple Music to go to your nice external desk speakers, but you always want your Zoom calls to go to your headphones. No more switching back and forth – all apps go where you want them to go and they stay there.
Every app can have added effects, similar to how it works for System Output. By default, you’ll see the same 10-Band Equalizer but also something called Volume Overdrive. I’ll get to that in a minute but first I want to explain Magic Boost. You’ll see a small icon next to the volume control for the system Output and all of your favorite applications, under a heading labeled Boost. When enabled Magic Boost increases the volume of quiet audio, leaving louder portions untouched. Think of Magic Boost as a real-time leveler.
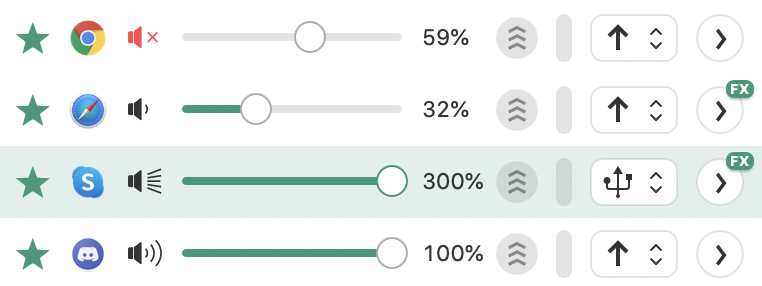
But if you want to take your speakers past what you thought they could do, activate Volume Overdrive. You’ll see an on/off toggle and then you can choose from 1x to 4x volume Volume Overdrive. By default, Volume Overdrive is set to 1x and if you click on 2x you’ll see the volume slider jump down halfway, but it will say 100%. I know that sounds funny, but now if you move the slider up, you get very granular control over how much you overdrive the speakers. The max of the slider is now 200%. The same kind of adjustment happens with 3x and 4x. Volume Overdrive should probably be used sparingly to avoid distorted output but with this level of control, it may provide an effect that helps you hear better.
In my testing, I set Skype to 3X with Volume Overdrive and forgot about it. Later, I looked back at SoundSource and noticed that the little speaker icon was looking decidedly shouty! That tiny graphic was enough to remind me to set it back to normal.
SoundSource is Accessible
Rogue Amoeba is best-in-class when it comes to the accessibility of their apps. They don’t tack on accessible buttons after the fact, they start the design from the ground up accessibility built into the foundation. I tested SoundSource 4 with VoiceOver and found that it worked really well. As I advanced through the app, it would tell me where I was (output vs. input vs. Safari) and when I stopped moving with the keyboard shortcuts for VoiceOver, it would tell me a lot about what I could do at that point.
But when I tested VoiceOver using SoundSource 5, it didn’t behave as nicely as SoundSource 4. I am not an expert at VoiceOver, and in fact “low novice” would be a better description of my skills, so I’d like to hear from some of my visually impaired buddies before I say definitively that this needs some work. It’s hard to describe exactly what the problems are because I seemed to get inconsistent results. The focus would jump around somewhat unpredictably one time through and then the next time it seemed to follow a natural progression that made sense. Sometimes buttons told me their functions and the next time the same button would simply tell me it was a toggle. I’d sure like someone more skilled than me to take a walk through it. If you do have VoiceOver skills and check it out, please let me know how it works for you.
Special Sources
I explained earlier that you can add Favorite apps to SoundSource to control their audio, and under that same button you can add Special Sources. These include Finder, Siri, Text to Speech and VoiceOver. Having the ability to separately control the volume and sound profile for Siri and VoiceOver is pretty handy.
Still too Big?
I said upfront that the new interface of SoundSource 5 is much more compact than its predecessor but they even provided a window resize button that squishes it up even more. I love this because you can have it nice and wide when you’re modifying things like the Equalizer and other effects, but then make it nice and tight with just what you need showing the rest of the time.
A nice touch with Rogue Amoeba applications is that you can often “tear off” their windows so they can be floating. With SoundSource as a menubar app, it pops down and then back out of the way when you click off of it or hit escape. But I need to use SoundSource so often, I usually tear it off so that it floats at a location of my choosing and I always have access to its controls.
Menubar Icons

SoundSource 5 comes with a few optional extra menubar icons that might be useful. The main icon looks almost exactly like the system volume icon, and you used to be able to toggle it to a different look so they wouldn’t get confused but for some reason they took that out. Maybe they’re really encouraging us to just disable the normal Sound icon in our menubar.
In SoundSource 5 preferences, you can enable three different menubar meters for the default output device, default input device, and active applications. The first two are kind of obvious, you get a microphone icon and a speaker icon, and if audio is flowing the little meter next to them bounces up and down. In addition, clicking on those icons instantly disables their audio. This means you have a really quick way to mute your mic which is something we all need.
You can also choose to show Active applications. Now don’t get worried, it isn’t all of your favorite applications, it’s just whichever ones are making noise. So if you start playing a YouTube video in Chrome, a little monochrome version of the Chrome icon appears. The meter is helpful but even better clicking on the icon instantly mutes Chrome. How many times has an app started to autoplay and you were scrambling for how to shut it up? SoundSource could come in handy for that.
In my testing, I had a lot of trouble controlling Safari using SoundSource 5. It didn’t respond to trying to mute it or control the volume. It also doesn’t show up in the menu bar for me when audio is playing. Here’s the good news. I filed a bug report with Rogue Amoeba, and in a few hours they were able to replicate the issues and they’re working on a fix as we speak.
My New Favorite Use Case
When Steve and I do the live show, we have a nuisance-level problem for which I’ve been seeking a solution for the last couple of years. During preshow, before the video goes live on YouTube, we like to chat in audio to people listening in the Discord app. When the show goes live, we switch over to chatting using mimoLive, the software that puts all the different video and audio sources together for YouTube. If we keep our headphones active on both Discord and mimoLive the entire time, we hear each other twice (with a little delay) which is super annoying.
So every time we switch, which is three times per show, we both have to tell a given app to not let audio go to our headphones. As I said, it’s just a nuisance, but on Discord alone, it’s four mouse clicks. Gets old REALLY fast. I was showing Steve SoundSource, and we simultaneously realized that SoundSource is the perfect solution for this. One click to mute Discord, one click to unmute mimoLive. That’s about as efficient as it could be.
I know that one isn’t a top use case for you, but I bet if you start messing around with SoundSource I’m sure you’ll find your own interesting problems to be solved.
Bottom Line
SoundSource runs on macOS 10.13 (High Sierra) and up, with a free, fully-functional trial available for download. SoundSource is normally only $39 but it’s on sale for an introductory price with SoundSource 5 of $29 right now. If you own a license of SoundSource 4, you can get an upgrade to SoundSource 5 for $19. If you bought SoundSource 4 after May 1st, it’s a free upgrade. I was sure glad to see that since I bought Steve a copy of SoundSource 4 just last week!
I love SoundSource and I’ve been able to find some really creative solutions to my problems with it.

