The Problem(s) to be Solved
Hold your hand up if you’re on a lot of Zoom calls these days. Everyone, right? We’re connecting with friends, we’re getting work done and while it’s exhausting to be on air so much, Zoom really is filling a need we have.
The ability to share your screen or just a single application on your screen makes it easier to explain concepts and truly communicate. You know I am not a fan of presentation programs, but show me an Excel spreadsheet and you’ve got my attention.
But what if you need to share analog information, something that’s not on a computer screen? If you’re only using your laptop’s built-in webcam, you have to hold things up to the camera and which doesn’t work very well. The lighting on the camera blows out whites, you can’t see if you’ve got things in frame, the camera is flipped so you keep moving in the wrong direction and invariably the webcam can’t focus at the distance you’ve chosen.
If you’ve got a discrete webcam, you’re a little better off. You can yank the camera off the top of your monitor to point at the real-life object. The bad news is that the view from your camera will surely give your fellow collaborators motion sickness as you wildly swing the camera around to get it in position.
As you get closer to showing what you want to show, you have to keep looking up at the small thumbnail onscreen of your own camera while also looking at the object of interest with respect to the camera. You may eventually successfully show off the item in question and successfully convey what you had hoped, but the journey isn’t pleasant or smooth.
Zoom’s Built-in Screen Mirroring
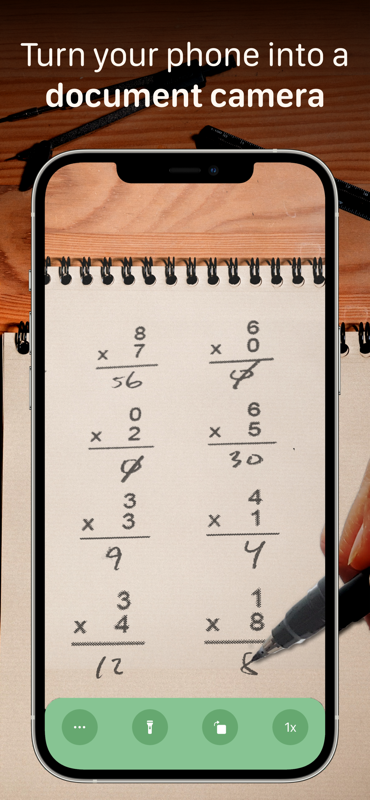
There’s a very simple and elegant iOS app that may solve this problem, and it’s called Overviewer by Charlie Chapman. As Charlie explains on his website at charliemchapman.com/…, his wife is a kindergarten teacher and his goal was to allow her to use her iPhone as a real-time document scanner for the virtual learning environment.
A document scanner is a physical table on which you place a document, with a camera mounted on an arm up above it, and often with a light source so your document is more clearly readable. A teacher, like Charlie’s wife, would put paper under a document scanner and show the children how to write their letters. He wanted to replicate this functionality with an iPhone. You may not be an official teacher, but you’ll be able to use Charlie’s Overviewer app to show your collaborators anything in the analog world.
Charlie started by taking advantage of a built-in utility of the Zoom application. In the Zoom interface, you’ve probably noticed that there’s a green Share Screen button at the bottom of the window. When selected, Share Screen allows you to choose from specific windows on your screen, but it also has two iOS-specific options. These options are to share an iPhone/iPad via AirPlay or via Cable. I had never noticed these options until Charlie pointed them out.
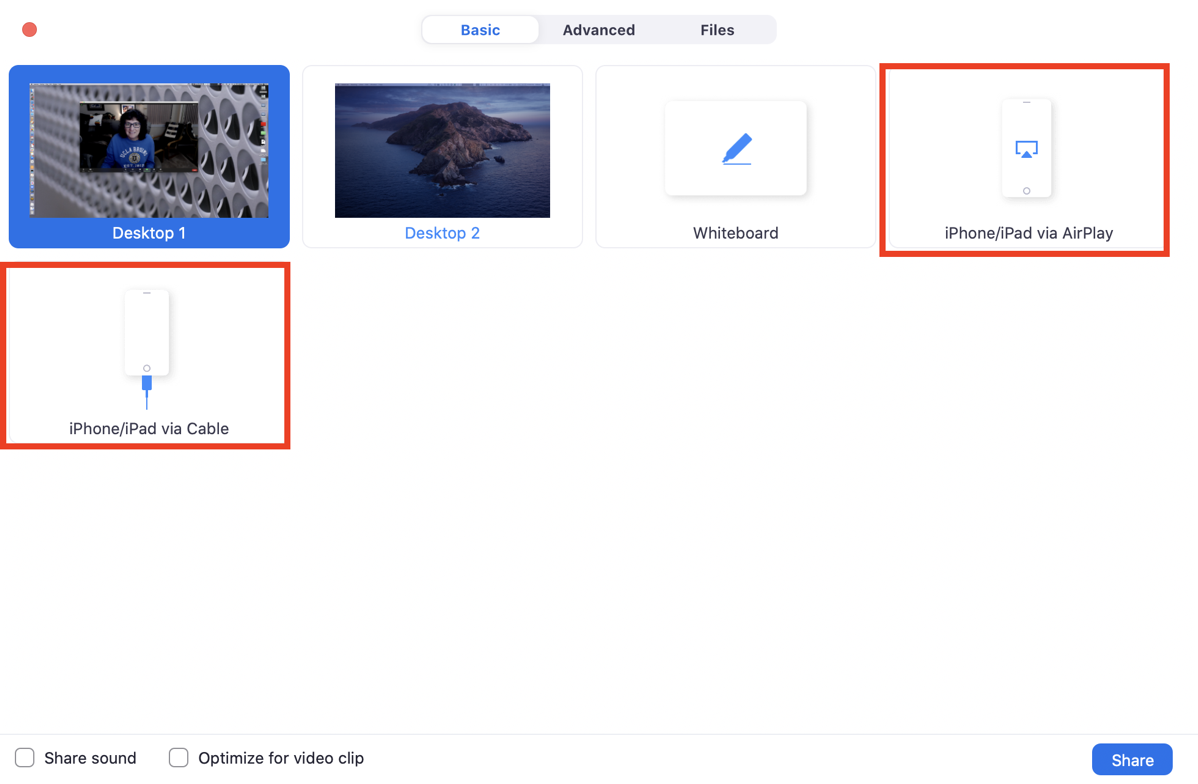
If you choose to share your iOS device via cable, you’ll immediately be able to see your iPhone’s display as a shared window inside the Zoom application. If you choose to share your iOS device via AirPlay, Zoom will put a big notice up on screen telling you the three easy steps to enable AirPlay.
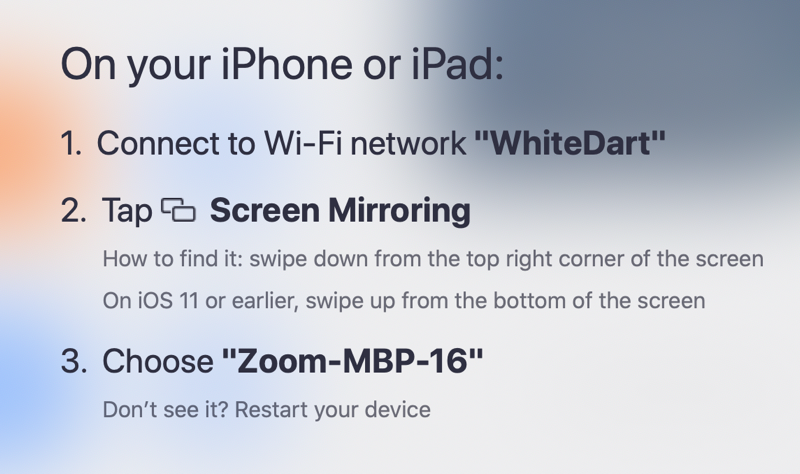
First, connect your iOS device to the same network as your Mac. Second, select Screen Mirroring from Control Center. Zoom even tells you how to find Control Center on iOS, including instructions for iOS 11. The last step is to scroll through the devices on your network that are AirPlay-capable until you get to the one entitled Zoom- followed by the name of your Mac. My Mac’s name is MBP-16, so mine says Zoom-MBP-16.
You’ll now be sharing your iPhone’s screen with your audience on Zoom. Pro tip: Before you start sharing your iPhone’s screen to Zoom, make sure you don’t have anything private opened.
At this point your audience can see, say the home screen of your iPhone. Remember Charlie’s wife wants to show the kids a paper on which she’s drawing letters. Before Charlie wrote the app Overviewer for her, she used the built-in camera app on the iPhone. This isn’t a terrible idea, since it does allow her to point the phone’s camera, but it isn’t the best experience.
Your viewers will be able to see what your camera sees, but the camera app on iOS has a lot of extraneous information overlayed on the camera’s view.
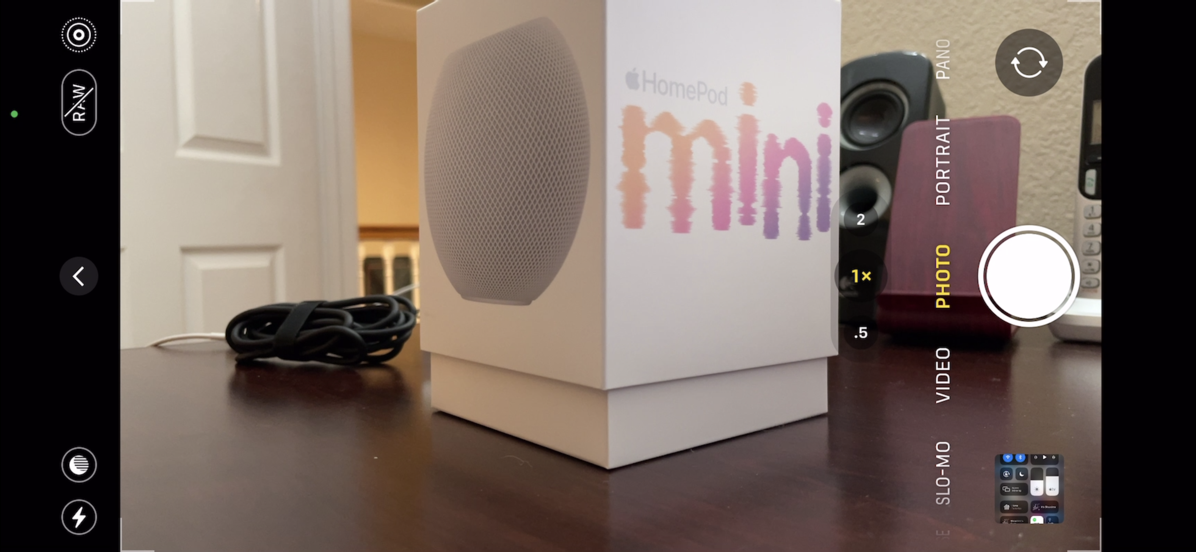
Open the camera app on your phone. Every single option available to you will show onscreen to your viewers. The shutter button, options to switch to video or pano or slo-mo, options to toggle live and night mode. They’ll see the last photo you took in that little thumbnail. Not exactly a distraction-free experience for them, is it?
Why Overviewer is a Better Experience
With the free Overviewer app, you can give your fellow collaborators or students a much better experience. When you launch Overviewer, all you get is the entire screen as a view through your iPhone’s camera. There are literally zero distractions for your viewers. There’s no shutter, no live, flashlight or night mode buttons, no options to do video or portrait, and most importantly they don’t see the last photo you took in that little thumbnail.
If you tap on the distraction-free screen Overviewer, a menu with just a couple of options will be revealed. One option is to watch Charlie’s little instructional video where he demonstrates how his wife props up her phone to make it a proper document viewer.
You’ll also get a button to enable the flashlight to light up the object you want to show, you can rotate the screen, and you can flip between the lenses of your iPhone’s camera, which may include .5x, 1x and 2x depending on the model of your iPhone. Charlie’s wife props her phone up high on a stack of books (with more books on top to stabilize it) so the 2X zoom is helpful for framing her paper properly.
Real-life Use Case
Obviously, Overviewer is a great way to use your phone as a document scanner when teaching. But you can use it for all sorts of fun. The other day, Steve and I had a different use for Overviewer.
For Christmas, Steve got a really cool present from our son Kyle and his wife Nikki. They got him a little kit to build a model of a Stirling Engine. This little kit was a blast to assemble (Steve let me help) and when completed is a really nifty demonstration of the fundamentals of thermodynamics.
The ideal gas law says PV = nRT. In this equation, R is a constant and n can be considered constant for the sake of this demonstration. So the ideal gas law essentially says that pressure times volume equals temperature. If you have a closed volume (V can’t change), then if the temperature is raised, then the pressure must go up proportionally.
This Stirling Engine has a sealed chamber with a piston in it. Under the chamber is a little reservoir where you put alcohol, and a wick coming out of it. When you light the wick, the air inside the chamber heats up. Since the temperature goes up, the ideal gas law tells us the pressure must go up. When the pressure goes up, the piston will move to increase the volume, thereby relieving the pressure.
Now the cool part is that this model has a series of linkages and a flywheel, which is in turn connected to another sealed chamber with a piston in it. So as our first chamber heats up, its piston moves out, which compresses the piston in the second chamber, but the rotation of the flywheel and that increased pressure moves the linkages to push the piston back into the heated chamber, and around and around it goes.
This Stirling engine can’t overcome static friction, so you do have to give the flywheel a little spin to get it started, but once it gets going it goes REALLY fast and continues until the reservoir of alcohol is emptied. Learn more about Stirling Engines here.
ANYWAY, what’s this got to do with Overviewer?
We have a weekly meet up with a group of friends which we call Wine Wednesday and of course, this takes place over Zoom.
On the agenda this week, Steve wanted to show off his Stirling Engine. He was going to try to hold his Logitech c920 in his hand while lighting the wick for the 99.5% pure alcohol, but instead quickly downloaded Overviewer, selected his phone over AirPlay from the Screenshare window, and turned on AirPlay mirroring as instructed. Now the audience was able to see Steve through his webcam and also see a nicely-steadied video of the engine at work. I put a little video in the shownotes of it running so you can see how cool it is.
Bottom Line
The bottom line is that this wasn’t just an excuse to show off my thermodynamics knowledge. Overviewer is a terrific little app that solves a real problem. I’ll be using it for a secondary camera on a regular basis. Overviewer is accessible with one caveat. I’m going to suggest to Charlie that he have the icon for the flashlight change when it’s enabled, because VoiceOver doesn’t know on vs. off. Go check it out and have some fun with it. Also, tell every single iOS-using teacher you know about Overviewer.

