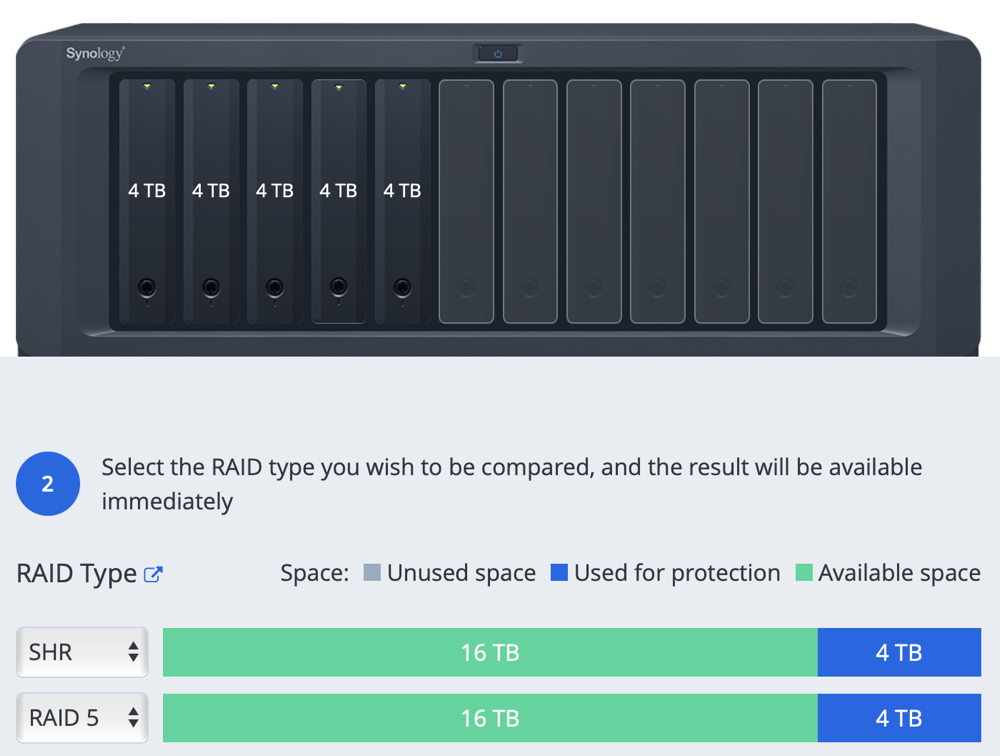
About 9 months ago I bought a Synology Disk Station which is a network attached storage device, also known as a NAS. I bought the DS1019+, which is a 5-bay unit, and populated it with five 4TB Western Digital drives. 20TB sounds like a massive amount of storage, but you don’t actually get nearly that much.
One of the main purposes of having a NAS is to have data protection. It’s not really a backup, but a disk can go bad in your array and all of your data is still safe. This is done with a technology called RAID 5 which stands for redundant array of inexpensive disks. The word “inexpensive” is in the name because you don’t have to buy one giant, expensive drive, you can buy lots of smaller drives and create one giant volume in the array.
In order to be able to have a disk go bad and still have all of your data, by definition my 20TB of purchased disks could never give me more than 16TB. In order to keep track of where the data is on the five drives and keep it striped across them to provide the fault tolerance we talked about, you need some space dedicated to run those calculations, and that space is called parity.
Synology provides a RAID storage calculator so you can virtually build your array with the drives you can afford, and then see how much usable storage you’ll effectively get. It’s actually pretty fun to play with, but it’s also rather depressing. It demonstrates the storage with either RAID 5, or with their own Synology Hybrid RAID, or SHR. I have to admit right here that I went with SHR because Steven Goetz told me to.
The bottom line is that with my 20TB of purchased drives, I get just 14.54TB of usable space of my 20TB worth of raw disk.
The problem to be solved is figuring out how I used up nearly all of my storage in only 9 months, and how to gain some breathing room without selling a kidney.
“It’s About Time, It’s About Space…”
We have several categories of data on our Synology:
- Financial and medical data that we don’t want stored on any of our computers and definitely not in the cloud
- Steve’s video files – both his completed videos but also all of the raw source data
- My audio files from the podcasts – both the published MP3s and the raw audio input
- Our ripped DVD collection allowing the Synology to be a PLEX server
- Scanned photos from our physical photo albums
Since the initial installation only 9 months ago, we’ve used 81% of the available space which sends the Synology into high alert status. It was time to look at the storage we’re using, and see what we can throw away. For example, do I really need Bart’s original stereo recording of every Chit Chat Across the Pond, and my original stereo recording of the same Chit Chat Across the Pond, and the Hindenburg version which contains the same stereo data, and the m4a which includes the same data, and the MP3 which is easily available on the Internet? Probably not.
Whenever I start down the path of trying to remove data from a drive, I make sure to start with the biggest types of files. You can spend three weeks throwing away text files and you’ll gain a few hundred megabytes. Get rid of photos and you might clean out a GB in that length of time. Cull your videos and you’re talking hundreds of GB with the same level of effort.
The next step after starting down the spring cleaning path is to think, “Could I just throw money at this problem instead?” Then you can make a tradeoff to decide whether to spend money or time.
Replacing 4TB Drives with 8TB Drives
The first thing I considered was just replacing some of the 4TB drives with 8TB drives. As depressing as it was to fill the Synology up with drives in the first place and to only be able to use 70% of what I put into it, it was even more depressing to look at replacing drives.
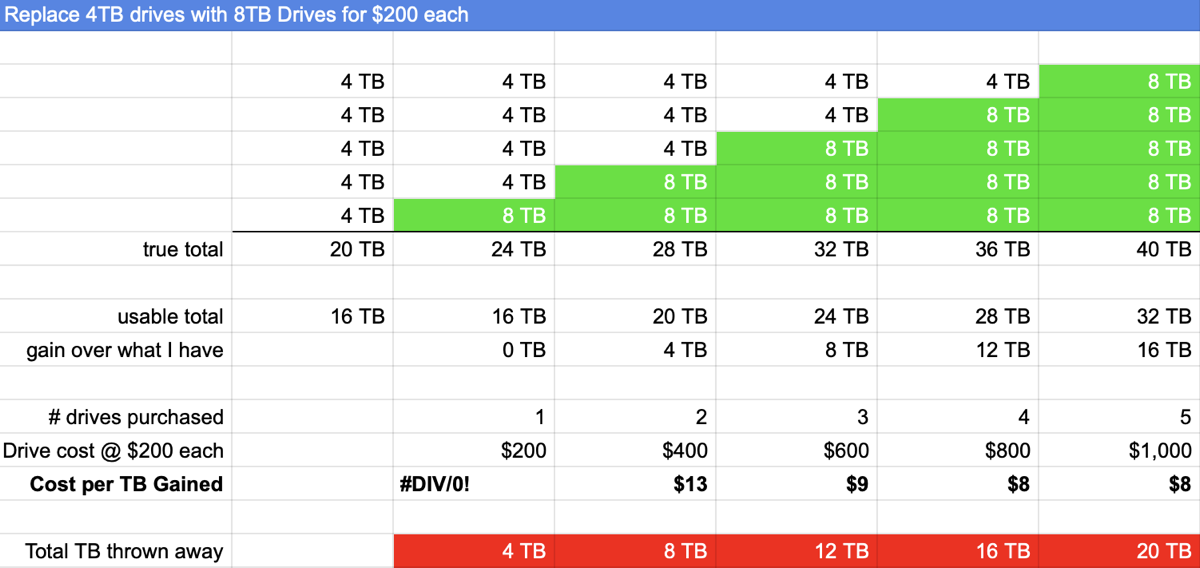
Using Synology’s RAID calculator again, I simulated replacing one 4TB drive at a time. I recorded how much space I would gain for each drive added, and how much it would cost me, at around $200 for each 8TB drive I added.
I put the chart in the show notes, but here’s the progression of replacing 4TB drives with 8TB. The first drive replacement gains you absolutely nothing because you need two of a given-sized drive in order for one to be able to go bad and still be protected. But from there on up, swapping an 8 in for a 4, actually gains you 4TB. It’s quite depressing though to spend $400 on two drives and only gain 4TB!
After running this analysis, I decided that it didn’t seem like smart money spent, so it was time to go back to deleting data.
Storage Analyzer
Even though I suspected Steve’s video files were taking up the most storage, I didn’t think it would be prudent to point fingers his way until I’d done some work culling my own data. My share folder on the Synology is using 2.9TB of the 11TB we’re currently using. 1.2TB of that is my last good bootable backup of my Mac before my last nuke and pave, and I’m not getting rid of that, but that leaves 1.7TB of data to clean up.
I started going through every folder of Chit Chat audio and getting rid of the uncompressed recordings I mentioned earlier. Remember that for many of the shows I have as many as three copies of the uncompressed audio. I deleted all of the duplicates for an entire year … and it didn’t gain enough space to register to the first significant digit.
It was time to target Steve’s video folder. Of the 11TB we’re currently using, the videos take up over 7TB. Just like in macOS, on the Synology, it’s very difficult to see the sizes of the enclosed folders. I started by right-clicking on each of the top-level folders, pulling down to properties, waiting for it to populate with the size, and then recording the number in a spreadsheet. This was going to get old REAL fast.
A bit of searching on the Internets found a nifty app for Synology called Storage Analyzer. With this app, you can point it at a set of folders and it will create a lovely report on the size of the folders and subfolders, it will look for duplicates and much more. You can ask it to run this task on a regular basis so you can keep an eye on things, or you can run it manually.
Not to do a commercial for Synology, but the vast number of quality apps available is one of the reasons I chose Synology.
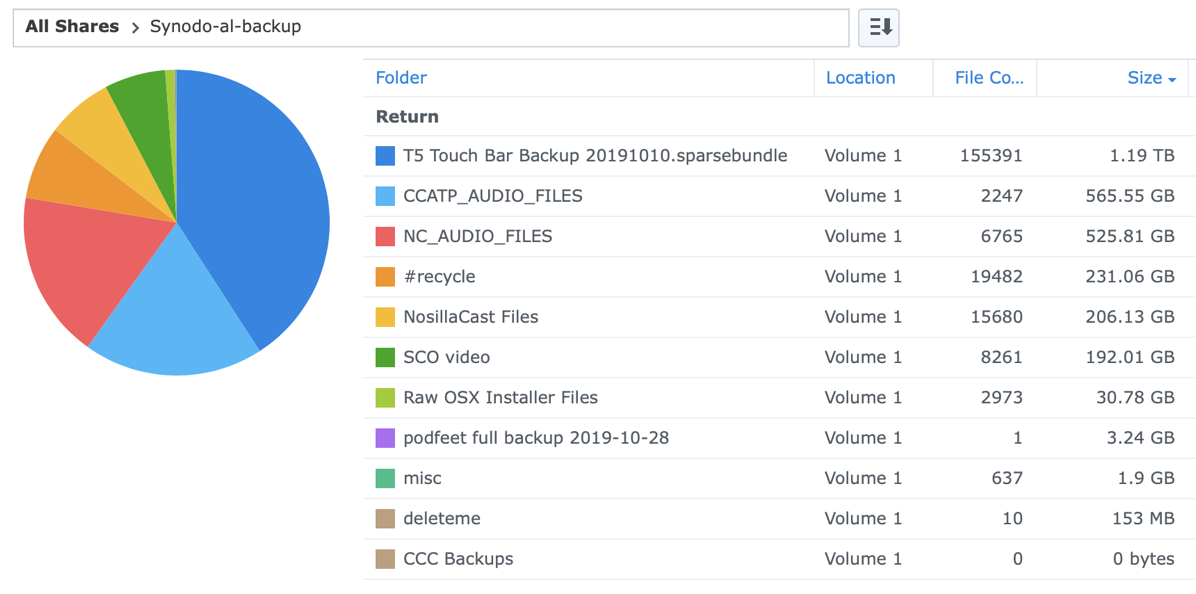
I love how Storage Analyzer works and I truly wish we had it on macOS. When the report finishes running, you get a pie chart of the subfolders in the share you asked it to analyze. Next to the colorful pie chart, you get a list of folders showing file count and folder size. Each line in that list can be double-clicked to show the file sizes of its folders.
Of the 7TB of videos, Steve’s Final Cut Libraries take up 4.5TB. Drilling down into that folder, we can see, in order by size, the folders the next level down. The cool part of this was we could see that our CES 2020 coverage was nearly a TB all by itself!
This gave us the spark of an idea. Steve may one day want to go back and remix some of the old conference videos, but he definitely doesn’t need them to be on such expensive storage. He went through the folders and quickly identified 2TB of data he could easily pull off and put on a drive in the closet.
I dug in my box of old hard drives and found a couple of 4TB drives, but the stickers on them said they were 9 years old! I know this data isn’t mission-critical, but do you want to start with such an old drive? Obviously, I’d need to buy him a brand new drive. And then Steve pointed out that he would want a backup drive as well. Sheesh, some people!
We started discussing whether to buy external disks in enclosures, or bare drives and using a drive toaster for copying the data, but it started to get expensive and complicated. It also seemed dumb to buy 4TB drives when I really needed to start expanding our storage options.
A better idea
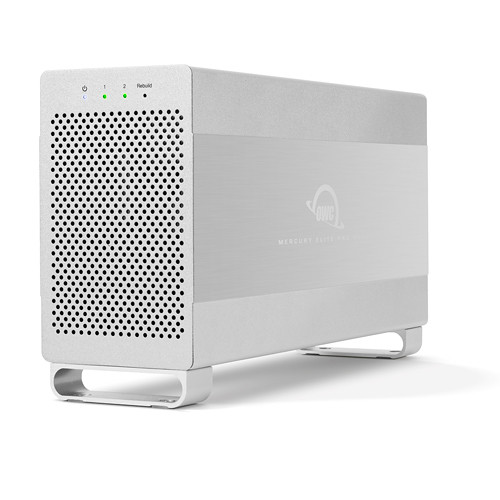
Then I came up with a better idea. If I buy two 8TB bare drives and put them in the Synology, that only buys me 4TB. But I can harvest those two 4TB drives for Steve’s cold storage of his older videos. He can move the 2TB of old data onto one harvested drive and have a backup. That means my gain will actually be 6TB of usable space on the Synology, for the cost of the two 8TB drives. It turns out that a bare 8TB drive isn’t that much more than a 4TB drive in an enclosure.
We own a drive toaster, so Steve could copy the data from the Synology to one drive and then copy from one drive to the other, and then pack those bare drives in static-free bags in the closet. There’s a risk with that idea because drives need to be spun up from time to time to reduce the chance of bit rot, but it would technically work.
I liked this idea a lot, and then I figured out how to spend just a little bit more money and make it more elegant and give us more options. They sell two-bay disk enclosures, with built-in RAID. With one of these, I could set it up as RAID 1, which means the disks would be mirrors of each other which is exactly what Steve wants.
I started by looking at super cheap, non-name brands but in the end I went with the OWC Mercury Elite Pro Dual 2-Bay USB 3.0 RAID Enclosure for $89 from B&H Photo. It looks like an adorable little cheese grater Mac Pro.
The Synology has two USB 3.0 ports, one on the front and one on the back. So for my purposes, there was no need to get some fancier and more expensive Thunderbolt 3 version of the enclosure. Synology will show it as an attached shared USB drive, and we can drag files right to it. The nice thing is we’ll be able to keep it up and spinning so less chance of bit rot.
If that doesn’t work for some reason, we can always hook it up to a Mac on the network (I have a few lying around) and have it manage the copy from the Synology to the RAID enclosure.
Pulling Drives is Terrifying
I received the two 8TB drives for the Synology this week, while the little two-bay enclosure doesn’t get here till Monday.
The next step was going to be terrifying. I’m so glad Steven Goetz is my spirit guide to point me to the technical articles that explain how to do things and to provide some advice along the way. I was going to yank a drive out of my Synology, put in the new 8TB, and then wait while the Synology rebuilt the entire RAID system to incorporate that new drive. When it was complete, I would have to do it again with the second drive.
I asked him how to start, and he asked me when the last time I ran Data Scrubbing on my Synology. Um…Data Scrubbing?
Steven explained that Data Scrubbing on Synology is designed to fix bit rot. Evidently, you’re supposed to somehow know to turn that on and run it on a schedule. It doesn’t seem right to me that I only found out because Steven Goetz read the vast documentation and happened to tell me about it. If I’m supposed to run it on a schedule, I think it would have been preferable if Synology had pinged me maybe after a few months of ownership and said, “Hey did you know we have this cool feature called Data Scrubbing you might want to enable?”
Data Scrubbing takes a long time, especially with a lot of data. It took the DS1019+ around 14 hours to complete on 11TB of data.
When that was complete, I had to face the music. It was time to take the terrifying step of removing one of the drives from my Synology. Steven told me I could just yank one of the drives to replace it with the Synology running, but I followed Synology’s instructions instead, which said to do a graceful shutdown first, replace the drive, and then boot it back up.
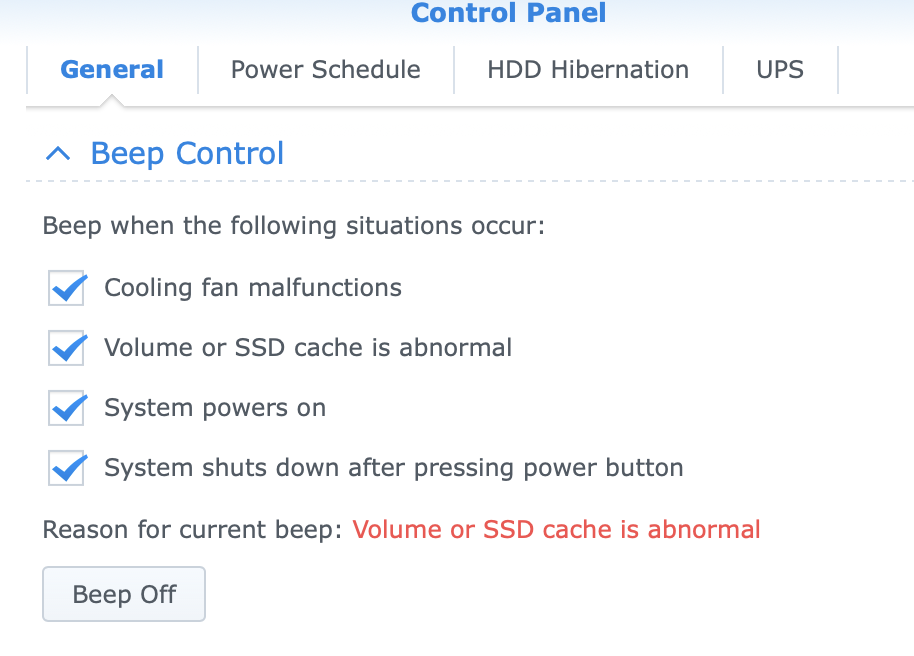
As soon as it started back up, the Synology started beeping constantly.
Luckily I found a spot in the Control panel where I could turn the darn beep off. I understood the Synology was just warning me that it was in a degraded state but I sure didn’t want to listen to it all day. I verified in the Storage Manager app that it was churning away rebuilding the array, and then started to obsessively watch the progress by percentage. It’s very cool that the Synology is still available to pull data from and write to during this process, but I decided not to bother it while it was working so hard.
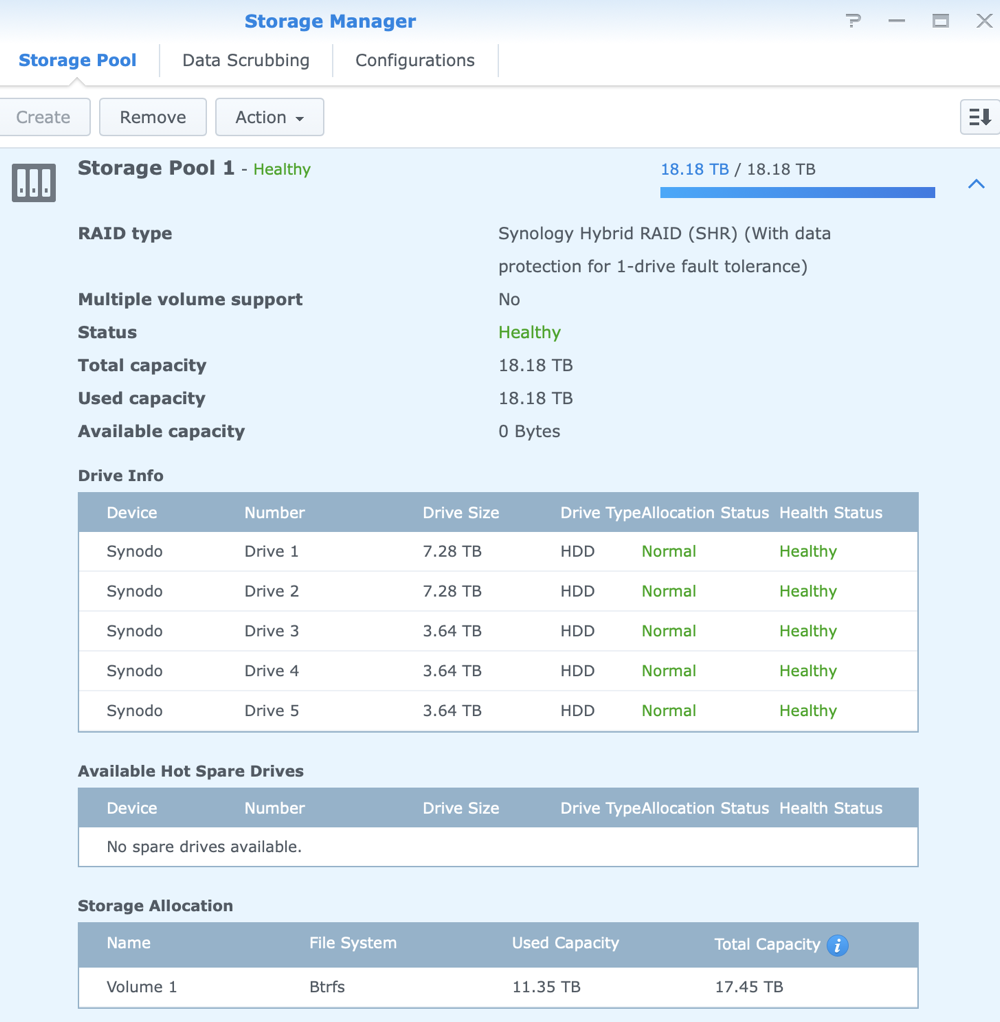
It took from 11:19 am till 8:34 pm to repair the array which if my cipherin’ is correct would be 9 hours and 15 minutes. It was a pretty exciting moment when it was done, even though the Synology storage manager showed that I still only had 14.54TB of storage in the pool. My excitement was also tempered with trepidation because I still had to go through the same terror to add the second 8TB drive.
I powered down and replaced the second 4TB drive with 8TB and let the repair run overnight … and when I awoke, my storage pool had grown from 14.54TB to 18.18TB. Some of you have probably noted that the gain wasn’t the 4TB we hoped for, it was only 3.64TB. There’s an explanation for this but it requires a smidge of math.
When drive manufacturers spec drives, they use the decimal definition of 1TB = 1000^4 bytes. But when file systems report disk space, they use the binary definition of 1TB = 1024^4. If we have 4TB of space defined in decimals, then we have 4TB * 1000^4/1024^4 = 3.64TB. Even though I understand the math, it still makes me feel like I’ve been cheated!
The little OWC two-bay RAID enclosure won’t be here till Monday so I haven’t begun the process of offloading Steve’s data just yet. I’ll definitely let you know if I learn anything interesting in that setup. But at least for now, the Synology has stopped hollering at us that we’re running out of space.
But What About the Drobo?
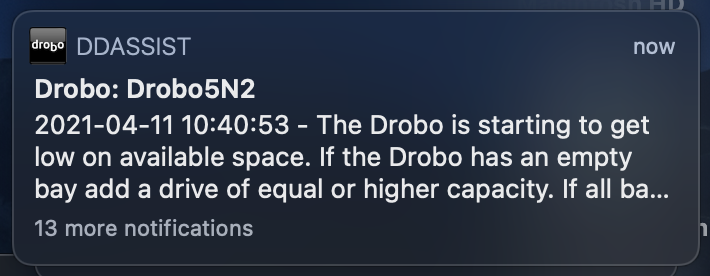
But there IS another device constantly sending alarming notifications that it’s out of space, and that’s the Drobo 5N2 that backs up the Synology. I simply can’t convince myself to spend $400 to put into an older device that’s a backup of data that’s already protected with fault-tolerant RAID. You do hear horror stories of people having NAS failures and not being able to get their data back, so I do lose a bit of sleep over that.
The good news is that when we move the 2TB of Steve’s video data off of the Synology, we can also remove it from the Drobo so maybe it will keep it quiet for a while. I’m sure I’ll have to deal with it at some point but that point is not today.
What about Offsite Backups
I know at least 20% of you are wondering about my offsite storage plan. I simply don’t have one. I’ve looked at the cold storage options with monthly fees, like Wasabi at $.006/GB/mo, Backblaze’s B2 at $.005/GB/mo, and Amazon Glacier at $.004/GB/mo. Amazon Glacier is the least expensive but to back up 11TB, that would cost me $44 per month! I’m definitely not going to pay over $500 per year to back up this data.
The truly mission-critical data is the financial and medical data, which is only around 10GB, but I’m extremely nervous about putting that data online. I’ve thought about making an encrypted disk image and putting it in Dropbox, and that would certainly work, but a real backup is automated and I haven’t figured out how to do that just yet. If you have any ideas I’m open to suggestions.
Bottom Line
The bottom line is that I learned a lot about how the Synology works because of this exercise and I think I came up with a clever solution that didn’t break the bank. It wasn’t cheap and it is very disappointing how little space I gained in the end. I think if I had it to do over again, I’d still buy a 5-bay Synology, but I’d start by putting in 3 of the biggest drives I could afford. When I started running out of storage, maybe by then drives would have gotten less expensive, and I could put in a pair of even bigger drives. That might have given me better bang for my buck.

