Last month I told you about a really cool service called the Noun Project, which for a small fee gives you access to thousands of really nice line art icons.
I’ve been enjoying jazzing up blog posts with Noun Project icons when I don’t have a suitable screenshot to keep readers from getting bored. When I wrote the article about the Noun Project, I talked about discovering that they have a delightful macOS app. It’s ever so much more efficient now for me to do a quick search for an icon in the app, and drag it right into my blogging software MarsEdit as a PNG.
But There’s a Problem with Dark Mode

With blog posts, there’s a thing called a featured image. When someone posts a link to a blog post on social media with a featured image, the link will expand to have a nice little excerpt and show the image. Without featured images, most people won’t click on links.
On occasion, I’ve been using Noun Project icons from the macOS app as my featured image, and it creates a problem for people who use dark mode on Twitter and other apps. Alert NosillaCastaway David Sheneman (aka @tvwonder on Twitter) sent me a screenshot of what a recent post looks like to him.
With a nearly-black background in his app, he can easily read the white text of my post, along with quite legible baby blue text for the link. But below that is a very dark grey square with a black icon on it.
It looks really bad and it’s nearly impossible to tell what it’s supposed to be.
Using the Noun Project’s macOS app, I’ve been choosing PNGs to drag into my articles, and the only option in the app is to have a transparent background. But a transparent background on a PNG picks up the black/dark grey of dark mode for people like David. I wrote to the Noun Project asking them if I was just missing an option for a non-transparent PNG in the app and they thanked me for my interest and feedback but said it wasn’t an implemented feature at this time.
I could use the Noun Project website instead of the app, since it does give you the option of a transparent PNG or one with a background color of your choosing.
For my diagrams, transparent PNGs are ideal because the connecting lines can attach right to the graphics. If I use PNGs with a background, even white, then the lines connect to the edge of the background and it doesn’t look the way I like it.
Easy Solution – Convert with Preview
I could use the Noun Project website when I’m doing images for blog posts, and the app when I’m making a diagram. Or I could keep using the app, download the image, and convert it to have an opaque background.
The transparent background of a PNG is created using the alpha channel. This is a channel that adds a percentage of opacity to the image. If the alpha channel is set to 0%, the background will be transparent, and if it’s set to 100% it is opaque.
There’s a very simple way on a Mac to turn off this alpha channel on a transparent PNG. If you open the PNG in Preview and then choose File → Export you’ll see a default format of PNG with a checkbox next to the word Alpha. Uncheck the box, export, and you’ve got an opaque PNG.
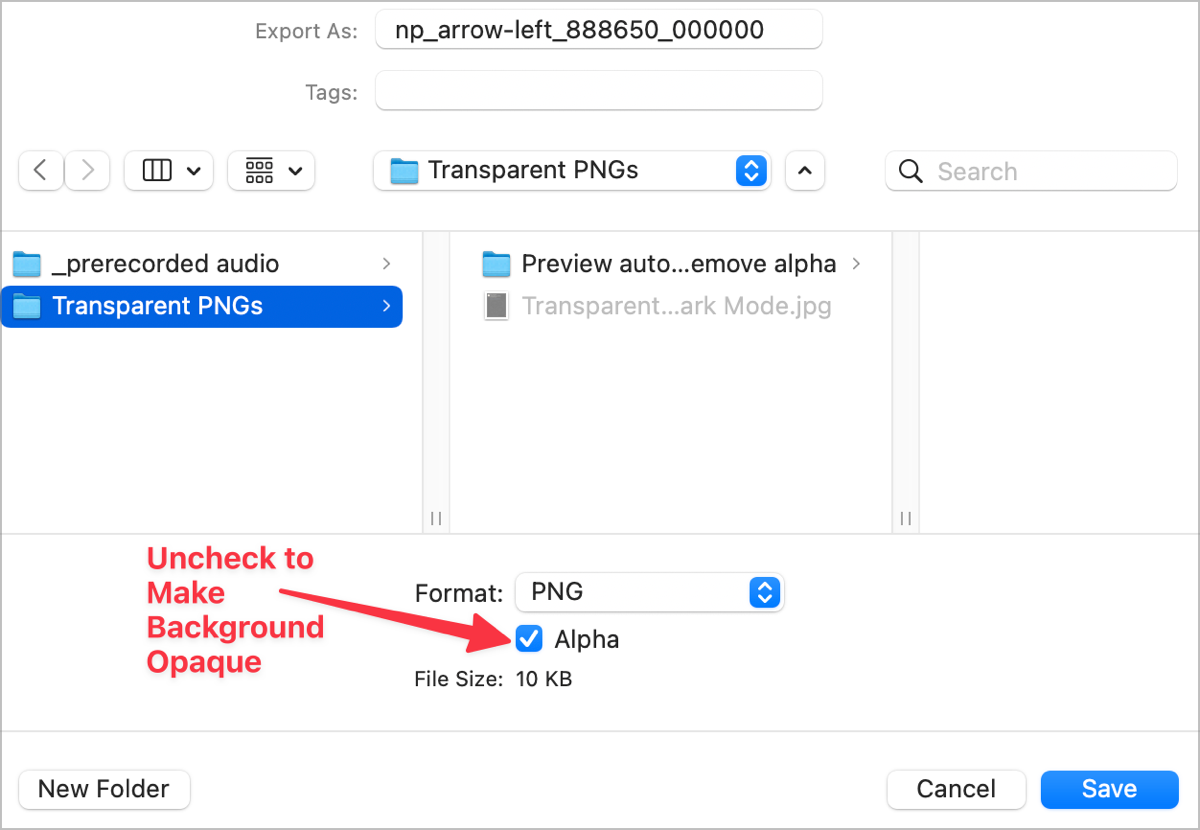
While that sounds easy, it’s also tedious. For one thing, File → Export is two menu picks with the cursor because there’s no keystroke for Export in Preview.
If I don’t want to use the web version of the Noun Project, I have two choices:
- For every PNG I use from the Noun Project:
- Export the PNG to disk
- Right-click and choose Open in Preview (since CleanShot X is my default PNG editor)
- Use two menu clicks to select File → Export
- Click a checkbox
- Hit enter to export the opaque PNG
- Drag the PNG into my blogging software.
- Spend countless hours trying to create an automated process to make opaque images out of my transparent PNGs from the Noun Project app.
Which option do you think I chose? 😉
Solutions I’ve Tried
I’ll walk you through all of the options I tried in order to automate this process. I did stick with this until I found a solution, but listen carefully, so you can be the one who gets to say, “I see your mistake, Allison, you forgot to…” Or, “I know an easier way!”
Keyboard Maestro
While many might suggest an Automator workflow to solve this problem, I stopped learning Automator when Apple showed its cards that it wasn’t the future of automation on the Mac. The tool that seemed tailor-made for this automation task was Keyboard Maestro.
- I know it can open files in a specified app from Finder
- It can select menu items
- The checkbox might be tricky but there’s a way to teach Keyboard Maestro to identify things on screen
- Keyboard Maestro can send keystrokes so hitting Enter to save is trivial
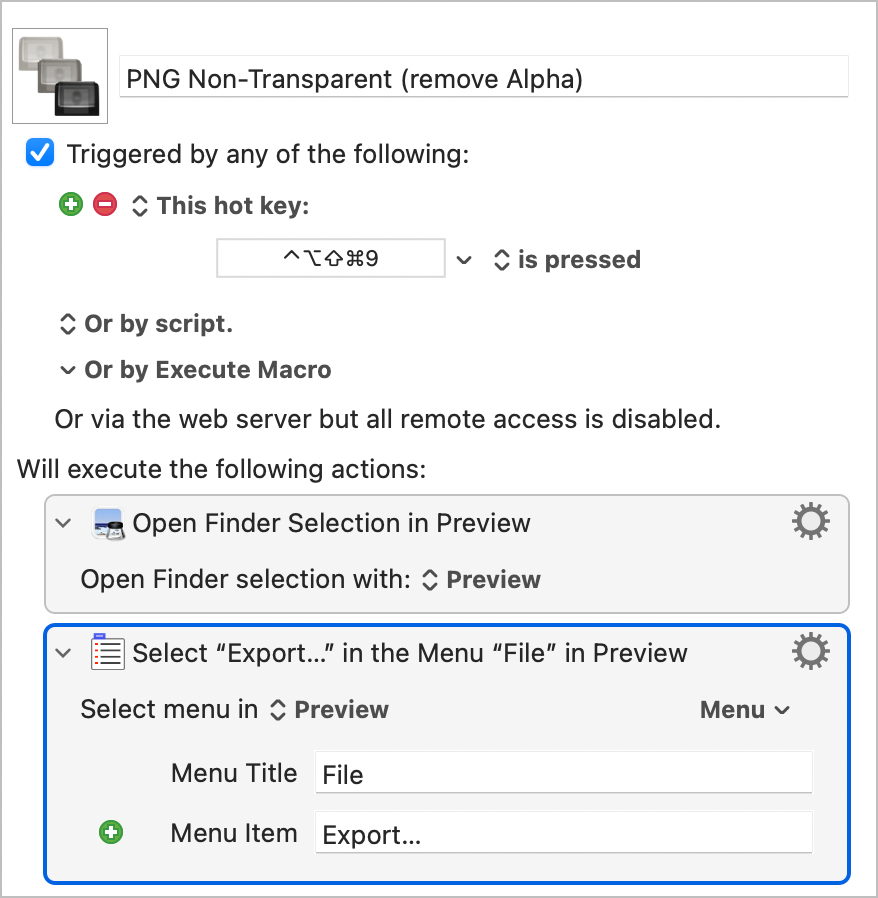
In Keyboard Maestro I chose an action called “Open Finder Selection” and chose Preview as the application to open the file. I selected a transparent PNG in the Finder and ran the automation. The file opened in Preview. Step one, done!
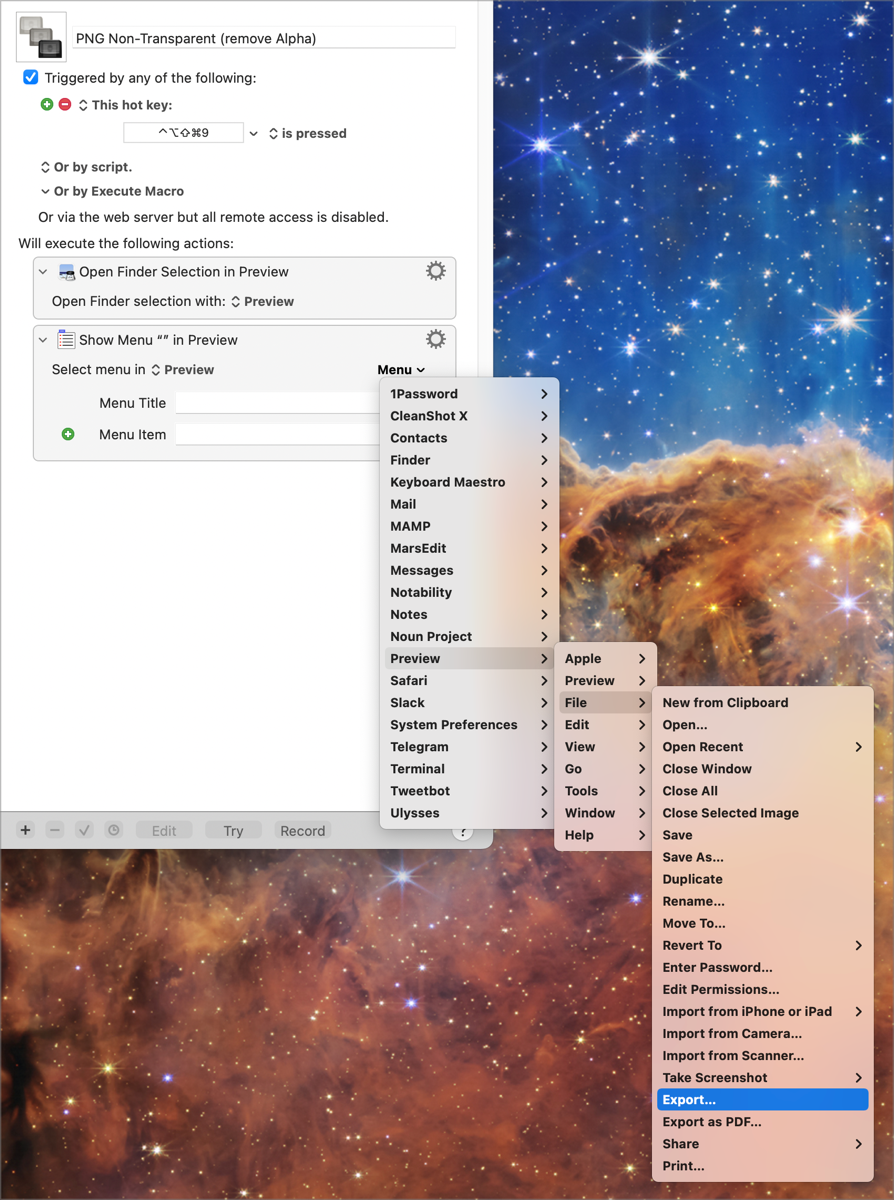
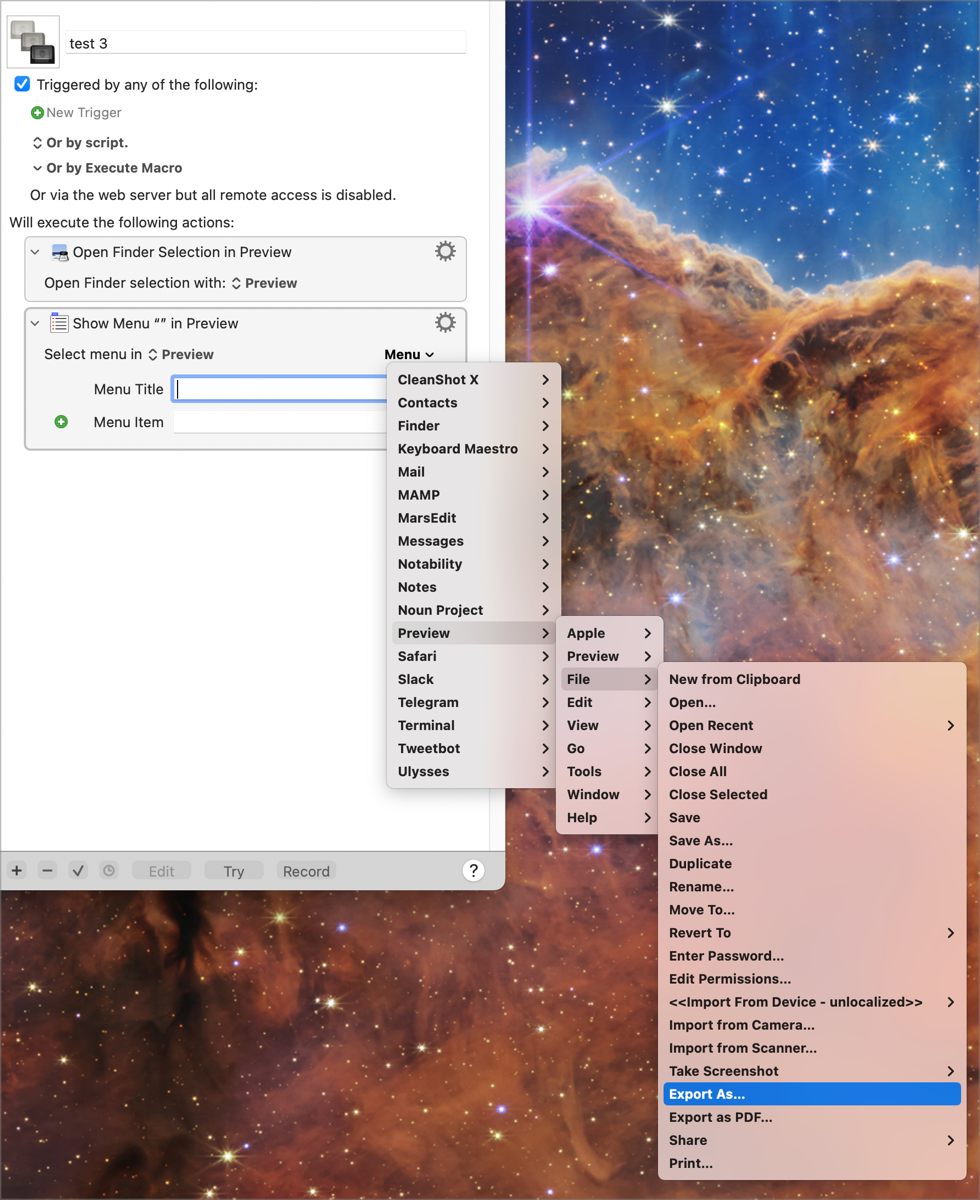
Keyboard Maestro has another action called “Select or Show a Menu Item”. If you use the little dropdown to choose Preview as the application in question, you’ll see another dropdown to choose the exact menu item. I selected Preview → File → Export…
I selected a transparent PNG in Finder, and ran the 2-step Keyboard Maestro macro … and it worked. The file opens in Preview and the Export menu is chosen from the File menu. I was cooking with gas!
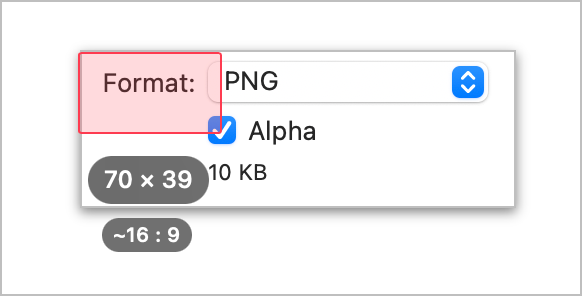
Now for the tricky bit trying to teach Keyboard Maestro what the checkbox looks like and to click on it when it finds the checkbox. The Keyboard Maestro action is called Click at Found Image. While this process sometimes works, it’s very fragile and tends to fail at a later time for no apparent reason.
I dragged the Click at Found Image action into the Keyboard Maestro workflow. The next step is to take a screenshot of what you want it to look for and drop it into the action. Once Keyboard Maestro finds a match to the image you’ve given it, you have to tell it where in the image to click. You can define the location in the image from a corner or the center by the number of pixels.
With my screenshot open in CleanShot X, I used PixelSnap from getpixelsnap.com/… (also in Setapp) to measure the distance from the upper left corner to the middle of the checkbox.
My macro now says to open a selected Finder item in Preview, choose export from the menus, and to click on the checkbox if it can find it.
I selected my transparent image again and ran the macro … and it failed. I’m used to “found image” clicking failing, but that’s not what failed. Now the macro was saying that it can’t find the File → Export menu that it so easily identified before I added the third step!
The exact error message is:
Macro Cancelled Select Menu Item failed to find target menu bar for File> Export
I can disable the click found image step, and the macro still can’t execute the menu selection. I can entirely delete the click on found image action, leaving only the two steps, open the file in Preview, and select export and it still does not work.
I created the macro from scratch again. Remember I told you that Keyboard Maestro would allow me to select a menu from an application, and it shows the path for Preview → File → Export? Well, guess what? The next time I tried to do the exact same thing, instead of “Export” as the menu option, now Keyboard Maestro says “Export As…”. But that’s not what the real menu said at the time.
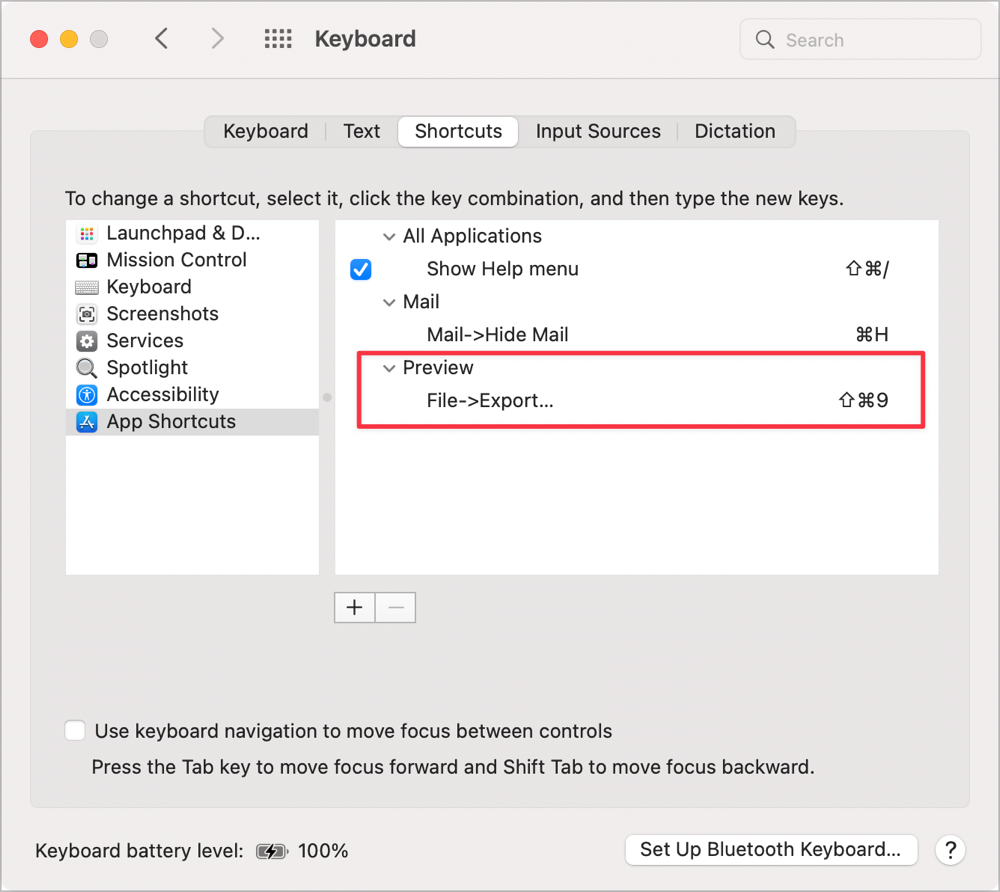
Obviously, Keyboard Maestro is getting confused. No worries, I’ve got another trick up my sleeve. I can add a keystroke to the Preview menu using System Preferences Keyboard Shortcuts. That way I only need to tell Keyboard Maestro to type the keystroke and not worry its pretty little head about knowing the menu commands.
When I went to System Preferences to create an App Shortcut for Preview, I double-checked and now the export menu says “Export As…” just like Keyboard Maestro said it did. I’m sure that you think I hallucinated this change, but I can prove it. I just happened to have taken a screenshot of it the first time and the second time I checked.
I created the keyboard shortcut in System Preferences and then told Keyboard Maestro to type it to bring up the export menu. When I tried to run the macro, guess what happened? The file opened in Preview and then it beeps at me like I tried to select an option that wasn’t available. If I manually typed my keystroke, the File → Export… menu came right up.
If you’ve never used Keyboard Maestro before, you might think this sounds like a super complex macro I was trying to create, but it is trivially simple and yet I could not get it to work.
I abandoned that whole path after several hours of fighting with it.
“There’s An App for That”?
My next idea was that certainly there must be an app to provide this functionality. I searched the web, Setapp, and the Mac App Store for a solution. I found a handful of apps that were designed to remove the alpha channel, but they were all more than five years old.
One was on an insecure website, so I avoided that one. One of the ones in the Mac App Store had a review that said the resulting image ended up all black, so I skipped over that one too. I found one that was old but didn’t see any huge red flags. I downloaded it and ran it on a test PNG and the resulting image ended up all black.
Solution path number two was abandoned.
macOS Shortcuts
Over the course of the next day, I kept thinking I must be missing something really obvious in the Preview/Keyboard Maestro solution so I tried every angle I could think of without success.
I briefly dabbled with using Keyboard Maestro to open the PNGs in Affinity Photo, but it is really slow to open images and I figured I’d probably run into the same problems.
I next thought maybe Apple Shortcuts could do the job. I’m not at all skilled in Shortcuts, so I started by searching the Gallery to see if I could get a starting point. I didn’t find anything helpful. I tried searching Matthew Cassinelli’s vast library of shortcuts but no joy there either.
I gave it my best shot at writing a Shortcut from scratch and I got farther than I expected. I was able to get the selected file in Finder and save it as a PNG, but it still had the alpha channel.
I tried to mask the image with a rounded rectangle and then convert the masked image to a PNG, but that whole masking thing didn’t do a darn thing. I’ve never really grokked masking so it was probably the wrong path.
I did figure out that instead of converting it from a PNG to a PNG, I could convert it to a JPG which would eliminate the transparency since the JPG format doesn’t support it. I didn’t want to use JPG because the files are bigger than PNGs but it turns out the icons are so simple that the JPG only increases the size from 10KB to 14KB. I guess I could allow that extra 4 KB to make David happy.
I tried my fancy schmancy 3-step Shortcut and it worked to simply convert a transparent PNG to an opaque JPG! I decided to challenge the automation gremlins and used the Details menu to add my Shortcut to the Services Menu. After a bit of faffing about, I can now right-click on a PNG file, pull all the way down to Quick Actions, and choose my Shortcut: Convert to JPG. Astonishingly, this also worked.
But right-clicking on a file and pulling all the way down to two menus is almost as hard as removing the alpha channel in Preview. No worries, there’s an option to add a keyboard shortcut to Shortcuts. But guess what happens when I use my keyboard shortcut? Absolutely nothing at all. I tried 3 different keystrokes and none of them caused anything to happen on my Mac.
It’s incredibly difficult to search the Internets for help with Shortcuts because you get piles of results about keyboard shortcuts, not the Shortcuts app itself. And what I’m looking for is help with keyboard shortcuts within Shortcuts so I had no hope of ever finding an answer to my issue.
I did find on iDownloadBlog an article explaining 13 ways to quickly run a shortcut on iPhone, iPad, and Mac. It didn’t help me diagnose my problem with the keyboard shortcut, but they explained that you can tell Siri to run a shortcut. I turned Siri on in Control Center and clicked on the icon.
I said, “run convert to jpg.” She just sat there. I wandered off to do something else, and a minute or two later she proudly announced, “That’s done!” Sure enough, the shortcut had run. Success, but is it really?
I tried Type to Siri, but that’s even more work because first I have to launch Siri, and then I have to type out this long name. You might wonder why I don’t say “Hey Siri” to invoke her but you know the answer. Because my HomePod, iPhone, or iPad will certainly answer long before my Mac version of Siri realizes I’m asking a question.
Another way to invoke a Shortcut on the Mac is to add it to the Dock, and that seems to work well. I don’t use the Dock for launching apps, so it might be tolerable to have one Shortcut in my Dock.
It still bothered me that the keyboard shortcut method didn’t work, so I tried it again. And that time it worked. 🤦🏻♀️
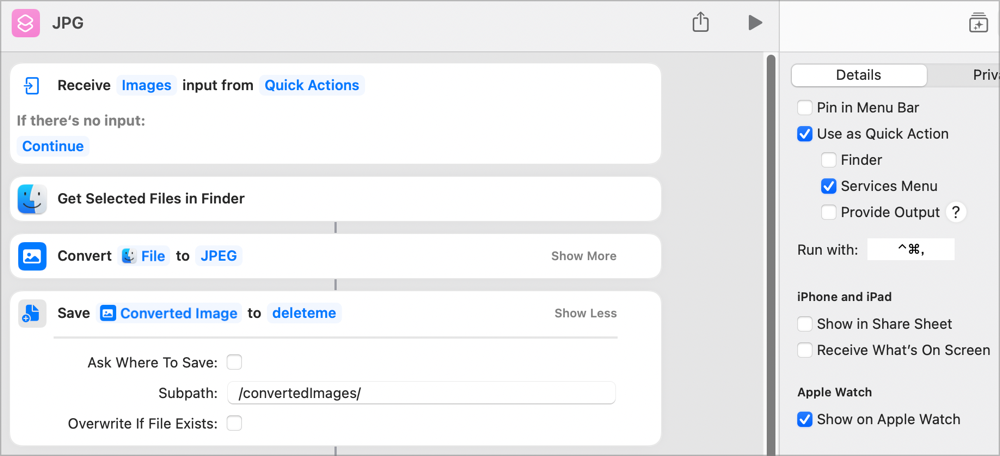
Even though this Shortcut is intermittently working, I can only seem to get it to save into a specified folder. I’ve been using my deleteme folder for testing, but that means every time I run this shortcut I would have to go fetch the converted JPG and move it back to where I have my original PNG.
I found an option to get the parent directory of the shortcut input which sounded very promising. In the save converted image section though, I can’t use the parent directory to save.
I did figure out how to make it create a subfolder in deleteme so at least I’ll be able to find the files easily after they’re converted.
It was all working great, but after I came back to it for a dinner break, the keyboard shortcut had stopped working again. I honestly don’t understand why so many people are wild about Shortcuts.
Solution path number three landed on the abandoned pile with the other two.
Tame the Terminal
I was about to give up after only three days of trying to automate this tiny process when I had an epiphany. I hadn’t searched for a way to do it from the command line.
About a hundred years ago, Bart taught us about a command-line tool called ImageMagick. He and I both used this image manipulation tool to add watermarks to our most prized images. I used ImageMagick to write an app to add a drop shadow to my images. It’s super powerful and used by a lot of people so you can usually find someone who has written most of what you need and then you can just tweak it a little bit to get what you want.
I found a discussion in Stack Overflow where someone gave the exact command I needed. After installing ImageMagick on my newly nuked and paved machine using Homebrew with brew install imagemagick, I followed the instructions:
convert input.png -alpha off output.png
And guess what? My image came out all black! I scrolled up to the date at the top of the discussion and it had been posted nearly 8 years ago. I’m guessing something changed in the last 5 or so years and all of those old apps I had looked at used this same command.
On a lark, I ran the command again but changed -alpha off to -alpha on and my image was again transparent.
I narrowed my Google search to only give me results “in the last year.” This gave me a slightly different command. The real answer is to remove the alpha channel, not turn it off. The correct command is then:
convert input.png -alpha remove output.png
I finally had a working single-line command in the terminal that would remove the transparency of my icons just for David. I had the working engine of a solution, but it’s pretty obvious that opening up the Terminal and typing a command was far more effort than opening Preview and unchecking a box. I needed to run this via a keystroke.
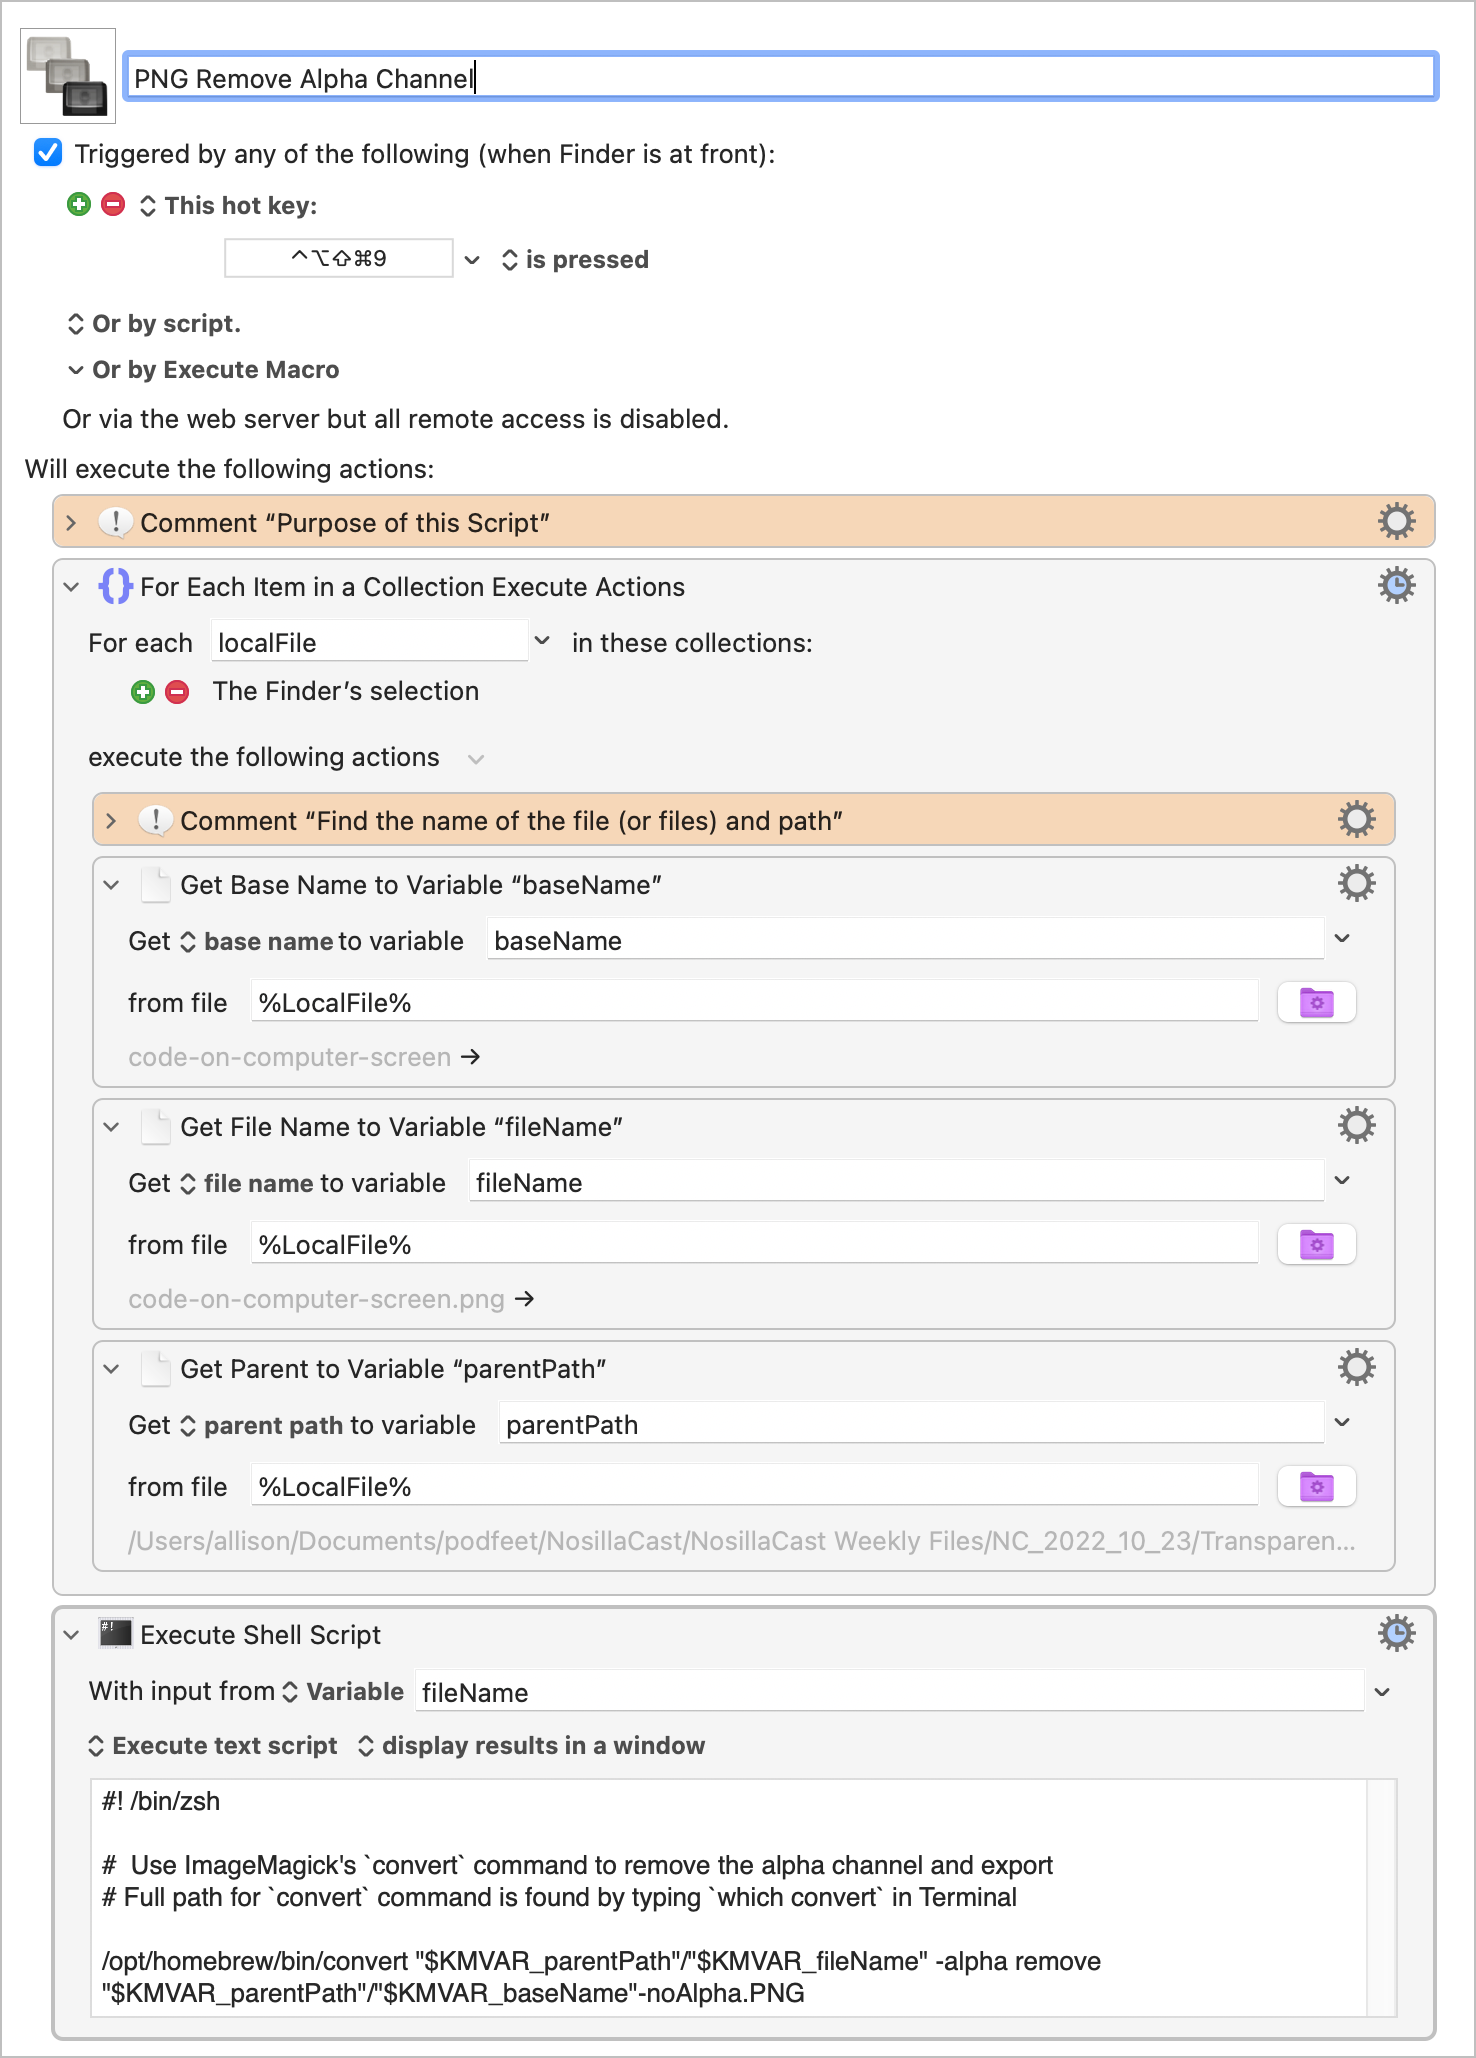
Instead of opening the Terminal to run a command, I could create a shell script and embed it inside a Keyboard Maestro macro.
My goal was to be able to select a PNG, hit a keystroke, and have my macro remove the alpha channel and save it adding “-noAlpha” to the end of the name.
It took me probably 3-4 more hours to get a one-line command to do my bidding inside Keyboard Maestro. You surely think I’m bananas to have spent so much time on such a little problem to be solved, but I love this kind of project because of how much I learn.
I learned how to find a file’s name and path in Keyboard Maestro. I learned how to assign the name and path to a variable. I even learned how to call a Keyboard Maestro variable name from within a shell script – prepend it with $KMVAR_.
I learned that you can’t call libraries from within a Keyboard Maestro shell script without specifying the entire path to the command. When I tried to run the convert command from ImageMagick, it didn’t run inside Keyboard Maestro’s shell script action. I figured that the Keyboard Maestro shell script didn’t know about what libraries I had installed and that it was a path problem, but I didn’t know exactly how to specify it in my shell script.
After a lot of searching for an answer, I finally asked for help in our Programming By Stealth Slack channel. I had tried really hard to do this on my own, but I did get the help I needed. Ben Rose (who is an astrophysicist by the way!) and Bart gave me the same answer. They told me to type which convert in the Terminal, which would give me the full path to the command. I could then use that full path in my Keyboard Maestro shell script.
Once I was using the full path to the convert command, it still didn’t work, but with a new error. It kept saying, “no such file or directory”. I had verified that the script knew the variable name for the file and that it could find the file name using the variable, so “no such file or directory” was baffling. It occurred to me that maybe I had to also tell the shell script the full path of the input and output files. That solved the unknown file/directory problem.
But it still didn’t work. The whiny little thing now said that it was a read-only file system. Another trip to the Googles suggested that Keyboard Maestro didn’t yet have full disk access in the Security & Privacy preference pane. That solved the final problem in my single-line shell script.
See how much I learned? Every bit of that information is now dutifully recorded in Keep It. I keep all portable knowledge about programming (and other things) in Keep It so I don’t have to relearn this the next time.
Finally, I assigned a hotkey combination and added it to my Stream Deck so now with a push of a button I can convert any transparent PNG to remove that pesky alpha channel.
Bottom Line
The bottom line is that I had a blast this week trying to figure out how to solve a tiny problem by spending at least 20 hours automating it. I may not be the best programmer in the world but I make up for my lack of knowledge and skill with dogged persistence. I learned a lot, I succeeded at my goal, and I made David and all the other dark mode people happier, and I had a blast doing it. Now all I need to do is remember to push the button when I use transparent PNGs.

