Steve and I use HomeKit to control our smart devices. While we can do a lot of what we want, it’s often clumsy, and we get tangled in the terminology. The solution to this problem is obvious. Add more automation.
Let’s set up the problem Steve and I were trying to solve, and as I explain how I solved it, I’ll broaden the description to be more applicable to problems you may run into with HomeKit automation.
Casa Sheridan Problem to be Solved
At Casa Sheridan, we have a gas water heater, and the water is plumbed such that it takes forever for the hot water to get to the kitchen and to our main bathroom. You may have heard that water is an extremely rare and precious resource in California, so running the water for two minutes just to get it hot enough to take a shower is incredibly wasteful.
In 2015, we installed a Hot Water Recirculation Pump. I wrote it up in an article called Saving Water in California with a Hot Water Recirculation Pump. The basic idea of the pump is that using sensors at the distant sinks, it senses when the water gets below a temperature threshold, and then pumps water from the water heater into the hot water line.
This solves the problem of wasting water, but it wastes electricity for this pump to constantly push hot water to the sinks when we’re sleeping or unlikely to require hot water.
To solve the problem we created with the pump, Steve put it on a smart switch and only has the pump turn on during specific hours of the day. He has it set to go on in the morning when we’re getting ready for the day, again at lunchtime for doing dishes, during dinner for the same reason, and finally at bedtime for our evening ablutions.
This all works great, and I’ll explain how it’s done in a moment, but now to add the problem to be solved.
When we go on vacation, Steve doesn’t want to waste any electricity needlessly pumping water around the house when we’re not even there. In HomeKit, he has to manually disable each of the Automations for the morning, noon, evening, and nighttime settings. Yes, we’re too lazy to toggle four switches in an app and toggle them back when we get home. We’d rather spend four or five hours trying to make it be only one toggle switch.
To bring this to a more generic problem description: if you have multiple Automations in HomeKit that you’d like to disable with a single flick of a switch, this article might help.
HomeKit Terminology
To get us all on the same page, let’s walk through the terminology HomeKit uses.
- Devices
- Switches, plugs, lights, garage door openers, motion sensors, and more
- Devices can be named
- Scenes
- One or more devices in defined states.
- For example, a scene could be the garage door is closed, the living room light is on, and the switch controlling the ceiling fan is on.
- Scenes can also be named
- Events
- Events are triggers for automation
- e.g. time of day, an accessory is turned on or off, people arrive or leave, or a sensor detects something
- Automations
- Devices or scenes triggered by Events
- Automations can also be named
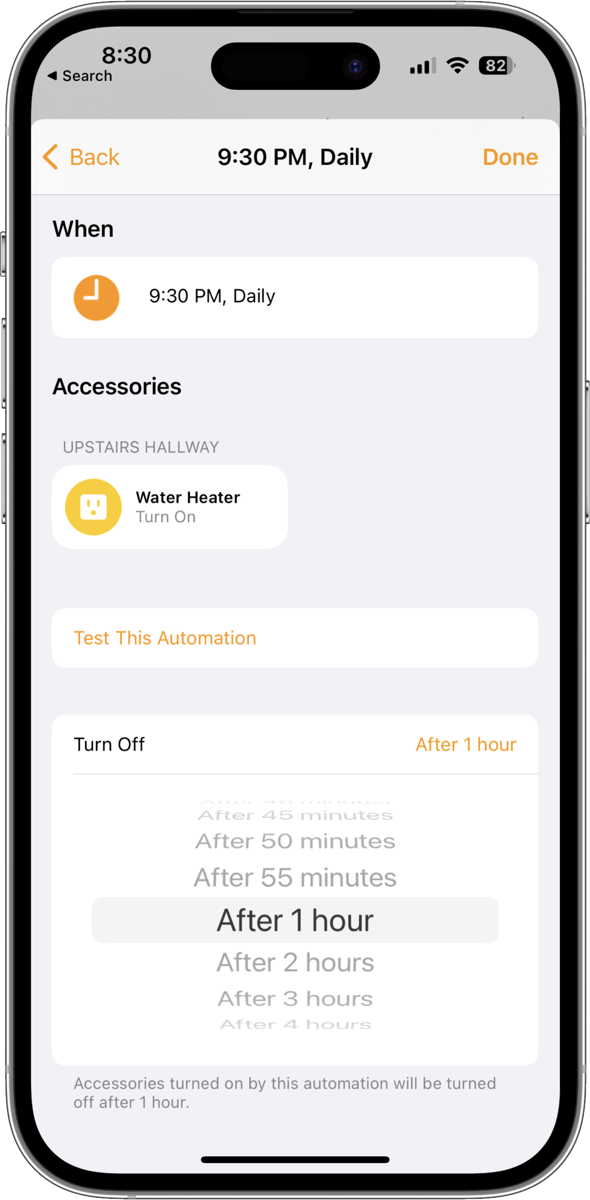
We have a Scene called WH ON, which is simply the switch for the water heater pump is turned on. We have a second Scene called WH OFF which turns the switch off so the pump does not run. Remember, a Scene is just a state for one or more devices.
When Steve set up the four times a day we wanted the pump’s switch turned on, he used an Automation. As I mentioned, Automations are triggered by Events, and the Event he used was the time of day. While he could have created 8 Automations — 4 to turn the switch on at specific times, and 4 to turn it off 2 hours later — there’s an easier way.
In Automations, you can tell HomeKit to trigger at a time of day and to turn off after a specific number of hours. He was able to have the water heater pump turn on and off 4 times each with 4 Automations.
The problem with this flawless design is that when we go on vacation, Steve has to launch the Home app, tap on Automations, and open each of the four time-based water heater pump automations one by one to disable them. It was tedious and annoying.
Automating Vacation Mode
I decided to figure out a way to make this a more automated process. I just assumed there was a way to do this in HomeKit or in the worst case, Shortcuts. I poked around in the Home app and didn’t find anything. As usual, I failed to figure it out in Shortcuts.
The next obvious thing to do is to ask on social media. I posted in the Podfeet Slack, and on Mastodon. I got several responses, all telling me it couldn’t be done. When you hear “can’t be done” and Shortcuts in the same sentence, the only thing you can do is turn to Rosemary Orchard, who is an absolute wizard at Shortcuts.
I posted a question to her on Mastodon @rosemary@snailedit.social. I asked, “Is there a way to create a shortcut to disable multiple Automations at once in HomeKit?” and she replied:
It would be through using a dummy switch in HomeKit. And converting those automations to shortcuts which check that switch.
While the brevity of messages in Mastodon didn’t allow for a lot of detail, she gave me enough descriptive words to start Googling for what she meant.
The words I started searching were “dummy switch” and “converting automations to shortcuts”.
Dummy Switch
A “dummy switch” is a physical switch that you will dedicate to the job of toggling all of the automations on and off. If you’re a semi-normal person, you should stop here and skip over the next part of what I’m going to explain. Just buy a spare switch that’s HomeKit-compatible, like the Meross 2-pack Smart Wi-Fi Plug Mini for $20. After you get it set up in HomeKit, you can name it something like Vacation.
Nerd Alert
But if you’re way past normal and you want to learn a nerdier way to do it, you can create a virtual switch using Homebridge. Homebridge is a tool you install on any computer that’s on all the time in your house. You can use anything from a Raspberry Pi to a Mac to a PC to a server like a Synology. Homebridge allows you to install plugins that make non-HomeKit-compatible devices show up in HomeKit.
I already have Homebridge running on my Synology to bring my Ring cameras into HomeKit, so I was up for this virtual switch fun. I launched Homebridge from my web browser, did a plugin search for dummy switch and found the homebridge-dummy plugin with 2000 downloads.
I installed the plugin, and added an “accessory”, named it Vacation, and checked the box for Stateful. That means the switch will remain on instead of being automatically turned off. I have no idea why you’d want a switch to automatically turn itself off, but make sure to check that box!
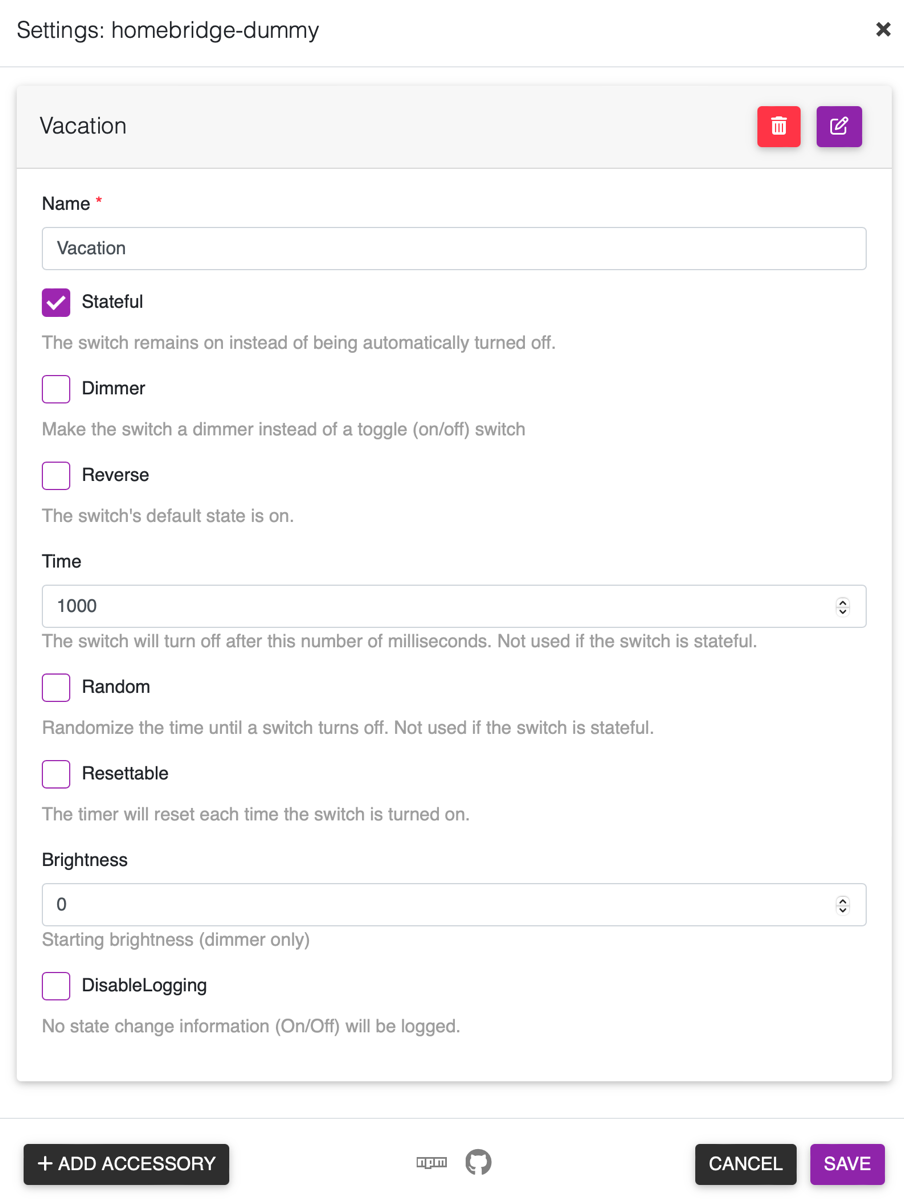
I wish these switches weren’t called “dummy” switches, but I haven’t been able to find a better term. My dummy switch happens to be a virtual switch so I’ll use that term for mine.
As soon as I had created my virtual switch in Homebridge, it showed up in the Home app as a physical switch called Vacation.
Nerd alert over
Whether you have a physical switch dedicated to the Vacation task or a virtual switch doing the job, we’re ready for step two.
Convert to Shortcut
I originally assumed that the Shortcuts app could do this automation for us, but I looked up this convert to shortcut term and found out that it’s a function buried inside the Home app.
On iOS (it doesn’t seem to function properly for me on the Mac version of Home), it’s an option you can only see when you create a new Automation. You would think that “convert to shortcut” would be for existing Automations, but you’d be wrong.
I learned everything I know about “convert to shortcut” by a fantastic guy on YouTube named Shane Whatley. In his video, “HomeKit Automations: Convert to Shortcut! 
Recreating Our Automations
We are going to have to recreate our Automations to use this magical “convert to shortcut” concept. Remember I’ve already created a scene called WH ON, which is simply the switch for the water heater pump in the ON state. I could have done all of this with just the switch itself, but having a scene makes it adaptable for future things to be added to the scene and it also makes the Shortcut more readable.
Remember I had 4 Automations, so I’m going to have to recreate all 4 of them. In the end I will have 8, but let’s not get ahead of ourselves.
We’ll create a new Automation by clicking the + button in the upper right, and choosing an Event to trigger the AutomatIon. I’m using “a time of day occurs” as my Event trigger. At this point, you’re offered scenes and accessories to automate. Do NOT choose a scene or accessory to automate. Instead, scroll down to the very bottom of the list of scenes and accessories and you’ll see a button that says “Convert to Shortcut”.
Totally intuitive. Can’t believe you never noticed that. Or figured out what it did.
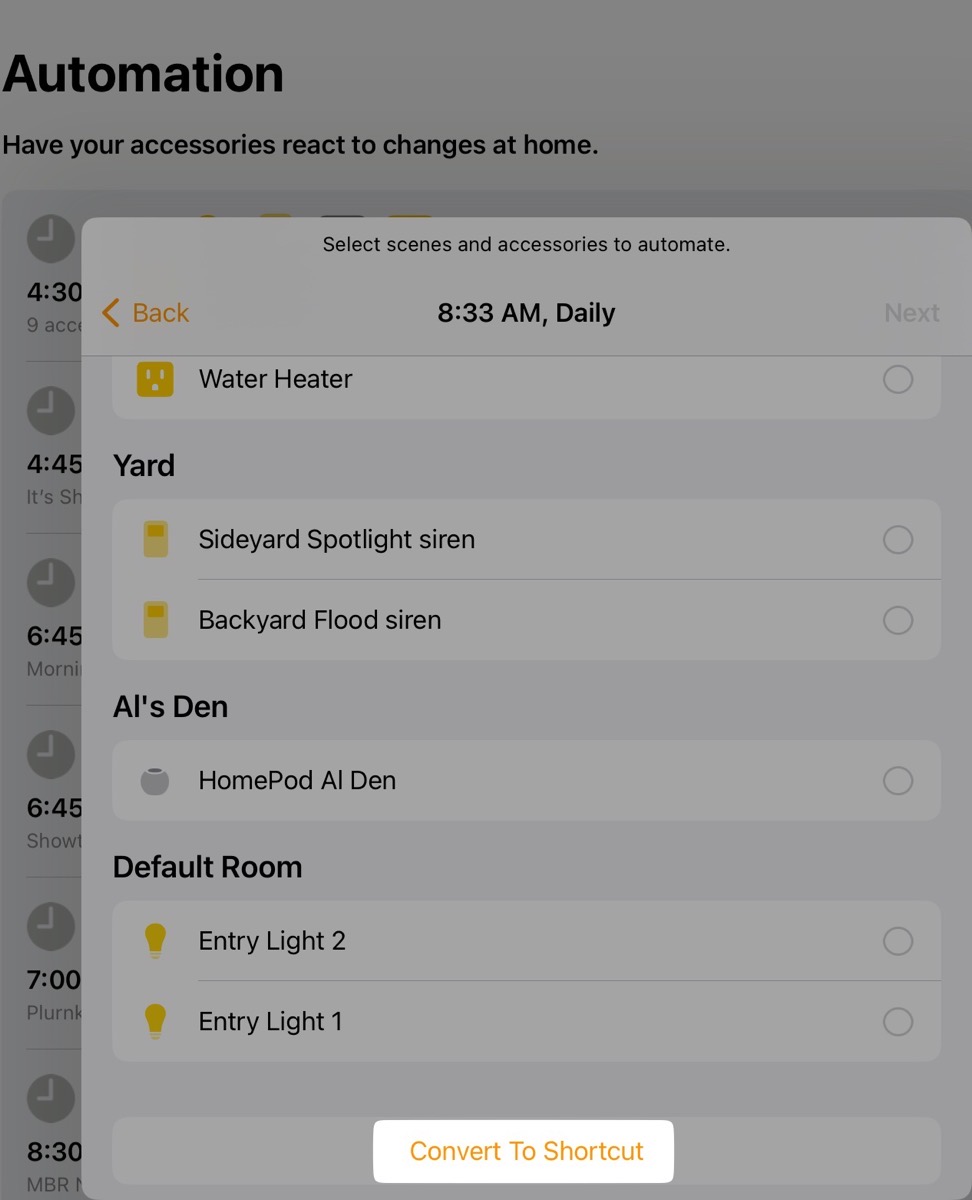
You’ll now enter the lovely world of Shortcuts. But it’s not exactly Shortcuts. It appears to be a small subset of Shortcuts, but it’s got the Shortcuts we need.
If/Otherwise/End If
For us to have a single switch to flip that disables four Automations we need to create some logic. It’s common to create an If/Then/Else condition in programming. Apple uses a slightly different terminology. They use If/Otherwise/End If.
We want to tell our Shortcut that if the Vacation switch is turned off, go ahead and run our Automations to turn the water heater pump on. Otherwise (meaning Vacation is on), then set the water heater pump to off.
When mini Shortcuts opens, you’ll see it already has one command: “Set Scenes and Accessories”. We’ll be using it in a moment but first we need to add the logic steps.
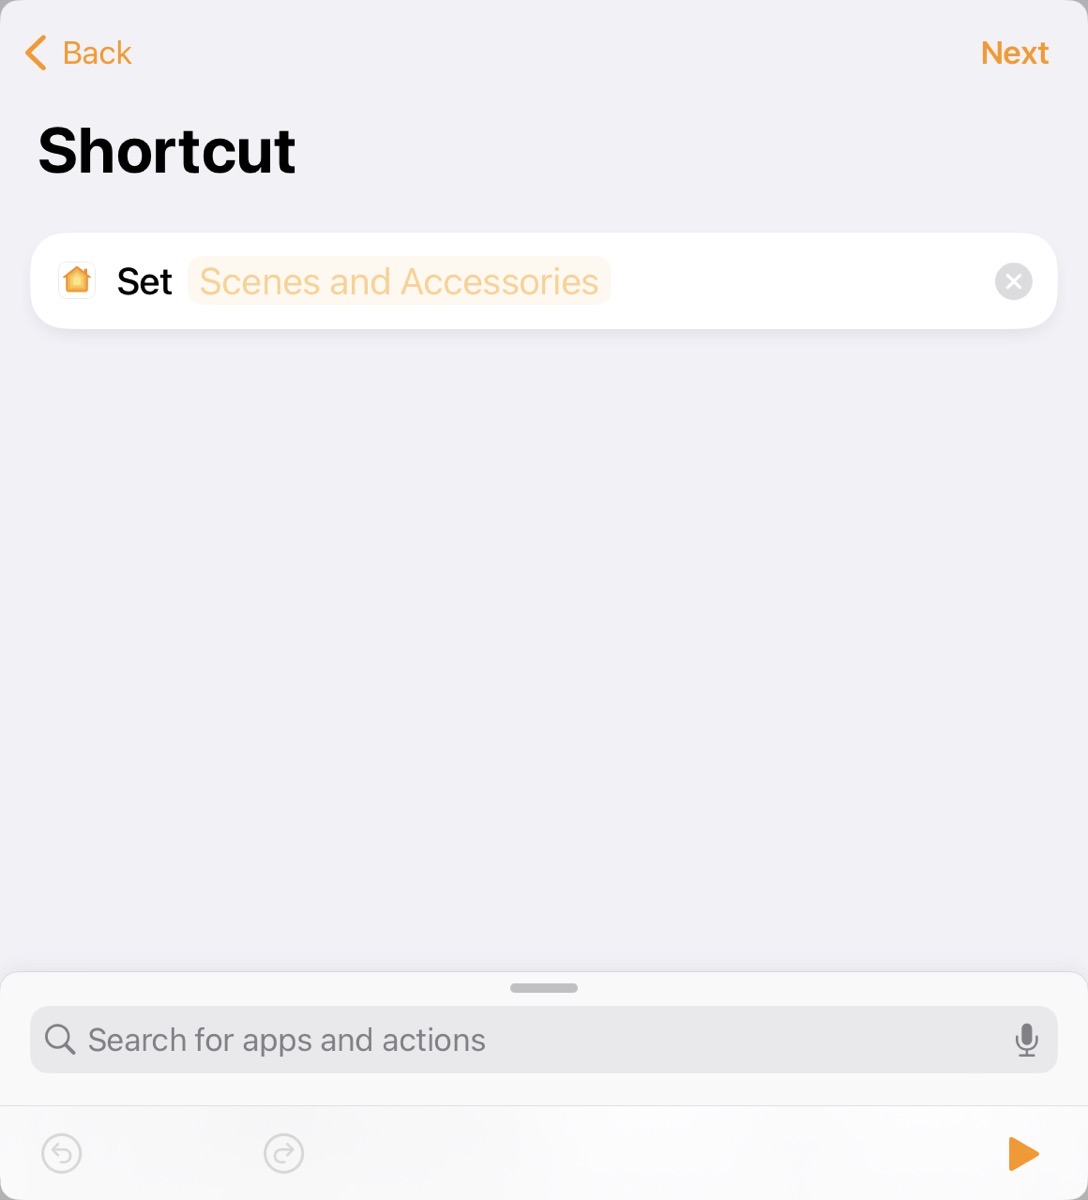
Creating the logic is actually super easy. In the search bar at the bottom, just type “if” and when the option shows up, double-tap it and it will drop in three commands: If, Otherwise, and End If.
Remember I said that the Shortcut will be prepopulated with a single command to “Set Scenes and Accessories”? We want to move that down into the If conditional statement. We need a second Set command for the Otherwise condition.
You could search for Set in the search bar to add a second Set command, but Shane taught me a much easier way. If you tap on the little icon on the left of the command, you get a menu, and Duplicate is an option. Now you can drag the duplicate under the Otherwise condition. Duplicating commands like this is a huge timesaver, but make sure you duplicate the commands before you assign anything to them.
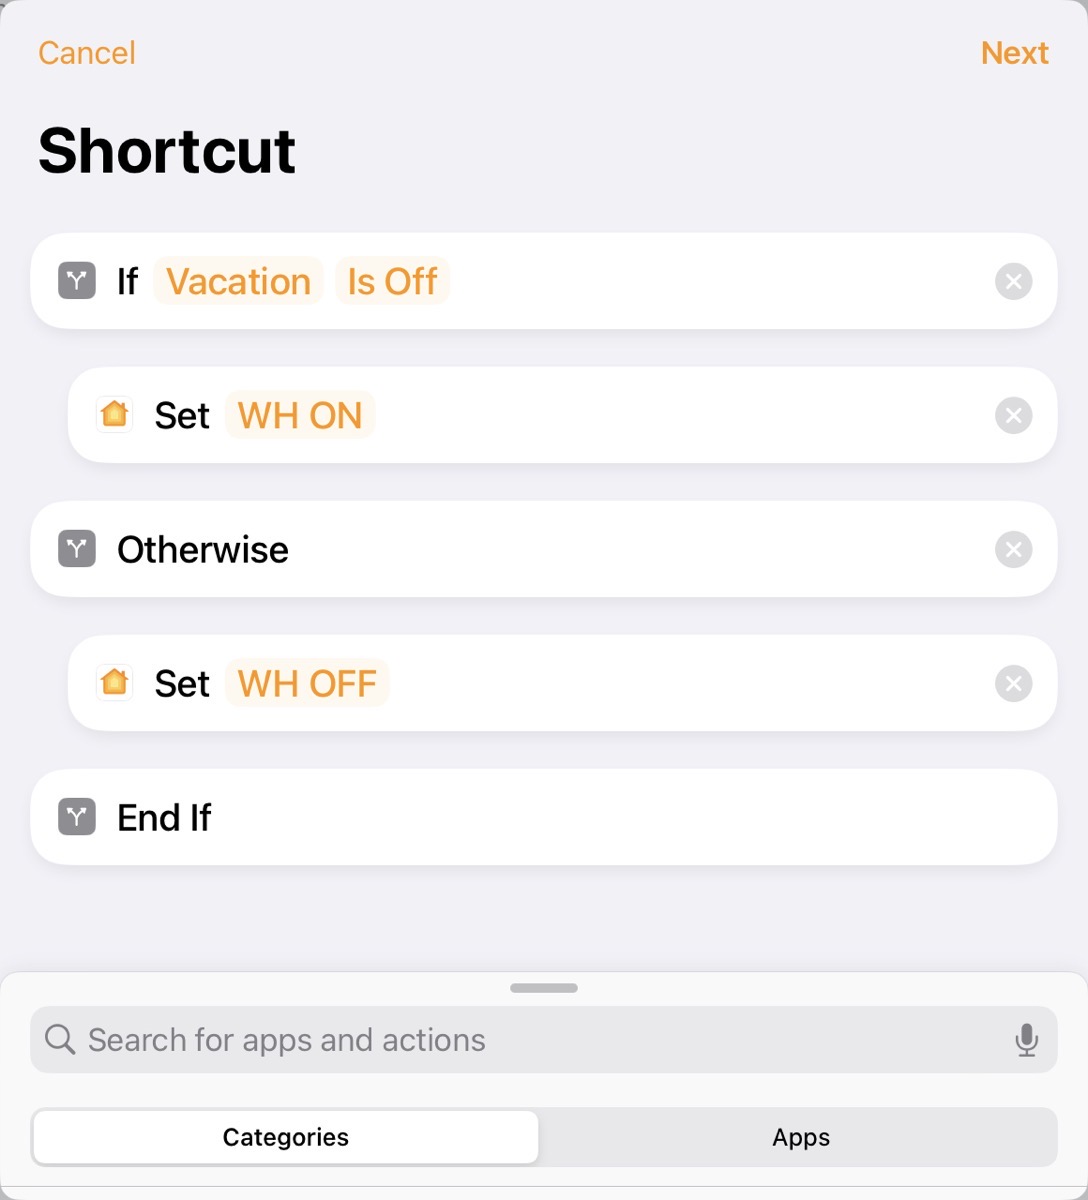
Rather than go through the details of how to edit the shortcut steps (which you can learn from people much more qualified than me), I put a screenshot in the shownotes of my final shortcut that is very simple to read and does what I described. If Vacation is Off, set WH ON, Otherwise Set WH OFF, followed by the End If statement.
Remember I said earlier that using a Scene for the water heater pump switch was more readable than if I’d addressed the switch directly? In the screenshot, you can see “Set WH ON” where WH ON is the scene. If I’d directly addressed the switch, it would have just shown the name of the switch. I’d have to tap into the switch name to find out which state I’d told it to be in, on or off.

I mentioned earlier that I created 4 of these for the 4 times a day we want the water heater pump to turn on. But I also said I had to make 8 Automations. Why is that?
When we originally created our 4 time-based Automations to control the water heater pump, we were able to not only turn the device on at a specific time but also to turn it off after a specified elapsed time. However, with Convert to Shortcut Automations, you don’t get that option.
So…we had to create 4 regular Automations to tell the 4 Shortcut Automations to stop. Since these 4 Automations are all telling the switch for the water heater pump to turn off at a certain time, we don’t need the Vacation switch to also tell it to turn off, so they don’t need any Shortcuts logic.
Even though this creates a lot of Automations, they’re actually very clear and easy to understand at a glance when you see the list.
Steve was enamored enough with our Vacation switch for the water heater pump that he applied what I’d learned to the water cooler (think Sparkletts but a different brand). The water cooler is also on a smart switch and goes on in the morning and off at night. A lot less complex, but yet another thing Steve has to disable manually when we go on vacation. In a couple of minutes, he recreated the Automation to turn the water cooler on with logic from Convert to Shortcuts to let it happen only if the Vacation switch was off.
He’s very happy now – and excited to try the vacation switch on the two trips we have planned in the next couple of weeks!
Bottom Line
I’m starting to think my core competency – my niche in the tech world – is finding incredibly complicated ways to solve very silly little problems. While that’s definitely true, I enjoyed the heck out of this whole process. I enjoyed learning how to make a virtual switch and how a “dummy” switch (if you’ll forgive the term), can allow you to control the super secret Convert to Shortcut menu.
While a physical switch would be less nerd work and quite satisfying to push when you leave the home on vacation to trigger your Automations, we can turn on Vacation mode in our house remotely. And we saved about $10.


For extra credit, have the automations trigger with a Vacation focus mode instead of the virtual switch!
How would that work with multiple people in the home, Ed?
Let’s say Steve’s focus is on Vacation and mine is off – what would happen?
You would have to use a logical AND on the vacation mode status because if either one of you is home you’ll want hot water
That would only be necessary if we went on vacation separately. We vacation together!
I have a circulation pump for exactly the same reasons as you. Mine is plugged into a smart plug. It is scheduled for 3 time periods each day.
I created new Automations to do this. It works in that if nobody’s home, the pump doesn’t turn on. The steps are:
1. Create new Automation.
2. Choose Time of Day.
3. Set up time, adjust days as needed.
4. Tap People.
5. Then choose When Somebody is Home.
6. Choose next and continue to select Scene or Device(s).
Repeat for each time of day the pump should activate.
You also still have access to the time range selector for when to turn off automatically.
Hi Bob – that’s a great way to do it.
I considered that path for us but it wouldn’t work well. We are often gone at the same time for hours at a time and want to come home to warm water at the correct times. It’s only on vacation that we want our home to shut off these automations.