Back in 2018, I told you about a tool called TouchRetouch for iOS from ADVA Soft. The problem to be solved is that you’ve taken a great photo, but there are things in the photo you’d like to remove. In the last five years, it’s come a very long way. Late last year I created a ScreenCastsONLINE tutorial about TouchRetouch but I realized that I never gave the NosillaCast audience a full explanation of everything TouchRetouch can do.
We already have the Retouch tool in Apple Photos for Mac which does a pretty good job of removing blemishes from faces, but it’s limited in its capability and it’s not available on your iPhone or iPad. You can get more advanced tools such as Affinity Photo or Pixelmator Pro, which both have terrific tools for removing unwanted things from images, but they’re applications designed to do a myriad of things to images and so have a steep learning curve. TouchRetouch is designed to do one thing and one thing well.
Pricing
Before we dig into learning about TouchRetouch, let’s talk about pricing. While the app is available for macOS for a flat price of $14.99, I don’t recommend you buy it. If you don’t yet have an Apple Silicon Mac and you don’t have an iPhone or Android phone or an iPad, then maybe consider it. All of the love from the developers has been poured into their mobile app and it’s so far ahead of the Mac desktop app that it’s not even worth me telling you about it.
If you have a mobile device, even on a small screen, the mobile app is fantastic. I’ll be explaining why it works so well on the small screen. If you have an Apple Silicon Mac, the iOS version of TouchRetouch will work on your Mac and again, is so much more capable than the dedicated Mac app.
Now here’s the catch. The mobile app is a subscription service. I know, I’m tired of subscriptions too, but this is where we are now. We have to decide between subscriptions for just about everything these days. Luckily the price isn’t high, and if you find you’re using it often, I think it will be worth the price.
The folks at ADVA Soft are great and very responsive but they make it tricky to figure out the pricing. They have a blog post about it but it’s on Medium (which I think is a weird place to put it) so I wrote to them directly and asked for the pricing and they got back to me immediately. I’ll give you the full description of what they sent but I think I can say it more simply.
You can try it out for free but can only export one image per day. If you want to buy it, it’s $15/year. If you already bought it when it was standalone, you can keep using it without losing anything, but you won’t get the new features. If you want to upgrade to the subscription, they’ll cut you a deal at half price for the first year.
- Retouch Free (for new users) > Users can use all the app’s features and tools, but with one limitation – only one photo export per day is allowed (no payments are made)
-
Retouch Plus (Yearly Plan – for new users) > No limitations on the app usage (14.99 $/year (prices may vary across different countries)); three-day trial is offered
-
Retouch Core (for those who already bought the app when it was a paid app) – Users can keep using all the features they previously paid for with no restrictions; users can try out new (premium) features but cannot export photos with those features applied to them (no additional charges will be made)
-
Retouch Plus (Yearly Plan – for our loyal users) > a yearly subscription with a 50% discount for the first year of use
One more thing – TouchRetouch is in Family Sharing so if you have family members who might like to use it, that makes the subscription a bit easier to accept, and remember it will work on your Apple Silicon Mac without the $15 one-time app. Ok, we’ve eaten our vegetables, let’s talk about how to use TouchRetouch and how amazing it is!
First Launch
When you first launch TouchRetouch, it shows one simple button in the middle inviting you to Open Gallery. This button will reveal the standard photo picker from Apple Photos (after you give it permission of course). Unlike some apps, you don’t necessarily have to scroll through your thousands of photos, you can view albums, and you can search. I name a lot of my photos and it uses those titles for search along with the standard people and places options built into Photos.
For the different tools in TouchRetouch, I’ll use images that show off the particular category of tools, I’m going to start with a photo I took down at the beach. The Santa Monica mountains are in the background with a nice white surf coming in, and there’s a delightful lifeguard station painted in rainbow colors. The only problem is that there are four ugly trashcans along the sand ruining the photo. I’d like to remove them.
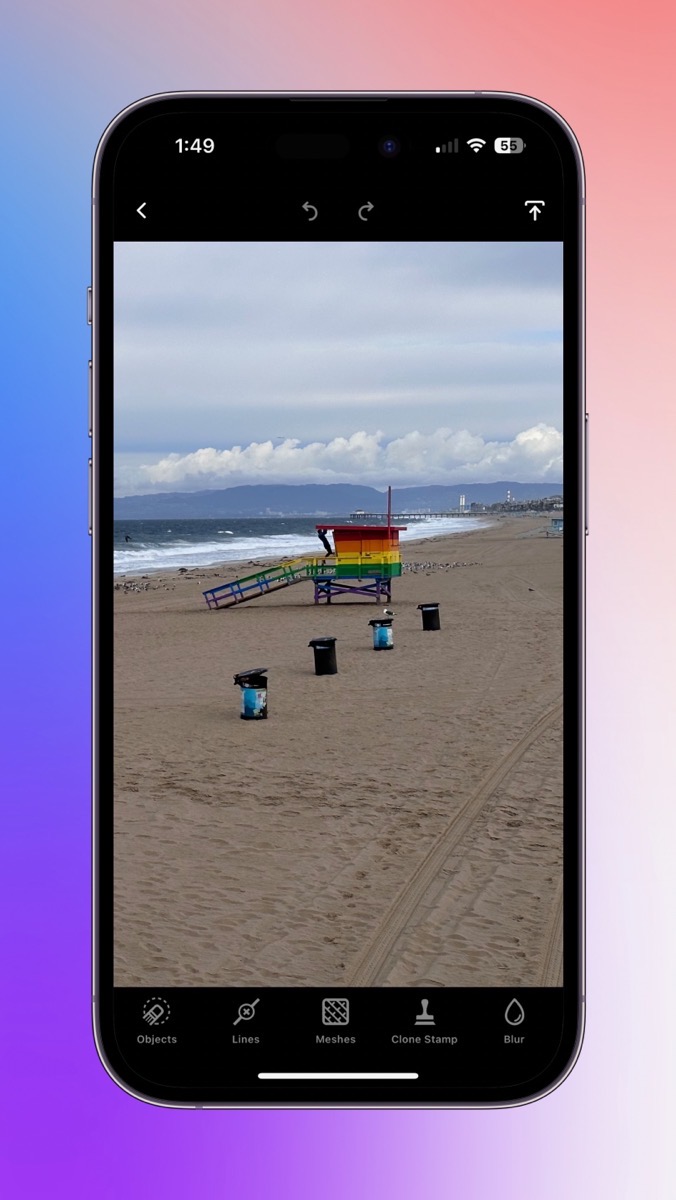
Below the image are five tool categories. Objects, Lines, Meshes, Clone Stamp, and blur. You’ll find it handy to pinch to zoom in and out as you work on your image. For our icky trash cans, we’ll use the Objects tools. Once I select Objects, I see four specific tools: Brush, Lasso, Eraser, and Settings.
Object-Aware Retouching
TouchRetouch has what they call object-aware retouching – meaning that their algorithms recognize objects you’re trying to remove as being different from things that are near them. If you select the Brush tool within Objects, you’ll notice that there are Settings for the tool. The obvious setting is to change the size of the selection brush with a slider, but you can also enable their people-aware algorithm. I haven’t done a test of people and other objects to test how it works with and without this setting enabled, but if you don’t get the effect you wanted I’d give this setting a try.
After selecting the Brush tool, if you’ve just got small blemishes on your image, you can simply tap on the screen to remove them but for bigger objects like big ol’ ugly trash cans, you’ll need to draw over the object.
When you drag your finger over an unwanted object, your finger obscures the thing you’re trying to select. With TouchRetouch, as soon as you start to finger paint like this, you’ll see a square in the corner reflecting exactly what you can’t see under your finger. It shows bright green where you’ve painted, and a crosshair showing the center of your finger touch. On an iPhone, you don’t need to mess with this little viewer, but on a big iPad, you may find it useful to drag it around so it’s closer to where you’re coloring.
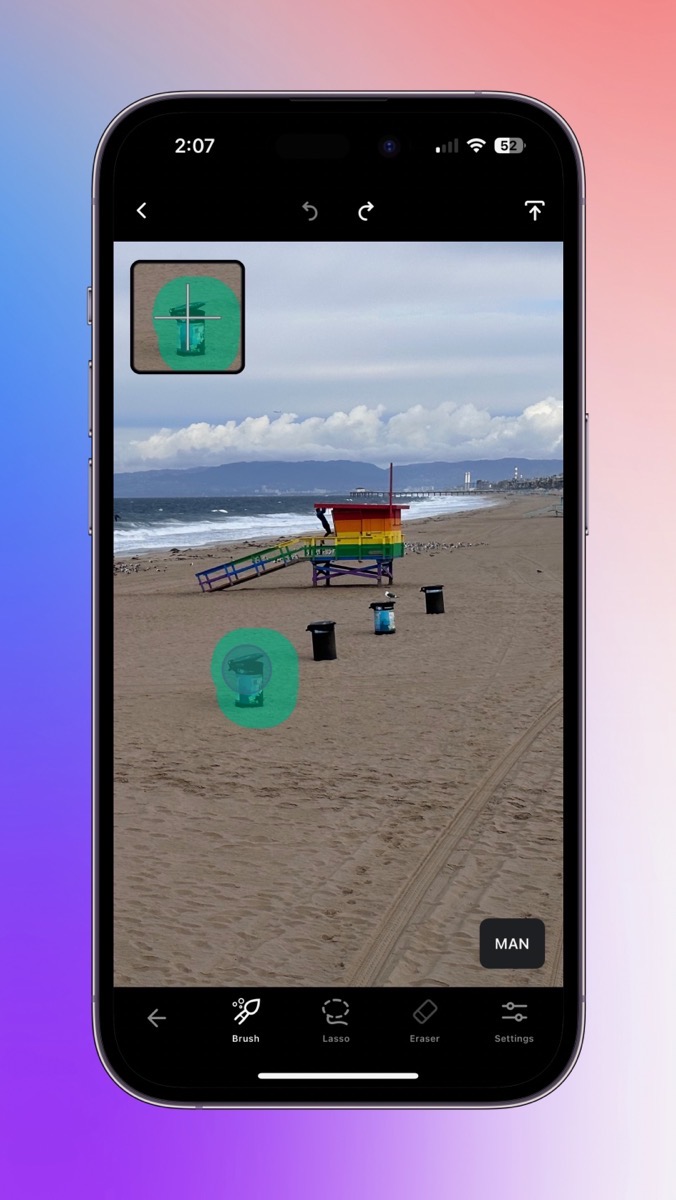
As you select one or more areas in this way, in the bottom right you’ll see a button that says “Go”. Use that button to remove the objects. For trash cans on sand, TouchRetouch does a great job of removal. You know that the success of apps like this is highly dependent on the subject. I find that TouchRetouch does a really good job in general but I can’t say that it doesn’t fail in the hardest examples.
On-screen, before you select anything, you’ll see a button that says “Man” which means we’ve been in manual removal mode. If tapping Go after selection is more work than you want, tap Man and it will change to AUTO. Now every time you let go from making a selection it will instantly disappear.
Restore and Reapply
On trickier objects than dark trashcans on beige sand, your selection might be bigger than necessary and have some adverse effects. Rather than undoing and trying again, TouchRetouch lets you edit your selection with Restore and Reapply. Right after you erase an object with your big, fat finger, the Restore icon will be automatically selected. If you select and hold on Restore, you’ll see the object you just erased reappear. This gives you a visual queue of what you want to restore. Wherever you drag around with the Retore tool will be … well … restored just like it says on the tin.
When you’re using the Restore tool, you’ll see a new tool arrive in the toolbox below called Reapply. You can toggle back and forth between these two tools refining your selection until it meets your satisfaction.
Settings
When you’re working with the Brush, Erase, Restore, and Reapply tools, Settings in the toolbox will allow you to change the size of these weapons. But that’s not all. You can change the weapon of choice, and you can also change the hardness, opacity, and whether the tool is edge-aware.
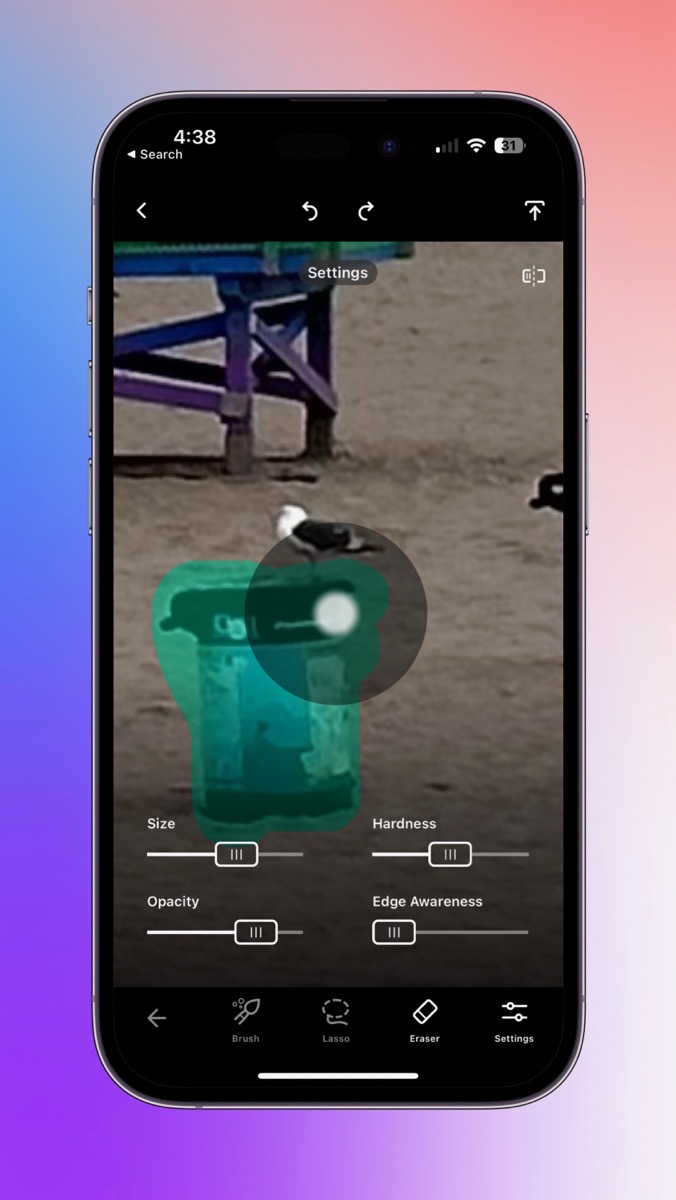
Lower the opacity if you’d like to show some of the removed object. Decrease the hardness if you’d like to have a fuzzy edge to the brush to fade in/out the effect. Edge awareness will attempt to find the edge of the object being removed.
Eraser
I mentioned the Eraser tool before I explained what it does. It’s pretty simple. If you’re in the manual mode and you’ve painted over something, you can immediately erase some of that painting rather than applying the removal and then doing the Restore/Reapply dance.
Lasso
We also have a lasso tool that works much like the brush tool and may be an easier tool when you have a large, easily-defined object to remove. I can grab an entire trashcan in one scribble. Like the Brush, I can Restore and Reapply or use the eraser tool.
Compare Before and After
At any time while you’re working, you can compare before and after your object removal using a tiny icon in the upper right. I don’t know about you, but it always humors me to see the before and after view, especially if I’ve removed people!
I mentioned an undo button – if you tap and hold on the undo button you can revert your image to the original if you’ve messed it up too much and want to start over.

Export
In the far upper right, you can see an up arrow to export your photo. You can save the image as a copy back into your Photos Library or you can modify the original. You can open the image in another application, or copy it to the clipboard.
Under the thumbnail of your image, if you’ve been working on a Live Photo it warns you that this modified image will be saved as a Still image. You also have a dropdown to change the format and resolution of the export. If you have preferred settings for all exports, you can save the current settings as the default.
Let’s say you’re still working on your image and you don’t want to lose your changes, but you forget how to do something in TouchRetouch or you want to change a global setting. You can use the backward chevron to change settings and learn about the tools with tips and little tutorials, and when you select Done you can continue back to work on your image.
Lines
Object removal is table stakes for an application like this, and TouchRetouch meets that requirement. Where I think it shines is how easily it removes lines.
I take a lot of photographs on walks in my neighborhood, and the power lines always ruin my photos. But with TouchRetouch I can quickly open a photo, remove the power lines, and post my image to my friends all from my iPhone while on my walk. I took a photo last Halloween of this awesome ghost in someone’s front yard against the bright blue sky with the sun shining through behind it … but the tethers to hold it up and the powerlines behind it ruin the image.
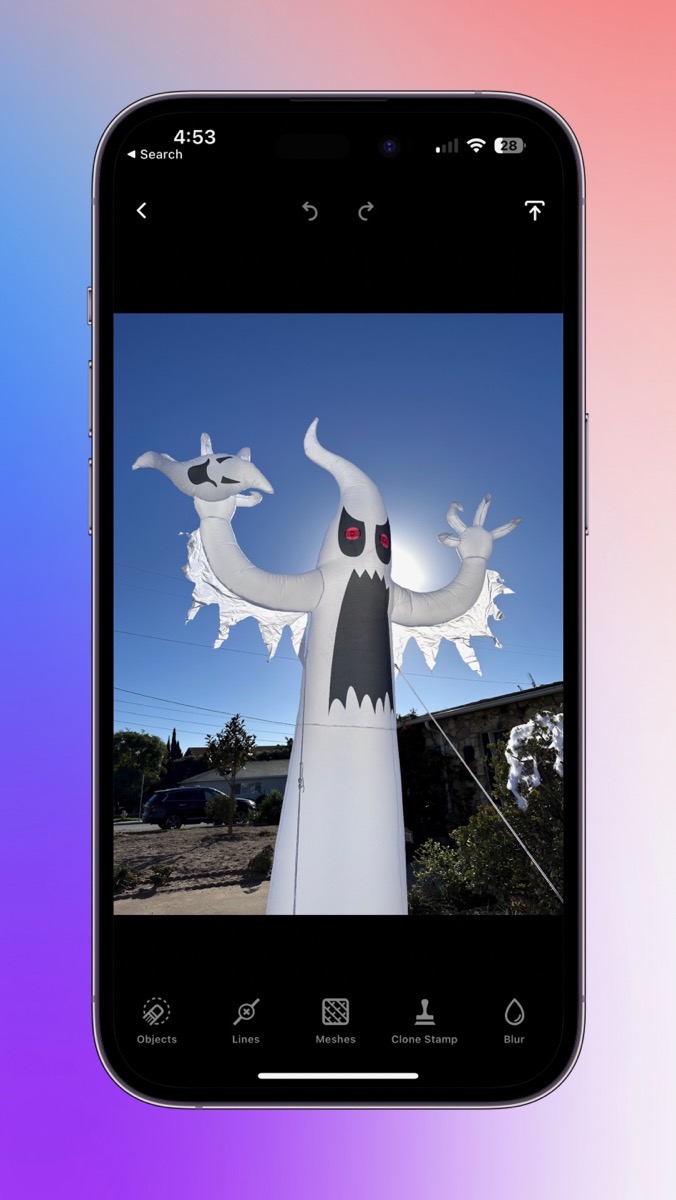
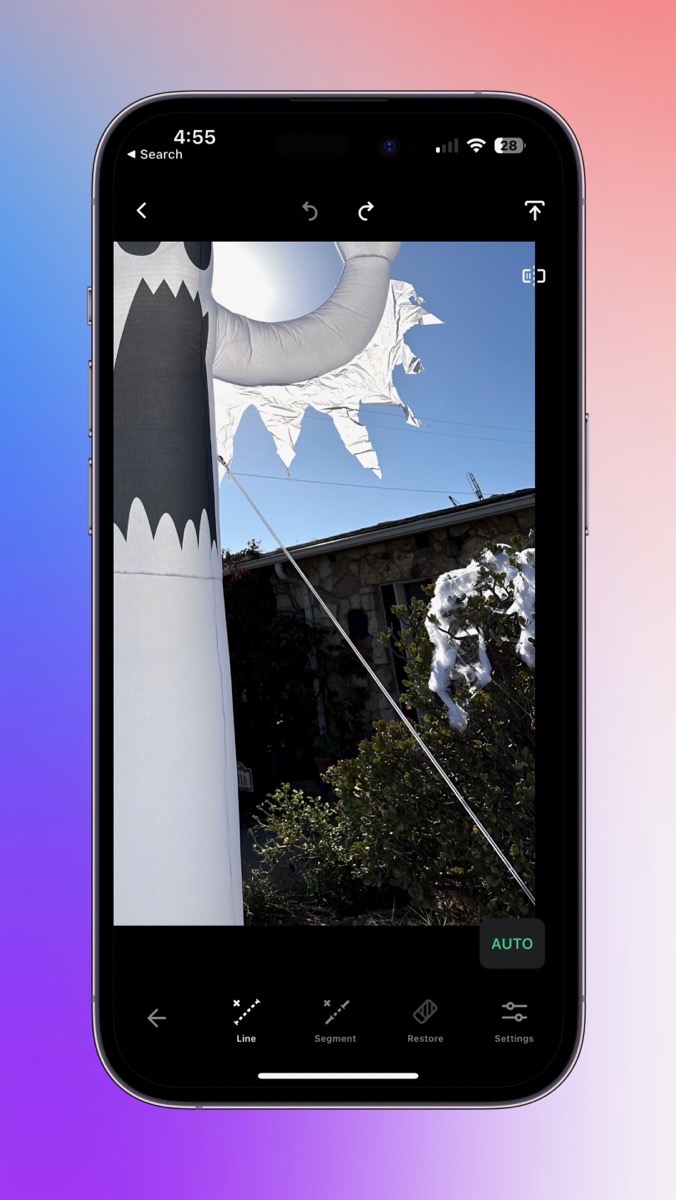
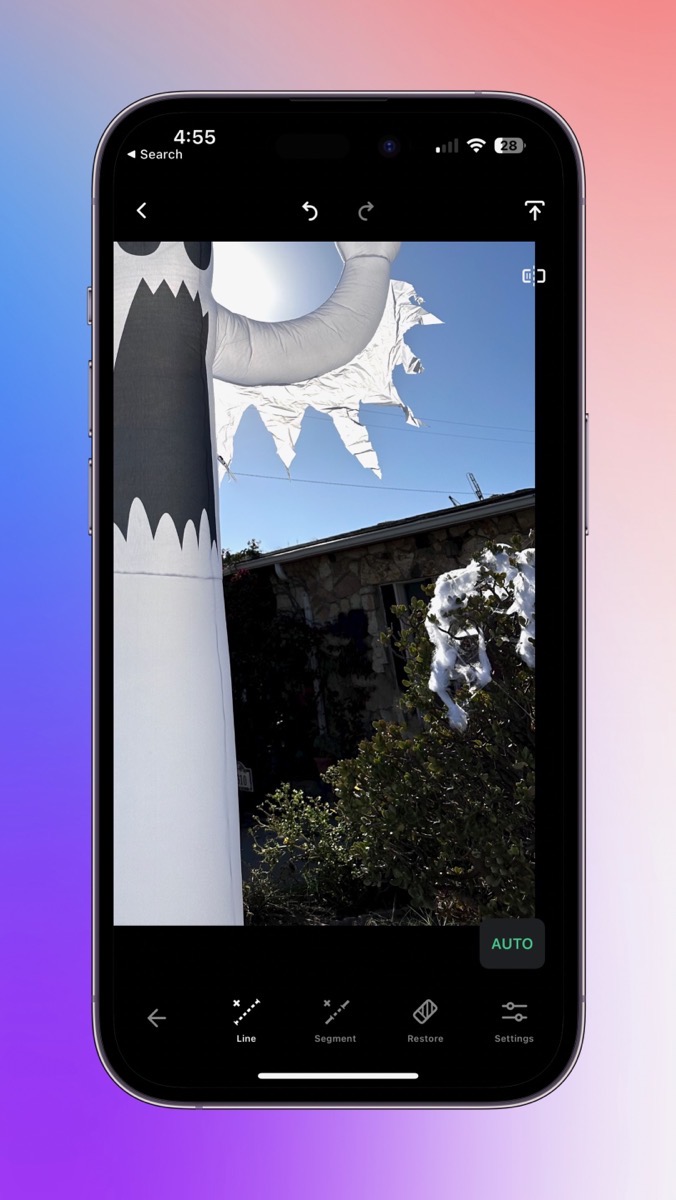
I’ll select the Lines category to fix these problems. At the bottom of the screen are four tools: Line, Segment, Restore, and Settings. I’ll explain the difference between Line and Segment in a moment.
I can zoom in on any of the lines, especially the bright white tether line that ruins the illusion, and drag my big, fat finger along just part of the line and when I let go, the entire thing disappears. Seriously, it’s more magical than the ghost herself. This line I erased in my example goes across the sky, some stonework on the front of the house, and across green shrubbery and it did a remarkably good job.
If for some reason I wasn’t completely happy with the erasure of the line, hitting the back button reveals some interesting options. There’s a slider to change the line thickness of the selection, and it shows you the control points it used to interpret the wiggly line you actually drew. You can move these control points around to more accurately clean up the line removal. You can even add more points by tapping if you think it will help, and if you tap on any existing control points they disappear. Hit Go again to see if the line removal looks any cleaner.
You may have figured out by now that since the Line tool removes an entire line even when you only draw over part of it, the Segment tool starts and stops removal right where you draw.
I’m astonished at how well this works on a tiny iPhone screen. The Adva Soft developers have made it feel natural and easy to use a finger to clean up images.
Mesh
I told you that the line removal tool is magical, but TouchRetouch has a tool that’s even crazier called Mesh. TouchRetouch can remove things like chain link fences!
If you open an image with any kind of mesh in front of it, a simple tap on the Mesh category will cause TouchRetouch to instantly scan the image searching for any mesh it can find in the image. If it finds a mesh, it will highlight what it found in green.
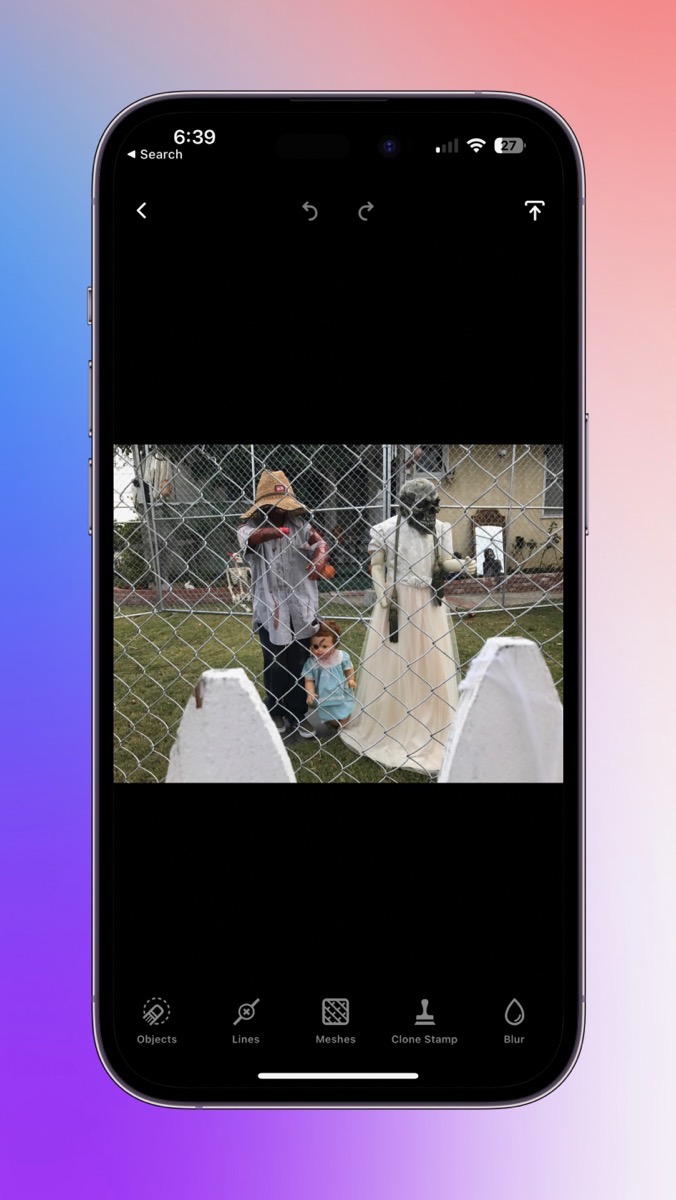
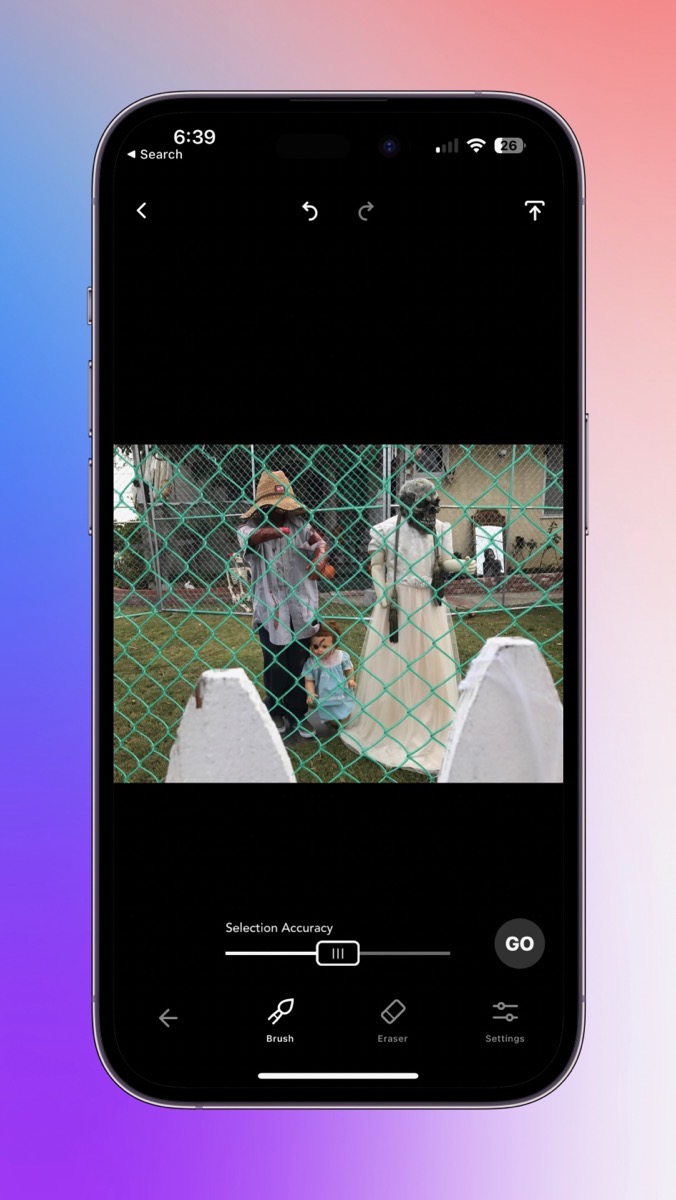
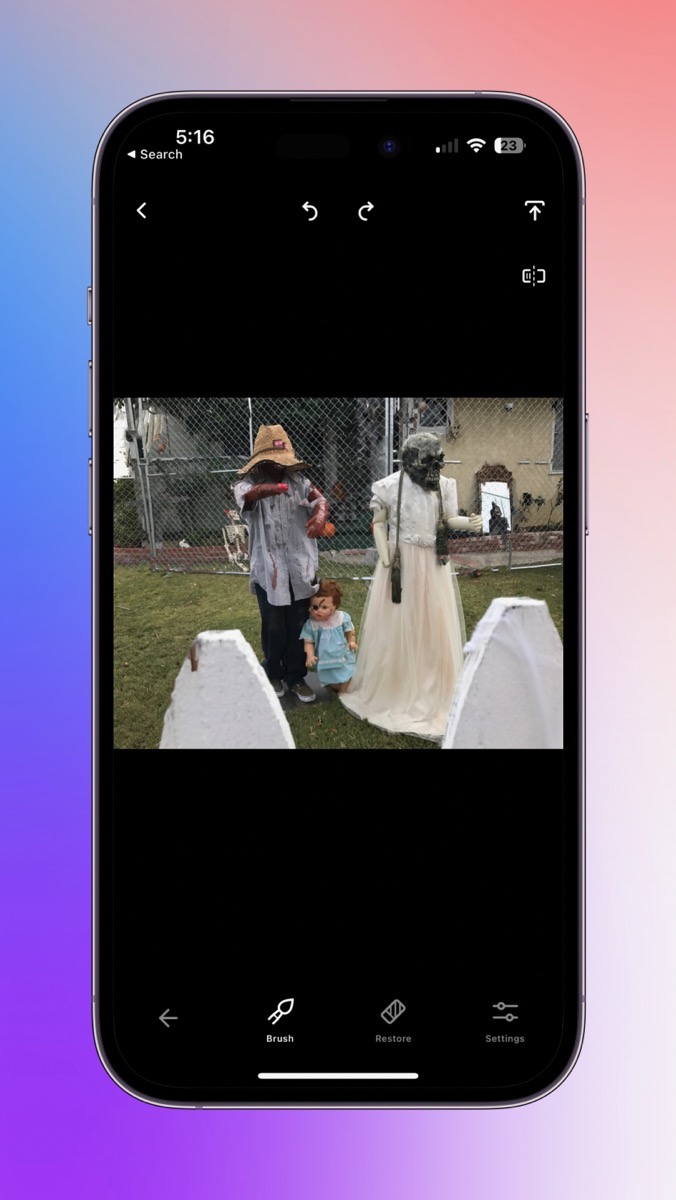
The tools will also change to add a slider for Selection Accuracy in case the Mesh tool misinterpreted the mesh selection. When you press Go, you’ll see the image being processed and it can take quite a few seconds because it’s doing a lot of math!
It looks pretty good but let’s zoom in again and see how good it looks up close. As I pan around, I’ll tap the restore button to see where the fence was before to check for any problems in the image.
I tried the Mesh tool on a particularly challenging image. There were some Halloween ghouls behind a fence, but worse yet there was a chain link fence behind them as well. In a few very small spots TouchRetouch made a few mistakes where the fences overlapped in the image, but it is not anything anyone would notice unless they were pixel-peeping the image.
I know that the developers have been putting a lot of work into TouchRetouch because I used this same image to teach the app for a ScreenCastsONLINE tutorial last year. In the tutorial, when the fence was selected by the Mesh tool, I remember that a skeleton in the background had part of his head removed. I made a joke that I wanted to leave him some dignity, so I used the restore tool to put the rest of his head back. When I tested the Mesh tool again with the same image for this article, the skeleton’s head did not get damaged by the removal of the fence. It was crazy good last year and it’s even smarter now.
Clone Stamp
TouchRetouch has a clone stamp tool that at first blush works just like every clone tool I’ve ever used. Tap in a target location, and then drag your finger around to use that sample to cover up an unwanted object or blemish. TouchRetouch does have the Restore/Reapply that helps make that task easier but it’s still fairly basic.
There’s a trick though with the Clone Stamp to give it superpowers. When you tap to put the target down, if you then tap and hold, you’ll get a popup for three different modes for the clone stamp target: Classic, Slide-back, and Texture.
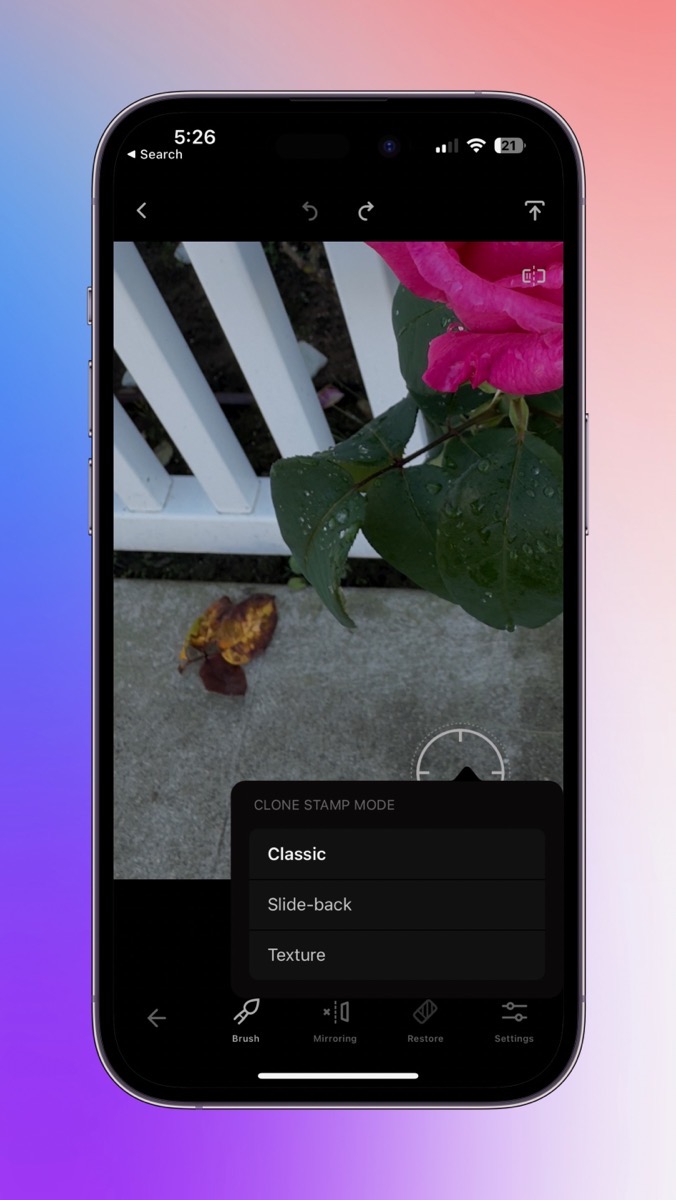
Classic is the default that works by moving the target in the same direction as you paint with your finger. If I pick up my finger and start painting in another area, the target will reposition itself in the same direction I just moved, changing the starting point of the target.
This often works the way you want, but have you ever been trying to clone an area and you run out of run room and start cloning an undesirable area?
With slide-back, the initial painting works just like the classic mode. However, if I pick up my finger, you see that the target slides back to the initial location. I can paint again and replicate the same area. So the target goes back to where it started.
The third option, Texture, is significantly different from the first two. The Texture target is a defined area. Within limits, you can change the size and aspect ratio of that target box.
When you paint with your finger in Texture mode, you can see that the clone tool replicates the area in the box, but when you to the edge of the box it starts over and replicates the boxed area again. I’m not exactly sure what problem it solves.
Within the Clone Stamp tool, you can select to have mirroring enabled as you clone. Picture you’ve got an L on the left side of an image. Without mirroring, the L would just be repeated if you cloned to the right. With TouchRetouch you can mirror horizontally so you get a backward L on the right, or you can choose vertical and get an upside down L, or you can even choose diagonal which makes it upside down and backward. That last one is kind of head-bendy to use but if you ever need it, TouchRetouch has your back.
Blur
One of the Pro tools I don’t yet have access to because of my plan is Blur. This tool isn’t particularly sophisticated. The problem it solves is when you have someone in a photo who shouldn’t be shown, like a young child on social media for example. If you tap on their face with the Blur tool it puts a very obvious blur over their face. There are definitely times this would be useful but I was hoping it would do a little bit more. You can try out Blur but if you haven’t subscribed you can’t export your image with that adjustment.
Retouch as a Photos Extension
While opening the TouchRetouch app and finding an image to fix in your Photos library isn’t difficult, I find it much easier to do it the other way around. From the Photos app, you can run TouchRetouch as an extension.
If you’ve never used Photos extensions, simply select an image, go into edit, and then tap the three-dot menu in the upper right. You should see all of the photo editing apps that have extensions available. There’s only one tricky part to this. TouchRetouch will not be in the list of extensions, for no reason I can think of, it will be called simply Retouch.
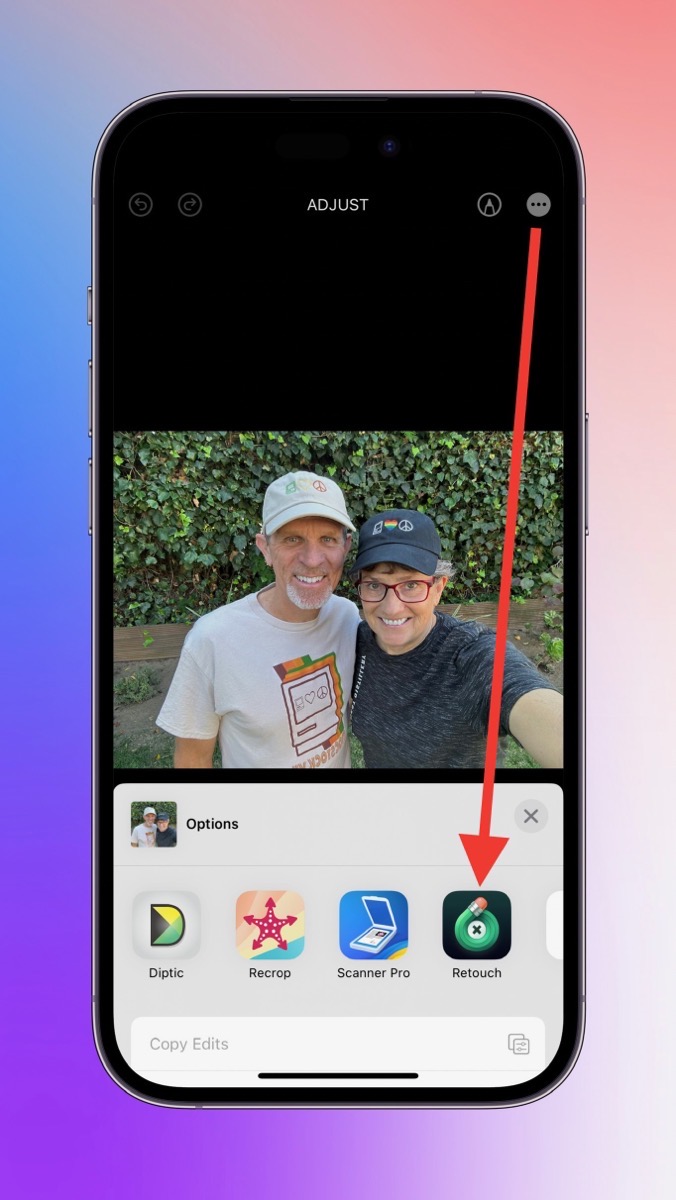
You’ll be warned that Live Photos will be turned off because you’re editing the original, but don’t panic. Changes you make to the image using the Retouch Photos Extension are reversible back in Photos, just like any changes you make in the native editor.
I put an animated GIF of the Photos app where I’m tapping the M key while in normal editing, and you can see the effect of removing a guy from the side of an image even though I made those changes using the Retouch for iOS Photos Extension on my Mac.
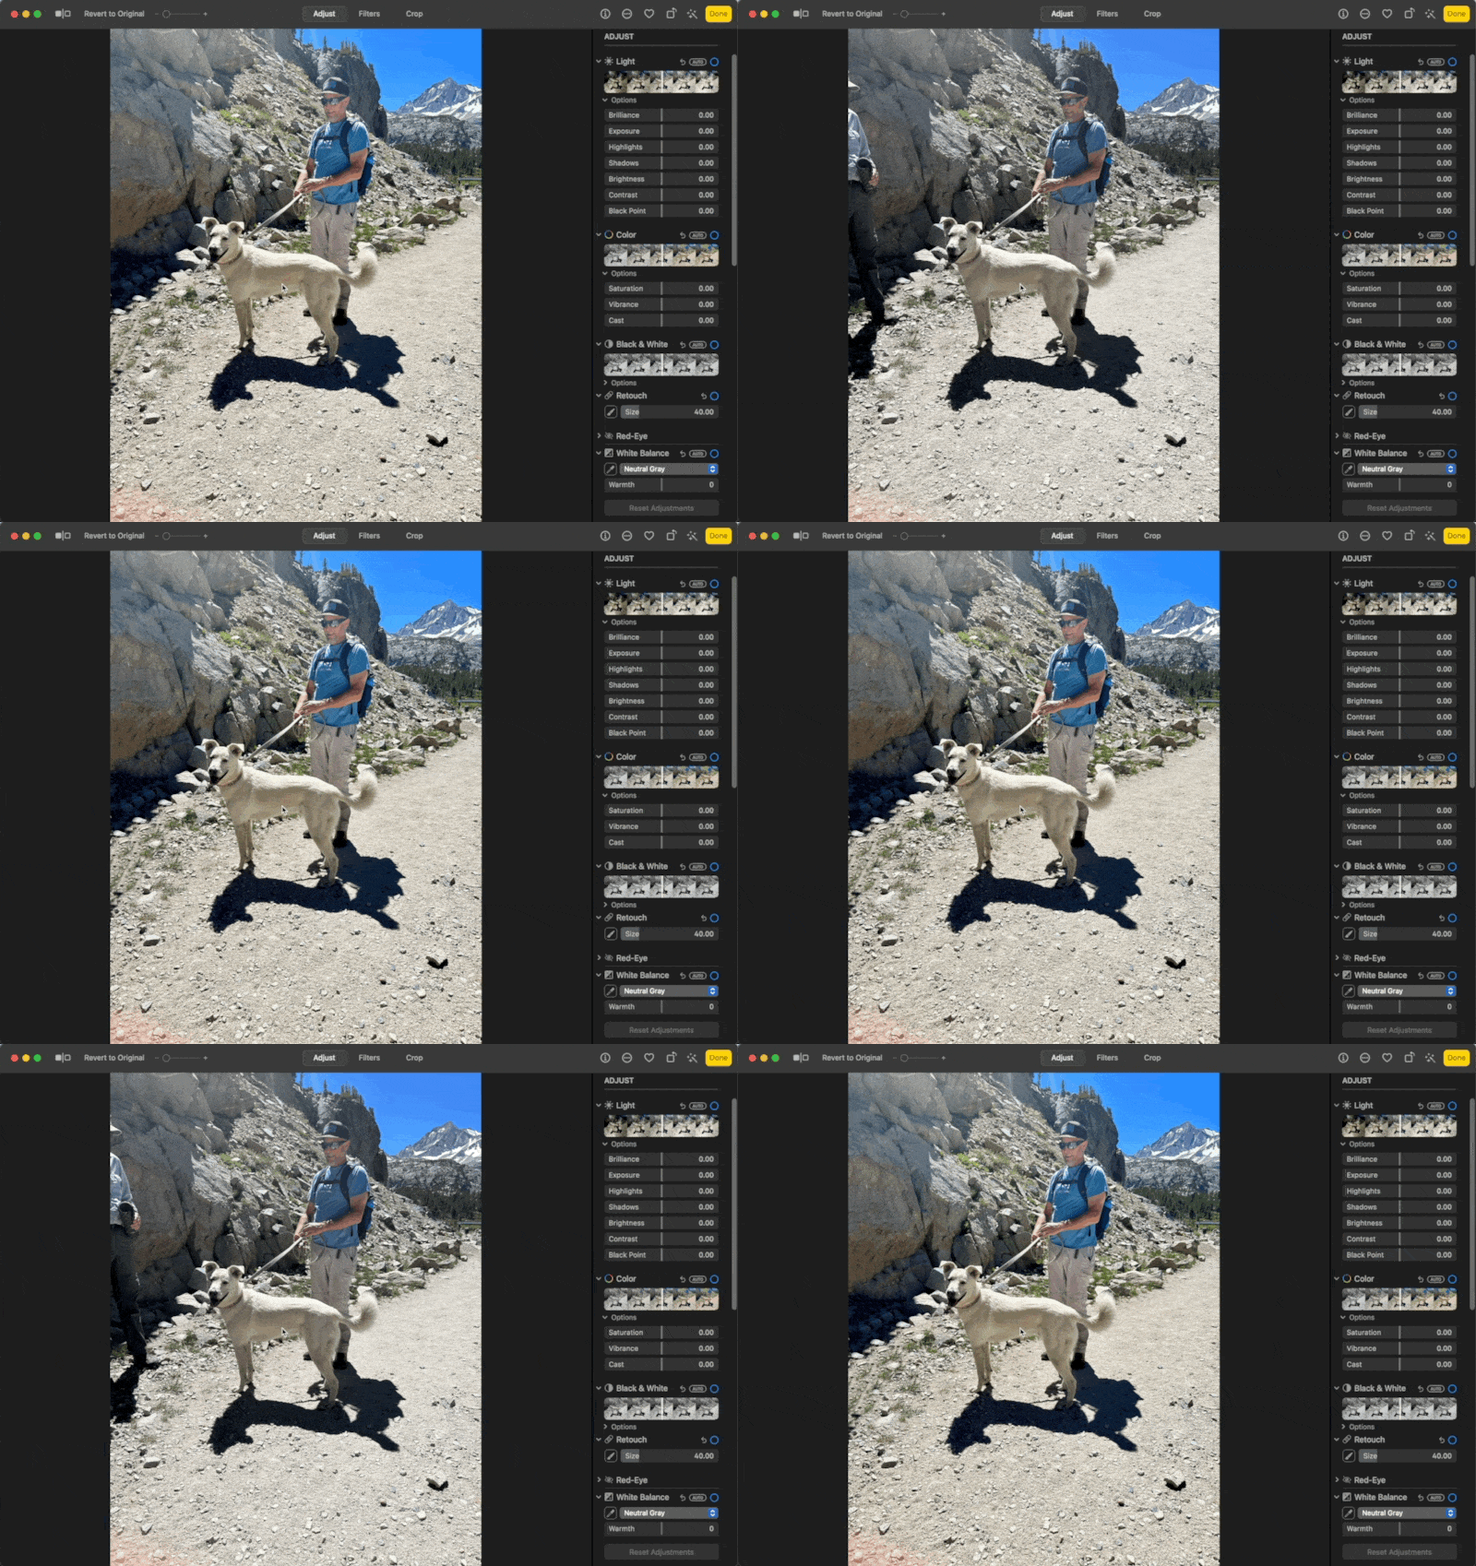
You might expect the TouchRetouch Photos extension to be a reduced capability extension, but it’s not. It has all of the capabilities of the full app. The extension is super useful because I’m already in my Photos app looking at an image with something distracting. No reason to get out of Photos, open TouchRetouch, and then try to find the same image.
360 Editing
Believe it or not, this little app can even edit 360° photos. And yes, I know that 360° is not a good description of these photos because that would mean you could only look around rather than up and down as well. The correct term is 4π steradian photos, but I haven’t gotten any traction on using the proper terminology. But the point is that TouchRetouch, even on your phone, can edit these spherical photos.
All of the tools I’ve explained in TouchRetouch work very well even in spherical 4 π photos.
Bottom Line
The bottom line is that TouchRetouch as a standalone app for iPhone, iPad, and Android is a terrific tool to have at hand when you capture that perfect shot … except there’s a powerline in the background, or a gloppy piece of the sidewalk, or a trash can on the beach, or a chain link fence, or a dog leash. If your photos are worth sharing, are they worth $15/year to make them perfect? Check out the mobile versions at adva-soft.com.

