One of the delights of using electronic devices is when you accidentally discover a hidden capability. A few years ago I was hammering away on the keyboard on my Mac and I accidentally hit the semicolon while holding down the Option key. Out popped an ellipsis – those three periods that are used to convey some missing words in a quote, or to transition to a new thought. I use them often as a way to convey a trailing off of my tone. Not sure if that’s even the right use or if that’s just me?
Whether I’m using ellipses correctly or not, the Mac keyboard can type all kinds of useful punctuation that you can’t find by just looking at the keyboard. When I was listening to a recent Mac Geek Gab, they brought up two more useful punctuation marks. Pilot Pete explained that you can type a greater than or equal to sign (≥) by holding down the Option key with the greater than symbol (>). Likewise less than or equal to (≤) can be typed with Option and the less than symbol (<).
These sound obvious once you hear it, but I’ve needed these symbols from time to time and never found them with the all-powerful Option key.
Inspired, I started holding down the Option key and tapping around and discovered two more useful ones. If you want a true divided by symbol (÷), you can hold down Option and the forward-slash (/). Again, makes sense. The other one I’ve often wanted is the not equal to symbol (≠). By now I bet you’ve found the pattern – it’s Option with the equals symbol (=).
While these hidden keystrokes are lovely, I have trouble remembering them.
Show Keyboard Viewer
If you don’t want to fill up your brain with all of these keystrokes either, you don’t have to. macOS has a Keyboard Viewer that lets you interactively view what will be typed based on the modifier keys you hold down. Back in the old days, the Keyboard Viewer was super easy to find, but I had to dig through a lot of support files to figure out where they’ve hidden the Keyboard Viewer in macOS Sonoma.
The only way to get to Keyboard Viewer is if first you show what’s called “Input Sources” in the menu bar. To enable this feature, open System Settings, and select Keyboard on the left. You should see under Text Input a line that says Input Sources. To the right of that, it will show in grey letters the language you’ve chosen, for example, DE for German. In my case it says U.S. To the right of that, there’s an Edit button. This is really unintuitive because I don’t want to edit the input source, but that’s where Apple has chosen to play this particular round of their little scavenger hunt.
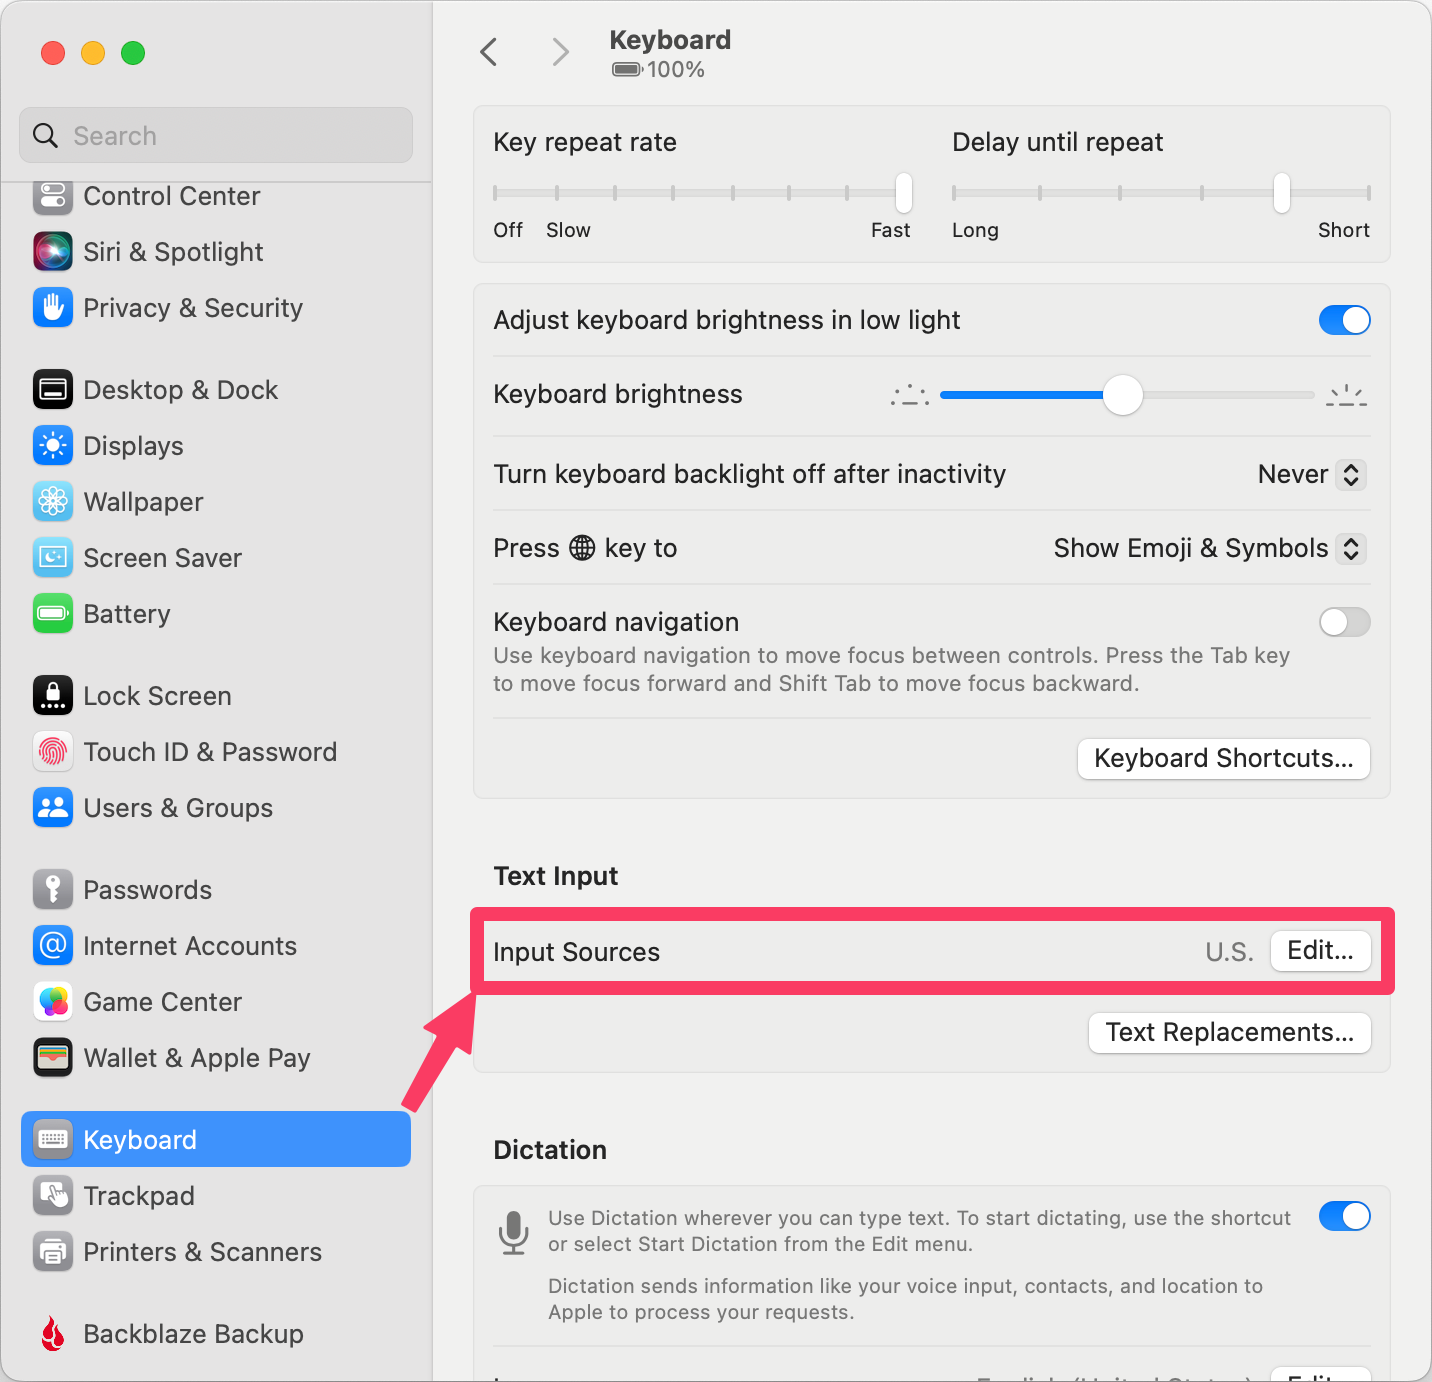
In the unintuitively named Edit menu, the top toggle says “Show Input menu in menu bar”. Once you toggle that on, you can close System Settings.
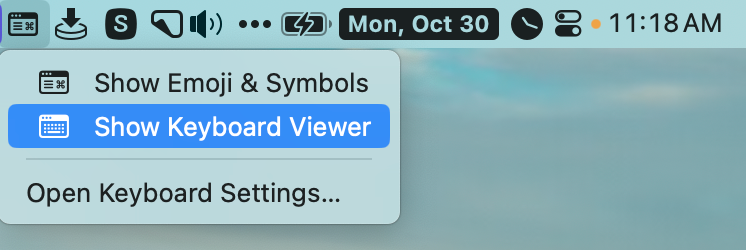
Now in your menu bar, you’ll see this very detailed icon that looks like a Finder window with the three buttons in the upper left, some lines of text in the window, along with the command symbol.
When you select this Input Sources icon in the menu bar, the dropdown gives you the option of showing the Emoji & Symbols tool or the Keyboard Viewer.
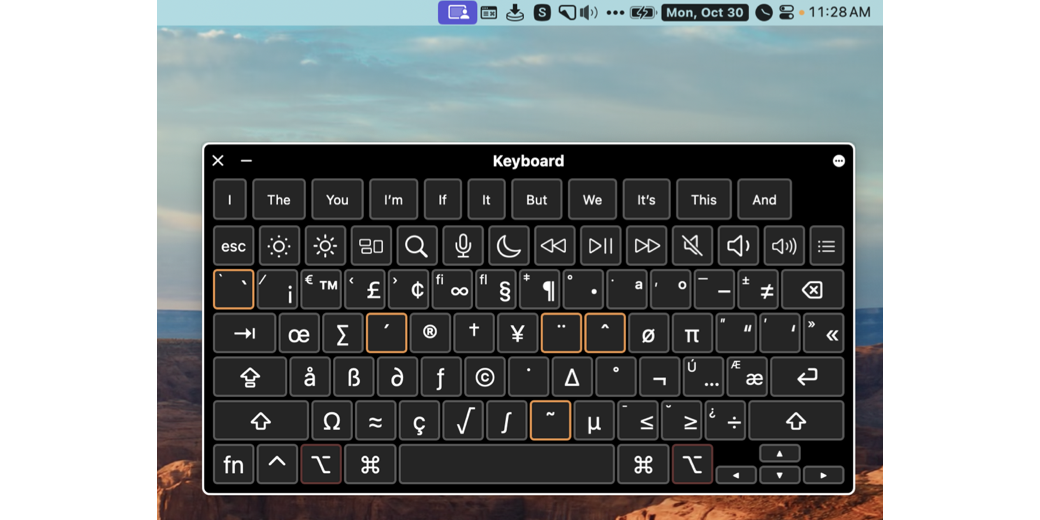
When you open the Keyboard Viewer, you can hold down modifier keys (like the Option key) and see what the different keys will type. In the screenshot I put in the shownotes, I held down the Option key (and you can see it is slightly highlighted in red). Since the Option key is held down, you can see ≤, ≥, ÷, …, and ≠ have replaced their normal keys. As soon as I hold down a modifier key while looking at the Keyboard Viewer, I can’t seem to remember which key is showing the character I want, so I just toggle the modifier key on and off until I can remember the key combination to get my desired punctuation.
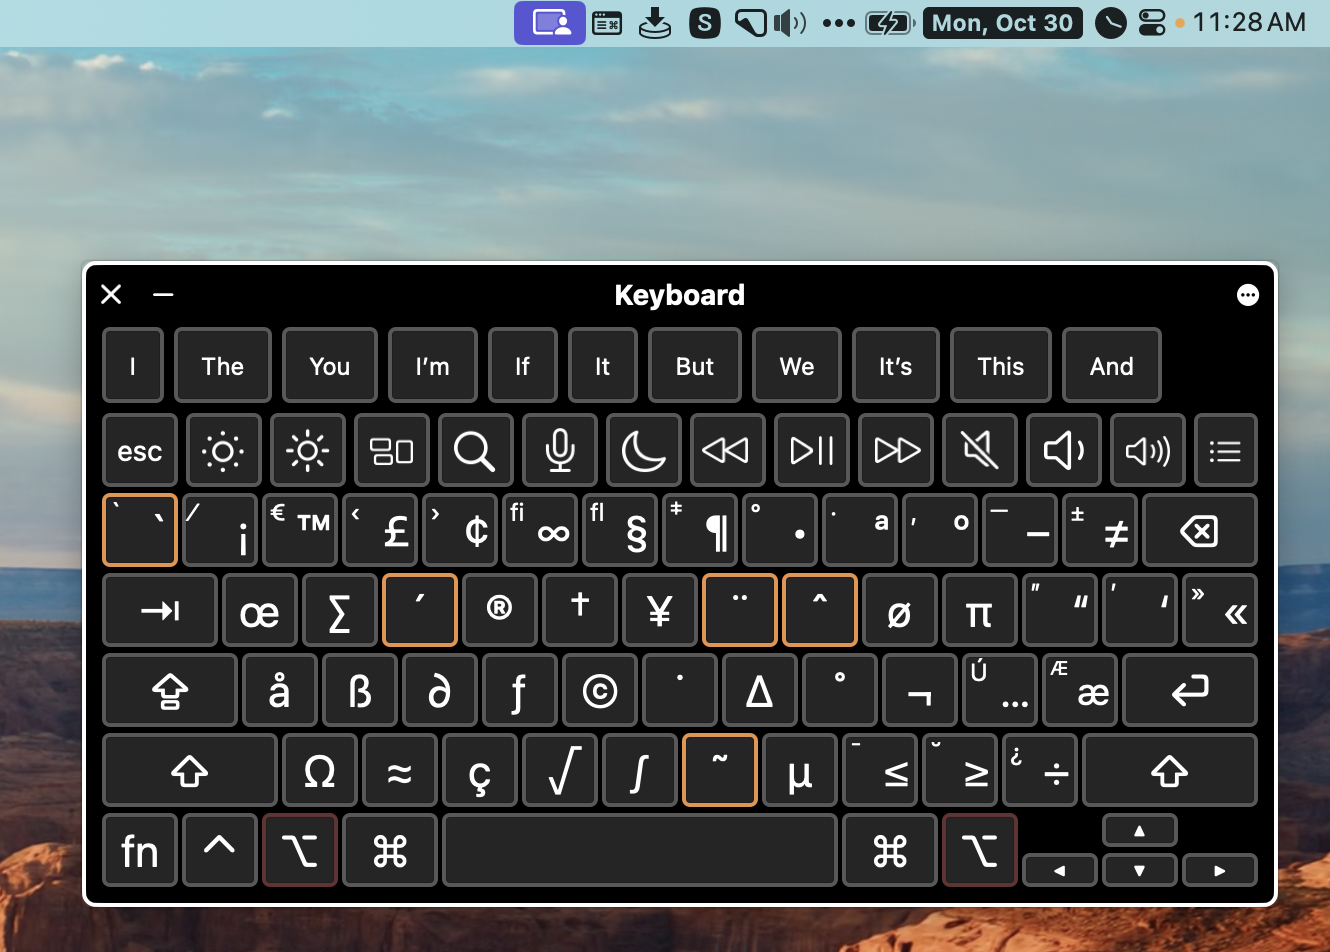
After you enable the Keyboard Viewer, I highly recommend holding down the different modifier keys just to familiarize yourself with what’s available. Don’t forget to try Option-Shift too. One of the keystrokes I can never remember is how to type the Apple logo. I’ll leave it as an exercise for the student for you to figure out how to type it using the Keyboard Viewer. Ooh – I just found another one I need – Option-Shift-2 is how to type the Euro symbol (€). Now why wasn’t that Option-Shift-$? Oh well, at least now I know I can find it with the Keyboard Viewer.
Accents
I mentioned that the modifier key you hold down will be slightly highlighted in red when looking at the Keyboard Viewer, but you’ll also notice that several of the keys have orange boxes around them. These are very special keys. I’ll explain by example.
Where the “e” key is normally, with the Option key held down you’ll see an accent going up and to the right (and it’s highlighted in orange). If you want to type this accent character above a letter, you hold down the Option key while typing the “e” and then follow it with the letter over which you want the accent. It’s quite common to put this accent above the letter “e” so you type Option-e followed by “e” again and you’ll get the é with the accent.
By the way, one of the few things I remember from High School French class is that this accent is called an accent aigu, or acute accent. Get it? It’s an acute angle!
Umlaut is another accent that’s useful in German (and I imagine some other Germanic languages?) The umlaut is common over both the letter “u” and the letter “o” which you can type with Option-u-u and Option-u-o. You can even type an umlaut over an “e” with Option-e-e.
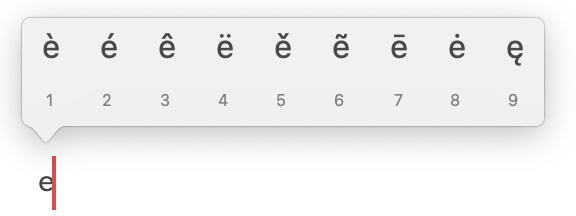
I’m sure a lot of you are hollering at your devices right now that there’s no need to know any of this because nowadays you just hold down the e or the u or the o on your keyboard and macOS will offer you all of the accents. True, but if I told you that first, I never would have been able to combine a story about High School French and geometry.
I Used to Be Able To …
I mentioned earlier that it used to be a lot easier to launch the Keyboard Viewer. In macOS we have a pane called the Character Viewer that you can launch by tapping the Globe icon on your keyboard. It might come up with just an emoji, but you can see the full set of emoji and symbols by tapping the icon in the upper right … which looks exactly like the Input Sources icon we just enabled in the menu bar. It now simply does this toggle back and forth between just emoji and emoji and symbols, but in the old days, that icon would open the Keyboard Viewer. It’s fascinating to me that they still use the same icon but have two meanings for this icon.
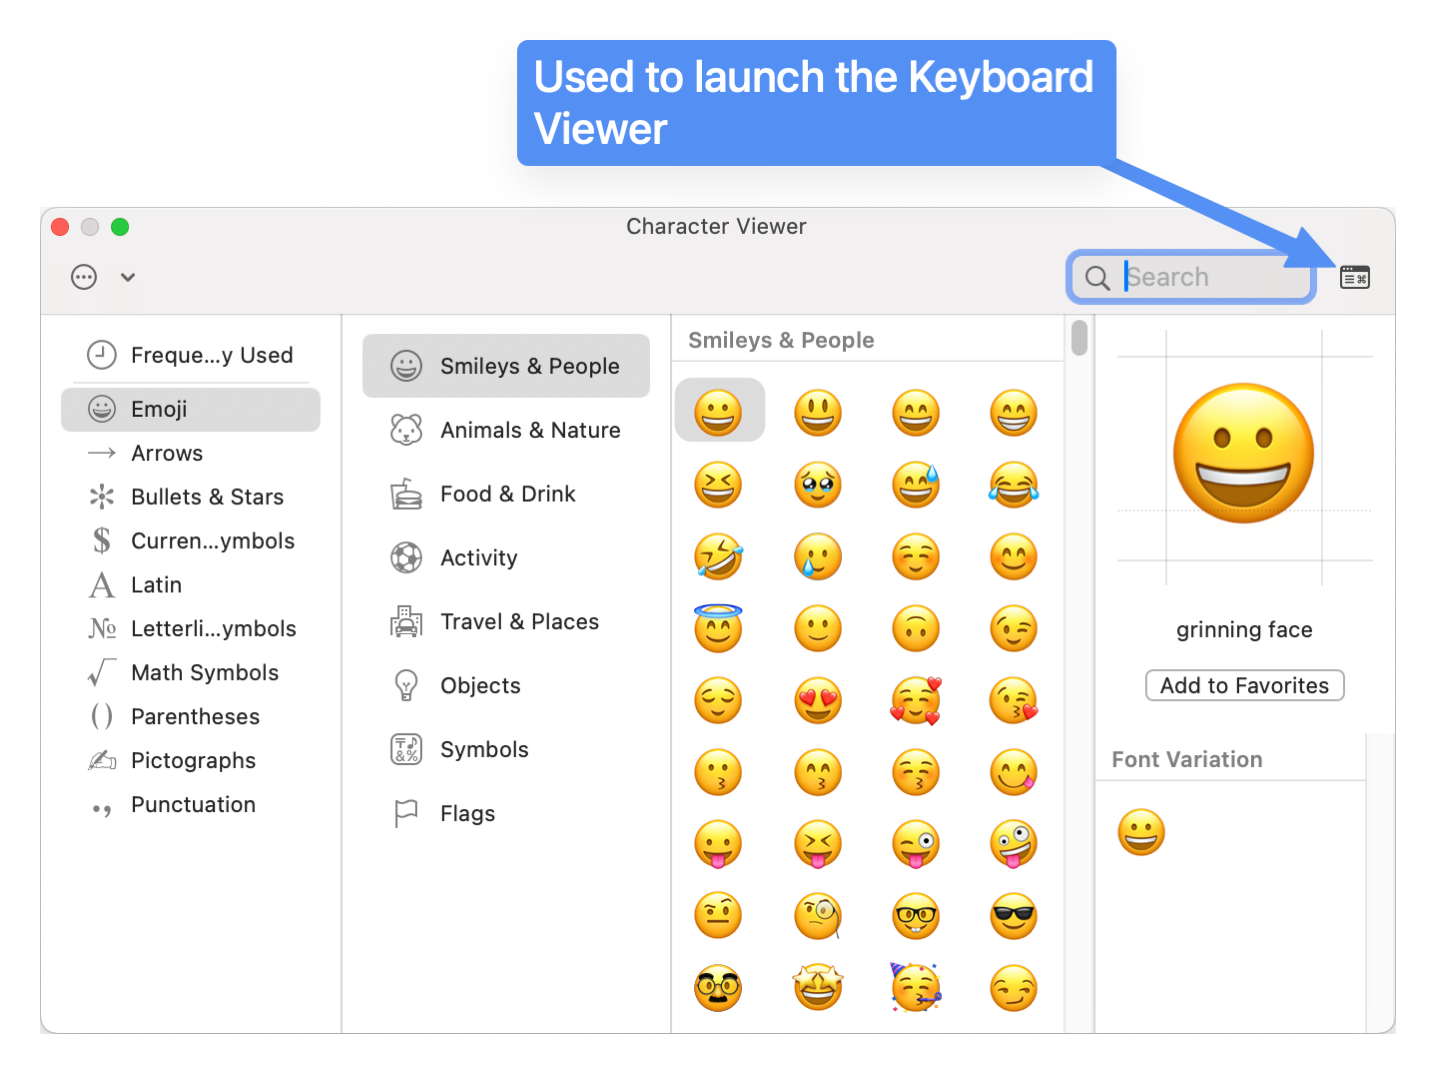
Since we’ve lost that feature, I wondered if maybe there was some key combination I could invoke to get the Keyboard Viewer to come up, and I found a very clever workaround to make that happen.
In the macOS Subreddit, contributor Roma H explained that in the old days, there were two redundant keyboard viewers. The one I used to invoke, and the Accessibility Keyboard. Roma went on to explain that starting in Catalina they eliminated the extra one so the keyboard I’ve been describing is actually the Accessibility Keyboard relabeled as the Keyboard Viewer.
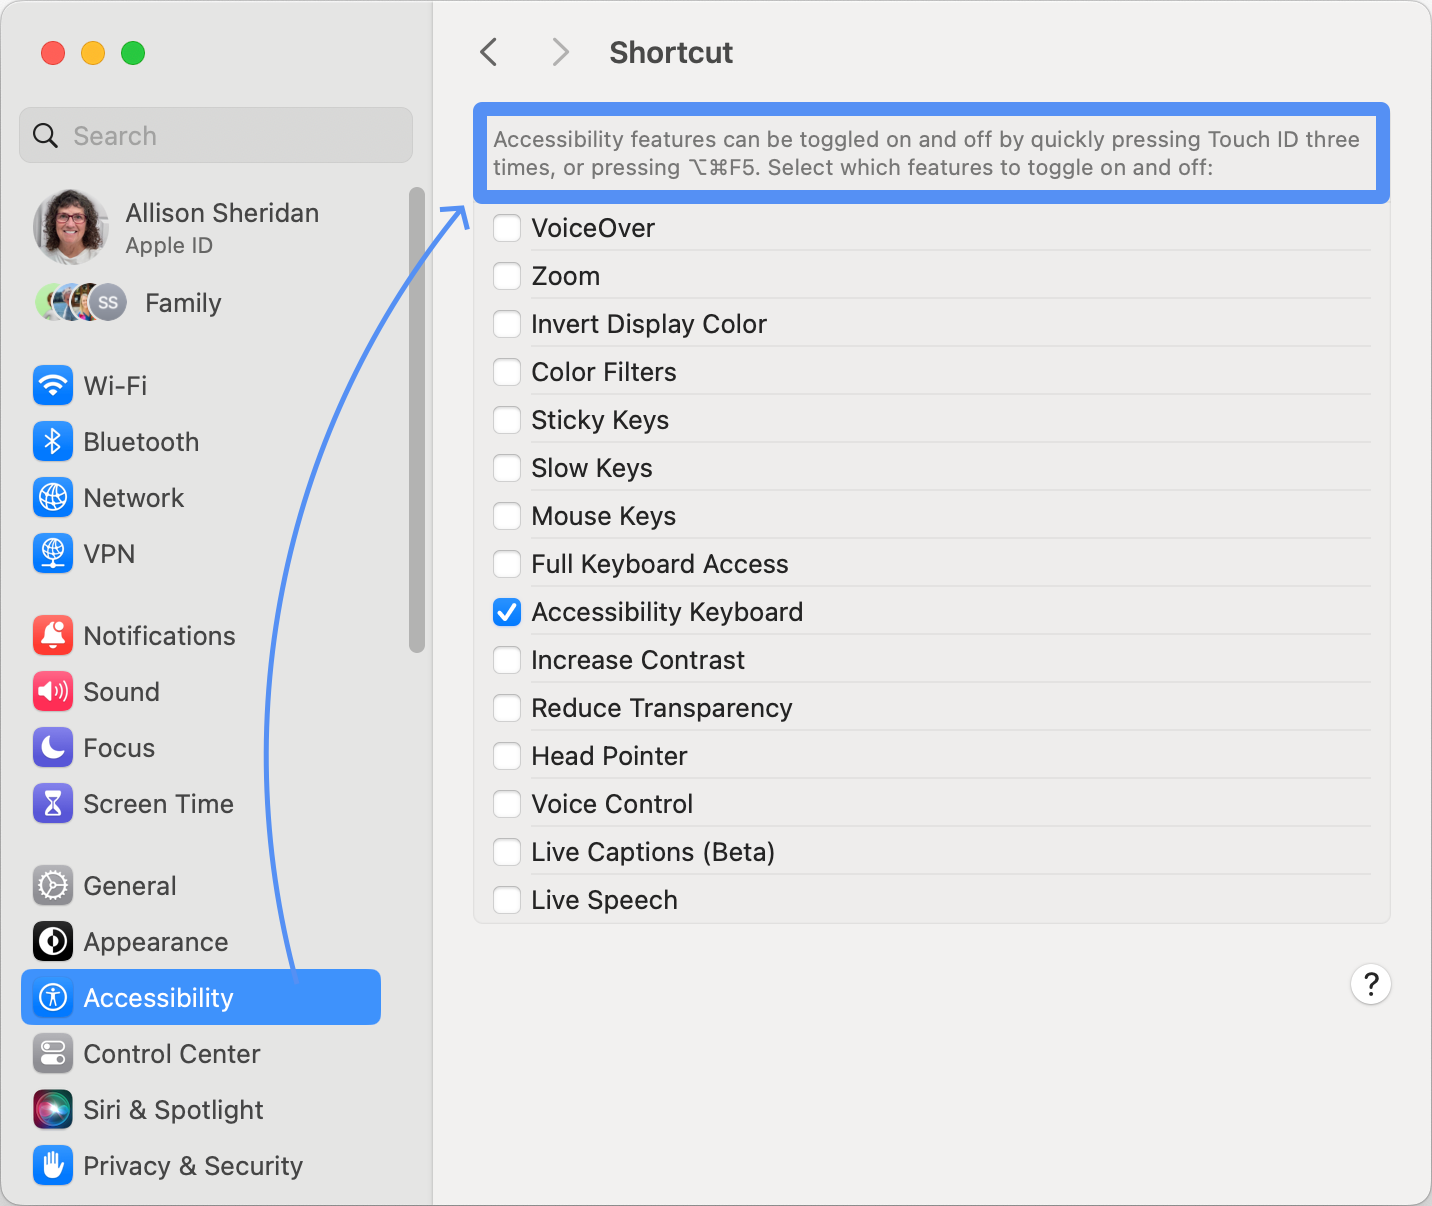
Better yet, Roma explained how you can use an accessibility shortcut to open and close the Keyboard Viewer. It’s a bit convoluted, and if you already use the Accessibility Shortcut you might not want to enable it. The steps Roma outlined are as follows:
- Go to System Settings → Accessibility
- On the left, go down to Shortcut.
- Then you’ll see a list of checkboxes. Uncheck all of them except one: Accessibility Keyboard
- Once you have only one, there is no need for the list of Accessibility options to come up when you trigger the shortcut, so it goes right to that one feature
- By default, ⌘-⌥-F5 will now launch the Keyboard Viewer
- If you want to change the shortcut, go to System Settings → Keyboard → Shortcuts and select Accessibility on the left
- You can then customize the “Show Accessibility Options” shortcut to a combination of your choosing.
Bottom Line
Now I’ve given you three paths (or is it four?) to help you figure out how to type fancy punctuation and other symbols on the Mac like the Apple logo. I hope one of these methods works the way your brain thinks.

I had no idea you could hold down a key to get access to all these special characters! ♂️