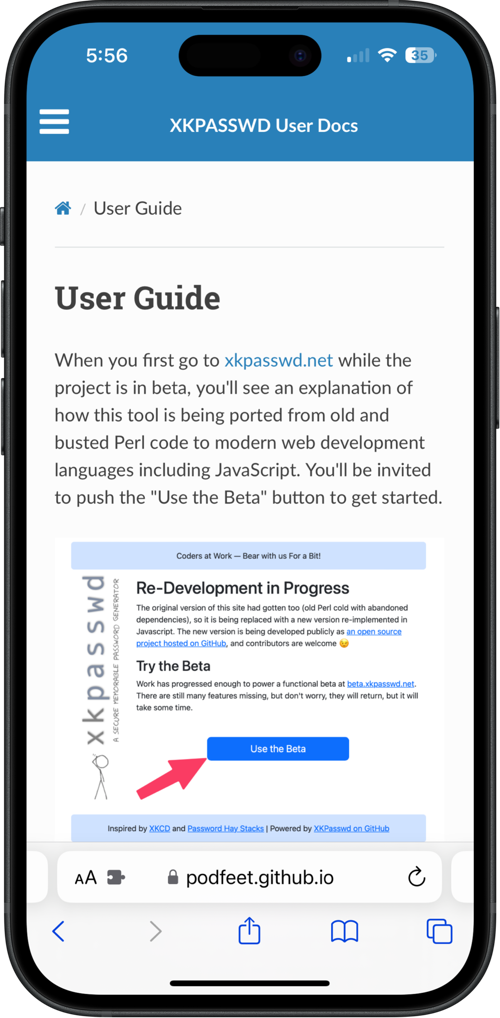
 This week I taught myself a new tool and I’m very excited about it. Let’s start with the problem to be solved, shall we?
As you may already know, the Programming By Stealth community is working on porting Bart Busschots’s XKPasswd secure, memorable password generation service to modern web tools. Bart created the original service using Perl when that was all the rage, but unfortunately, over time many libraries on which it depended were no longer being kept up to date. It was time to port it to modern tools.
In the Programming By Stealth podcast, Bart has been teaching us all of the tools to help him port the project to JavaScript. You’ve heard the saying, “Give a man a fish and you feed him for a day; teach a man to fish and you feed him for a lifetime”, right? Well, Bart has been teaching us to fish for the last few years and it’s paying off in a big way for Bart and all of us.
Bart taught us HTML, CSS, and JavaScript which let us create functional web services. But he also taught us to use Git, the version control system that would allow us to work collaboratively with others. He taught us to use Bootstrap to make our web services pretty without a lot of work. He knew he’d have to have documentation of all of the functions in the new XKPasswd, so he taught us to use JSDoc. He taught us Test Driven Development using Jest.
Bart kept thinking he’d have time to start the port himself from Perl to JavaScript, but higher priorities kept taking over. Finally, the most awesome Helma van der Linden asked if she could start the project, and Bart happily said yes. She has been a beast at getting it off the ground, using much of what Bart taught us along with what she already knew how to do.
A few of us have been working on the project with Helma, including Mike Price and me. I’ve done some HTML layout work to make it more responsive and I found a few issues with accessibility which we collectively fixed. I’m also pretty good at breaking things so I’ve gotten quite good at posting issues to the repository in GitHub for Helma to fix.
This week Helma mentioned that she was going to start working on a user guide for XKPasswd. Clearly, Helma’s time could be better spent on the heavy lifting, so I asked her if I could write the user documentation. I think I’m a pretty good writer – I’d better be, since I write around 4000 words per week. On top of that, I enjoy writing.
One of the reasons I wanted to take it on was that I’d seen some delightful documentation recently that was made with a tool I didn’t know know how to use. I was looking for an excuse to learn that tool.
MkDocs
The tool is called MkDocs from mkdocs.org. Probably the quickest way to appreciate MkDocs is to go to their user guide which is, of course, written in MkDocs.
From a top level, you create your documentation in a set of Markdown text files, and then MkDocs pulls them together into a pretty, easy-to-navigate format for the web. This means anyone can write the docs themselves but it takes someone a bit higher up the nerdy scale to pull it together with MkDocs. This type of tool is called a static site generator.
Python is More Than a Scary Snake
The very first step to using MkDocs to make documentation is to use the pip package manager for Python from the command line. If I’ve learned anything about being a nerd, it’s to try stuff I don’t understand. I don’t know a lick about Python and had never heard of pip, but that didn’t stop me.
It was a disaster. Apple quit installing Python by default a few years ago, and I knew that, so I installed it from scratch. Unbeknownst to me, XCode had also installed Python, but a lower version. I’m positive about this, but I’m pretty sure there was a third version of Python lurking around in my system somewhere too.
The other fun thing is that Python wasn’t called Python on my Mac, it was called Python3. And pip wasn’t there, because it was called pip3. With all these conflicting versions things were getting very messy. At one point I sent a desperate plea for help to our Slack community in the PBS channel, and while both Allister Jenks and Steve Mattan tried to help me, I seemed to make more of a mess of it.
I thought maybe I’d just see if the Homebrew package manager could install MkDocs and it worked like a champ.
The Structure of MkDocs
We’ve successfully escaped the scary snake, so now let’s talk about how delightful and simple it is to write documentation with MkDocs.
Every page of documentation is a simple text file written in the Markdown language. The MkDocs software does all of the rendering and assembling of these individual Markdown files into pretty web pages that are easy to navigate.
For our user documentation for XKPasswd, I created the following pages:
- About
- Help the Project
- Home
- Thar be Dragons
- User Guide
- XKCD & XKPasswd
I told you the page names in alphabetical order on purpose but that’s not how they appear in our fancy new docs. The display of your documentation is controlled by what is called a YAML file. YAML is a configuration file format that’s pure text, but where things like colons and indents have real meaning. I don’t know YAML and have only heard Helma talk about it from time to time, and yet the instructions from MkDocs were super easy to follow. In case you’re wondering, some say that YAML stands for “Yet Another Markup Language”, but others say it stands for “YAML Ain’t a Markup Language”. So that’s helpful.
To create the ordering and viewability of the Markdown files in MkDocs, in the YAML config file, you type nav:. On a new line, indent 2 spaces (not tab, not 4 spaces) and start entering the names of the pages in the order you want them to appear in the navigation. Each line (after the 2 spaces) starts with a dash, then a space, then the pretty name you want people to see, followed by a colon, and then the name of the text file. This sounds very clumsy to describe, but easy to read and type. For the XKPasswd user guide, my nav section has simple lines like: ” – About: about.md”.
nav:
  - About: about.md
  - Home: index.md
  - User Guide: user-guide.md
  - Statistics & Entropy: statistics-entropy.md
  - Help the Project: help-xkpasswd.md
  - XKCD and XKPasswd: xkcd-comic.md
  - Thar be Dragons: the-maths.md
We’d Better Talk About Themes
Before we dig into MkDocs any further, we’d better talk about themes.
MkDocs comes with two built-in themes: mkdocs and readthedocs. You tell MkDocs which theme you want to use in the same YAML file we’ve been talking about that defines the navigation. Again the syntax is super simple. If you aren’t going to add anything extra to the theme, you can type simply “theme: mkddocs”.
The mkdocs theme has a pretty blue bar across the top where the navigation elements live. Almost immediately I realized that having 7 pages in the navigation bar was untenable. On small screens, it would collapse to a hamburger menu, but it still wasn’t very user-friendly.
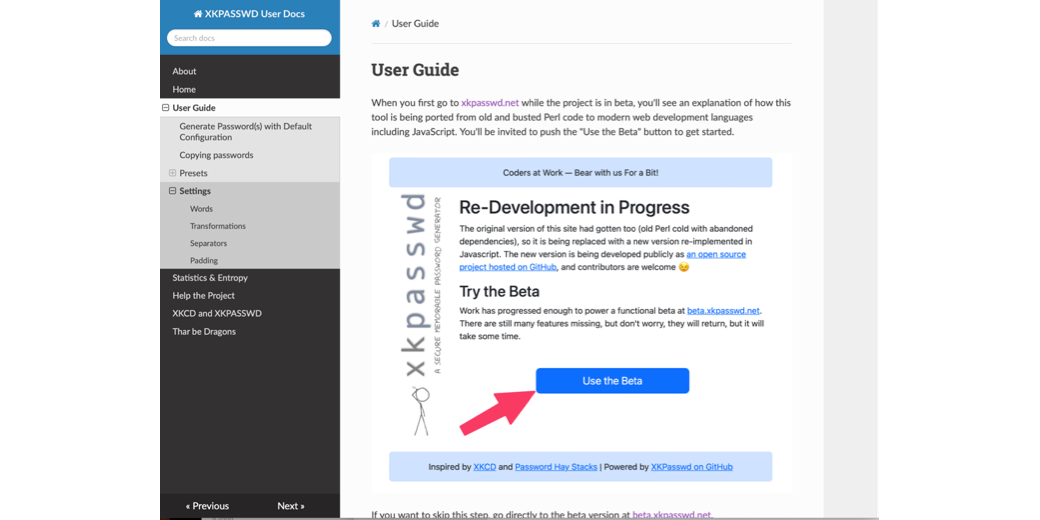
The readthedocs theme is much better for documentation with a lot of separate pages. Instead of navigation across the top, this theme uses a left sidebar. I really like how this element works in MkDocs. The name of each text file is listed on the left side in the order you entered in the nav portion of the YAML file. More importantly, if you use headings in your text files, each page in the sidebar can be expanded to show the internal headings. Clicking on a heading jumps you immediately to that section of the file. It’s like an automatically generated, navigable table of contents with close to zero work on your part.
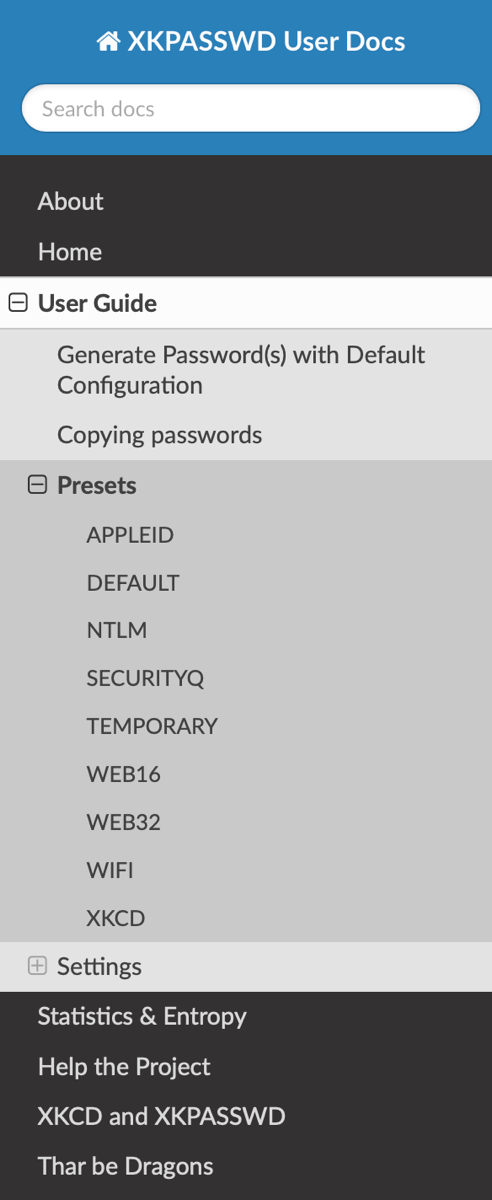
While I love the navigation and usability of the readthedocs theme, the colors don’t blow my dress up. The sidebar is super dark and menacing looking. I started looking for new themes. There’s a list of awesome themes and plugins on a repository run by the MkDocs folks on GitHub so I decided to try installing them using Homebrew.
The Snake is Back
And that’s when the real madness of Python began. It turns out that the themes for MkDocs are only available through pip. I beat pip into submission and got it to work to install the themes I wanted to try out, but MkDocs kept saying those themes didn’t exist. As Helma is my witness, we had a Schrodinger’s Cat problem going on. I finally found an explanation online. MkDocs installed via Homebrew simply can’t see any plugins you download via pip. The only solution was to try to get a Python installation of MkDocs working.
After literally two and a half hours of Helma and me fighting with multiple versions of Python and pip and problems with PATH and inconsistencies of error messages, we threw in the towel. I came up with a good rationalization for giving up.
Everything about XKPasswd is open source and welcomes contributions from the community. If I want people to help with the documentation, it would be just plain mean to make them have to go through the agony of dealing with Python and pip to install a custom theme.
If you think I’m just complaining because I’m new to the installation of Python, I can prove it’s not just me. There’s even an XKCD cartoon documenting the nightmare I experienced!

Styling Without Installing Themes
Helma and I decided that I’ll stick with the built-in readthedocs theme. We can still affect the styling using CSS (cascading style sheets). To tailor the docs, I merely had to create a directory in the project called docs_dir and then create a file inside that directory called style.css. I then needed to add a configuration to the YAML file to tell it to look for the CSS styling.
extra_css:
  - docs_dir/style.css
So far, I’ve only messed around a little bit with styling code snippets using CSS. I plan to get back to it to make it more pleasing and match the color palette of XKPasswd itself. So far I have resisted the urge to play with styling and rather dedicated my time to writing the user documentation.
Running the MkDocs Server
Working on a tool that creates pretty web pages isn’t very fun unless you can get immediate feedback on how your changes affected the site. With MkDocs, you issue a very simple command in Terminal:
mkdocs serve
This starts a little local webserver, and then you can find your rendered documentation at http://127.0.0.1:8000` orhttp://localhost:8000`. Don’t worry about remembering that port number, because the serve command will remind you of how to view your content.
The best part about this little server is that MkDocs is constantly watching for saves to files for the site. As soon as you save in one of your Markdown files, the YAML config file, or the extra_css file if you have one, you’ll see the site update. I really like instant gratification.
Let’s Git this Party Started!
At this point, I had the docs working pretty well on one of my Macs. I live a two-Mac lifestyle these days and I wanted to work on the docs on both of them. I also wanted other people to be able to suggest additions and edits to what I’d written. The obvious solution was to put my documentation under version control with Git. I would create a local Git repository, and since the Programming By Stealth crowd has settled on GitHub, I’d need a repo up there too.
It was easy enough to use the command line to initialize my MkDocs directory as a git repo using
git init
Then I pointed my Git client GitKraken to that directory and pushed it up to my GitHub account. It’s available at github.com/podfeet/user-docs-xkpasswd. I’ve gotten pretty comfortable with Git over the last few years since Bart and I use it for all of the shownotes for Programming By Stealth as well as his Security Bits segment on the NosillaCast. I use it for my own development projects, Time Shifter Clock and Time Adder.
Working with Git isn’t as easy as just saving things locally, but it’s not all that hard. I just have to remember to pull from GitHub before I start working and push my changes back up when I’m done, so I’m always sure I’m working on the latest version no matter which Mac I’m on.
I kept poking around in the MkDocs documentation and I found another super cool awesome thing about MkDocs. With a simple command, you can create a GitHub Page in your repo for your documentation. If you’re not familiar with GitHub Pages, it’s a way of hosting a static site on GitHub’s servers to be publicly viewable. It’s a free way to make our documentation viewable to users.
Here’s the entire process. In Terminal, enter:
mkdocs gh-deploy
MkDocs will do some churning, and then ask you for your username and password to GitHub. This will not work. GitHub disabled this method of login ages ago, I presume since it doesn’t support multi-factor authentication. Once it gets to the login prompt, simply use Control-C to back out of the command.
In your Git client, you’ll now see that the gh-deploy command created a new branch called gh-pages. If you check out that branch and push it up to GitHub, in a wee bit you’ll be able to see the rendered webpage for your documentation.
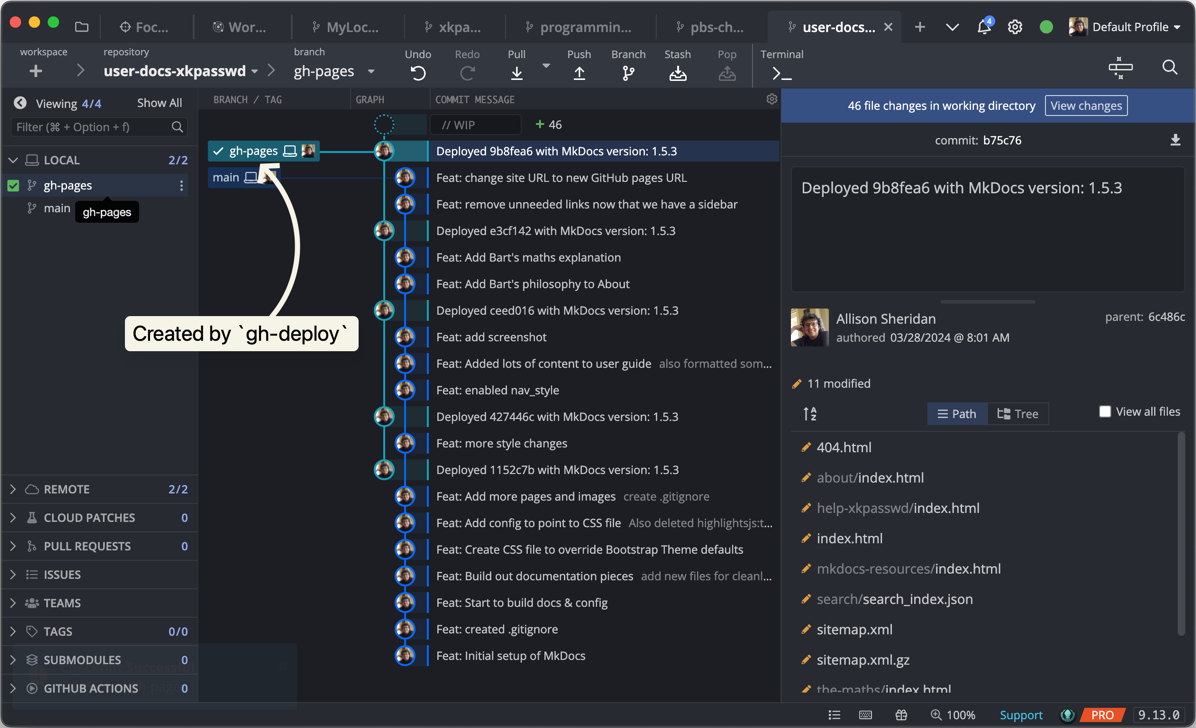
To find your GitHub Page and the URL for it, log into GitHub and navigate to the repo for your documentation. Use the dropdown on the Code tab to change the branch from main to the newly created gh-pages branch.
In the same menu bar where you see Code, Issues, etc, at the far right there’s a Settings Tab. In the left sidebar, now you should see up near the top, “Your site is live at” and a URL that starts with your username.github.io followed by the name of the repo. For our XKPasswd documentation, it shows that the Page is currently available at:
podfeet.github.io/user-docs-xkpasswd/
Don’t memorize that location for XKPasswd, as we’ll probably be moving it into the Bartificer org eventually to make it part of the XKPasswd family. I started it in my own repo so I could demonstrate it to Bart and Helma without borking anything up in Bart’s organization. I presume the URL will change when we move it but you can view it there for now.
More Cool Stuff You Get For Free
You get a couple of other cool things for free when you create documentation with MkDocs. It automatically adds search capability for the site. It works reasonably well but I’ve seen it not return any search results at all and later find things using the same search term as before. But hey, it’s free!
Another feature of MkDocs is a next and previous button at the bottom of each page, and at the bottom of the left navigation sidebar. This can be super handy if you’ve got sequential documentation like a tutorial.
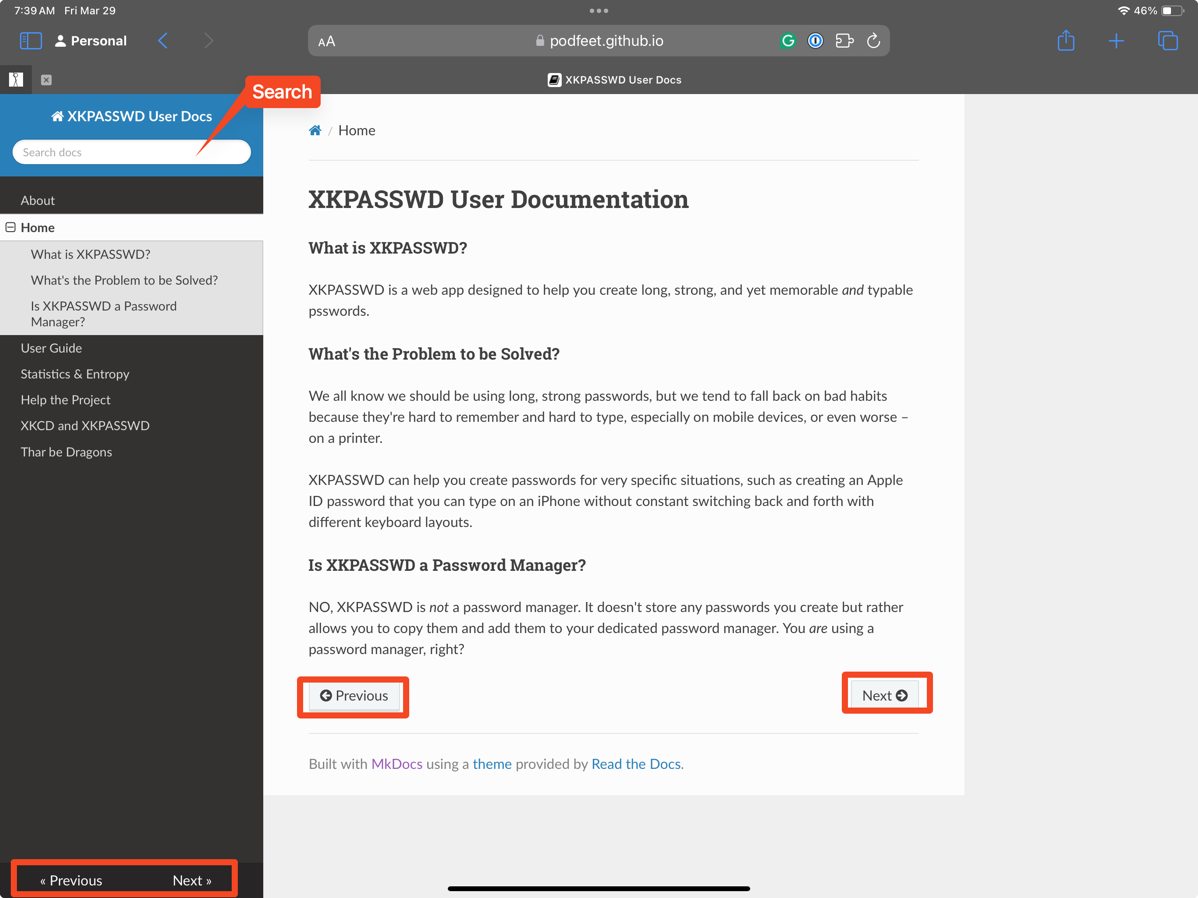
If you’re a fan of keystrokes, you can set them up in the YAML file. It’s part of the theme section and the tutorial on MkDocs gives you the format and some examples. It suggests keystrokes for help, next, previous, and search. I don’t quite understand the format but I copied and pasted it from the MkDocs documentation and it worked!
theme:
  name: mkdocs
  navigation_depth: 4
  nav_style: light
  shortcuts:
    help: 191    # ?
    next: 78     # n
    previous: 80 # p
    search: 83   # s
However, as I was writing this up, I tested the keystrokes and they didn’t work! I was very confused and it took a lot of searching on the interwebs before I figured out why. Some themes don’t support shortcuts, and readthedocs is one of those themes. I thought I was losing what little was left of my mind because I swore it used to work, but I had been using the other default theme, mkdocs.
Bottom Line
The bottom line is that I’m thrilled with MkDocs and how easy it was to make beautiful documentation with it. It’s a smidge nerdy but the instructions are super clear and easy to follow at mkdocs.org. Well, except for that Python pip nonsense.
But I can’t really call a bottom line just yet. That evil temptress Helma just sent me links to several more static site generators to try out. Some of them look even prettier, so now I’m going to go down the rabbit hole of trying them all! The good news is that they’re all JavaScript, not Python so maybe I can have more fun with themes.
You might be thinking that this is way too much work to do all over again, but remember the real work is writing the documentation itself. The reason Markdown is such a powerful tool is that it’s completely portable because it is plain text. This means that after I figure out these other static site generators, I can simply plop my Markdown documents into them and see how they look. Who knows, maybe I’ll come back to my first love, MkDocs but I want to test these other options before settling down. I’m really excited about this as you can tell, so stay tuned for more fun about how to create pretty documentation.

You know Python is named after the comedy group and not the snake, right? 🙂
Oh my gosh – are you SERIOUS??? That’s actually kind of awesome if true.
It’s true:
Why is it called Python?
When he began implementing Python, Guido van Rossum was also reading the published scripts from “Monty Python’s Flying Circus”, a BBC comedy series from the 1970s. Van Rossum thought he needed a name that was short, unique, and slightly mysterious, so he decided to call the language Python.
Source: https://docs.python.org/3/faq/general.html#why-is-it-called-python
I could not be happier about this. When I was in high school, I was studying for a chemistry exam. My father, who valued education above all else hollered to me to come watch something on TV. I protested, explaining about the upcoming exam. He said, “I guarantee that what you’re about to see is something you’ll remember long after the Chemistry has been forgotten.”
And as you may have guessed, it was Monty Python’s Flying Circus.
All I can say is NOBODY expects the Spanish Inquisition. 🙂
I honestly thought Bart would have told you ages ago. Oh well. :).