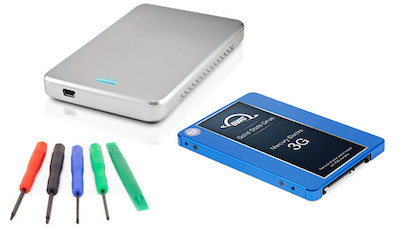
 Hello Fellow NosillaCastaways, this is Denise Crown with a review of Other World Computing’s SSD upgrade kit for the Mac mini.
I love my Mac mini. It’s a late 2012 with the i7 chip, a terabyte drive and 16 GB of RAM. Lately the spindle drive is showing signs of potential failure so I thought about buying a new computer, but Apple is due to refresh hardware and I really didn’t want to spend thousands right now.
This led me to pop over to macsales.com and moments later I had ordered a 1 TB OWC Solid State Drive with a toolkit and an enclosure to turn my old drive into an external. Spoiler Alert: I just want to say right now that was the best purchase I’ve made in a long time.OWC had the kit at my doorstep a few days later. I set up my MacBook Air so I could follow along with OWC’s step-by-step video and I had no trouble taking the Mini apart and removing the existing drive. The included toolkit and spudger made it so easy. The most challenging part of the whole process is aligning the new drive into the right position. OWC recommends you use a business card to guide it into place and that did help.
A couple things to keep in mind that I will call best practices:
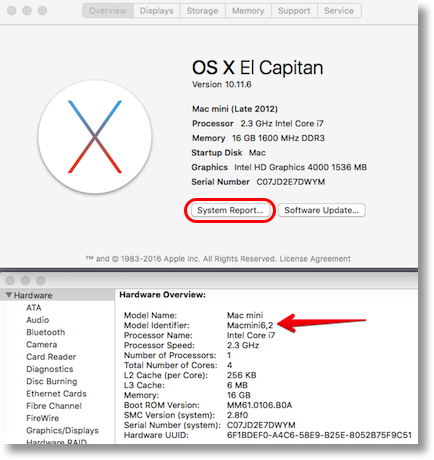
- Ensure you’re shopping for the right computer model. MacSales makes this pretty easy for you. Find your model by clicking the Apple / About this Mac / System Report / Hardware Overview. From there find the model identifier. Mine is a Macmini6,2.
- Uninstall programs you never use from your computer. This is a good time to tidy up.
- Back up your drive ahead of time. I ran a Time Machine backup right before I started this project.
- Be mindful of static. I had some soft microfiber cloths to work on.
- Small food containers are excellent for holding the screws and parts you will remove and replace. Stack as you go and the computer goes back together in reverse order.
- Take your time; this process takes 30 to 45 minutes.
- Have excellent lighting available. I need reading glasses so a lot of light helped me locate the tiny connectors you need to remove and replace for the power supply and antenna.
- Don’t attempt without the right tools.
- Either set up a second computer so you can watch OWC’s great video tutorial while you work or, if no second computer is available, you can print out some good directions from ifixit.com.
 Once I had the Mini back together, I formatted and reinstalled from my Time Machine backup. It would have been a good time for a clean install, but I had done that not too long ago so I decided to forego. The Time Machine restore worked mostly. I did have to go find some product keys for Microsoft Office, and I lost a couple of Audio Hijack settings from my play date with Alison that I’ll had to go recover from the original drive. My data restore of 500GB took about 45 minutes.
My old drive lives in the external drive case that OWC includes in this bundle. Installing the drive there is a one-minute job.
Let me just say now what a game-changer this upgrade has been. My computer is noticeably faster and I expect to get quite a few more years out of a computer that is already 4 years old. This is one of those delightful purchases that made me wonder why I didn’t do it sooner.
As an aside, I checked with a couple of local computer shops and they charge between $80 and $100 to do this project for you. I found it quite easy to do myself just following OWC’s video.
If you have an older Mini, this is a fantastic upgrade. I highly recommend this kit from OWC and I’m always happy with the service I get from them.

Denise: We have two of the Quad Core i7 Minis at work. They’re awesome. Ours have Apple 256 GB SSDs from when we bought them new. The 2012s are the last really powerful Minis, all the later models have slower dual core processors. Though their Intel HD graphics may be better enough to help.
Anyway, with the Quad i7 and a 1TB SSD, you’re rockin’ a great system.
Keeping things simple, every Mac Apple sells with an SSD comes with TRIM enabled by default.
Perhaps because OWC started selling SSDs before Apple added TRIM to OS X, OWC long advertised TRIM isn’t necessary on OWC drives. Never mind that the manufacturer of the SandForce controller in those drives recommended it.
One of our 2010 Minis has an OWC SSD installed by OWC at their shop. It started having boot problems that went away after I installed TRIM and then erased the drive.
OWC at least now says TRIM wont hurt. Indeed it won’t
Here;s a link to their instructions on how to enable TRIM, if you haven’t already done so. Good enough for Apple, good enough for me!
http://blog.macsales.com/31619-how-to-execute-trimforce-command-with-your-owc-ssd
George, thanks for this. It will be a fun project tonight.
I always appreciate your tips! Denise
When I upgraded my Mac Mini with a SSD I did the following. I put the SSD in an external USB enclosure, did a backup to the SSD using SuperDuper (using the setting to make the backed-up disk bootable), then once I installed the SSD in my Mac Mini it booted and was immediately useable. All software ran like it did on the old spindle disk and I did not have to look for any keys or reset any additional settings I had created.
I used this same method when I upgraded my wife’s 2007 iMac with an SSD. Any backup software that makes a drive bootable should work the same as SuperDuper.
This process doesn’t look as hard to do but I’m still scared of doing something wrong and messing things up :(. I would be ecstatic to be able to get more years out of my 3+ year old mini. If people weren’t charging $100 for this I would actually take this route but as it stands this is too much so I will try it myself. Going to back up the drive so I can at least have some peace of mind. Wish me luck, Denise!
You can do it, Catherine! Just watch the video a few times and take your time. Also, James Earl Ford’s comment to reload off the original drive is easier than my restore from Time Machine.
If you don’t own either SuperDuper are Carbon Copy Cloner the nice thing about both is you can use them for free to start. Super Duper allows you to use it for free forever if you want too while Carbon Copy Cloner has a 30 day free trial. However, I strongly recommend that whichever you choose that you purchase it for your long-term safety and to support the developers.
I use SuperDuper which I purchased a long time ago and it has worked flawlessly for me. You cannot go wrong with either one.
Well this is what I was looking for, thanks for this post, solved my problem, will continue to use my mac mini !