Remote Control Another Computer with Virtual Network Computing (VNC)
The idea of VNC is that you have one computer be the server (the one that will be controlled) and the other machine becomes the client. The good news is that there’s lots of options to choose from and most of them are freeware, no one solution is best for everyone. This tutorial will walk through the use of OSXvnc for the server, and VNCDimension for the client, which are both Mac OSX applications, but there are plenty of Windows solutions to choose from. Just head over to VersionTracker or downloads.com to find the client and server software for Windows. The basic idea of the settings are similar, but the window graphics will be different. I hope by reading this you’ll be able to figure out how to tailor your client to your needs. At the end of the Mac to Mac connection I’ll walk through the connection I was able to do to control a PC from a Mac (ah, the control we’ve always wanted!)
Server Software – OSXvnc – download at:
http://www.versiontracker.com/dyn/moreinfo/macosx/16699
After download, launch the OSXvnc1 .dmg file (disk image file). It will put a disk volume on your desktop. Open that disk volume and drag the application OSXvnc into your Applications folder.
Client Software – VNCDimension – download at:
http://www.versiontracker.com/dyn/moreinfo/macosx/9462
If the server is on a router, a port (or hole) must be opened in the firewall to allow VNC traffic to go through even if you’re working on your internal network. I don’t get why that is, but my client software crashes if I don’t have that port open. Go to the port forwarding menu (sometimes shown under games) and set port 5900 to be open to the internal IP address of the server (for example, if it’s a Linksys router, the internal IP would be 192.168.1.100 or something like that). Check the boxes (or pulldowns) for both UDP and TCP. Save changes.
The client will need to know the Internet IP address of the router (or the server machine itself if there’s no router). The easiest way to find out your IP address is to open a web browser and go to whatismyip.com and it will show you. Note this IP address.
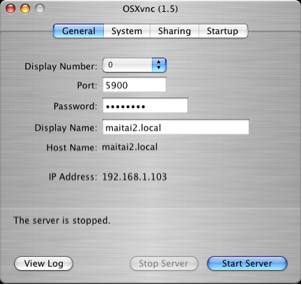
Now on the machine that will be the server, launch OSXvnc. Note the display number (in the example below it’s set to 0, usually that’s the default), and the port number is usually set to 5900. This can be changed, but let’s not mess with the settings just yet. Enter a password that will be required by the client for security. The display name should be entered automatically. Click on “Start Server”.

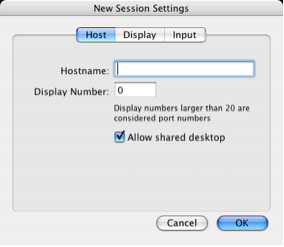
Now for the client setup: Launch VNCDimension, and in the menu select Session–>New (or hit command-N).

You want to connect to the server you just finished setting up, right? So in the host name field, type in the IP address of the Server machine (that’s the internet address). Make sure the display number matches the one on the server (0 in our example). Click OK.
When VNCDimension makes a connection, it should prompt you for a password (this is the password you set on the server side).
Now the client should be able to see what’s going on on the server, AND is able to move the mouse around and make selections and type just as though you were on the other machine, albeit quite slowly!
IMPORTANT NOTE: Make sure when you’re done, you close up the port you opened on the firewall (port 5900 in our example) as this port is a vulnerability to your system. Keep it closed unless you need it!
Controlling a Windows XP machine from Mac OSX
I used RealVNC which is freeware for my needs, got it at http://www.realvnc.com/
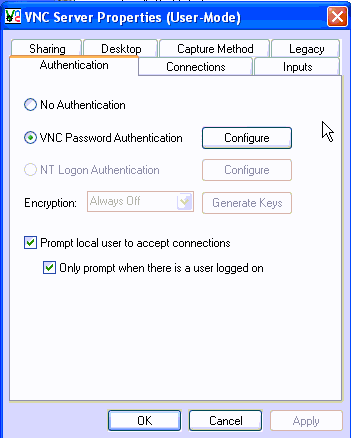
After installation, I selected Start–>Programs–>RealVNC–>VNC Server 4 (User-Mode)–>Configure User-Mode Settings as shown below:

This brings up the configuration program which allows you to do two important things – one is to set the password (under the authentication tab) and the other is to allow machines of a given IP address to access the machine. The authentication tab is shown below:

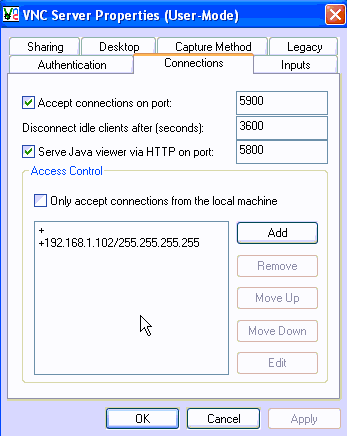
Then to include the allowed IPs click on the Connections tab and click Add as shown below:

Oddly this server did not request the display number, it must assume that it’s zero. Now you need to actually launch the server software (we’ve just configured it so far), go to Start–>Programs–>RealVNC–>VNC Server 4 (User-Mode)–>Run VNC Server. You won’t see a darn thing happen, but down in your system tray there should now be a teeny little icon that says VNC. I did it four times before I noticed and there were four nice little icons in there! I did learn how to kill it though, right click on the icon and select Stop Server.
You’re ready to launch the client viewer application now, in this case I used VNCDimension again on the Mac, but you can use a PC to do the same thing. When I launched the client software, I selected new connection, typed in the IP address of the PC, selected OK and it asked me for a password and shazam! there was XP on my Mac. I’m going to use this to test my website on Windows from now on.
Hope this tutorial helped you get a little more clarity on how this works, if you have any questions, please feel free to contact me at allison@podfeet.com.
